- Winter Storm Watch vs. Winter Storm Warning? 9 Steps to Protect Your Home — Know the exact operational difference between a Winter Storm Watch and Warning, and learn the step-by-step protocol to protect your home's…
- Paint Peeling in an Old House? Lead Dust Safety for DIY Repairs — If your home was built before 1978, repairs that disturb painted surfaces can create hazardous lead dust—here's how to test and work safely.
- House Built Before 1978? What Every Homeowner Needs to Know About Lead Paint — If your home was built before 1978, you likely have lead paint. Disturbing it during DIY repairs can create toxic dust—here's how to work s…
- Lead Paint in Your Older Home? 10 Safety Steps Every DIYer Must Take — Learn how to safely identify, contain, and remove lead paint during home renovations without spreading toxic dust through your house or HVA…
- Lead Paint Safety for DIY Repairs: 12 Containment Steps Every Homeowner Must Know — Working on a pre-1978 home? Learn how to safely identify lead paint, build dust containment, wet-scrape surfaces, and clean up without cont…
Published November 12, 2026Last updated November 12, 2026
Tools & materials you'll need
Affiliate links- AmazonLevel 2 Wall Charger Station32A to 48A hardwire or plug unit
- AmazonDouble-Pole Circuit Breaker50A or 60A matched to panel make
- Amazon6 AWG Copper Wire (THHN or NM-B)Length matched to conduit run
- Amazon3/4-inch EMT Conduit or Schedule 40 PVCWith matching sweep elbows and connectors
- AmazonIndustrial Grade NEMA 14-50 ReceptacleHubbell or Bryant (optional for plug setups)
As an Amazon Associate FixlyGuide earns from qualifying purchases — at no extra cost to you. Prices and availability are accurate as of publication and subject to change.
Quick Answer
To install a 240V Level 2 EV charging station for a high-draw electric truck or vehicle at home, I’d run a dedicated 50- or 60-amp double-pole breaker from your main breaker box to an adjacent NEMA 14-50 receptacle or hardwired wall connector using 6 AWG copper wire. If your home's service panel is rated at 100 or 150 amps, you’ve got to calculate the full electrical load first so you don’t overload the panel — or upgrade to a 200-amp service if the math says so.
The Problem
Electric trucks and next-generation utility EVs show up with massive battery packs—often between 120 kWh and 200 kWh. Plug that kind of iron into a standard 120-volt three-prong wall outlet (Level 1 charging), and you’re only getting about 1.4 kW. That trickles in roughly 2 to 3 miles of driving range per hour. A full recharge on a heavy electric pickup from empty on Level 1 can take four to six days. Yep. Days.
I’ve had homeowners buy an electric truck thinking they’ll roll into the garage, plug in overnight, and wake up with a full tank of electrons. Then they find out the garage is sharing a 15-amp circuit with an old fluorescent shop light and the opener. And a lot of residential breaker panels across North America—especially in homes built before the 1990s—are already tapped out at 100 or 150 amps. Add a continuous, multi-hour 48-amp load without checking panel capacity, and you’ll trip the main breaker, cook lugs, or create a real fire hazard behind the drywall. No dice.
How It Works
Residential electrical panels split incoming 240-volt single-phase utility power across two 120-volt hot bus bars (Leg A and Leg B), balanced around a shared neutral bus and a dedicated grounding bar. Standard household circuits grab a single bus bar for 120 volts. A Level 2 EV charger, on the other hand, ties into both hot bus bars at once using a dedicated double-pole breaker so it can deliver the full 240-volt potential.
Under the National Electrical Code (NEC Article 625), EV charging counts as a "continuous load." That means the circuit has to be built to carry 125% of the charger's rated output current continuously for three hours or longer. So if you install a wall charger that pulls 48 amps, you can’t just slap in a 50-amp breaker and call it a day. You need a 60-amp double-pole breaker (48A × 1.25 = 60A) wired with thick 6 AWG copper conductor rated for at least 75°C. For a plug-in setup using a commercial-grade NEMA 14-50 outlet, the draw is capped at 40 amps on a 50-amp breaker (40A × 1.25 = 50A). Once the power hits the truck, the onboard inverter converts that alternating current (AC) to direct current (DC) to charge the cells, and that steady heat will test every junction, screw terminal, and conduit connector in your garage. I pulled a water heater in Frisco last month that had exactly this kind of sloppy heat damage nearby — same story, loose termination and too much load.
Step-by-Step Fix
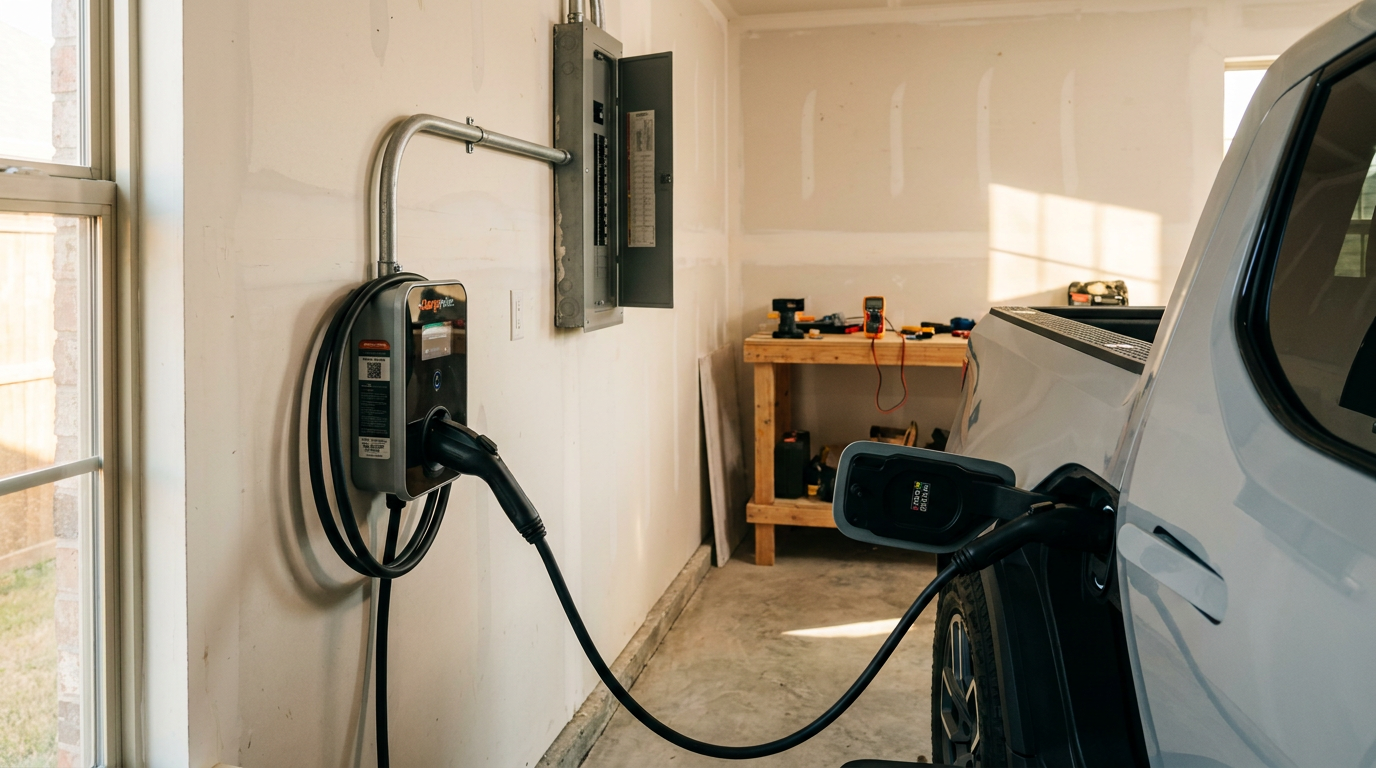
Here is how to properly plan, wire, and commission a dedicated 240V Level 2 home charging station capable of keeping a heavy-duty electric vehicle powered up overnight.
-
Calculate your home's total electrical service load — Pop the panel cover, read the main breaker rating (typically 100A, 150A, or 200A), and run an NEC Article 220 load calculation. Tally your fixed appliances: HVAC condenser, electric dryer, electric range, water heater, and well pump.
- If your computed load is already above 80% of your service capacity, you’ll need to upgrade to a 200-amp service panel or install an EV energy management system (load shedder) that pauses vehicle charging when the oven or AC kicks on.
-
Choose between a hardwired connector and a NEMA 14-50 outlet — Decide on your hardware interface before buying wire. Hardwiring directly to the wall unit lets you charge up to 48 amps (11.5 kW) on a 60-amp circuit and eliminates plug contact resistance; a NEMA 14-50 plug caps you at 40 amps (9.6 kW) on a 50-amp circuit and requires an expensive GFCI breaker under NEC 2020/2023.
- Pro Tip: Modern EV wall units already contain integrated GFCI hardware. Stack a GFCI breaker on top of a GFCI outlet, and you’ll often get nuisance tripping. Hardwiring skips that headache in most municipal jurisdictions.
-
Map the conduit run and measure distance — Pick the mounting spot on the wall next to your truck's charge port door. Measure the linear footage along studs or masonry back to the panel, and don’t forget the 90-degree sweeps.
- For indoor surface runs, use 3/4-inch EMT (electrical metallic tubing) or Schedule 40 PVC; for runs inside finished walls, plan for 6/2 or 6/3 NM-B (Romex) depending on whether your charger needs a neutral wire.
-
Kill the main panel breaker and confirm with a multimeter — Flip the main 100A–200A service disconnect at the top of your breaker panel to the OFF position. Put on your safety glasses. Remove the deadfront panel cover screws while supporting the plate with one hand so it doesn't drop onto energized terminals.
- Safety: Touch a verified digital multimeter lead to each hot leg feeding the branch breakers to confirm zero volts. Remember, the raw utility lugs above the main disconnect stay live at 240V!
-
Mount the charger backplate securely to framing — Find the center of a wall stud with a stud finder. Mount the unit's bracket at roughly 48 inches above the garage floor using heavy-duty lag bolts (minimum 1/4-inch by 2.5-inch).
- Don’t hang a heavy charging unit on drywall anchors alone; repeated plugging and cable tugging will rip those anchors clean out of the gypsum board within six months.
-
Run conduit and pull conductors — Install 3/4-inch EMT or run your 6 AWG copper cable from the breaker box to the charger knockout. Pull two insulated hot conductors (black and red) and one bare or green grounding wire.
- If you’re installing a NEMA 14-50 receptacle, pull a fourth white neutral conductor. If you’re hardwiring a standard wall unit, check the manufacturer manual—almost all modern Level 2 wall boxes only need two hots and an equipment ground.
-
Install the industrial-grade receptacle or terminate hardwire lugs — If you’re using a plug-in setup, mount an industrial-spec receptacle (such as a Bryant or Hubbell 9450A). Strip 3/4 inch of insulation off each wire, insert them into the terminals, and torque strictly to specification.
- Skip the cheap $10 builder-grade residential outlets; continuous 40-amp vehicle charging will melt standard spring-contact receptacles. Tighten terminal screws with a calibrated torque screwdriver to the manufacturer's exact rating (typically 40 to 75 in-lbs).
-
Seat the double-pole breaker in the main panel — Pick two adjacent, vertically stacked breaker slots on your panel bus. Snap in a new, panel-compatible double-pole breaker (50A for plug-in, 60A for hardwired 48A units).
- Make sure the breaker brand matches your panel panelboard label (Square D QO, Siemens QP, Eaton BR/CH). Don’t mix and match breaker brands, because clip tension varies and that’s how you get arcing.
-
Terminate panel connections — Route the ground wire to the panel ground bar and secure it. If you’re using a neutral, seat it in the neutral bus bar. Route the two 6 AWG hot conductors neatly along the panel gutter and insert them into the breaker lugs.
- Torque breaker terminal lugs to the factory rating printed on the breaker label (typically 35 to 45 in-lbs). Loose connections under continuous heavy loads will oxidize and melt the plastic housing.
-
Reinstall the panel cover and power up — Check the panel interior for stray wire strands or dropped screws. Replace the deadfront cover plate. Stand to the side of the panel, not directly in front of it, switch on the main service disconnect, and then flip your new EV double-pole breaker to ON.
- Measure voltage at the charger terminals with your multimeter: you should read roughly 120V from each hot leg to ground, and 240V directly across hot-to-hot.
-
Configure charger amperage settings and test — Open the manufacturer's configuration app on your phone or adjust the internal physical DIP switches on the charger circuit board to match your circuit breaker rating. Connect your vehicle's charge handle.
- Confirm the vehicle acknowledges the connection, begins drawing power, and locks the connector pins. Watch the cord and breaker for the first 30 minutes of continuous charging to make sure no excess heat or buzzing shows up.
Common Causes of Home EV Charging Failures
- Melted NEMA 14-50 Receptacles: This is the most common failure point in garages. Standard hardware-store 50-amp outlets are built for electric clothes dryers, which pull intermittent heat for 45 minutes at a time. Run 40 continuous amps through them for eight hours straight, and the weak internal spring contacts overheat, scorch the plastic, and weld themselves to the plug prongs.
- Undersized Neutral and Ground Conductors: Running 8 AWG or 10 AWG wire on a circuit protected by a 50- or 60-amp breaker violates code and causes rapid thermal breakdown. If an overcurrent fault happens, the undersized path can’t carry the fault current fast enough to trip the breaker.
- Nuisance GFCI Tripping: Ground-fault circuit interrupter breakers detect millivolt differences between hot and neutral legs. EV chargers run their own internal self-testing ground-fault detection circuits. Put them together, and their high-frequency test signals can clash, causing the breaker to trip randomly mid-charge.
- Bus Bar Pitting and Loose Lugs: If aluminum conductors are used without anti-oxidant paste, or if steel set-screws are hand-tightened without a torque tool, thermal cycling loosens the connection over time. That leads to heavy arcing, and arcing destroys the panel bus tab fast.
Common Mistakes
- Using Romex (NM-B) wire at full conduit capacity: NM-B cable is limited to the 60°C column of the NEC ampacity table. That means 6 AWG NM-B Romex is rated for a maximum of 55 amps, making it illegal for a continuous 48-amp charge requiring a 60-amp circuit. For 48-amp charging, you must run individual THHN copper wires inside conduit (which qualify for the 75°C rating, delivering 65 amps of capacity) or bump up to 4 AWG NM-B.
- Skipping the torque screwdriver: Tightening electrical lugs by "feel" or "until it's snug" is a recipe for a garage fire. Hand-tightened connections loosen under sustained electrical resistance. Always use a proper inch-pound torque wrench on breaker lugs and outlet terminals.
- Plugging into an existing shared laundry circuit: Trying to run an electric vehicle from an outlet shared with a chest freezer, power tools, or lighting causes immediate overcurrent trips. An EV circuit must be 100% dedicated to that single vehicle.
- Ignoring local permit and inspection requirements: Homeowners frequently skip pulling an electrical permit for garage additions. If an unpermitted charger fails and burns structural framing, your homeowner's insurance policy can legally deny the property claim.
- Coiling the charge cable tightly while charging: Leaving 15 feet of heavy gauge vehicle charging cord looped tightly around a wall hanger acts like a heat trap. Always uncoil the cable across the floor so it radiates heat freely into the room.
Cost & Time Breakdown
| Task | DIY Cost | Pro Cost | Time |
|---|---|---|---|
| Basic Level 2 Charger Unit (32A–48A) | $350–$650 | $450–$800 | 30 minutes (selection) |
| Wiring, Conduit, & Double-Pole Breaker (20-ft run) | $120–$220 | $350–$600 | 2–3 hours |
| Industrial Hubbell/Bryant Receptacle & Box | $60–$90 | $150–$220 | 1 hour |
| Permit & Municipal Inspection Fees | $50–$150 | $100–$250 | 1–2 hours (paperwork) |
| Full 200-Amp Service Panel Upgrade (if needed) | Not recommended | $2,200–$4,500 | 1 full day |
Tips & Prevention
- Schedule charging during off-peak hours: Program your vehicle or charger app to start drawing power at 11:00 PM or midnight. That’ll catch lower time-of-use (TOU) utility rates, and it also charges your battery while your household HVAC system and ovens are resting, which cuts panel stress way down.
- Perform a tactile temperature check: Once a month, after your truck has been charging for at least two hours, place the palm of your hand on the faceplate of the outlet, the breaker panel door, and the charger casing. Everything should feel warm (around 85°F to 105°F), but never painfully hot or like burning fish or ozone.
- Set your charge limit to 80% for daily use: Unless you’re getting ready for a cross-country towing haul the next morning, set the truck's battery management system (BMS) to stop charging at 80% state of charge. That doubles cell cycle life and limits high-resistance thermal stress on your home's wiring during top-balancing.
- Keep outdoor connector pins clean and dry: If your charger cord reaches an outdoor parking pad or carport, always stow the J1772 or NACS handle facing downward in its protective holster. Rain, spider webs, and road grit inside the terminal sleeves create localized resistance that can melt the connector handle pins.
When to Call a Professional
Upgrading home wiring for a heavy-draw EV isn’t the place for trial-and-error DIY. Call a licensed, insured electrician right away if your main panel has no physical breaker spaces left, shows visible signs of rust, corrosion, or burnt insulation, or still uses old pushmatic switches or split-bus configurations. If your home runs on a 100-amp service drop and uses an electric heat pump, water heater, and range, your panel is already running near capacity; trying to tap another 50 or 60 amps will cause frequent main-breaker trips. And any panel work that requires pulling the electric utility meter to de-energize the service mast has to be handled by a certified electrician and coordinated directly with your municipal power company.
Related Articles
Keep troubleshooting with these hand-picked guides from FixlyGuide:
- Winter Storm Watch vs. Winter Storm Warning? 9 Steps to Protect Your Home — Know the exact operational difference between a Winter Storm Watch and Warning, and learn the step-by-step protocol to protect your home's…
- Paint Peeling in an Old House? Lead Dust Safety for DIY Repairs — If your home was built before 1978, repairs that disturb painted surfaces can create hazardous lead dust—here's how to test and work safely.
- House Built Before 1978? What Every Homeowner Needs to Know About Lead Paint — If your home was built before 1978, you likely have lead paint. Disturbing it during DIY repairs can create toxic dust—here's how to work s…
- Lead Paint in Your Older Home? 10 Safety Steps Every DIYer Must Take — Learn how to safely identify, contain, and remove lead paint during home renovations without spreading toxic dust through your house or HVA…
- Lead Paint Safety for DIY Repairs: 12 Containment Steps Every Homeowner Must Know — Working on a pre-1978 home? Learn how to safely identify lead paint, build dust containment, wet-scrape surfaces, and clean up without cont…
- Pipes Bang When Faucet Shuts Off? 5 Causes of Water Hammer and How to Silence It — Stop that loud pipe bang when you turn off the faucet. Clear waterlogged air chambers, secure rattling lines, and install mini arrestors in…
Should you do this yourself?
Answer five quick questions before you start. Safety outranks savings every time.
Your experience with work like this
How high do you have to work?
Does the job involve any of these?
Will it need a permit?
Specialty tools
Free and instant. Educational guidance only — not a quote, inspection, or professional diagnosis.
What should this project cost?
Enter your project details for a realistic cost range before you call anyone.
Outlet and switch work usually $150–$400; panel upgrades commonly $1,800–$4,200.
- Regional adjustment
- National average
- Labor share (typical)
- ~$709
- Quotes to collect
- 3 written estimates
Educational estimate based on national averages — not a binding quote. Always confirm with written local estimates.
Before you start
Check the difficulty, permits, and safety risk — then decide whether to call a pro.
- Estimate this projectGet a cost range for your scope and ZIP before you call anyone.Open
- Get local estimatesSend one request and compare written estimates from vetted pros.Open
Free, no signup required. Estimates are educational guidance, not a quote or an inspection.
Get the print-ready PDF of this guide
A clean, ad-free, printable version you can keep on your phone or pin to the workshop wall. Free with a FixlyGuide account.
- Print-optimized layout
- Tools, materials & every step included
- Saved to your account
This article was independently written by FixlyGuide based on the source topic.
Frequently asked questions
What is the real difference between Level 1 and Level 2 charging?+
Level 1 charging uses a standard 120-volt household wall outlet and delivers roughly 1.4 kW, adding only 2 to 4 miles of range per hour. Level 2 charging taps a dedicated 240-volt circuit (similar to an electric clothes dryer or stove) delivering 7.2 kW to 11.5 kW, restoring 20 to 45 miles of range per hour.
Do I have to upgrade my 100-amp panel to charge an electric truck?+
Not always, but it depends on your current electrical load. If your home has gas heating, a gas water heater, and a gas stove, a 100-amp panel might have just enough margin for a 30-amp or 40-amp EV circuit. However, all-electric homes with electric heat and appliances typically require a panel upgrade to 200 amps or the installation of an automated load-management shedder.
Is it better to hardwire a home charger or use a NEMA 14-50 plug?+
Hardwiring is generally better for electric trucks. Hardwired connections can support up to 48 amps of continuous charging on a 60-amp circuit, eliminate the risk of a plug melting under long-term load, and bypass the requirement for a costly GFCI breaker that frequently trips on EV circuits.
What size wire is required for a 60-amp EV charger breaker?+
You need 6 AWG copper wire. If you run individual conductors inside conduit (EMT or PVC), you can use 6 AWG THHN wire for a 60-amp breaker. However, if you are running non-metallic sheathed cable (NM-B/Romex) inside finished walls, code limits 6 AWG Romex to a 50-amp breaker, which limits you to 40 amps of continuous charging.
Does an EV charger require its own dedicated breaker?+
Yes. The National Electrical Code requires a dedicated branch circuit for electric vehicle supply equipment (EVSE). It cannot share a neutral or ground path, nor can it share a junction box or breaker with garage wall plugs, openers, or shop tools.
Why do standard NEMA 14-50 outlets melt during EV charging?+
Standard builder-grade $10 receptacles use thin, stamped metal contacts designed for electric clothes dryers that cycle on and off for short bursts. Electric trucks draw maximum continuous current for 8 to 12 hours straight. This sustained heat causes cheap outlet contacts to loosen, arc, and melt the housing. Always install an industrial-spec receptacle like a Bryant or Hubbell 9450A.
How much does it cost in electricity to charge an electric truck at home?+
At an average U.S. electricity rate of $0.16 per kilowatt-hour, fully replenishing a massive 130 kWh electric truck battery costs about $20.80. If your local utility offers off-peak time-of-use (TOU) rates around $0.08 per kWh at night, that same charge drops to roughly $10.40.
Can I charge a non-Tesla electric vehicle with a Tesla Wall Connector?+
Yes, almost all modern home chargers work with any electric vehicle on the market. Older setups use the standard J1772 connector, while newer vehicles are adopting the North American Charging Standard (NACS). Inexpensive, heavy-duty adapters let you cross-charge between J1772 and NACS vehicles safely on the same home station.


Discussion
Loading comments…