Tools & materials you'll need
Affiliate linksAs an Amazon Associate FixlyGuide earns from qualifying purchases — at no extra cost to you. Prices and availability are accurate as of publication and subject to change.
Quick Answer
Patching small drywall holes (up to about 3 inches in diameter) is a straightforward DIY task that can be completed quickly using an adhesive fiberglass mesh patch with a pre-applied metallic plate. This method minimizes mess and drying time, allowing for painting within an hour or two once the patch is applied and smoothed. It’s ideal for holes caused by door handles, picture hangers falling out, or minor impacts, providing a strong, seamless repair without the need for extensive mudding or sanding.
The Problem
Small holes in drywall are an all-too-common eyesore in many homes. Whether it's the result of a doorknob swing gone wrong, a nail ripped out of its anchor, or just an accidental bump, these imperfections can detract from the cleanliness and finish of your walls. While seemingly minor, leaving them unaddressed can lead to larger issues over time, such as increased moisture penetration in humid areas or further damage if the wall is bumped again. Traditional drywall repair often conjures images of messy joint compound, multiple drying layers, and prolonged sanding—a process many homeowners dread. This article focuses on a much simpler, faster, and cleaner approach using a specialized adhesive patch kit, making professional-looking repairs accessible to everyone without the usual hassle.
How It Works
Understanding how drywall is constructed helps in appreciating the repair process. Drywall, or gypsum board, consists of a gypsum plaster core pressed between two sheets of heavy paper. It's an economical and efficient material for creating interior walls and ceilings. When a hole occurs, the gypsum core is compromised, and the paper facing is torn or pushed in. The goal of a patch is to restore the structural integrity and create a smooth, paintable surface that blends seamlessly with the surrounding wall. Traditional methods involve cutting out a square, adding backing wood, and then fitting a new piece of drywall. This works, but it’s overkill for small holes and very labor-intensive.
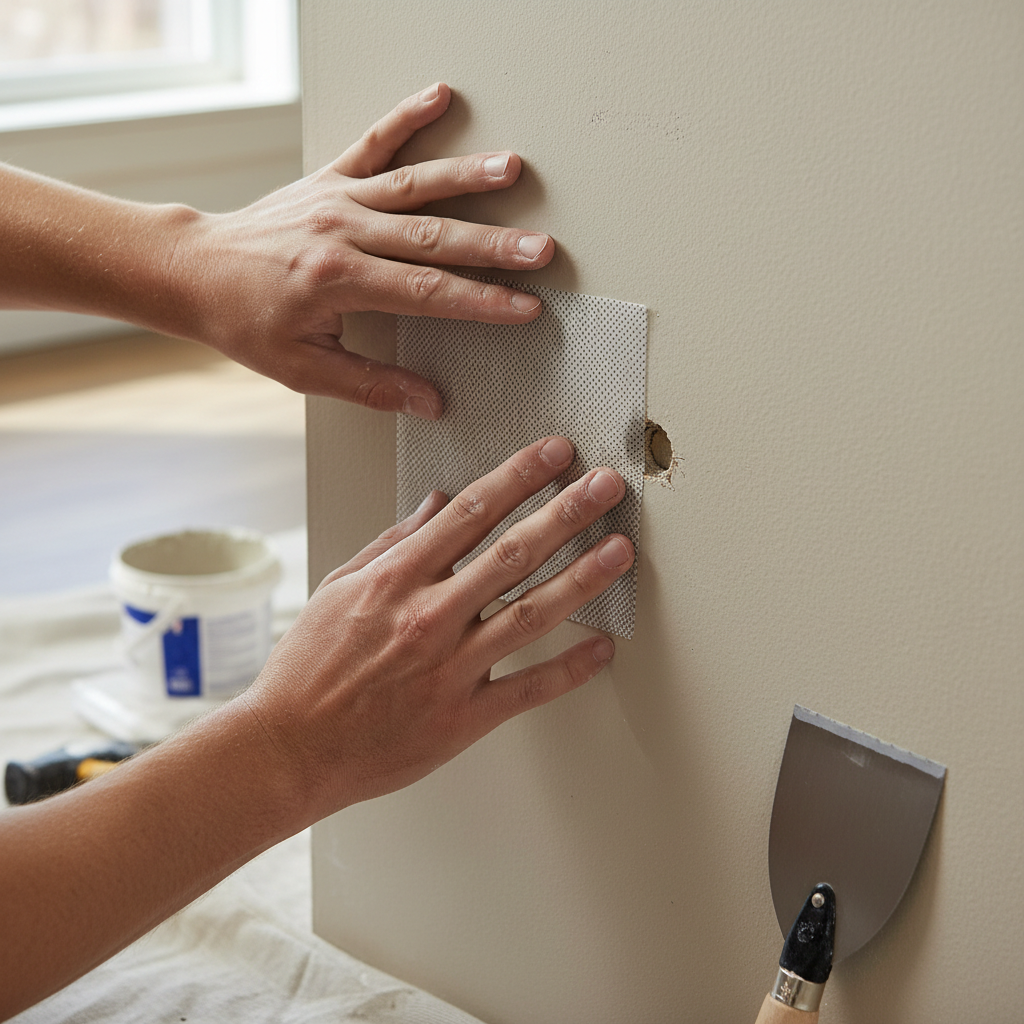
Our chosen method utilizes an adhesive drywall repair patch. These patches typically consist of a strong, self-adhesive fiberglass mesh backing with a thin, rigid aluminum or galvanized steel plate in the center. The metallic plate provides rigidity and strength to bridge the hole, preventing the patch from caving in or flexing. The fiberglass mesh extends beyond the plate, creating a feathered edge that adheres firmly to the existing drywall surface. When joint compound (or spackle) is applied over this mesh, it fills the texture of the mesh and the slight depression created by the patch's thickness, creating a smooth transition. The adhesive ensures the patch stays firmly in place while the compound dries. Because the patch itself provides the structural repair, only a thin layer of compound is needed to hide the mesh, accelerating the drying and finishing process significantly compared to filling a cavity with multiple layers of mud.
Step-by-Step Fix
1. Assess and Prepare the Area — Clean around the hole and ensure no loose debris remains. The success of the patch depends on good adhesion.
- Safety First: Always wear safety glasses when dealing with drywall dust. It's fine particulate and can irritate eyes.
- Examine the hole: Ensure it's not larger than the metallic plate of your adhesive patch (typically 2-4 inches diameter). If the hole is larger, you'll need a different repair method.
- Carefully remove any loose paper or crumbly gypsum from around the hole using a utility knife or sandpaper. You want a clean, relatively smooth surface for the patch to adhere to.
- Wipe down the area with a damp cloth to remove dust and grease, then let it dry completely. Alcohol wipes can be used for extra degreasing.
2. Size and Apply the Patch — Choose the right size patch and press it firmly over the hole.
- Select an adhesive patch where the metal center completely covers the hole, and the mesh extends at least an inch beyond the hole's edges in all directions. Commonly available sizes are 4x4 or 6x6 inches for the overall patch.
- Peel off the backing paper from the adhesive patch.
- Center the patch precisely over the hole, ensuring the metallic plate fully bridges the void. The adhesive side should face the wall.
- Press the patch firmly onto the drywall, starting from the center and working your way outwards to ensure good adhesion, especially around the edges of the mesh. Use a drywall knife or your hand to smooth it down thoroughly.
- If the patch isn't sticking well: The wall might be dusty or greasy. Remove the patch, clean the area again, and try a fresh patch (or ensure your existing patch hasn't lost its stickiness). Applying a thin layer of spray adhesive to the wall before the patch can help in troublesome cases, but typically isn't needed.
3. Apply the First Layer of Joint Compound — Cover the mesh and feather the edges.
- Using a 6-inch or larger drywall knife, scoop a small amount of lightweight joint compound (sometimes called spackle or patching compound) onto the blade.
- Spread a thin, even layer of compound over the entire patch, working from the center outwards. Ensure the compound completely covers the fiberglass mesh and fills its texture.
- Use firm, overlapping strokes to feather the edges of the compound out onto the surrounding drywall, making the transition as smooth as possible. The goal is to build up the compound slightly thicker over the metallic center and then thin it out to nothing at the edges, creating a subtle ramp.
- Consistency is Key: The compound should be the consistency of thick peanut butter. If it's too stiff, add a few drops of water and mix. If it's too runny, it will be hard to control and won't build up properly.
4. Let it Dry (First Layer) — Allow sufficient drying time for the compound to harden.
- Lightweight joint compound typically dries much faster than traditional mud. Depending on humidity and thickness, expect 30 minutes to 2 hours for the first layer to be dry to the touch. It will lighten in color as it dries.
- Resist the urge to apply the second coat too soon. Applying wet compound over still-wet compound can lead to bubbling, cracking, or a weaker bond.
- Speed Up Drying: A fan can help circulate air and accelerate drying, but avoid direct heat (like a heat gun) which can cause cracking.
5. Light Sanding (First Layer) — Smooth out any imperfections before the final layer.
- Once the first layer is completely dry, very lightly sand the patched area with 150-grit or 220-grit sandpaper or a sanding sponge. The goal here is just to knock down any obvious ridges or high spots, not to sand all the way down to the mesh.
- Use gentle, circular motions. Be careful not to sand through the compound and expose the mesh, especially at the feathered edges. If you do expose the mesh, you'll need to apply more compound and let it dry again.
- Wipe away any sanding dust with a damp cloth.
6. Apply the Second Layer of Joint Compound — Achieve a perfectly smooth, blended finish.
- Apply a second, very thin layer of joint compound over the first, extending it slightly wider than the first layer to further feather the edges. The aim is to achieve a perfectly smooth, imperceptible transition to the untouched drywall.
- Use long, sweeping strokes with your drywall knife, holding the blade at a shallow angle to the wall (around 20-30 degrees) to scrape off excess compound and leave a very thin, consistent layer.
- Advanced Feathering: For a truly invisible patch, use a wider drywall knife (e.g., 10-inch or 12-inch) for this final coat. The wider blade helps create a flatter, more seamless finish by reducing the likelihood of humps or depressions.
7. Final Drying and Sanding — Prepare for painting.
- Allow the second layer to dry completely (another 30 minutes to 2 hours, depending on conditions). It should be uniformly light in color.
- Once dry, perform a final, very light sanding with fine-grit sandpaper (220-grit or higher) or a fine-grit sanding sponge. Focus on achieving a perfectly smooth surface that matches the surrounding wall texture.
- Run your hand over the patch and the surrounding wall. You shouldn't feel any bumps or depressions. If you do, apply a very thin skim coat of compound, let it dry, and sand again.
- Wipe away all dust with a damp cloth. A tack cloth can also be used for removing fine dust particles.
8. Prime and Paint — Finish the repair to match your wall.
- Apply a coat of good quality primer over the entire patched area. This step is crucial, as primer helps seal the new compound, prevents paint from soaking in unevenly (which can make the patch visible), and promotes better paint adhesion.
- Allow the primer to dry according to the manufacturer's instructions.
- Once the primer is dry, paint the patched area to match the rest of your wall. For the best blend, it's often advisable to paint the entire wall section from corner to corner, or at least from the patch to the nearest architectural break (like a door frame or corner). Use a roller with the same nap as was used on the rest of the wall to ensure consistent texture.
Common Causes
- Door Knob Damage: A classic cause! Unrestricted door swings often lead to knobs striking and puncturing drywall. Installing a wall-mounted or hinge-pin door stop can prevent this.
- Picture Hanger Accidents: Overloaded picture hangers, improperly installed anchors, or simply pulling a nail out carelessly can leave behind small holes or tear away chunks of drywall.
- Moving Furniture: Bumping walls with the edge of a couch, table, or chair during a move is a frequent culprit for minor wall damage.
- Fastener Removal: When removing screws, wall anchors, or other fasteners, sometimes the drywall can tear or crumble around the hole, especially if not removed carefully.
- Minor Impacts: An accidental bump from a vacuum cleaner, a child's toy, or even a pet can be enough to create a small, localized hole in relatively thin drywall.
Common Mistakes
- Not Cleaning the Area: Leaving dust, loose paper, or grease around the hole prevents the patch from adhering properly, leading to it peeling or bubbling later.
- Applying Too Much Compound: Piling on thick layers of joint compound, especially with rapid-drying varieties, increases drying time significantly and makes achieving a smooth, feathered edge much harder. It also makes the patch more prone to cracking.
- Improper Feathering: Failing to blend the edges of the compound seamlessly into the existing wall will leave a visible hump or ridge, making the patch obvious even after painting. Use broad, sweeping motions and a wide knife.
- Sanding Too Aggressively: Over-sanding can expose the fiberglass mesh or create a depression, requiring more compound and prolonging the process. Gentle, fine-grit sanding is key.
- Skipping Primer: Primer is not optional! Without it, your new paint will absorb differently into the patched area than the untouched wall, resulting in a dull or 'flatter' spot that screams
Related Articles
Keep troubleshooting with these hand-picked guides from FixlyGuide:
- The 15-Minute Drywall Patch Secret (No Mudding Skills Required) — Discover how to quickly and easily patch a small hole in drywall using a simple method that doesn't require advanced mudding skills.
- The 4-Inch Drywall Hole Fix: Why Spackle Alone Always Fails — Fix a small drywall hole (up to 4 inches) properly with a simple patch kit and avoid common mistakes that lead to visible repairs.
- The 1 Common Drywall Patching Mistake (and The Right Way to Fix a Hole) — Discover the biggest mistake homeowners make when patching drywall holes and learn the correct, long-lasting method for seamless repairs.
- The 1 Common Mistake That Makes Drywall Patches Obvious (And How to Fix It) — Learn the common pitfall in drywall repair that leaves unsightly patches and how to achieve a seamless, invisible fix every time.
- The 3 Hidden Drywall Mistakes That Make Floating Shelves Sag (And How to Fix Them) — Prevent disastrous sagging and ensure your floating shelves stay perfectly level by avoiding common drywall installation mistakes.
- The #1 Mistake Homeowners Make After Finding Missing Shingles (And How to Fix It Right) — Discover the crucial steps to take after a storm rips shingles from your roof, ensuring a proper, lasting repair and preventing costly futu…
Recommended for DIYers & woodworkers
Sponsored
The Top 20 Tools for Workshops of Any Budget
No stationary machines or power tools required — plus 3 fundamental tools that can't be bought at any price.
Get the free guide
Ted's Woodworking — The #1 Woodworking Resource
Detailed instructions, dimensioned drawings, materials & cutting lists, and 3D schematics for every skill level.
See the plansSponsored: links above are affiliate links. FixlyGuide may earn a commission on qualifying purchases — at no extra cost to you.
Frequently asked questions
How big of a hole can I patch with an adhesive kit?+
Adhesive drywall patches are generally suitable for holes up to 3-4 inches (7-10 cm) in diameter. The metallic plate in the center of the patch needs to fully bridge and cover the hole for structural integrity. For larger holes, you'll need to cut out a square, add backing, and insert a new piece of drywall.
How long does it take for a drywall patch to dry?+
Using lightweight joint compound and applying thin layers, each coat typically dries to the touch within 30 minutes to 2 hours, depending on humidity and ventilation. You can often apply two coats and be ready for primer and paint within 2-4 hours total active drying time.
Can I paint directly over the patch without primer?+
It is strongly recommended to prime the patched area before painting. Primer seals the porous joint compound, ensures uniform paint absorption, and helps prevent 'flashing' (where the repaired area looks dull or different from the surrounding wall) and promotes better paint adhesion.
What if my wall has texture?+
If your wall has a textured finish (like orange peel or knockdown), you'll need to reapply that texture after the patch is smooth and primed, but before the final paint. You can buy aerosol texture sprays that match common textures to blend the repair perfectly.


Discussion
Loading comments…