
Tools & materials you'll need
Affiliate links- AmazonScrewdriver setPhillips and flathead, for removing access panels
- AmazonHairdryerFor melting ice in the drain opening
- AmazonTurkey baster or syringeFor flushing warm water into the drain line
- AmazonSmall flexible brushLike a bottle brush or pipe cleaner, for clearing blockages
- AmazonBucket or shallow panFor emptying the drain pan
- AmazonFlashlightFor inspecting dark areas
As an Amazon Associate FixlyGuide earns from qualifying purchases — at no extra cost to you. Prices and availability are accurate as of publication and subject to change.
Quick Answer
A refrigerator leaking water on the floor is a common household nuisance, often leading to slippery kitchens and potential floor damage. The most frequent culprit behind this watery mess isn't a major plumbing disaster, but rather a simple issue: a clogged or frozen defrost drain line. This drain line, a small tube designed to carry condensation from the freezer's evaporator coil to a defrost pan beneath the fridge, can become blocked by ice buildup, food particles, or mold. When blocked, the water has nowhere to go but out, typically pooling under the crisper drawers inside the fridge and eventually spilling onto your floor. Fortunately, this is a problem you can usually diagnose and fix yourself in under an hour with basic tools and a little know-how.
The Problem
Imagine walking into your kitchen only to find a puddle of water slowly expanding from beneath your refrigerator. It’s an alarming and frustrating sight, often leading to immediate panic about broken water lines or expensive appliance repair. However, before you call a technician in a frenzy, understand that many refrigerator leaks stem from a much more manageable issue. The primary suspect in most cases of water pooling on the floor is a compromised defrost drain line or a malfunctioning defrost system component. This isn't just about a minor inconvenience; prolonged water exposure can damage flooring, create slip hazards, and even lead to mold growth behind and under the appliance, compromising your home's air quality and structural integrity. Addressing this issue promptly is crucial for both your home's condition and your peace of mind.
How It Works
To understand why your refrigerator leaks, it helps to know a bit about its internal workings, specifically the defrost cycle. Every frost-free refrigerator has an evaporator coil, typically located in the freezer compartment, which gets very cold to remove heat from inside the fridge. As it cools, moisture from the air inside the freezer condenses and freezes onto this coil, forming frost. To prevent excessive ice buildup, which would reduce efficiency, refrigerators regularly go through a defrost cycle. During this cycle, a heating element warms the evaporator coil, melting the accumulated frost.
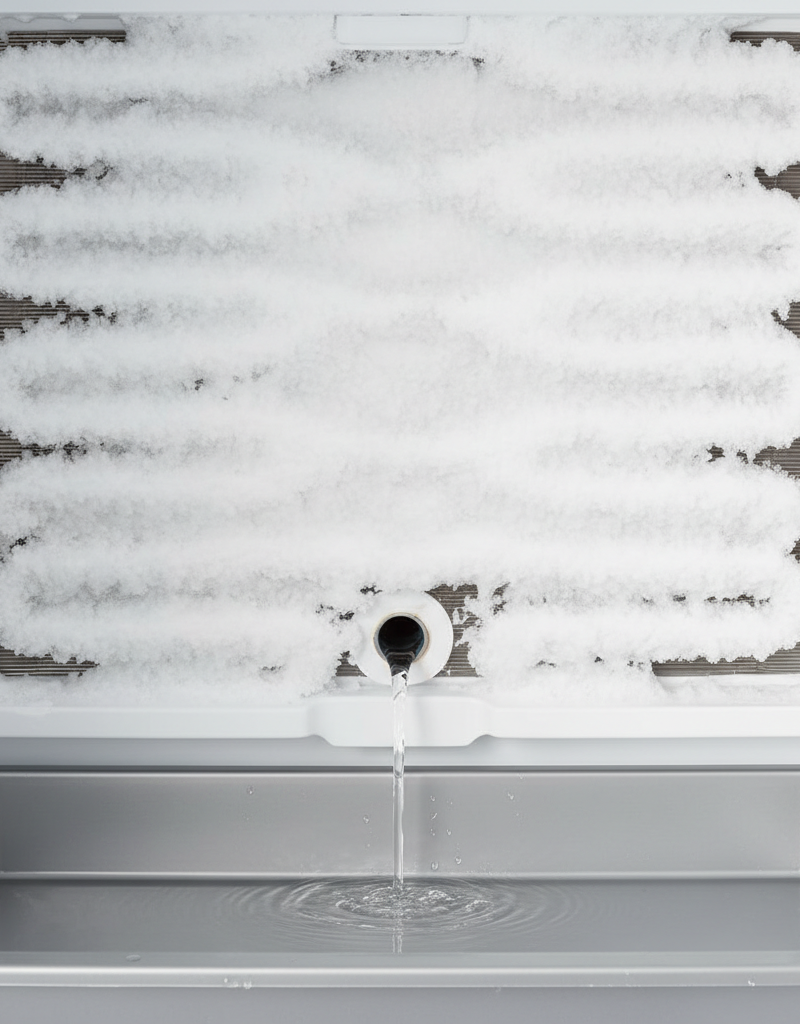
This melted water doesn't just disappear. It’s designed to drain through a small opening at the bottom of the freezer compartment, into a tube called the defrost drain line. This line typically runs down the back of the refrigerator, emptying into a shallow drip pan (also called an evaporation pan) located near the compressor at the bottom of the unit. The heat generated by the compressor then helps to evaporate the water in this pan back into the air, completing the cycle. Problems arise when this delicate system is interrupted. If the drain opening or the drain line itself becomes clogged with ice, food debris, or even mold and mildew, the melted water has no clear path to the defrost pan. Instead, it overflows within the freezer or refrigerator compartment, often pooling under the crisper drawers, and eventually finds its way out, manifesting as a leak on your kitchen floor. Understanding this mechanism is key to accurately diagnosing and effectively resolving the leak.
Step-by-Step Fix
1. Safety First – Unplug the refrigerator.
- Safety Note: Always unplug your refrigerator before attempting any repairs. This prevents electrical shock and injury from moving parts. Don't just turn it off; pull the plug completely from the wall outlet.
2. Locate the Drain Plug/Opening – Identify the source of the draining water.
- This is typically found on the back wall of the freezer compartment, often directly beneath the evaporator coils (sometimes hidden behind a cover panel). You might need to remove freezer shelves or storage bins to get a clear view. If your fridge leaks inside the cabin, below the crisper drawers, then the drain is clogged as well – and the path of the water onto the floor from here is usually through the door seal or gaps in the fridge lining.
3. Clear the Drain Plug (Inside the Freezer) – Remove visible obstructions.
- If you see ice buildup right on the drain opening, use a hairdryer on a low setting (keep it moving to avoid overheating plastic) or a turkey baster with warm water to melt it. Avoid using sharp objects that could puncture the drain line. A small amount of dish soap in the warm water can help dissolve greasy clogs. Only use a small amount.
4. Access the Defrost Drain Pan – Prepare for external access.
- You'll need to pull the refrigerator away from the wall to access the back. Most refrigerators have wheels, but if yours doesn't, you might need a dolly or someone to help you carefully move it. Be mindful of the water line if you have an ice maker or water dispenser. Once clear of the wall, locate the defrost drain pan, usually a plastic tray situated near the bottom, often above the compressor. It might be challenging to spot, so use a flashlight.
5. Remove and Clean the Drain Pan – Empty and sanitize.
- Carefully slide out the drain pan. It might contain standing water, so be prepared to empty it into a bucket or towel. Clean the pan thoroughly with warm soapy water and a mild disinfectant to remove any slime, mold, or food particles that might be contributing to odors or blockages. Rinse it well.
6. Clear the Defrost Drain Line (From Below) – Tackle the blockage from the bottom up.
- Once the pan is removed, you should see the end of the defrost drain line protruding into the area where the pan sits. Use a small, flexible brush (like a bottle brush or a plumber's snake designed for small pipes) to carefully push up into the drain line, dislodging any clogs. Alternatively, you can use a turkey baster or syringe to forcefully flush warm water mixed with a little baking soda and vinegar (or dish soap) up into the drain line. This helps to melt ice and break down organic matter. You're looking for water to flow freely down into the pan area after you've cleared it.
7. Test the Drain Line – Verify the flow.
- Place the empty drain pan back in its position. Pour a cup of warm water down the drain opening inside the freezer (where you started). The water should flow freely through the drain line and into the pan at the bottom. If it doesn't, repeat step 6, applying more force or flushing solution.
8. Reassemble and Restore Power – Put everything back together.
- Once you're satisfied the drain is clear and water flows properly, reassemble any panels or shelves you removed in the freezer. Slide the refrigerator back into place, taking care not to crimp the water line (if applicable) or the power cord. Plug the refrigerator back in. Monitor for a few days to ensure the leak has stopped.
Common Causes
- Clogged Defrost Drain Line: This is by far the most common cause. Over time, ice, food particles, debris, and even mold or mildew can accumulate in the narrow drain tube, blocking the path for melted defrost water. When the water can't drain, it backs up and overflows.
- Frozen Defrost Drain Line: In some cases, especially in older or less efficient units, the drain line can freeze solid, often due to a slight clog slowing the flow, allowing ice to form. This creates an impenetrable barrier for the melted water during defrost cycles.
- Misaligned or Cracked Drain Pan: The drain pan, situated at the bottom of the fridge, can become misaligned if the refrigerator is moved roughly. If it's not positioned correctly under the drain tube, water will miss the pan and spill onto the floor. Cracks in an old or brittle plastic pan can also lead to leaks.
- Defective Defrost Heater or Thermostat: Less common, but still possible, is a malfunction in the defrost system itself. If the defrost heater (which melts the ice) or the defrost thermostat (which tells the heater when to turn on and off) fails, excessive ice can build up. This buildup can eventually block the drain opening or other components, leading to water overflow once the ice unexpectedly melts.
- Blocked Water Filter Housing (for dispenser models): If your refrigerator has a water dispenser and ice maker, a leak can sometimes originate from a faulty or improperly installed water filter or its housing, creating a drip that appears to come from the fridge's interior.
- Loose Water Supply Line: For refrigerators with ice makers or water dispensers, the water supply line (which connects the fridge to your home's water supply) can become loose or damaged, causing a leak. This usually produces a more continuous drip than a defrost drain issue.
Common Mistakes
- Ignoring the Safety Step: Many DIYers rush to inspect or repair without unplugging the appliance. Forgetting to disconnect power is dangerous and can lead to electrical shock or accidental injury from internal components. Always unplug first.
- Using Sharp Objects: Attempting to clear an ice blockage with a knife, screwdriver, or other sharp metal object can easily puncture the drain line or damage the delicate evaporator coils, leading to a much more expensive repair than a simple clog.
- Not Fully Cleaning the Drain Line: Just clearing the visible ice isn't enough. If mold or slime is present, it will quickly re-clog the line. Thoroughly flushing with a cleaning solution and using a flexible brush is essential for a lasting fix.
- Overlooking the Drain Pan: Concentrating solely on the drain line in the freezer while neglecting to inspect and clean the drain pan at the bottom of the refrigerator is a common oversight. The pan itself can harbor bacteria, mold, or cracks.
- Assuming a Major Problem: Many homeowners immediately assume a major appliance failure or burst pipe, calling an expensive technician when the issue is often a simple, DIY-friendly clog. Proper diagnosis can save significant money.
- Not Monitoring After the Fix: Simply clearing the drain and walking away without monitoring the refrigerator for a few days can lead to a surprise re-occurrence. Watch for new leaks to confirm the fix was successful.
Cost & Time Breakdown
| Task | DIY Cost | Pro Cost | Time |
|---|---|---|---|
| Diagnosing & Clearing Drain | $0–$10 | $75–$200 | 30–60 mins |
| Tools & Materials (if needed) | $5–$20 | Included | N/A |
| Replace Drain Pan (if cracked) | $20–$50 | Included | 15–30 mins |
| Replace Defrost Heater/Thermo | $30–$100 | $150–$350 | 1–2 hours |
| Water Filter Replacement | $25–$60 | Included | 5–10 mins |
Tips & Prevention
- Regular Cleaning: Periodically clean the interior of your refrigerator and freezer. Wipe up spills immediately to prevent food particles from washing into the drain. Consider a quick visual check of the freezer drain opening every few months.
- Defrost Drain Flush: Every 6-12 months, consider proactively flushing a small amount of warm water (maybe with a teaspoon of baking soda) down the defrost drain opening in the freezer. This helps keep the line clear before clogs can form.
- Check Door Seals: Ensure your refrigerator and freezer door seals are tight and free of cracks. Worn seals allow warm, humid air into the compartments, increasing frost buildup and the amount of water the defrost system has to handle.
- Maintain Proper Temperature Settings: Overly cold settings can sometimes contribute to excessive frost. Ensure your refrigerator is set between 35-38°F (2-3°C) and your freezer at 0°F (-18°C) for optimal performance and less frost generation.
- Clear The Coils: Dust and debris on the condenser coils (usually underneath or behind the fridge) can reduce efficiency, causing the compressor to work harder and potentially affecting the defrost system. Clean these coils yearly with a coil brush or vacuum.
- Proper Food Storage: Cover foods to prevent moisture release, which contributes to frost buildup. This reduces the workload on your defrost system and helps minimize the amount of water flowing through the drain.
When to Call a Professional
While a clogged defrost drain is a common and often DIY-friendly fix, there are situations where calling a licensed appliance repair technician is necessary. If you've followed all the steps to clear the drain line and the leak persists, or if you suspect the issue is more complex, a professional can accurately diagnose the problem. Specifically, if the leak is accompanied by the refrigerator failing to cool properly, unusual noises, or if you identify a suspected failure of internal components like the defrost heater, thermostat, or main control board, it's time to call in an expert. These electrical parts often require specialized tools for testing and replacement, and improper handling can lead to further damage or safety hazards. Additionally, if the leak appears to be coming from the water supply line connections behind the refrigerator and you're uncomfortable working with plumbing, contact a plumber. Always prioritize safety and avoid attempting repairs beyond your comfort level or expertise, especially when dealing with refrigerants or complex electrical systems.
Related Articles
Keep troubleshooting with these hand-picked guides from FixlyGuide:
- The Secret Culprit Behind Your Leaky Refrigerator (It’s Not Always a Hose) — Discover the hidden causes of your refrigerator leaking water and how to fix them with our comprehensive troubleshooting guide.
- The Secret Culprit Behind Your Leaky Refrigerator (It’s Not Always a Hose) — Discover why your refrigerator might be leaking water and how to diagnose and fix the most common culprits, saving you from costly repairs.
- The #1 Mistake Homeowners Make When Their AC Drain Clogs (And The $5 Fix) — Discover the most common error homeowners make when tackling a clogged AC drain line and learn a simple, inexpensive solution to prevent co…
- The 3 Hidden Reasons Your Refrigerator Leaks Water (And How to Fix Them in 30 Minutes) — Discover the most common culprits behind a leaking refrigerator and learn how to diagnose and fix them quickly with this comprehensive guid…
- The $7 Secret Why Your AC is Leaking Water (And How to Fix It in 15 Minutes) — A clogged AC drain line is a common culprit for water leaks, but a simple and inexpensive fix can get your system running smoothly again.
- The One Reason Your Refrigerator Fails (While the Freezer Doesn't) — If your freezer works but your refrigerator isn't cooling, the most common culprit is a blocked or malfunctioning defrost drain system.
Frequently asked questions
Why is my refrigerator leaking water inside?+
If water is pooling inside your refrigerator, often under the crisper drawers, it's almost always due to a clogged or frozen defrost drain line. The melted frost from the freezer's evaporator coil cannot properly drain away, causing it to back up and overflow into the fresh food compartment and eventually onto the floor.
How do I clear a refrigerator defrost drain tube?+
You can clear a defrost drain tube by first unplugging the refrigerator, locating the drain opening in the freezer (often at the bottom back), and melting any ice with a hairdryer or warm water. Then, from the back of the fridge, locate the drain pan and the end of the drain tube. Use a small, flexible brush or flush warm water (possibly with baking soda/vinegar or dish soap) up the tube to dislodge blockages.
What tools do I need to fix a leaky refrigerator?+
For a typical defrost drain clog, you'll need basic tools such as a screwdriver (to remove access panels if necessary), a hairdryer or turkey baster (for warm water), a small flexible brush (like a bottle brush or pipe cleaner), towels for spills, and a bucket for the drain pan. You might also need a flashlight to see into tight spaces.
Can a household cleaner clear a clogged fridge drain?+
Yes, a mild solution of warm water mixed with a small amount of dish soap, baking soda and vinegar, or a very dilute bleach solution (for mold) can help break down organic clogs in the defrost drain. Always flush thoroughly with clean water afterward to remove any residue. Avoid harsh chemical drain cleaners.


Discussion
Loading comments…