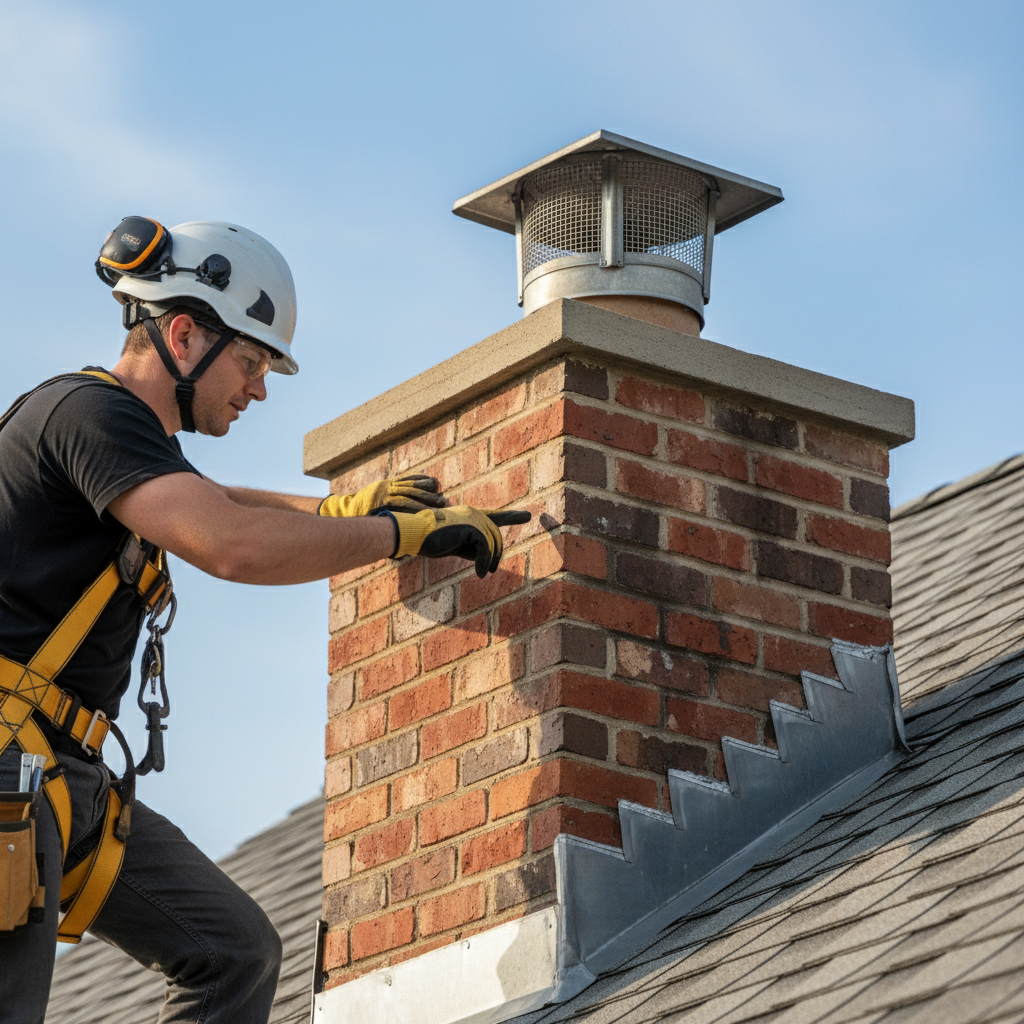
- Ensure the weather is dry and clear. Avoid working in windy or wet conditions.
- Use a sturdy ladder, properly secured and extending at least three feet above the roofline.
- Wear non-slip footwear, work gloves, and potentially a safety harness if you have one and are working on a steep roof.
- Have a helper on the ground to steady the ladder and assist if needed.
Plumbing · Leak
| Project category | Plumbing |
|---|---|
| Problem type | Leak |
| Trade required | Plumbing |
| Urgency | Emergency — act now |
| Safety risk | High safety risk |
| DIY suitability | DIY for experienced homeowners |
| Cost category | Low cost |
| Typical timeline | Shut water off now; repair usually same or next day |
| Contractor type | Licensed plumber |
Repair option
Isolate at the shutoff, replace the failed component, and dry the cavity fully.
Replacement option
Repipe the run or the branch when corrosion is widespread.
Common causes
- Failed supply line or shutoff valve
- Worn washers, cartridges, or P-trap connections
- Pinhole corrosion in older copper
Relevant tools:emergency checklistdiy or hire a pro
Published July 10, 2026Last updated August 17, 2026
Tools & materials you'll need
Affiliate linksAs an Amazon Associate FixlyGuide earns from qualifying purchases — at no extra cost to you. Prices and availability are accurate as of publication and subject to change.
Quick Answer
A chimney leaking during rain is a common but concerning issue that can lead to significant damage within your home. While it might seem like a complex problem, the culprit is often one of several key components: a damaged chimney cap, a cracked chimney crown, compromised flashing around the base of the chimney, or deteriorated mortar joints and bricks. Identifying the exact source requires a methodical inspection, and while some fixes are within a homeowner's DIY capabilities, others necessitate professional intervention to prevent further water intrusion and costly repairs.
The Problem
You notice a dreaded water stain on your ceiling or wall near the fireplace after a rainstorm. Perhaps you even hear dripping sounds. A leaky chimney isn't just an unsightly annoyance; it's a serious structural and health hazard. Water infiltration can rot framing, damage drywall, weaken mortar, promote mold growth, and even compromise the integrity of your chimney flue. Ignoring a persistent leak can lead to thousands of dollars in repairs, not to mention indoor air quality issues from mold and mildew. Pinpointing the precise entry point of the water can be challenging, as water often travels a circuitous route before manifesting as a visible leak inside your home.
How It Works
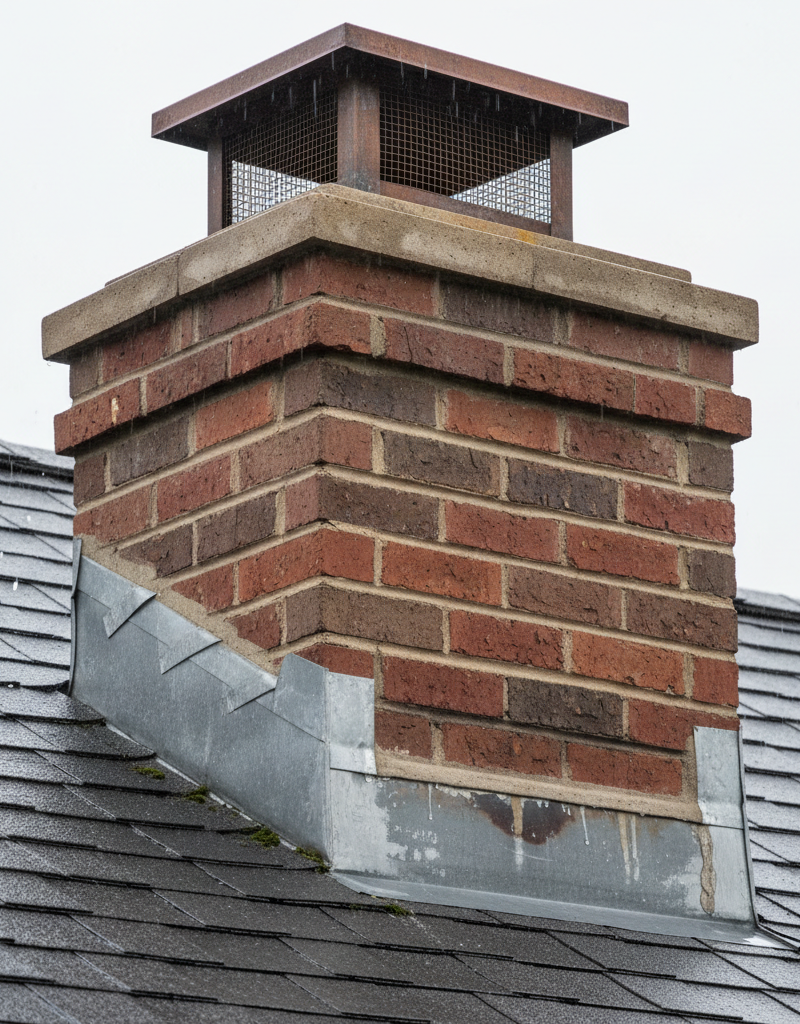
Your chimney is a complex system designed to safely vent combustion byproducts while also protecting your home from the elements. At the very top, the chimney cap acts like an umbrella, preventing rain, snow, and animals from entering the flue. Below the cap, the chimney crown is a concrete slab that slopes away from the flue, directing water off the top of the chimney walls. The vertical structure consists of bricks and mortar joints, which, when properly maintained, form a watertight barrier. Where the chimney penetrates the roof, flashing—typically made of sheet metal—creates a seal between the chimney and the roof shingles. This flashing is often installed in layers (step flashing and counter flashing) to account for thermal expansion and contraction, ensuring a flexible, watertight seal.
When any of these components fail, water finds a way in. A missing or damaged chimney cap allows rain to pour directly into the flue. Cracks in the chimney crown allow water to seep into the chimney structure itself, bypassing the flue. Deteriorated mortar joints or cracked bricks create porous pathways for water to penetrate the chimney stack. And finally, damaged, improperly installed, or corroded flashing provides a direct route for water to flow from the roof surface into the attic or walls adjacent to the chimney. Understanding how each part functions is crucial for identifying where the system has broken down and is allowing water intrusion during rainfall.
Step-by-Step Fix
Before undertaking any work on your roof or chimney, ensure you have a spotter and use appropriate safety gear. Working at heights is inherently dangerous. If you are uncomfortable or unsure, contact a professional.
1. Safety First – Always prioritize safety when working on a roof. * Ensure the weather is dry and clear. Avoid working in windy or wet conditions. * Use a sturdy ladder, properly secured and extending at least three feet above the roofline. * Wear non-slip footwear, work gloves, and potentially a safety harness if you have one and are working on a steep roof. * Have a helper on the ground to steady the ladder and assist if needed.
2. Visual Inspection of the Chimney Cap – Check for damage or dislodgement. * Carefully ascend the ladder and examine the chimney cap. Look for rust, holes, missing mesh, or if it's completely dislodged. * A common issue is a rusted or loose cap, allowing rain to enter the flue directly. Squirrels or birds can also dislodge caps. * If your cap is missing or damaged: A temporary fix can be to cover the flue opening with heavy-duty tarpaulin and bungee cords (securely!) until a permanent replacement can be installed. For replacement, measure the flue opening accurately.
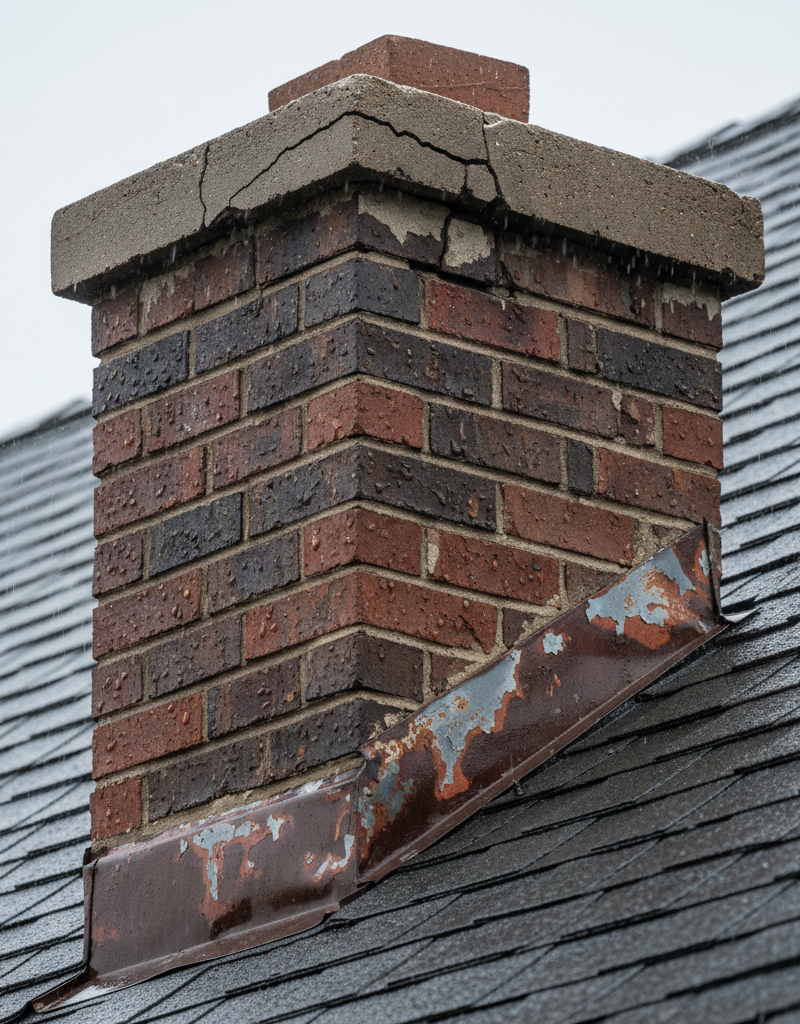
3. Inspect the Chimney Crown – Look for cracks, deterioration, or improper slope. * Examine the concrete or mortar slab on top of the chimney, just below the cap. This is the crown. * Look for hairline cracks, larger fissures, or sections that have spalled or broken away. Pay close attention to the area where the crown meets the flue liner. * Also, note if the crown is flat or slopes inward, which would direct water towards the flue rather than off the chimney. * If you find small cracks: Clean the area thoroughly with a wire brush. Apply a high-quality, flexible concrete patch or a crown repair sealant designed for chimneys. Ensure it has proper adhesion and cures according to manufacturer instructions. For larger damage or an improperly sloped crown, professional repair or replacement is usually necessary.
4. Examine Mortar Joints and Bricks – Check for crumbling, missing mortar, or damaged bricks. * Scan the entire visible chimney stack, paying attention to the horizontal and vertical mortar joints. * Look for signs of deterioration: crumbling mortar, gaps, holes, or mortar that can be easily scraped away with a key or screwdriver. * Also, inspect individual bricks for spalling (flaking/chipping), cracks, or significant erosion. * If you find deteriorated mortar (repointing needed): This is a time-consuming but crucial repair. Carefully rake out old, loose mortar to a depth of about 1 inch using a tuckpointing tool or cold chisel. Wet the area, then apply new mortar specifically formulated for chimneys (Type N or S) using a hawk and trowel, pressing it firmly into the joints. Tool the joints to match the original profile for proper water shedding. This is often best left to a professional if extensive. * If you find damaged bricks: Individual spalled or cracked bricks may need to be carefully removed and replaced with new ones matching the existing style and color. This requires more advanced masonry skills.
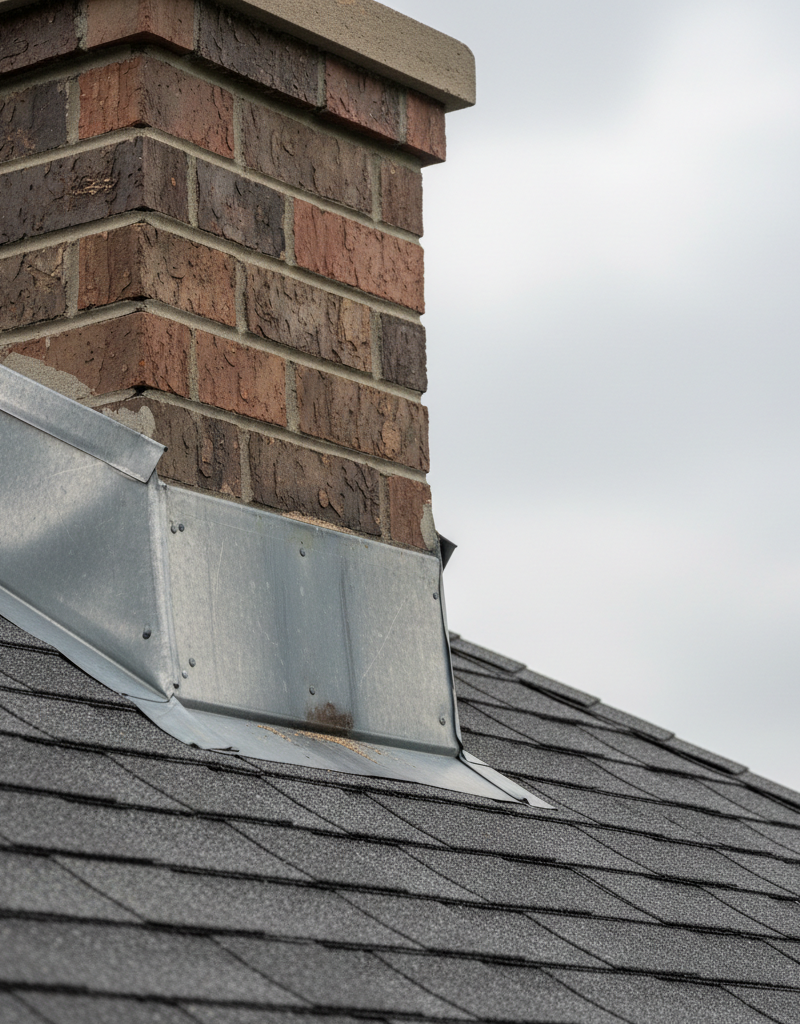
5. Inspect the Flashing – Look for tears, bends, gaps, or improper installation. * This is a very common leak source. Examine the metal flashing where the chimney meets the roof surface. * Look for bent or missing pieces, cracks, rust, loose caulk or tar, or areas where the flashing has pulled away from the chimney or the roof. * Pay close attention to the "counter flashing" (the L-shaped metal embedded into the chimney mortar joints) and the "step flashing" (individual pieces woven into the roof shingles). * If flashing issues are minor (e.g., small gaps or loose sealant): Clean the area thoroughly. Re-seal with a high-quality, flexible, exterior-grade polyurethane caulk or roofing cement. Ensure the sealant forms a continuous, watertight bond. * If flashing is rusted, torn, or improperly installed: This usually requires a professional roofer or chimney sweep to replace the entire flashing system. Improper flashing installation is a rampant cause of leaks and requires expert knowledge.
6. Check Valleys and Roof Deck (Adjacent to Chimney) – Sometimes the chimney is a red herring. * While focused on the chimney, take a moment to inspect the roof area immediately surrounding it. Check for damaged or missing shingles, especially those upslope from the chimney. * Examine any roof valleys or dormer junctions that are near or above the chimney, as leaks from these areas can migrate and appear to originate from the chimney. * If you find damaged shingles: Replace them following standard roofing practices. For significant roof damage, professional help is advised.
7. Perform a Water Test (Optional, with caution) – Confirm the repair. * After making a repair, wait for the area to dry completely. Have a helper ready with a hose on the ground. * From a safe position on the roof, spray water gently directed at a small section you suspect was leaking (e.g., directly onto the crown, then onto a section of flashing) for several minutes. * Have your helper inside the house monitor the leak area. This targeted approach helps confirm if your repair was successful or identify the remaining leak source. * Important: Do not flood areas indiscriminately and avoid aiming directly into the flue unless you are specifically testing the cap/crown. Also, be mindful of water pressure to avoid creating new leaks.
Common Causes
- Damaged Chimney Cap: Missing, rusted, or structurally compromised caps allow rain and even snow to drop directly into the flue, leading to leaks.
- Cracked Chimney Crown: The concrete slab on top of the chimney develops cracks over time due to weathering and freeze-thaw cycles, allowing water to seep into the chimney masonry.
- Deteriorated Mortar Joints: Old or improperly mixed mortar crumbles and erodes, creating open pathways for water to penetrate the brickwork, a process known as "spalling."
- Damaged or Improperly Installed Flashing: This is arguably the most common cause. The metal strips that seal the chimney to the roof can rust, tear, become dislodged, or were simply installed incorrectly, creating gaps for water entry.
- Spalling Bricks: Bricks themselves can absorb water and, when exposed to freezing temperatures, can crack and flake apart, compromising the chimney's watertight integrity.
- Condensation within the Flue: While not a rain-based leak, internal condensation (especially with high-efficiency appliances) can mimic a leak. If the flue isn't properly sized or insulated, warm, moist air can condense and drip back down.
- Saturated Masonry: Even without obvious cracks, very old or unsealed masonry can become super-saturated during prolonged heavy rain, allowing water to slowly migrate through to the interior.
Common Mistakes
- Haphazard Patching with Caulk: Applying a bead of caulk over a large crack or loose flashing without proper cleaning or preparation (or worse, using standard silicone not rated for roofing) is a temporary, ineffective fix that will quickly fail.
- Ignoring the Chimney Cap: Many homeowners overlook the cap, assuming a leak must be lower down. A missing or damaged cap is a primary, easily fixable leak source.
- Assuming the Leak is Where it Appears: Water can travel horizontally along rafters or sheathing for several feet before dripping. The visible stain indoors might be far from the actual entry point.
- Using Improper Mortar for Repairs: Using general-purpose concrete or mortar not specifically formulated for chimneys (which needs to withstand high temperatures and specific moisture exposure) will lead to premature failure.
- Dangerous Ladder Practices: Attempting to climb onto a roof without a stable ladder, a spotter, or appropriate safety gear is extremely risky and can lead to severe injury.
- Ignoring Underlying Causes: Simply patching a crack without understanding why it cracked (e.g., poor crown design, lack of adequate flashing) means the problem will likely recur.
Cost & Time Breakdown
| Task | DIY Cost | Pro Cost | Time |
|---|---|---|---|
| Chimney Cap Replacement | $30–$200 | $150–$400 | 30 min–1 hour |
| Minor Crown Repair (Sealant) | $20–$50 | $100–$300 | 1–2 hours |
| Tuckpointing (Small Area) | $50–$150 (materials) | $300–$800 (per area) | 2–4 hours |
| Flashing Re-sealing (Minor) | $15–$40 | $75–$200 | 30 min–1 hour |
| Full Flashing Replacement | $100–$300 (materials) | $400–$1,000+ | 4–8 hours |
| Chimney Inspection by Pro | $0 | $150–$300 | 1–2 hours |
Tips & Prevention
- Annual Chimney Inspection: Have your chimney professionally inspected by a certified chimney sweep at least once a year. They can spot small issues before they become major leaks.
- Install a Quality Chimney Cap: Ensure your chimney has a multi-flue cap made of stainless steel or copper that covers all flue openings and extends over the crown slightly. This is your first line of defense against water and animals.
- Seal Masonry: Consider applying a penetrating, breathable water repellent (specifically formulated for chimneys) to the exterior masonry every few years. This helps reduce water absorption without trapping moisture.
- Proper Crown Construction: When replacing a crown, ensure it has a proper overhang (at least 2 inches past the chimney walls) and a slight slope to shed water effectively.
- Clean Gutters Regularly: Clogged gutters adjacent to the chimney can overflow and direct excessive water against the chimney masonry and flashing, exacerbating potential leaks.
- Trim Overhanging Branches: Branches directly over the chimney can deposit debris, hasten cap/crown deterioration, and even cause physical damage during storms.
When to Call a Professional
While some minor repairs, like re-sealing small flashing gaps or applying crown sealant, can be DIY projects, many chimney leaks are best left to licensed professionals. You should immediately call a certified chimney sweep, a licensed roofer, or a qualified masonry contractor if you observe significant damage to your chimney's structure, extensive and deteriorating mortar, deeply spalled or crumbling bricks, or flashing that is clearly torn, heavily rusted, or improperly installed. Any work involving climbing onto a steep or high roof, extensive masonry repair (like tuckpointing or brick replacement), or full flashing replacement requires specialized skills, tools, and safety equipment that most homeowners do not possess. Furthermore, if you suspect the leak is tied to the flue liner itself or is creating an unsafe condition for your fireplace or heating appliance, a professional assessment is critical for safety and to prevent carbon monoxide hazards. Attempting complex repairs without the proper expertise can lead to further damage, more expensive repairs down the line, or serious personal injury.
Related Articles
Keep troubleshooting with these hand-picked guides from FixlyGuide:
- The 4 Hidden Reasons Your Chimney Leaks During Rain (And the $50 Fix) — A leaky chimney during rain can signify several underlying issues, from a damaged chimney cap to degraded flashing, leading to significant…
- The Secret Culprit Behind Your Leaky Chimney (It's Not Always the Roof) — Discover the often-overlooked causes of a leaky chimney during rain and how to fix them, from flashing issues to masonry problems.
- The Secret Culprit Behind Your Leaky Chimney (It’s Not Always the Obvious Flashing) — Discover the often-overlooked causes of chimney leaks during rain and how to tackle them with effective DIY solutions and prevention tips.
- The Secret Culprit Behind Your Leaky Chimney (It's Not Always the Obvious Fix) — Discover the often-overlooked causes of a leaky chimney during rain, beyond just a faulty cap, and learn practical steps to fix it.
- The #1 Overlooked Reason Your Chimney Leaks (It Rots Your Roof!) — Discover the surprising, often-missed culprit behind your leaky chimney and how this common issue can silently damage your home.
- The #1 Gutter Mistake That Causes Overflow (It's Not Clogs!) — Discover the often-overlooked culprit behind overflowing gutters during heavy rain and learn the surprising, easy fix most homeowners miss.
Should you do this yourself?
Answer five quick questions before you start. Safety outranks savings every time.
Your experience with work like this
How high do you have to work?
Does the job involve any of these?
Will it need a permit?
Specialty tools
Free and instant. Educational guidance only — not a quote, inspection, or professional diagnosis.
Questions to ask before you sign
Ask every contractor the same questions and the cheapest bid stops looking cheapest. Check them off as you go — your progress is saved on this device.
Free, no signup. Bring this to every walkthrough so you compare bids on the same terms.
What should this project cost?
Enter your project details for a realistic cost range before you call anyone.
Common repairs run $150–$650; repipes and water-heater replacements reach $1,500–$4,500.
- Regional adjustment
- National average
- Labor share (typical)
- ~$754
- Quotes to collect
- 3 written estimates
Educational estimate based on national averages — not a binding quote. Always confirm with written local estimates.
Fixly Project Decision Box
- DIY difficulty
- Professional Recommended
- Estimated time
- Inspection 1–2 hours · repairs 1–3 days
- Cost level
- High
Main tools / materials
- Binoculars for a ground-level look
- Flashlight for attic checks
- Moisture meter
- Roofing cement (temporary patch only)
When to stop and call a pro
- Active leak near lights, fans, or any wiring
- Sagging, bulging, or water-filled ceiling
- Steep, wet, or two-story roof — do not climb it
- Storm or hail damage you plan to claim on insurance
Need professional help?
Free roof assessment first — no phone calls until you ask for them.
Get Local Roofing HelpGet help with your roof now
Stay off the roof. These free tools help you protect the house and reach the right professional fast.
- Emergency repair checklistThe first steps that limit damage before a pro arrives.Open
- Repair or replace your roof?Answer 10 questions about age, leaks, and damage to get a clear next step.Open
- Get local estimatesSend one request and compare written estimates from vetted pros.Open
Free, no signup required. Estimates are educational guidance, not a quote or an inspection.
Frequently asked questions
How do I find out where my chimney is leaking from?+
Start by inspecting the top of the chimney from the roof down. Check the chimney cap for damage, then the chimney crown for cracks. Next, examine the mortar joints and bricks for deterioration. Finally, inspect the flashing where the chimney meets the roof for any gaps or damage. A targeted water test with a helper can also pinpoint the source.
Can flashing be repaired or does it need to be replaced?+
Minor flashing issues, like small gaps or separations, can often be repaired by cleaning and re-sealing with a high-quality roofing caulk or cement. However, if the flashing is extensively rusted, torn, improperly installed, or severely bent, a full replacement by a professional roofer is typically necessary for a lasting fix.
How much does it cost to fix a leaky chimney?+
The cost to fix a leaky chimney varies widely depending on the cause. Simple repairs like replacing a chimney cap might cost $150-$400 professionally, while patching a crown can be $100-$300. More extensive work like tuckpointing (mortar repair) or full flashing replacement can range from $400 to over $1,000 or more, depending on the extent of the damage and local labor rates.
Can a chimney leak cause ceiling damage?+
Absolutely. Water leaking from a chimney can travel along rafters and joists, causing water stains, mildew, and structural damage to ceilings, walls, and even flooring. Prolonged leaks can lead to wood rot, compromised drywall, and widespread mold growth, necessitating significant interior repairs.
Discussion
Loading comments…