
Tools & materials you'll need
Affiliate linksAs an Amazon Associate FixlyGuide earns from qualifying purchases — at no extra cost to you. Prices and availability are accurate as of publication and subject to change.
Quick Answer
A frozen pipe can lead to significant water damage if not addressed quickly and safely. The quickest way to thaw an accessible frozen pipe is by gently applying heat using a hairdryer, heat gun on a low setting, or warm towels, starting from the faucet side and working backward towards the freeze. Always ensure water can flow from the faucet as the ice melts, and be prepared to shut off your main water supply if a leak or burst occurs.
The Problem
It’s a homeowner’s winter nightmare: you turn on the faucet, and nothing comes out, or perhaps just a trickle. The likely culprit? A frozen pipe. When temperatures plummet, the water inside unprotected pipes, especially those in unheated areas like basements, crawl spaces, exterior walls, or attics, can freeze solid. As water turns to ice, it expands, creating immense pressure within the pipe. This pressure doesn't just happen where the ice forms; it builds between the ice blockage and the closed faucet, or between two ice blockages. This internal pressure is the real danger, often leading to a burst pipe and thousands of dollars in water damage, structural repairs, and mold remediation. Identifying and safely thawing a frozen pipe before it bursts is critical to protecting your home.
How It Works
Water is unique because its solid form (ice) is less dense than its liquid form. This means when water freezes, it expands by approximately 9% in volume. Imagine a section of pipe completely filled with water. As that water freezes, it pushes outwards against the pipe walls. However, the most destructive force isn't just the ice expansion itself. It's the hydraulic pressure created when an ice blockage forms. If a pipe freezes solid in one section, and there's still liquid water trapped between that ice blockage and a closed faucet downstream, as more water freezes, it acts like a piston, exerting incredible pressure on the trapped water. This pressure can reach upwards of 2,500 pounds per square inch (psi), far exceeding what most residential plumbing pipes (rated for 40-60 psi) can withstand. This is why pipes often burst away from the actual ice blockage, at a weaker point in the pipe, or even at fittings and joints. The key to preventing a burst is to relieve this pressure, which means thawing the pipe gradually and allowing the expanding water to escape through an open faucet.
Different pipe materials react differently to freezing. Copper pipes are rigid and may split cleanly. PEX (cross-linked polyethylene) pipes are more flexible and often resist bursting better, but they can still fail, especially at fittings. PVC and CPVC pipes are brittle in cold temperatures and are highly susceptible to shattering or cracking when frozen.
Step-by-Step Fix
Before you begin, locate your main water shut-off valve and ensure you know how to turn it off quickly. Have buckets and towels ready in case of a leak or rupture.
-
Open the Affected Faucet — Relieve pressure and allow water to escape Open the cold water faucet associated with the suspected frozen pipe as wide as it will go. If it's a hot water pipe, open the hot water faucet. Even a tiny trickle indicates some water flow, and it will allow steam to escape if you thaw it too quickly, or water to flow out as the ice melts and expands. This is a critical step for preventing a burst.
-
Identify the Freeze Location — Pinpoint the problem spot Walk through your home, checking pipes in unheated areas: basements, crawl spaces, garages, attics, and exterior walls (look under sinks on exterior walls). Look for any visible frost on the pipes, a bulge, or dripping water, which may indicate a crack. Tap the pipe gently with a screwdriver handle; a solid thud suggests ice, while a hollow sound means liquid water. The frozen section will feel notably colder than surrounding pipes.
-
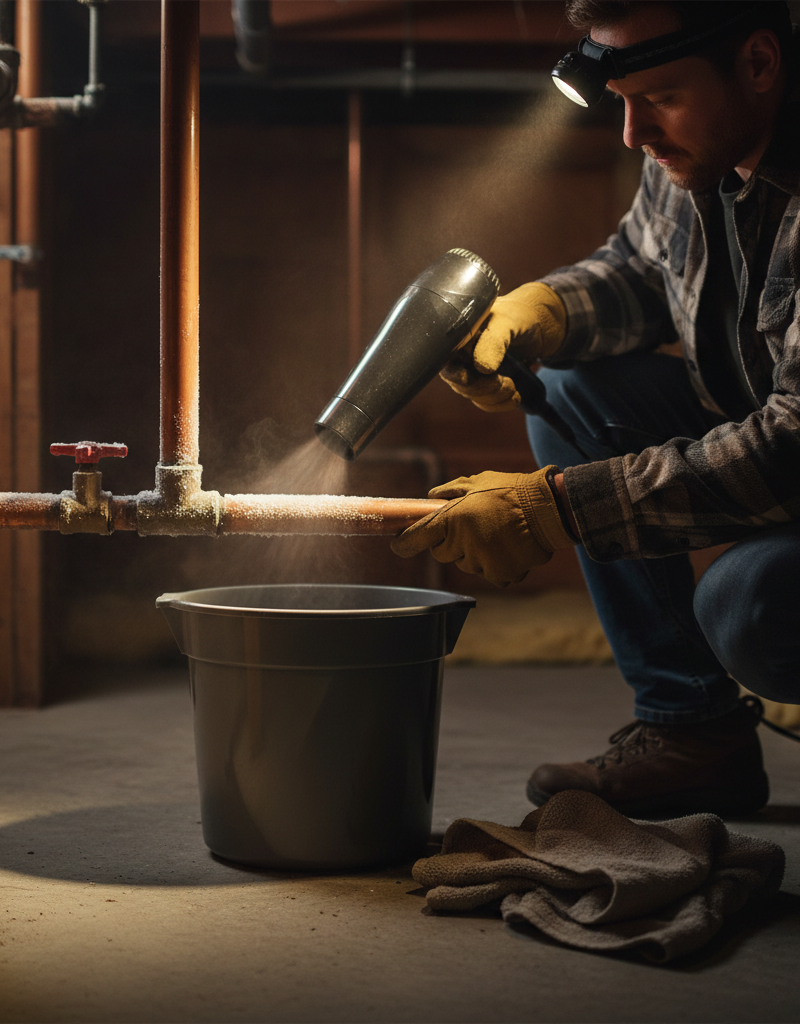
Apply Gentle Heat (Option 1: Hair Dryer) — Controlled, safe thawing Plug in a hairdryer (ensure it's not plugged into an overloaded circuit or near standing water) and set it to a medium or high heat setting. Direct the warm air at the frozen section of the pipe. Start heating the pipe closest to the faucet and work your way back toward the main water supply or warmer areas of the pipe. This allows melted water to flow out, relieving pressure. Keep the hairdryer moving to avoid overheating one spot, which could damage the pipe or surrounding materials. This method is slow but generally the safest.
- Safety Note: Never point the hairdryer at a single spot for too long. Maintain a safe distance and keep an eye on the pipe's condition.
- If this doesn't work: Consider a heat gun on its lowest setting, but use extreme caution.
-
Apply Gentle Heat (Option 2: Heat Gun - Use Extreme Caution) — Faster but riskier approach If a hairdryer isn't effective or the pipe is particularly stubborn, a heat gun can be used, but ONLY on its absolute LOWEST heat setting and with continuous movement. Hold the heat gun several inches away from the pipe and sweep it back and forth constantly. Do not let it dwell on one spot. Overheating can cause plastic pipes to melt or metal pipes to warp, potentially creating a leak or weakening the pipe. This method is not recommended for inexperienced DIYers due to the risk of damage or fire.
- Safety Note: Keep a fire extinguisher handy. Never use a heat gun near flammable materials or insulation.
-
Apply Gentle Heat (Option 3: Warm Towels) — Slow, but very safe method Soak several towels in hot water, wring them out so they are damp but not dripping, and wrap them around the frozen section of the pipe. Replace the towels as they cool. This is a slower method, but it's very safe and can be effective for minor freezes or pipes in sensitive areas where direct heat tools might be risky. You can combine this with a hairdryer to keep the towels warm.
-
Apply Gentle Heat (Option 4: Portable Space Heater) — For larger areas or inaccessible pipes If the frozen pipe is in an enclosed, unheated space like a crawl space or cabinet, place a portable space heater (electric, oil-filled radiator style is safest) in the area. Close off the space to trap the warmth. Do not use propane or kerosene heaters indoors due to carbon monoxide risk. Ensure the heater is placed on a stable surface, away from flammable materials, and never left unattended.
- Safety Note: Ensure the space heater is rated for indoor use and has tip-over protection. Do not use extension cords with space heaters unless specifically rated for high wattage.
-
Monitor Water Flow — Confirm thawing and prevent re-freezing As you apply heat, periodically check the open faucet. Water should begin to trickle, then flow more steadily. Continue applying heat until full water pressure is restored. This indicates the entire blockage has melted. Once water is flowing normally, allow it to run for several minutes to flush any remaining ice particles and to help prevent re-freezing.
-
Inspect for Leaks — Crucial post-thaw check Once the pipe is fully thawed and water is flowing, thoroughly inspect the entire length of the pipe that was frozen, and any surrounding areas, for leaks. Look for drips, damp spots, or subtle swelling in drywall. Early detection of a leak can save significant repair costs. If a leak is found, immediately turn off your main water supply and call a licensed plumber.
-
Prevent Future Freezes — Long-term protection Once the pipe is thawed, take steps to prevent it from freezing again. Wrap susceptible pipes with pipe insulation sleeves, heat tape (following manufacturer instructions for installation), or insulate the wall cavity where the pipe runs. In extreme cold, leave a faucet dripping slightly (both hot and cold) to maintain water movement within the pipes, which can prevent freezing.
Common Causes
- Lack of Insulation: Pipes running through unheated areas like crawl spaces, attics, garages, or exterior walls without adequate insulation are highly susceptible to freezing.
- Sudden Temperature Drops: A rapid and severe drop in outdoor temperatures, especially when combined with high winds, can quickly freeze unprotected pipes.
- Poorly Sealed Openings: Gaps or cracks in exterior walls, foundations, or around outdoor hose bibs can allow frigid air to reach pipes.
- Thermostat Set Too Low: If you leave your home for an extended period and set your thermostat too low (below 55°F or 13°C), interior pipes can freeze, especially those near exterior walls.
- Pipes on Exterior Walls: Plumbing lines, particularly those on north-facing walls, are more exposed to cold and have a higher risk of freezing.
- Drafty Basements/Crawl Spaces: Unsealed vents, windows, or foundation cracks in these areas contribute to extremely cold conditions around pipes.
Common Mistakes
- Using an Open Flame: Never use a propane torch, kerosene heater, grill, or any open flame to thaw pipes. This is an extreme fire hazard, can damage the pipe, and could lead to an explosion if near gas lines. Only use approved electric heating methods.
- Heating One Spot Too Intensely: Concentrating heat on a single spot can cause the water inside to boil and create steam, leading to a catastrophic pipe burst. Always keep the heat source moving.
- Not Opening a Faucet: Failing to open the affected faucet before and during thawing prevents the expanding water from escaping, trapping pressure and making a burst more likely.
- Ignoring the Problem: Hoping the pipe will thaw on its own is a recipe for disaster. The longer a frozen pipe remains, the higher the chance it will burst and cause extensive water damage.
- Shutting Off the Water Immediately: While you might think turning off the water helps, if the pipe hasn't burst yet, keeping the affected faucet open allows melted water to escape and relieves pressure. Only shut off the main water if a leak or burst is confirmed.
- Forgetting to Inspect for Leaks: A pipe can crack internally or develop a hairline fracture that only becomes apparent once water pressure is restored. Thorough inspection after thawing is essential.
Cost & Time Breakdown
| Task | DIY Cost | Pro Cost | Time |
|---|---|---|---|
| Thawing a visible, accessible pipe | $0-$50 | $150-$400 | 20-60 minutes |
| Insulating exposed pipes | $20-$100 | $200-$500+ | 1-3 hours |
| Repairing a burst pipe | $-- | $500-$2,000+ | 3-6 hours+ |
| Water damage cleanup (minor) | $100-$300 | $1,000-$5,000+ | 1-2 days+ |
| Water damage cleanup (major) | $-- | $5,000-$20,000+ | 1-4 weeks+ |
Tips & Prevention
- Insulate Exposed Pipes: Wrap any pipes in unheated basements, crawl spaces, attics, and exterior walls with foam pipe insulation or heat tape. Ensure heat tape is installed according to manufacturer instructions, including proper grounding if required.
- Seal Air Leaks: Caulk or seal any cracks and openings in your home's foundation and exterior walls, paying close attention to areas where utility lines enter the house.
- Open Cabinet Doors: During extreme cold, open kitchen and bathroom cabinet doors on exterior walls to allow warmer indoor air to circulate around the pipes under your sinks.
- Keep Thermostat Above 55°F: If you're going away during winter, never turn your heat off completely. Set your thermostat to at least 55°F (13°C) to keep interior pipes from freezing.
- Drip Faucets: In anticipation of a deep freeze, allow a slow drip from both hot and cold water faucets that are served by pipes vulnerable to freezing. Even a small flow can prevent water from freezing solid.
- Disconnect Hoses: Disconnect all outdoor garden hoses and drain outdoor spigots before the first freeze. If you have an interior shut-off valve for exterior spigots, close it and drain the exterior line.
- Know Your Main Shut-Off: Make sure every member of your household knows the location of your main water shut-off valve and how to operate it. This is crucial in an emergency.
When to Call a Professional
You should call a licensed plumber immediately if you suspect a pipe has already burst or if you cannot locate and safely thaw a frozen pipe yourself. Signs of a burst pipe include visible water leaks, no water coming from any faucet despite the main water being on, or a sudden drop in water pressure throughout your home. If a frozen pipe is inaccessible behind walls, ceilings, or under floors, attempting to thaw it yourself can cause significant damage to your home's structure or create a major leak that's hard to find. Plumbers have specialized equipment like thermal imaging cameras to locate hidden frozen sections and can safely thaw them without damaging your property. They can also repair any burst sections, inspect your plumbing system for further vulnerabilities, and recommend appropriate long-term solutions to prevent future freezing. Do not hesitate to call if you are unsure or uncomfortable with any step of the thawing process, as a burst pipe can quickly become a very expensive and damaging problem.
Related Articles
Keep troubleshooting with these hand-picked guides from FixlyGuide:
- The 90-Minute Hidden Danger of a Frozen Pipe (And the DIY Fix) — Thawing a frozen pipe quickly and safely is crucial to prevent bursting and extensive water damage to your home.
- The 3 Hidden Dangers of Frozen Pipes (And How to Thaw Them Safely) — Safely thawing a frozen pipe is crucial to prevent bursting, water damage, and costly repairs; acting quickly and correctly can save your h…
- The 3 Hidden Dangers of Frozen Pipes (And How to Thaw Them Safely) — Frozen pipes can burst, causing extensive water damage. Learn to safely thaw them and prevent costly repairs.
- The 3 Hidden Reasons Your Pipes Freeze (And How to Thaw Them Fast) — Discover the real culprits behind frozen pipes and learn a step-by-step method to safely thaw them, preventing costly damage.
- The 3 Hidden Reasons Your Pipes Freeze (and How to Thaw Them Fast) — Discover the real culprits behind frozen pipes and learn safe, effective methods to thaw them quickly, preventing costly damage to your hom…
- Your Roof is Leaking. Now What? — A leaking roof after a storm is a homeowner's nightmare. Learn how to safely install a temporary roof tarp to prevent further water damage…
Get the print-ready PDF of this guide
A clean, ad-free, printable version you can keep on your phone or pin to the workshop wall. Free with a FixlyGuide account.
- Print-optimized layout
- Tools, materials & every step included
- Saved to your account
Frequently asked questions
How do you tell if a pipe is frozen or burst?+
If you turn on a faucet and only a trickle or no water comes out, you likely have a frozen pipe. If you have no water *and* you see visible water stains, dripping, or hear running water behind walls, the pipe has likely burst. Immediately shut off your main water supply if you suspect a burst.
What is the fastest way to unfreeze a pipe?+
The fastest safe way to unfreeze an accessible pipe is by using a hairdryer on a medium-to-high setting, moving it continuously along the frozen section. Start from the faucet side and work your way back. Alternatively, a heat gun on its lowest setting can be faster but requires extreme caution to avoid damaging the pipe.
Can a frozen pipe unfreeze on its own?+
Yes, a frozen pipe can unfreeze on its own if temperatures rise significantly. However, waiting for it to unfreeze naturally is risky because the pressure can continue to build, increasing the chance of a burst. It's always best to take active steps to thaw it safely and promptly.


Discussion
Loading comments…