
Tools & materials you'll need
Affiliate linksAs an Amazon Associate FixlyGuide earns from qualifying purchases — at no extra cost to you. Prices and availability are accurate as of publication and subject to change.
Quick Answer
Is your refrigerator unexpectedly spilling water onto your kitchen floor? The most frequent culprit, often overlooked by homeowners, is a clogged defrost drain line. This small but critical component can become blocked by ice buildup and food particles, forcing the water from your refrigerator's defrost cycle to back up, overflow the internal drain pan, and ultimately drip onto your floor. Fortunately, diagnosing and clearing this blockage is a common DIY repair that can save you a professional service call.
The Problem
Few things are as frustrating as discovering a puddle of water seeping out from under your refrigerator. Beyond the annoyance of cleanup, it raises immediate concerns about appliance damage, floor damage, and even safety. While several issues can cause a refrigerator to leak (from a cracked water line to a faulty ice maker), the vast majority of leaks that appear as a mystery puddle under the unit can be traced back to a single, easily rectifiable problem: a blocked defrost drain line. This article will guide you through understanding why it happens and how to fix it, preventing potential long-term damage to your kitchen and appliance.
How It Works
Most modern refrigerators use an automatic defrost system to prevent excessive ice buildup on the evaporator coils, which are responsible for cooling the air inside the fridge and freezer compartments. Here's a simplified breakdown:
Periodically, usually every 6 to 8 hours, a heating element cycles on for about 20-30 minutes, melting any accumulated frost on the evaporator coils. This melted water then drips down into a small collection pan, typically located directly beneath the evaporator coils inside the freezer compartment. From this pan, a small drain hole leads to a PVC or rubber tube, the defrost drain line. This tube channels the water down to a larger shallow pan, known as the drain pan or drip pan, located underneath the refrigerator, usually near the compressor. The heat generated by the compressor helps to evaporate this water back into the air. This entire system is designed to remove moisture from the freezer and maintain efficient cooling without user intervention. When the defrost drain line becomes clogged, this elegant system fails. The water has nowhere to go but to overflow the internal collection pan, run down the back wall of the freezer or refrigerator compartment, and eventually find its way out onto your floor.
Step-by-Step Fix
Safety First! Before attempting any repairs, always unplug your refrigerator from the wall outlet to prevent electrical shock.
-
Empty and Access the Freezer — Clear out the contents Carefully remove all food items from your freezer and, if necessary, from the upper shelves of your refrigerator. Store perishable items in a cooler with ice. Locate the back wall panel inside your freezer. You'll need to remove this panel to access the evaporator coils and the defrost drain pan.
- Tools: Phillips head screwdriver, nut driver (if applicable)
- Tip: Take a photo before you start unscrewing to remember where everything goes.
-
Remove the Back Panel — Unscrew and detach Using your screwdriver or nut driver, remove the screws holding the back panel in place. These tend to be a mix of Phillips head or hexagonal screws. Once all screws are out, gently pry the panel away. It may be lightly frozen to the insulation, so be patient. You will see the evaporator coils, which look like a series of copper or aluminum tubes and fins, with a drain pan directly beneath them.
- Warning: The coils can be sharp; handle with care. Avoid bending the fins.
- If this doesn't work: Some models have a small access panel at the bottom rear of the freezer, not the entire back wall.
-
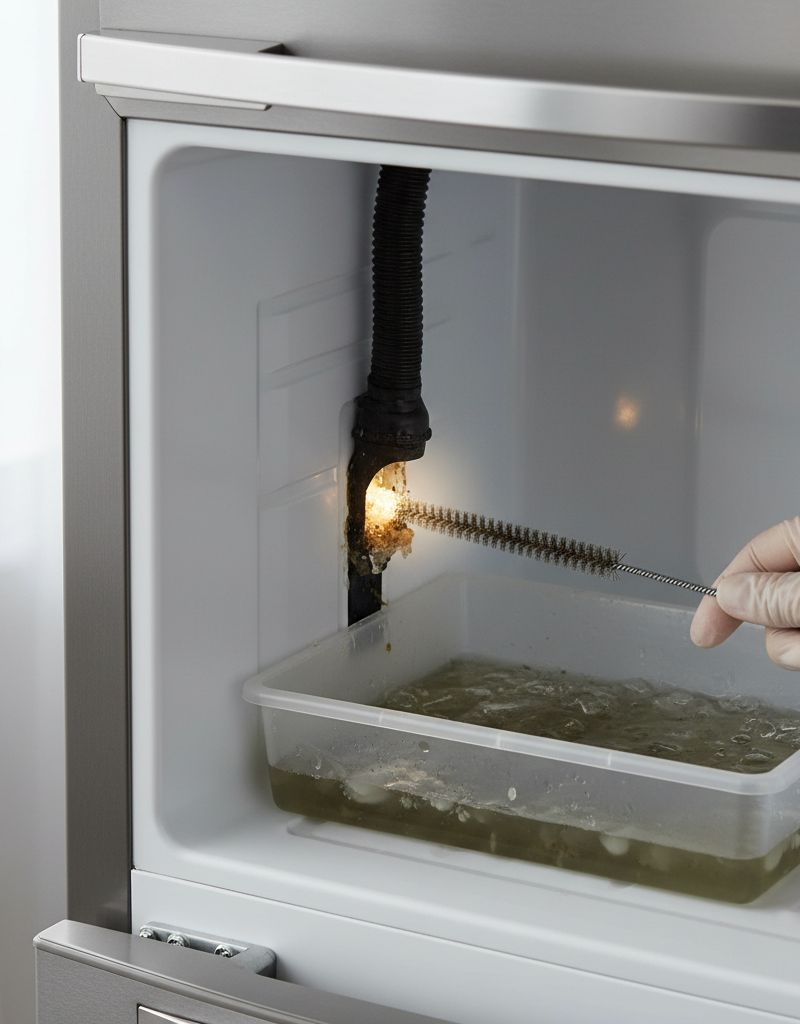
Locate the Defrost Drain Pan and Hole — Identify the blockage source Beneath the evaporator coils, you'll see a shallow trough or pan. In the center or towards one side of this pan, you'll find a small hole – this is the entrance to your defrost drain line. This is where ice and debris accumulate.
- Visual clue: Look for pooled water or ice buildup around this hole.
-
Clear the Blockage (Top Down) — Melt and flush the ice Pour a small amount of warm water (not boiling, to avoid thermal shock to plastic components) directly into the drain hole. This will help melt any ice blockages. You can also use a turkey baster or a syringe to direct the water precisely. For stubborn blockages, gently insert a flexible pipe cleaner or a long cotton swab (like an extra-long Q-tip) into the drain line to dislodge any debris. Do not force anything large or rigid down the tube.
- Material: Warm water (not hot), turkey baster or syringe, pipe cleaner (flexible, non-abrasive)
- Alternative: Some recommend a mixture of warm water and a tiny bit of baking soda to help dissolve gunk.
-
Access the Drain Pan (Underneath the Fridge) — Find the exit point Pull your refrigerator away from the wall. You will need to access the main drain pan, which is typically a shallow plastic tray located at the bottom rear of the appliance, near the compressor. You might need to remove a cardboard or metal access cover held in place by screws or clips.
- Caution: The compressor can be hot. Avoid touching it directly.
-
Clear the Drain Pan and Tube Exit (Bottom Up) — Ensure free flow Once you've located the drain pan, you'll see the end of the defrost drain tube leading into it. Often, this is where the other end of a blockage forms – a slimy buildup of mold, mildew, or food particles. Use a small brush, cloth, or pipe cleaner to clean out any gunk from the drain pan and from the end of the drain tube. You can also try flushing the tube from this end with a little more warm water to ensure it's completely clear.
- Tools: Small brush, rags, pipe cleaner, warm water.
- Check: The water you poured from the top should now drain freely into this pan.
-
Clean and Reassemble — Put it all back together Clean the main drain pan thoroughly before re-installing it. Wipe down any moisture from the freezer floor and the back panel. Reattach the freezer's back panel and the rear access cover underneath the refrigerator. Push the refrigerator back into its position.
-
Power On and Monitor — Test the repair Plug your refrigerator back in. Give it several hours, or even a full day, to regain its normal operating temperature and go through a defrost cycle. Monitor the area under the refrigerator for any signs of continued leaking. If the leak persists, the issue might be more complex, or the blockage was not fully cleared.
Common Causes
- Ice Buildup: The primary cause. Over time, moisture from food and ambient air can freeze in the drain line, especially if the defrost cycle isn't fully effective or if the drain tube is slightly kinked.
- Food Debris: Small food particles, especially in frost-free freezers where items are often left uncovered, can fall into the drain pan and get washed into the drain hole, creating a clog.
- Mold/Mildew: A common issue, particularly in the warmer, damper environment of the drain pan under the fridge. This slime can grow up into the drain tube, forming a blockage.
- Kinked or Dislodged Drain Tube: If the refrigerator has been moved recently, the drain tube underneath could have been crimped or pulled out of its proper position within the main drain pan, preventing water from flowing freely or directing it onto the floor.
- Evaporator Fan Issues: While less common for drain line clogs, a malfunctioning evaporator fan can lead to excessive frost buildup, overflowing the defrost drain pan more quickly.
Common Mistakes
- Ignoring the Safety Note: Forgetting to unplug the refrigerator before working on it is a common and dangerous mistake. Always prioritize electrical safety.
- Using Too Much Force/Rigid Tools: Jamming a coat hanger or thick wire into the drain line can puncture the tube or scratch the evaporator coils, leading to a much more expensive repair. Always use flexible, non-abrasive tools.
- Not Cleaning Both Ends of the Drain: Only clearing the top half of the drain line (in the freezer) can leave the bottom blockage intact, leading to a recurring leak. Always check the main drain pan and the end of the tube underneath the fridge.
- Overlooking the Main Drain Pan: Sometimes the pan itself cracks or becomes dislodged, causing a leak that isn't related to a clog. Always visually inspect its condition.
- Not Monitoring After Repair: Assuming the fix worked without observing for new leaks after a full defrost cycle can mean the problem persists, potentially causing unseen water damage.
- Using Boiling Water: Pouring boiling water directly onto frozen plastic components or cold metal can cause them to crack due to thermal shock. Use warm water instead.
Cost & Time Breakdown
| Task | DIY cost | Pro cost | Time |
|---|---|---|---|
| Diagnosing Leak | $0 | $75–$150 | 10–20 min |
| Clearing Drain Line | $0–$10 | $150–$300 | 30–60 min |
| Replacing Drain Pan (if needed) | $20–$50 | $200–$400 | 45–90 min |
| Cleaning Components | $0 | Included | 15–30 min |
| Full Refrigerator Check | $0 | $150–$350 | 1–2 hours |
Tips & Prevention
- Regular Cleaning: Periodically clean the drain pan located under the refrigerator. This minimizes mold and mildew buildup which can travel into the drain line.
- Check Door Seals: Ensure your refrigerator and freezer door seals are tight. Gaps allow warm, humid air in, leading to increased frost buildup and a higher chance of drain line clogs.
- Cover Foods: Store foods in sealed containers to reduce moisture and food particle dispersal, which can end up in the drain line.
- Proper Airflow: Don't overpack your freezer. Allow for proper air circulation around items to ensure efficient defrosting and prevent excessive ice formation.
- Warning Signs: Listen for unusual gurgling sounds from the freezer, notice excessive frost buildup on the back wall, or see ice pooling in the bottom of the freezer compartment – these are early indicators of a potential drain line clog.
- Baking Soda Solution: Occasionally, pour a mild baking soda and warm water solution (1 teaspoon baking soda per cup of warm water) down the defrost drain hole to help prevent organic buildup.
When to Call a Professional
While a clogged defrost drain line is a common DIY fix, there are several situations where calling a licensed appliance repair technician is the smarter choice. If, after following these steps, your refrigerator continues to leak, the problem may be more complex. This could include a cracked or damaged external drain pan, a faulty defrost heater (leading to excessive ice that overwhelms the drain system), a refrigerant leak, or a broken water inlet valve if your model has an ice maker or water dispenser. If the leak seems to be coming from the front or side of the unit rather than the back, or if you suspect a water line issue from an internal dispenser, it's best to consult a pro. Additionally, if you're uncomfortable with pulling out the refrigerator, working with electrical components, or dealing with potentially sharp evaporator coils, a professional can diagnose and fix the issue safely and efficiently, often preventing further damage to your appliance and home.
Related Articles
Keep troubleshooting with these hand-picked guides from FixlyGuide:
- The Secret Culprit Behind Your Leaking Refrigerator (It’s Not Always a Big Repair) — Discover the most common, often overlooked reason your refrigerator is leaking water onto your kitchen floor and how to fix it yourself.
- The Surprising Culprit Behind Your Refrigerator's Water Leak (It's Not Always the Ice Maker) — Discover the most common, often overlooked reason your refrigerator is leaking water and how to fix it with simple steps.
- The Secret Culprit Behind Your Leaky Refrigerator (It’s Not Always the Water Line) — Discover the most common, often overlooked, reasons your refrigerator is leaking water and how to fix them with simple DIY steps.
- The Secret Culprit Behind Your Leaking Refrigerator (It’s Not Always a Big Fix) — Discover the most common and often overlooked reasons why your refrigerator is leaking water on the floor, and how to fix them yourself.
- The Secret Culprit Behind Your Leaky Refrigerator (It's Not What You Think) — Discover the often-overlooked reason your refrigerator is leaking water and how a simple, inexpensive fix can prevent costly damage.
- The #1 Reason Your AC Blows Warm Air (And It's Not What You Think) — Discover the most common and often overlooked reason your AC might be blowing warm air, and how a simple capacitor fix can restore cool air.
Get the print-ready PDF of this guide
A clean, ad-free, printable version you can keep on your phone or pin to the workshop wall. Free with a FixlyGuide account.
- Print-optimized layout
- Tools, materials & every step included
- Saved to your account
Frequently asked questions
Why is there a puddle of water under my refrigerator?+
The most common reason for a puddle of water under your refrigerator is a clogged defrost drain line. Ice and food debris can block this small tube, causing water from the automatic defrost cycle to overflow inside the freezer and spill onto the floor.
How do I clear a clogged refrigerator drain line?+
To clear a clogged drain line, first unplug the refrigerator. Remove the back panel in the freezer to access the drain hole. Pour warm (not boiling) water into the hole to melt ice, and use a flexible pipe cleaner to dislodge debris. Then, access the drain pan under the refrigerator to clean the other end of the tube and the pan itself.
Can I use a coat hanger to clear my refrigerator's drain line?+
No, it is not recommended to use a coat hanger or any rigid tool. These can puncture the plastic drain tube or damage the delicate evaporator coils, leading to more serious and costly repairs. Always use a flexible pipe cleaner or a long cotton swab.
How often should I clean my refrigerator's drain pan?+
It's a good practice to periodically inspect and clean the drain pan located under your refrigerator every 6-12 months. This helps prevent the buildup of mold, mildew, and debris that can lead to drain line clogs.


Discussion
Loading comments…