
Tools & materials you'll need
Affiliate linksAs an Amazon Associate FixlyGuide earns from qualifying purchases — at no extra cost to you. Prices and availability are accurate as of publication and subject to change.
Quick Answer
Preventing frozen pipes is a critical winter task for homeowners, and it often involves more than just setting your thermostat. While insulation is essential, a small, continuous drip from specific faucets during extreme cold can be your most effective, low-cost defense against burst pipes. This gentle flow relieves pressure in the system, giving ice room to expand without rupturing the pipe.
The Problem
Every winter, thousands of homeowners face the nightmare of frozen pipes. When water inside a pipe freezes, it expands, creating immense pressure. This pressure doesn't just push outwards; it can build up between the ice blockage and the nearest closed faucet, increasing to a point where the pipe itself, often at a weak joint or a previously stressed section, simply bursts. The consequence? A catastrophic flood once temperatures rise and the ice melts, leading to thousands of dollars in water damage, structural repairs, and a massive headache for the homeowner. Many people mistakenly believe that pipes burst at the point of freezing, but it's often the pressure buildup downstream or upstream from the ice plug that causes the failure. Basements, crawl spaces, exterior walls, and unheated garages are common zones for vulnerable pipes.
How It Works
Water expands by about 9% when it freezes into ice. In a closed plumbing system, this expansion creates hydrostatic pressure. Imagine a pipe completely filled with water, with a section freezing solid. The ice plug acts like a dam. If faucets are closed on both ends of this plug, the water trapped between the ice and the closed faucet has no room to expand further. As more water freezes, the pressure skyrockets, easily exceeding 2,000 pounds per square inch (psi) – far more than most residential plumbing (typically rated for 100-300 psi) can withstand. It's this pressure, not the expansion at the point of freezing itself, that causes pipes to rupture, often at a point of weakness in the pipe or a fitting, which may not even be where the ice plug formed.
The 'drip method' works by preventing this pressure buildup. By allowing a small, steady drip from a faucet, you create an open outlet for any expanding water. If ice begins to form, the water can still move, even if slowly, preventing the immense pressure from accumulating. Furthermore, the continuous movement of water, even a slight flow, makes it harder for ice crystals to form and connect, raising the freezing point slightly within the pipe. This method is particularly effective for pipes that run through unheated or poorly insulated areas of your home, such as those in exterior walls or unheated crawl spaces. It’s a simple thermodynamic and hydraulic principle: provide an escape route for expansion, and you drastically reduce the risk of structural failure in your pipes.
Step-by-Step Fix
1. Identify Vulnerable Pipes — Locate the pipes most at risk of freezing based on their exposure to cold temperatures.
Walk through your home, basement, crawl space, and garage. Look for pipes running along exterior walls, in unheated or poorly insulated areas, or in attics. Pay special attention to outdoor spigots and the pipes leading to them. Areas under kitchen or bathroom sinks on exterior walls are also common trouble spots. You might feel a noticeable temperature drop near these pipes with your hand.
2. Insulate Exposed Pipes — Add insulation to any pipes in unheated areas to create a thermal barrier.
Use foam pipe insulation sleeves (often pre-slit for easy installation) or fiberglass insulation. Wrap the pipes thoroughly, ensuring there are no gaps. Secure the insulation with tape. For outdoor spigots, use a faucet cover. Insulation slow heat transfer, keeping the water inside the pipe warmer for longer. Don't forget the hot water pipes too, as they can also freeze if exposed to extreme cold for extended periods. This is a good general preventative measure, but not a guaranteed fix in deep cold spells.
3. Seal Air Leaks — Prevent cold drafts from reaching pipes by sealing any gaps or cracks in your home's exterior.
Use caulk or expanding foam to seal cracks and holes in exterior walls, foundations, and around utility penetrations where pipes enter your home. Even small drafts can significantly lower the temperature around pipes, especially those inside cabinets or crawl spaces. Check around window frames, door frames, and dryer vents for potential cold air pathways. This is a crucial, often overlooked step.
4. Open Cabinet Doors — Allow warmer indoor air to circulate around pipes located in uninsulated cabinets on exterior walls.
During severe cold snaps, open the cabinet doors under sinks on exterior walls, especially in kitchens and bathrooms. This allows the warmer air from your heated living space to reach the pipes, raising their ambient temperature and reducing the risk of freezing. If you have children or pets, ensure that any hazardous cleaning supplies or chemicals stored in these cabinets are secured or temporarily moved to a safe location.
5. Maintain Indoor Temperature — Keep your home's thermostat set to a consistent, reasonable temperature, even when you're away.
Aim for at least 55°F (13°C) throughout your home, day and night, during cold weather. While it might seem like a cost-saving measure to lower the thermostat significantly when you're out or asleep, the risk of a burst pipe and the subsequent repair costs far outweigh the slight increase in heating bills. If you're going away for an extended period, drain your plumbing system completely or have someone check on your home regularly.
6. Use the Drip Method — During prolonged sub-freezing temperatures, let a small stream of water flow from vulnerable faucets.
Select a cold water faucet that serves an exterior wall, especially one in a kitchen or bathroom. Turn the faucet just enough so that a slow, steady drip or pencil-thin stream of water flows out. This continuous movement, coupled with relief of pressure, significantly reduces the likelihood of freezing. It's usually sufficient to just drip the cold water side. You don't need to run all faucets; pick one or two strategically located ones known to be vulnerable. This method uses very little water, much less than a burst pipe would waste.
7. Consider Heat Tape/Cables — Apply thermostatically controlled heat tape or cables to specific, highly vulnerable pipe sections.
For severely exposed pipes that are prone to freezing despite other efforts, consider installing electric heat tape. These tapes have built-in thermostats that turn on automatically when temperatures drop to a freezing point. Follow the manufacturer's instructions carefully for installation, ensuring the tape is appropriate for potable water pipes and is properly grounded. This is a more active solution for specific problem areas.
8. Disconnect Hoses & Drain Sprinklers — Prepare exterior water lines for winter by disconnecting hoses and draining irrigation systems.
Remove all garden hoses from outdoor spigots. If your spigots aren't 'frost-free,' turn off the interior shut-off valve for the spigot and then open the spigot to drain any remaining water from the line. For in-ground sprinkler systems, ensure they are properly winterized, which typically involves blowing out the lines with an air compressor to remove all water. Failure to do so is a leading cause of exterior pipe damage.
Common Causes
- Lack of Insulation: Pipes in unheated areas (crawl spaces, attics, garages, exterior walls) without proper insulation are directly exposed to freezing temperatures.
- Cold Drafts: Unsealed cracks, gaps, or holes in exterior walls and foundations allow cold air to directly contact pipes, creating localized freezing points.
- Low Thermostat Settings: Lowering household temperatures significantly, especially overnight or when away, reduces the ambient warmth around pipes, increasing freezing risk.
- Exterior Faucet Neglect: Garden hoses left connected to outdoor spigots can trap water in the pipe leading to the spigot, causing it to freeze and burst.
- Poorly Winterized Irrigation Systems: Sprinkler systems not completely drained of water will freeze and rupture lines and sprinkler heads.
- Sudden, Severe Cold Snaps: Abrupt temperature drops, especially those lasting several days, can overwhelm existing insulation and preventative measures.
Common Mistakes
- Ignoring the Drip Method: Many homeowners avoid dripping faucets due to perceived water waste, but the minimal water used is negligible compared to the cost of a burst pipe.
- Only Insulating Hot Water Pipes: Both hot and cold water pipes are susceptible to freezing. Insulate both, especially in cold zones.
- Forgetting Cabinet Doors: Under-sink cabinets on exterior walls often provide little insulation; forgetting to open these doors isolates pipes from ambient home heat.
- Setting Thermostat Too Low When Away: Trying to save money on heating by setting the thermostat below 55°F (13°C) for extended periods dramatically increases risk.
- Leaving Hoses Connected: Failing to disconnect garden hoses from outdoor spigots leads to water trapped in the spigot line, making it highly vulnerable to freezing.
- Using a Torch to Thaw: Never use an open flame to thaw a frozen pipe. This is extremely dangerous and can damage pipes or even start a fire. Use a hairdryer or space heater carefully.
Cost & Time Breakdown
| Task | DIY Cost | Pro Cost | Time |
|---|---|---|---|
| Pipe Insulation (Materials) | $20–$100 | N/A | 1–3 hours |
| Caulk/Foam for Air Leaks | $10–$50 | N/A | 1–2 hours |
| Faucet Cover | $5–$15 each | N/A | 5 minutes |
| Heat Tape (Materials & Install) | $30–$150 per section | $150–$300 | 1–2 hours |
| Professional Winterization (Sprinklers) | N/A | $75–$150 | 30–60 minutes |
| Burst Pipe Repair | $100–$500 (DIY parts) | $500–$10,000+ (major damage) | Hours to Days |
Tips & Prevention
- Know Your Home's Vulnerabilities: Identify where your pipes run in unheated areas (crawl spaces, attics, exterior walls) and prioritize these spots for insulation and monitoring.
- Check Forecasts Regularly: Pay close attention to extended periods of sub-freezing temperatures or sudden deep cold snaps. This is when to activate the drip method.
- Insulate Water Heater Lines: While not directly for freezing, insulating the first six feet of hot and cold water lines connected to your water heater improves efficiency and keeps water slightly warmer.
- Learn Your Main Shut-Off Valve: In case of a burst pipe, knowing how to quickly turn off your home's main water supply can minimize damage. Practice turning it off and on once a year.
- Drain Vacation Homes: If you have a vacation home that will be vacant for the winter, the safest approach is to completely drain the plumbing system by turning off the main water supply, opening all faucets, and flushing toilets.
- Install Smart Home Sensors: Consider smart water leak detectors with temperature sensors that can alert you to freezing conditions or leaks via your phone, even when you're away.
When to Call a Professional
While many preventative measures are DIY-friendly, certain situations warrant calling a licensed professional. If you suspect a pipe is already frozen and cannot locate the section or safely thaw it with a hairdryer, a plumber can use specialized equipment to pinpoint and safely thaw the blockage. Never use an open flame to thaw a pipe. If you discover a burst pipe, immediately shut off your main water supply and call a plumber. They can assess the damage, repair or replace the ruptured section, and advise on further preventative steps. For complex, integrated water systems like radiant floor heating or extensive outdoor irrigation, professional winterization is highly recommended. If you have any gas appliances or water heaters that require draining, or if your main water shut-off valve is stuck, contact a professional to avoid damage or injury.
Related Articles
Keep troubleshooting with these hand-picked guides from FixlyGuide:
- The #1 Mistake Homeowners Make When Protecting Pipes From Freezing — Preventing frozen pipes is crucial in winter; many homeowners make a common mistake that leaves their plumbing vulnerable.
- The 7 Critical Mistakes That Lead to Burst Pipes (And How to Stop Them Now) — Learn the seven critical mistakes homeowners make that lead to burst pipes and discover actionable steps to prevent this costly winter disa…
- The #1 Mistake Homeowners Make to Burst Pipes (and 5 Ways to Prevent It) — Learn the critical mistake most homeowners make when trying to prevent frozen pipes and discover five actionable strategies to protect your…
- The #1 Mistake Homeowners Make When Protecting Pipes From Freezing — Preventing frozen pipes is crucial for winter home maintenance. Learn the common mistakes and effective strategies to safeguard your plumbi…
- The #1 Mistake Homeowners Make When Protecting Pipes From Freezing — Preventing frozen pipes is crucial for winter home maintenance. Learn the key mistake homeowners make and how to properly prepare your plum…
- The #1 Hidden Culprit Behind Your Whole-House Low Water Pressure (It's Not Your City!) — Discover the most common, often overlooked cause of low water pressure throughout your entire home and how to fix it yourself.
Frequently asked questions
How cold does it have to be for pipes to freeze?+
Pipes can begin to freeze when temperatures drop below 32°F (0°C). However, the risk increases significantly when temperatures are consistently below 20°F (-6°C) for several hours, especially for pipes in unheated or poorly insulated areas.
Should I drip both hot and cold water to prevent freezing?+
While simply dripping cold water is often sufficient to relieve pressure, if a pipe carries both hot and cold water through an unheated space, it's safer to drip both hot and cold water from the designated faucet to ensure both lines are protected. Focus on faucets in exterior walls.
How much water should I drip to prevent freezing?+
A slow, steady drip or a pencil-thin stream is usually enough. You're not trying to run a flood, but rather to ensure continuous movement of water and to provide an escape route for any expanding ice. Minimal flow is all that's required.
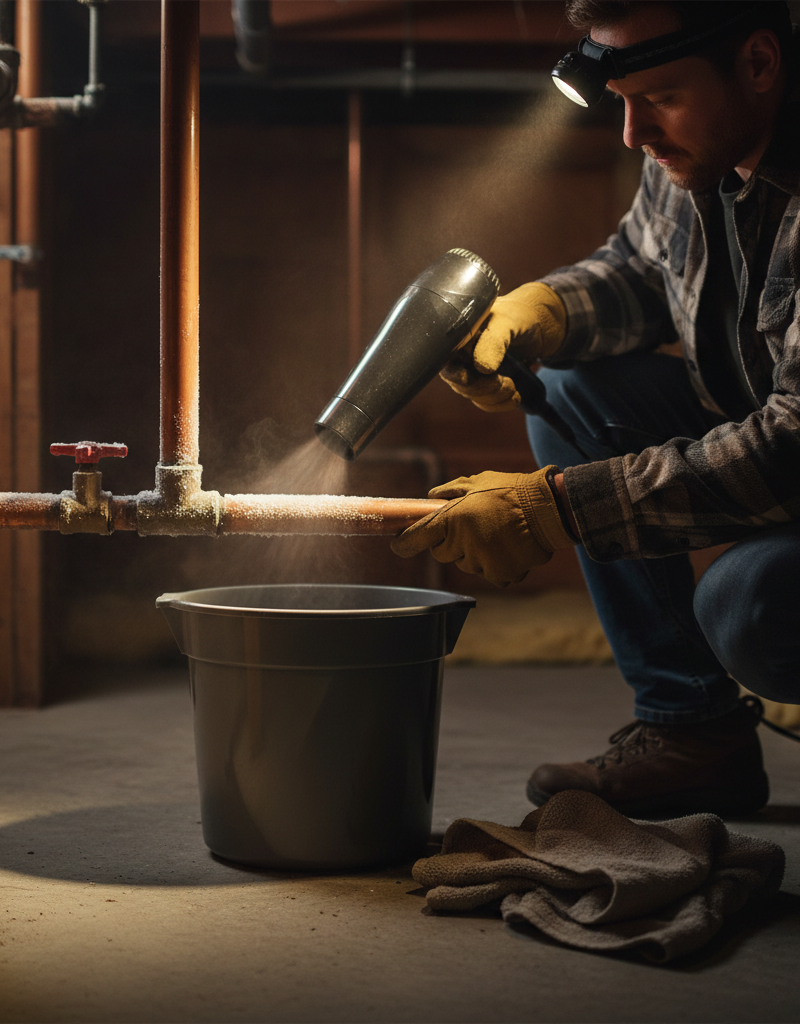
What should I do if a pipe freezes but hasn't burst yet?+
If you suspect a pipe is frozen but not burst, immediately locate the frozen section. Keep the faucet served by that pipe open. You can try to thaw it carefully with a hairdryer on a low setting, a heat lamp, or warm towels. Never use an open flame. If you can't locate or safely thaw it, call a plumber.
Does insulating pipes guarantee they won't freeze?+
Pipe insulation significantly reduces the risk of freezing by slowing heat loss, but it doesn't guarantee protection in extreme and prolonged cold. In deep freezes, even insulated pipes can freeze if the ambient temperature is low enough for long enough. Combining insulation with the drip method offers the best protection.


Discussion
Loading comments…