Tools & materials you'll need
Affiliate links- AmazonStep ladder or extension ladderEnsure it's tall enough for your roof and stable.
- AmazonSafety harness and fall protectionCrucial for working on roofs.
- AmazonWork gloves
- AmazonWire brushFor cleaning mortar joints and flashing.
- AmazonCaulk gun
- AmazonTuck-pointing trowelFor mortar repair.
- AmazonFlashlight and mirrorFor inspecting the flue internally.
As an Amazon Associate FixlyGuide earns from qualifying purchases — at no extra cost to you. Prices and availability are accurate as of publication and subject to change.
Quick Answer
AA chimney leaking during rain is a homeowner's nightmare, signaling potential damage to the chimney structure and your home's interior. The most frequent culprits include deteriorated flashing, a cracked chimney crown or cap, compromised mortar joints, or issues with the flue liner and chase cover. Timely diagnosis and repair are essential to prevent extensive water damage and costly structural repairs.
The Problem
Rainwater, when it finds a way into your chimney, can cause significant problems. Beyond the visible water stains on your ceiling or walls near the fireplace, sustained leaks can lead to a host of destructive issues. These include rot in the attic framing and rafters, weakened drywall, ruined insulation, and even the growth of hazardous mold and mildew within your home's structure. The metal components within the chimney, such as the damper and firebox, can corrode, making them less efficient and potentially unsafe. Prolonged moisture can also spall bricks, where the brick face crumbles and flakes off due to repeated freezing and thawing cycles. Identifying the exact entry point of the water is critical because the visible leak inside your home might be far from the actual source of the infiltration on the roof or chimney structure. Neglecting a chimney leak, even a seemingly minor one, can escalate into a major home repair project costing thousands of dollars.
How It Works
Your chimney is a complex system designed to safely vent combustion byproducts from your home, but it's also a primary penetration point in your roof, constantly exposed to the elements. Several components work in unison to protect it from water intrusion. At the very top, the chimney cap prevents rain, snow, and animals from entering the flue. Below it, the chimney crown is a concrete slab that slopes away from the flue, directing water off the top of the chimney walls. The flashing is a critical seal where the chimney meets the roofline, comprising multiple layers of metal (step flashing, counter flashing, apron flashing) that are interwoven with the roof shingles to create a watertight barrier. The mortar joints between the bricks are the glue that holds the chimney together, and they must be sound to prevent water from seeping through. Inside the chimney, a flue liner (ceramic, metal, or clay tile) contains the exhaust, while a chase cover (for pre-fabricated metal chimneys) acts similarly to a chimney crown, keeping water out of the chase. Any failure in these interconnected defenses—a crack in the crown, a loose piece of flashing, or crumbling mortar—creates an open invitation for rainwater to penetrate. Gravity then guides this water down the path of least resistance, often along the flue liner, down the brickwork, or through framing timbers, until it eventually manifests as a noticeable leak or stain inside your living space.
Step-by-Step Fix
Always prioritize safety when working on your roof. Use proper fall protection and ensure your ladder is stable. If you are uncomfortable working at heights, call a professional.
-
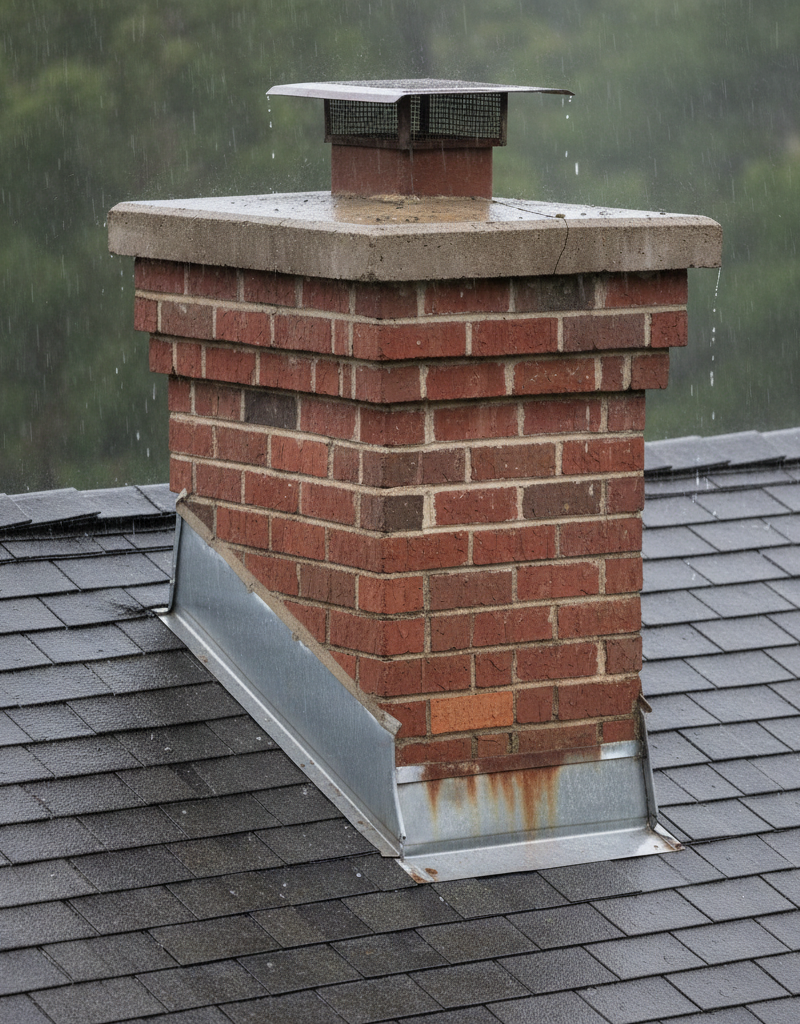
Inspect the Chimney Cap and Crown — Start at the very top
- Visually inspect the chimney cap for rust, damage, or dislodged covers. Replace if compromised. Expect to pay $50-$200 for a new cap, plus sealants.
- Examine the chimney crown for cracks, especially around the flue. Small cracks can be sealed with a quality elastomeric crown sealant; larger cracks may require a new crown. Apply sealant with a caulk gun, ensuring full coverage.
- If this doesn't work: The leak might be elsewhere, or the crown damage is more extensive than visible.
-
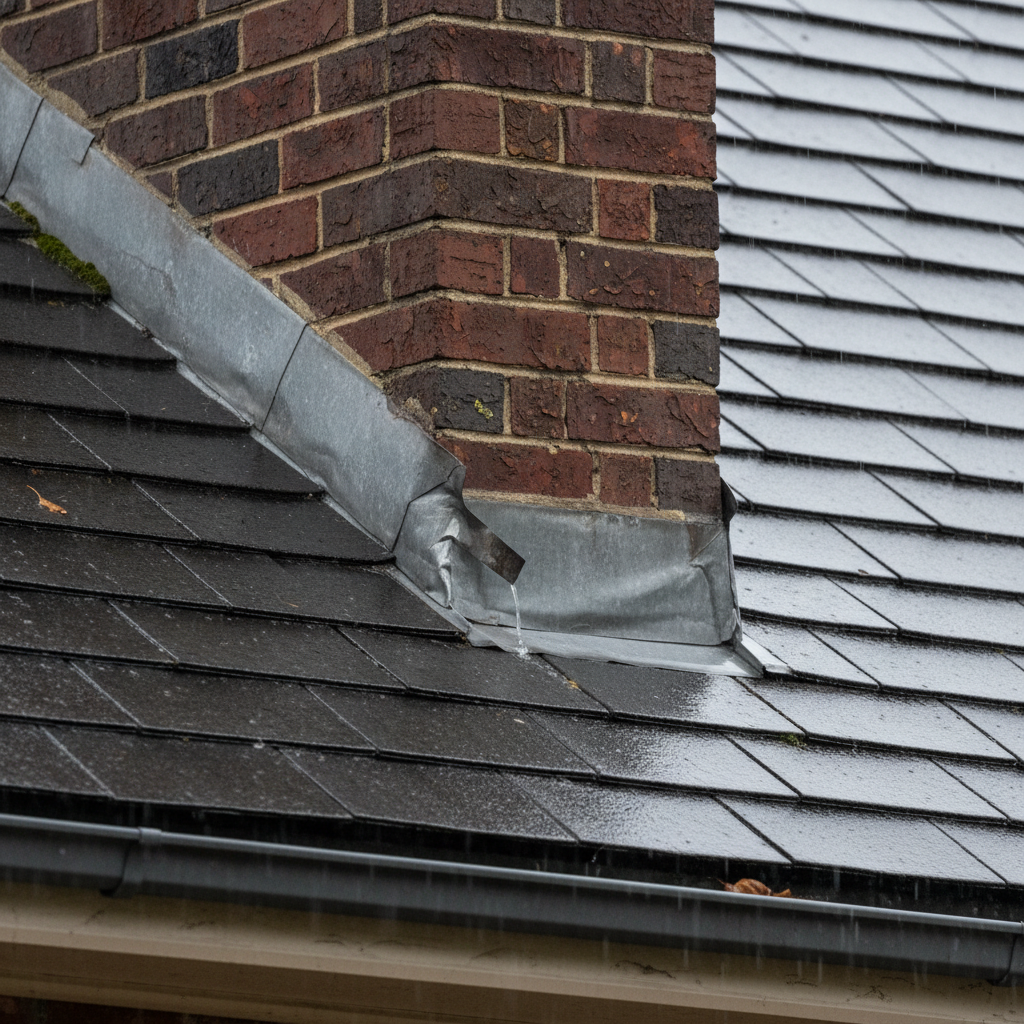
Examine the Flashing — The most common culprit
- Carefully check the metal flashing where the chimney meets the roof for any gaps, bends, rust, or missing caulk. Look for pieces that have pulled away from the chimney or roof.
- Clean the area thoroughly. Use a wire brush to remove debris, moss, or old caulk.
- Re-seal small gaps with a high-quality polyurethane caulk or roofing cement. For larger issues, you may need tolift shingles and re-nail flashing elements. If flashing is rusted or severely deteriorated, it will need to be replaced by a professional.
- Safety Note: Ensure your ladder is securely positioned. Avoid stepping directly on fragile roof sections or old, brittle shingles.
-
Check Mortar Joints and Bricks — Look for signs of deterioration
- Scan the entire visible brickwork of the chimney. Look for crumbling mortar, missing pieces, or cracks in the bricks themselves (spalling).
- Use a screwdriver or awl to gently poke at mortar joints. If they're soft or easily crumble, they need repair.
- For minor mortar deterioration (up to 1/2 inch deep), you can re-point the joints. Mix new mortar according to manufacturer instructions, wet the old joint, and press the new mortar in firmly with a tuck-pointing trowel. Smooth it flush with the brick face.
- If this doesn't work: Extensive spalling or widespread mortar decay indicates significant water intrusion and may require professional masonry work.
-
Inspect the Chase Cover (for metal chimneys) — Often overlooked
- For pre-fabricated metal chimneys, the chase cover sits on top of the chase. Inspect it for rust, holes, or buckling, especially where the flue pipe exits. Old galvanized steel covers are prone to rust.
- Small holes can be sealed with roofing cement or a metal patch kit. If the cover is extensively rusted or damaged, it needs replacement, ideally with a stainless steel or copper version.
- Pro Tip: Ensure the flue pipe collar is properly sealed to the chase cover, preventing water from running down the pipe into the chase.
-
Examine the Flue Liner — Internal chimney issue
- Open your damper and, using a strong flashlight, look up into the flue. You might need a mirror to get a good view. Look for cracks, missing sections of tile, or saturated areas.
- A damaged flue liner isn't typically a DIY fix and often indicates serious water damage or structural issues within the chimney. This will require a professional chimney inspection.
- Safety Note: Wear eye protection and a dust mask when checking the flue.
-
Verify Gutter and Downspout Functionality — Water management around the chimney
- Ensure gutters near the chimney are clear of debris and pitched correctly to drain water away from the chimney and roof. Clogged gutters can cause water to overflow and pool against the chimney, exacerbating leaks.
- Confirm downspouts are securely attached and directing water away from your home's foundation.
- Pro Tip: Consider adding a gutter splash guard specifically around the chimney area if you notice consistent overflow at that point.
-
Water Test for Pinpointing the Leak — A targeted approach
- If the source isn't obvious, use a garden hose to systematically flood sections of the chimney and roof, starting from the lowest point (flashing) and working your way up. Have someone inside watching for the leak to reappear.
- Apply water for 5-10 minutes, then pause. Move to the next section if no leak appears. This helps isolate the exact point of entry.
- Caution: Only do this on a calm, dry day. Do not spray water directly into the flue unless you suspect a flue liner issue.
Common Causes
- Damaged or Deteriorated Flashing: This is by far the most common cause. The metal strips that seal the intersection of the chimney and roof can rust, bend, separate, or be improperly installed, creating gaps for water entry.
- Cracked Chimney Crown: The concrete slab on top of the chimney is designed to shed water. Cracks allow water to seep into the brickwork and down the chimney's interior.
- Missing or Damaged Chimney Cap: A cap prevents rain, snow, and debris from entering the flue directly. A missing or damaged one is an open invitation for water.
- Porous or Deteriorated Mortar Joints: Over time, mortar can erode, crack, or become porous, allowing water to wick into the brick structure. This is especially true on the most weather-exposed side of the chimney.
- Spalling Bricks: Water absorbed by bricks can freeze and expand, causing the brick face to crack and flake off. This reduces the integrity of the chimney and allows more water penetration.
- Damaged Flue Liner or Chase Cover: For pre-fabricated chimneys, a rusted or improperly sealed chase cover or a cracked flue liner can be the source of leaks. Clay tile flue liners can crack from thermal shock or settling.
- High Humidity/Condensation: While not a rain leak, internal condensation can mimic leaks, especially with high-efficiency furnaces venting into older, uninsulated flues. This requires professional diagnosis to distinguish from rain intrusion.
Common Mistakes
- Ignoring the problem: Assuming a small leak will just go away or only happens in extreme weather. Small leaks inevitably become big, costly problems.
- Using the wrong sealant: Applying standard caulk to flashing or mortar. Roofing cement or elastomeric crown sealants are specifically designed for these applications and will last longer.
- Not checking the entire chimney: Focusing only on the visible leak point downstairs. The actual source could be several feet above it.
- Improper ladder safety: Not securing a ladder or attempting to work on a wet, slippery roof. This puts you at serious risk of injury.
- Assuming it's a roof issue: While related, a chimney leak has specific causes that differ from general roof leaks. Pinpointing the exact chimney component is key.
- DIYing complex repairs: Attempting extensive flashing replacement, chimney re-pointing, or flue liner repair without experience. These are jobs best left to qualified masons or chimney professionals.
Cost & Time Breakdown
| Task | DIY Cost | Pro Cost | Time |
|---|---|---|---|
| Inspect & re-seal minor crown | $20–$50 | N/A | 30–60 minutes |
| Re-seal minor flashing gaps | $15–$40 | N/A | 45–90 minutes |
| Mortar joint re-pointing (small) | $30–$70 | $150–$300 (small area) | 1–2 hours |
| Replace chimney cap | $50–$200 | $150–$400 | 30–60 minutes |
| New elastomeric crown sealant | N/A | $250–$600 | 1–2 hours |
| Replace chase cover | $150–$400 (material) | $400–$1,000 | 2–4 hours |
Tips & Prevention
- Annual Chimney Inspection: Schedule a professional chimney inspection and cleaning every year, especially before the heating season. This proactively identifies potential issues.
- Water Repellent Application: Consider applying a breathable, silane/siloxane-based water repellent to brickwork. This reduces water absorption without sealing in moisture.
- Proper Drainage: Ensure your gutters are clean and effectively diverting water away from the chimney and foundation.
- High-Quality Materials: When replacing parts like chimney caps or chase covers, opt for durable materials like stainless steel or copper to extend their lifespan.
- Maintain Your Roof: Address any roof issues promptly. A well-maintained roof contributes to a leak-free chimney.
- Seal Small Cracks Early: Don't wait for small cracks in the crown or mortar joints to become large problems. Address them with appropriate sealants as soon as they appear.
When to Call a Professional
While some minor chimney leak repairs are within the scope of a handy homeowner, there are clear instances when calling a licensed chimney professional or qualified mason is not just recommended, but essential. If you suspect extensive flashing damage that requires lifting and replacing roof shingles, if the chimney crown is severely degraded and needs rebuilding, or if multiple bricks are spalling and require replacement, these are jobs that demand specialized skills and tools for proper execution. Anytime you observe widespread crumbling mortar joints (extensive re-pointing), significant cracks in the flue liner, or any structural instability in the chimney itself, it's time to step back. Additionally, if water testing doesn't reveal the source, or if the leak persists after your DIY attempts, a professional equipped with diagnostic cameras and specialized expertise can accurately pinpoint hidden damage and safely carry out the necessary, often complex, repairs. Attempting advanced repairs without the right knowledge can lead to further damage, costly fixes, and even compromise the safe operation of your fireplace.
Related Articles
Keep troubleshooting with these hand-picked guides from FixlyGuide:
- The Secret Reason Your Chimney Leaks During Rain (It's Not Always the Obvious Culprit) — A leaking chimney during rain can be a frustrating mystery, but often the root cause isn't what you think, leading to costly misdiagnosis.
- The 4 Hidden Reasons Your Chimney Leaks During Rain (And the $50 Fix) — A leaky chimney during rain can signify several underlying issues, from a damaged chimney cap to degraded flashing, leading to significant…
- The Secret Culprit Behind Your Leaky Chimney (It's Not Always the Roof) — Discover the often-overlooked causes of a leaky chimney during rain and how to fix them, from flashing issues to masonry problems.
- Why Your Chimney Leaks in the Rain (It's Not Always the Roof) — Discover the hidden causes of a leaky chimney during rain, from flashing failures to damaged crowns, and how to fix them for good.
- The Secret Culprit Behind Your Leaky Chimney (It’s Not Always the Obvious Flashing) — Discover the often-overlooked causes of chimney leaks during rain and how to tackle them with effective DIY solutions and prevention tips.
- The 3 Hidden Reasons Your Gas Burner Won't Light (Beyond a Clog) — Before you call a technician, discover the most common culprits behind a gas stove burner that refuses to ignite and learn how to fix them…
Get the print-ready PDF of this guide
A clean, ad-free, printable version you can keep on your phone or pin to the workshop wall. We'll also send occasional weekly tips matched to your home situation.
- Print-optimized layout
- Tools, materials & every step included
- Unsubscribe anytime
Frequently asked questions
Why is my chimney leaking only when it rains heavily?+
Heavy rain exacerbates existing vulnerabilities. A minor crack in the chimney crown or a small gap in the flashing might not allow water through during light rain but will fail under the pressure and volume of heavy downpours. It often points to a compromised seal or component that is overwhelmed by significant water flow.
Can a chimney leak fix itself?+
No, a chimney leak will not fix itself. Water intrusion into your chimney or home is a symptom of a structural or material failure that will only worsen over time, leading to more extensive and costly damage. Addressing it promptly is crucial.
How much does it cost to fix a leaking chimney?+
The cost to fix a leaking chimney varies widely depending on the cause and extent of the damage. Minor repairs like sealing small cracks or gaps might cost $50-$200, while more extensive issues like flashing replacement ($300-$800) or chimney crown replacement ($500-$1,500+) can run into hundreds or even thousands of dollars if professional masonry work is required.
What are the first signs of a chimney leak inside my house?+
The most common first signs of a chimney leak indoors are water stains on the ceiling or walls near the fireplace or chimney chase. You might also notice dampness, a musty odor, rust on metal components like the damper or firebox, or crumbling mortar in your fireplace.
Is a chimney leak dangerous?+
Yes, a chimney leak can be dangerous. Besides causing extensive water damage, mold growth, and structural weakening of your home, persistent moisture can corrode the metal components of your fireplace and flue, potentially leading to unsafe operation and fire hazards. It also compromises the integrity of the chimney itself, which is a structural element of your home.


Discussion
Loading comments…