- Starting from the general area you identified from the attic, systematically inspect your roof. Look for:
- Damaged, missing, or curled shingles: High winds or age can lift, crack, or tear shingles, allowing water to penetrate.
- Clogged gutters or downspouts: Overflowing gutters can cause water to back up under shingles or behind fascia boards, leading to leaks.
- Cracks in vent pipe boots: The rubber seal around vent pipes can degrade and crack over time.
- Loose or missing mortar on chimneys: Rain can penetrate through deteriorated mortar joints.
Plumbing · Leak
| Project category | Plumbing |
|---|---|
| Problem type | Leak |
| Trade required | Plumbing |
| Urgency | Emergency — act now |
| Safety risk | High safety risk |
| DIY suitability | DIY for experienced homeowners |
| Cost category | Low cost |
| Typical timeline | Shut water off now; repair usually same or next day |
| Contractor type | Licensed plumber |
Repair option
Isolate at the shutoff, replace the failed component, and dry the cavity fully.
Replacement option
Repipe the run or the branch when corrosion is widespread.
Common causes
- Failed supply line or shutoff valve
- Worn washers, cartridges, or P-trap connections
- Pinhole corrosion in older copper
Relevant tools:emergency checklistdiy or hire a pro
Published July 10, 2026Last updated August 18, 2026
Tools & materials you'll need
Affiliate links- AmazonGloves1 pair · To protect hands from insulation and debris.
- AmazonDust mask1 · To protect against insulation fibers and mold spores.
- AmazonMasking tape or marker1 roll · To outline interior stains.
- AmazonExterior-grade silicone caulk (roofing compatible)1 tube · For temporary seals only.
- AmazonRoofing cement/tar1 can · For temporary shingle patches.
As an Amazon Associate FixlyGuide earns from qualifying purchases — at no extra cost to you. Prices and availability are accurate as of publication and subject to change.
Quick Answer
Catching a roof leak before it escalates is crucial for preventing extensive and costly damage to your home's structure, insulation, and interior finishes. The most effective methods involve a combination of interior and exterior inspections. Inside, look for water stains on ceilings, walls, or in the attic on the underside of your roof decking. Outside, examine your shingles for damage, look for pooling water in gutters, and check for compromises around roof penetrations like vents, chimneys, and skylights. Early detection allows for targeted, less expensive repairs before the problem becomes a full-blown emergency.
The Problem
You've likely experienced the dread of a water stain slowly spreading across your ceiling, or worse, the sudden drip of an unexpected indoor shower. Roof leaks are insidious. They start small, often out of sight, and if left unaddressed, can lead to a cascade of problems including damaged drywall, ruined insulation, mold growth, compromised structural integrity of your home's framing, and even electrical hazards. Waiting until you see a steady stream of water or a sagging ceiling means the leak has likely been active for a long time, quietly rotting away your home's vital components. The challenge for homeowners is understanding that a leak rarely appears directly above its entry point on the roof, making it a frustrating detective game to pinpoint the source. But with a systematic approach, you can learn to read the subtle clues your house gives you.
How It Works
Your roof is designed as a sophisticated shedding system, directing rainwater away from your home's interior. This system relies on multiple layers working in concert: the roof deck (usually plywood or OSB), an underlayment (felt or synthetic), and the outermost layer of shingles, tiles, or metal panels. Water intrusion typically occurs when this protective envelope is breached. This can happen through damaged or missing shingles that expose the underlayment, or more commonly, around roof penetrations where flashing—a metal barrier designed to divert water—has failed.
When water gets past these outer defenses, it follows the path of least resistance. It travels along the top surface of the roof deck, down rafters, or along the underside of sheathing until it encounters a horizontal obstruction or gravity pulls it downwards. This can explain why a leak might start near a chimney but manifest as a water stain 10 feet away on a different part of the ceiling. The water saturates insulation, soaks into drywall, and can even wick into wall studs and floor joists. Over time, prolonged moisture creates an ideal environment for mold and mildew, which not only pose health risks but also contribute to the degradation of building materials. Understanding this journey water takes is key to tracing a leak back to its origin.
Step-by-Step Fix
1. Map the Stain – Identify the general area of the leak.
If you have an interior stain on your ceiling or wall, the first step is to accurately identify its location. Use masking tape or a marker to outline the perimeter of the stain. This reference point will be invaluable when you go into the attic or onto the roof. Remember, the actual leak source on the roof is often uphill from the visible stain due to water traveling along rafters or roof decking before dripping. Jot down notes on the color, size, and texture of the stain. Is it yellowish, dark brown, or black? Is the drywall soft or crumbling? This helps gauge the age and severity of the leak.
2. Ascend to the Attic – Look for direct evidence of water.
- Safety First: Always use a sturdy ladder and have a spotter if possible. Wear long sleeves, gloves, and a dust mask to protect against insulation fibers and dust. Carry a strong flashlight. Watch your footing on joists; never step directly onto the ceiling below. If your attic is difficult to access or navigate, consider specialized tools like an inspection camera.
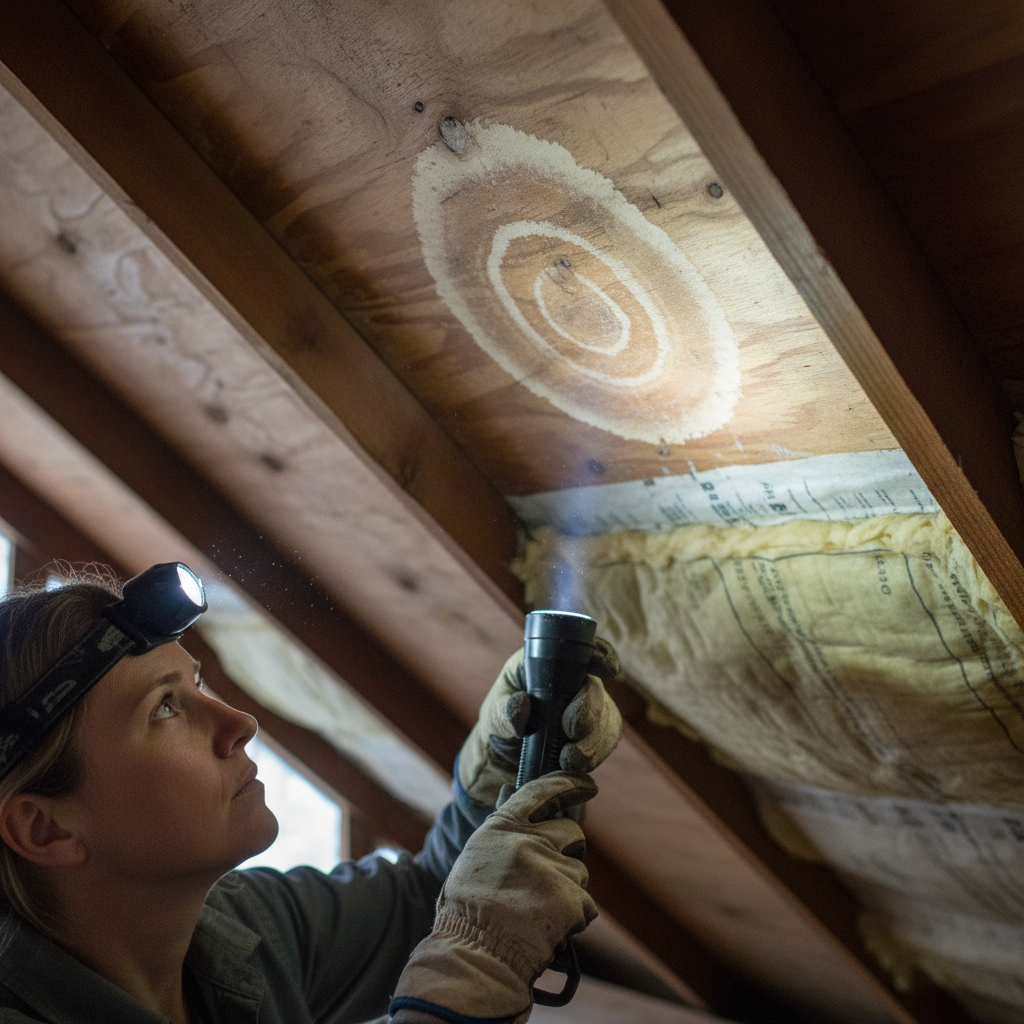
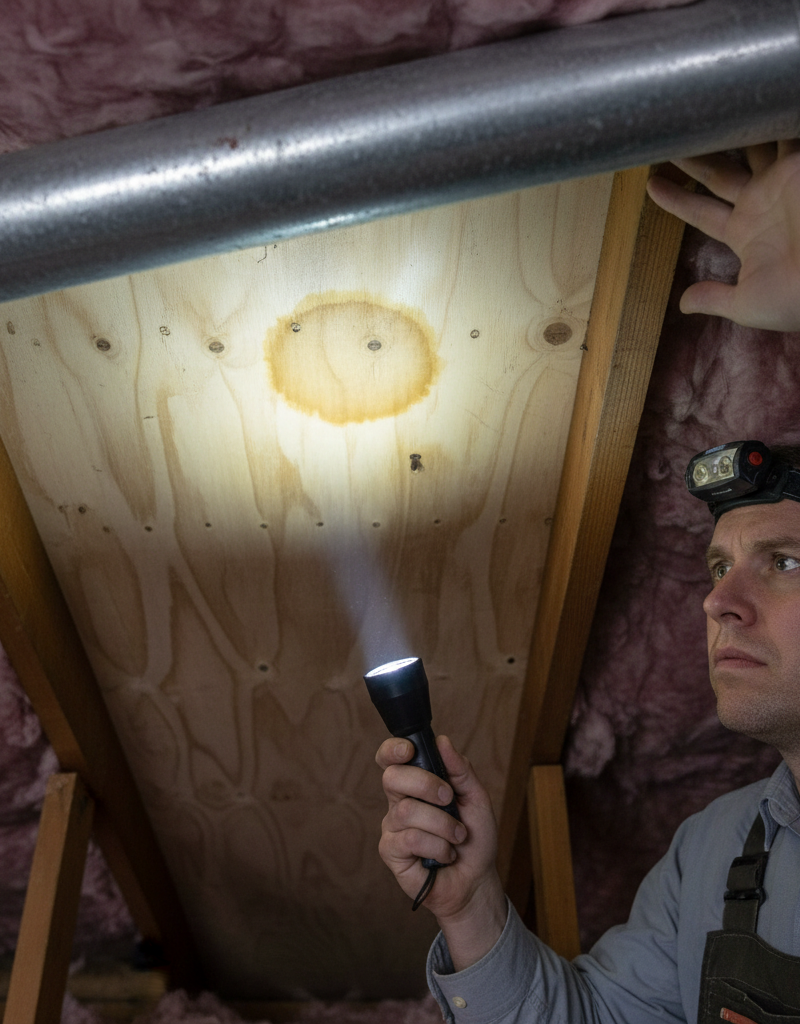
- Once in the attic, locate the area directly above your interior stain. Examine the underside of the roof deck (plywood or OSB) for water stains, discoloration, or mold. Check the rafters and insulation for dampness or compression, as wet insulation loses its R-value and becomes heavy. Pay close attention around vent pipes, chimneys, skylights, and any other roof penetrations. These are common culprits. If the roof deck is visibly wet, you're very close to the source.
- If you find nothing in the attic directly above the stain, expand your search. Water can travel a significant distance. Look 'uphill' from the stain along the roof deck towards the peak. Also, remove small sections of insulation (wear gloves and a mask!) to check for hidden moisture or mold on the drywall above the ceiling.
3. Scan the Roof Surface (Exterior) – Pinpoint external breaches.
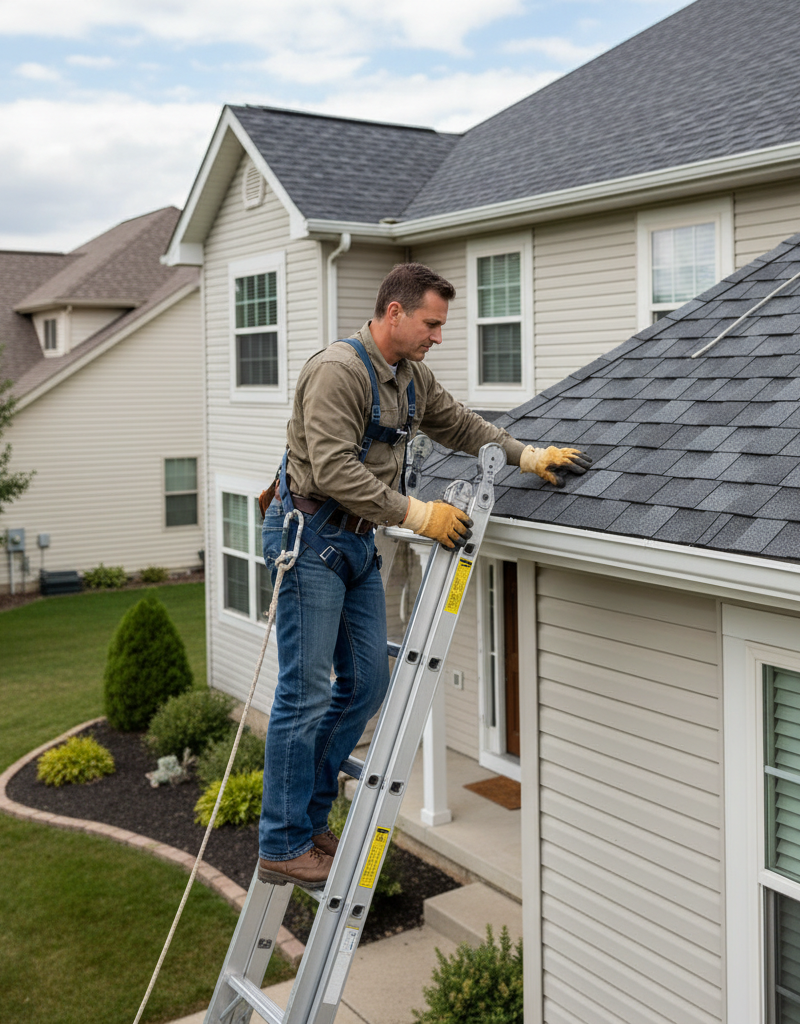
- Extreme Caution: Working on a roof can be dangerous. Only attempt this if you are comfortable with heights, have proper safety gear (non-slip shoes, safety harness if available), and good weather conditions. If you have a steep pitch, significant height, or are uncomfortable on a roof, call a professional.
- Starting from the general area you identified from the attic, systematically inspect your roof. Look for:
- Damaged, missing, or curled shingles: High winds or age can lift, crack, or tear shingles, allowing water to penetrate.
- Compromised flashing: This is metal sheeting found around chimneys, skylights, vents, and in valleys. Look for cracks, rust, gaps in caulk, or where it has pulled away from the structure. Caulk, unfortunately, is not a permanent solution for flashing and will eventually fail.
- Clogged gutters or downspouts: Overflowing gutters can cause water to back up under shingles or behind fascia boards, leading to leaks.
- Cracks in vent pipe boots: The rubber seal around vent pipes can degrade and crack over time.
- Loose or missing mortar on chimneys: Rain can penetrate through deteriorated mortar joints.
- Areas of standing water: While not directly a leak source, pooling water accelerates shingle deterioration.
4. Water Test (If Necessary) – Simulate rain to confirm the leak source.
- Important: This step requires two people: one on the roof with a garden hose and one inside monitoring the stain. Start by soaking the lowest potential leak area with the hose for several minutes. If no drip appears inside, move the water stream slightly higher on the roof. Systematically move the hose across the suspect area, going section by section, working your way uphill.
- The person inside watches for the first sign of a drip or increased dampness. Once water appears, pinpoint the exact section being watered on the roof. This helps isolate the leak source precisely. It may take some time for water to travel through the roof layers.
5. Temporary Patch – Stop the immediate flow.
- Shingle Damage: For a missing or cracked shingle, a temporary fix might involve sliding a piece of sheet metal or tarpaper under the damaged area and securing it with roofing cement.
- Small Hole: For a small puncture (e.g., from a nail), a dab of roofing tar or sealant can provide a temporary seal.
- Flashing Gaps: Apply a generous bead of exterior-grade silicone caulk (ensure it's compatible with roofing materials) into small gaps, but understand this is a very short-term solution for flashing issues.
- Note: These are temporary fixes to prevent further water intrusion until a proper repair can be made. Do not rely on them as permanent solutions.
6. Plan for Permanent Repair – Assess long-term solutions.
Once you've identified the source, assess the extent of the damage. For a single missing shingle, a DIY replacement might be feasible. For extensive flashing issues, widespread shingle damage, or signs of structural compromise, it's often best to consult a roofing professional. They have the expertise, safety equipment, and knowledge to make durable, lasting repairs that prevent future recurrence.
Common Causes
- Damaged or Missing Shingles: The most obvious cause, often due to strong winds, severe hail, or general wear and tear over time. Shingles can curl, crack, blister, or be completely torn off, exposing the underlayment.
- Failed Flashing: Metal flashing around chimneys, vents, skylights, and in roof valleys is prone to deterioration. It can rust, crack, or pull away from its sealant, creating a direct path for water. Old caulk around flashing is a frequent culprit.
- Cracked Vent Pipe Boots: The rubber or plastic seal (boot) around plumbing vent pipes degrades from UV exposure and temperature fluctuations, leading to cracks that allow water to seep around the pipe.
- Clogged Gutters and Ice Dams: When gutters are blocked, water can pool and overflow, seeping under shingles or behind fascia boards. In cold climates, ice dams form when snow melts, refreezes at the eaves, and forces water back up under shingles.
- Poorly Sealed Skylights: Skylights are notorious for leaks, often due to improper installation, old seals around the glass, or compromised flashing where they meet the roof.
- Blocked Roof Valleys: Valleys are channels where two roof slopes meet. Debris like leaves and pine needles can accumulate here, trapping water and causing it to back up under shingles.
Common Mistakes
- Ignoring Small Stains: A small, faint watermark can quickly become a major structural issue. Don't assume it's an old stain or just condensation. Investigate immediately.
- Patching with Caulk Only: While caulk can offer a temporary seal, it's rarely a permanent solution for flashing or shingle repair. It degrades, cracks, and doesn't address the underlying structural issue.
- Walking on a Wet or Damaged Roof: This is extremely dangerous and can cause further damage to already compromised shingles, increasing the risk of slips and falls.
- Assuming the Leak is Directly Above the Stain: Water travels. Always investigate 'uphill' from the visible stain and check all roof penetrations.
- Overlooking Attic Inspections: Many leaks can be spotted in the attic long before they show up on your interior ceiling. Regular attic checks are crucial preventative maintenance.
- DIYing Complex Repairs: If you're uncomfortable on a roof, if the leak is extensive, or if it involves complex flashing or structural issues, attempting a DIY fix can lead to bigger, more expensive problems or personal injury.
Cost & Time Breakdown
| Task | DIY cost | Pro cost | Time |
|---|---|---|---|
| Initial Interior Check | $0 | $0 | 5–10 minutes |
| Attic Inspection | $0 | $0 | 15–30 minutes |
| Exterior Roof Visual | $0 | $0 | 15–45 minutes |
| Water Test (2-person) | $0 | $0 | 30–60 minutes |
| Temporary Patch (minor) | $5–$20 | $100–$250 | 15–30 minutes |
| Simple Shingle Replace | $10–$50 | $200–$500 | 30–60 minutes |
Tips & Prevention
- Annual Attic Check: Make it a habit to inspect your attic once a year, preferably before the rainy season. Look for new stains, dampness, or mold growth on the roof deck, rafters, and insulation.
- Regular Gutter Cleaning: Keep gutters and downspouts free of leaves and debris, especially in fall. This prevents water backup and potential ice dams.
- Examine Shingles Periodically: After severe storms, or at least every few years, visually inspect your roof from the ground with binoculars. Look for missing, curled, or damaged shingles. If safe and comfortable, a cautious physical inspection can be more thorough.
- Check Flashing and Sealants: Pay particular attention to the seals around chimneys, skylights, and vent pipes. Look for cracks, gaps, or signs of deterioration in caulk or mastic. Re-seal small cracks before they become major leaks.
- Trim Overhanging Branches: Tree branches rubbing against the roof can abrade shingles, and falling branches can cause punctures. Trim them back to avoid damage.
- Know Your Roof's Age: Most asphalt shingle roofs last 20-30 years. If your roof is approaching or exceeding its lifespan, even minor leaks are a sign it might be time for a full replacement.
When to Call a Professional
You should absolutely call a professional roofer if you are uncomfortable or unable to safely access your roof or attic. Any leak involving a steep roof pitch, extensive damage across multiple areas, or signs of structural compromise (like sagging roof deck or rafters) warrants immediate professional attention. If you suspect a leak due to a major storm and your homeowner's insurance might be involved, it's often best to get an expert assessment and repair from a licensed contractor. Finally, if you've performed a thorough investigation and still cannot pinpoint the source of the leak, a professional has specialized tools and experience to detect hidden water intrusion. They can also provide a detailed assessment of your roof's overall condition and offer durable repair solutions that DIY fixes often can't match, ensuring your home remains protected.
Related Articles
Keep troubleshooting with these hand-picked guides from FixlyGuide:
- The One Hidden Sign of a Roof Leak Most Homeowners Miss (And the $10 Fix) — Catching a roof leak early can save thousands in repairs. Learn the elusive signs and a simple, effective fix before minor issues become ma…
- The Silent Destroyer: 7 Hidden Signs Your Roof Has a Leak (Before You Need a New Ceiling) — Catching roof leaks early can save your home from extensive damage and costly repairs. Learn the subtle indicators that reveal hidden water…
- The $5 Secret to Fixing a Clogged AC Drain Line (and Avoiding a Costly Flood) — A clogged AC drain line can lead to water damage and mold, but a simple, inexpensive DIY fix can prevent costly repairs.
- The Secret Culprit Behind Your Leaky Refrigerator (It's Not What You Think) — Discover the often-overlooked reason your refrigerator is leaking water and how a simple, inexpensive fix can prevent costly damage.
- The 3 Hidden Dangers of Frozen Pipes (And How to Thaw Them Safely) — Safely thawing a frozen pipe is crucial to prevent bursting, water damage, and costly repairs; acting quickly and correctly can save your h…
- The 9 Sneaky Signs Your Roof Is Failing (And How to Spot Them From the Ground) — Learn to spot critical signs of roof damage from the safety of the ground, potentially saving thousands in repairs.
Should you do this yourself?
Answer five quick questions before you start. Safety outranks savings every time.
Your experience with work like this
How high do you have to work?
Does the job involve any of these?
Will it need a permit?
Specialty tools
Free and instant. Educational guidance only — not a quote, inspection, or professional diagnosis.
Questions to ask before you sign
Ask every contractor the same questions and the cheapest bid stops looking cheapest. Check them off as you go — your progress is saved on this device.
Free, no signup. Bring this to every walkthrough so you compare bids on the same terms.
Get help with your roof now
Stay off the roof. These free tools help you protect the house and reach the right professional fast.
- Emergency repair checklistThe first steps that limit damage before a pro arrives.Open
- Repair or replace your roof?Answer 10 questions about age, leaks, and damage to get a clear next step.Open
- Get local estimatesSend one request and compare written estimates from vetted pros.Open
Free, no signup required. Estimates are educational guidance, not a quote or an inspection.
Frequently asked questions
How do you find a roof leak in the rain?+
Finding a roof leak during rainfall is challenging but possible. Go into your attic with a flashlight and bucket. Listen for dripping sounds and look for active drips, wet spots, or trails of water on the underside of the roof deck, rafters, or insulation. You can also place cardboard or paper down to help highlight where new drips are occurring. Never go onto the roof during active rain.
What are the first signs of a roof leak?+
The first signs of a roof leak often appear in your attic as water stains, discoloration, or damp-smelling insulation. Inside your living space, look for faint yellowish or brown stains on ceilings or walls, bubbling paint, or a musty odor, especially after heavy rain. Outside, missing or curled shingles can be an early indicator.
Can a roof leak repair be a DIY project?+
Minor roof leaks, such as those caused by a single missing shingle or a small crack in a vent pipe boot, can often be a DIY repair for homeowners comfortable working safely on a roof. However, complex leaks involving flashing, extensive shingle damage, or structural issues are best left to licensed roofing professionals due to safety concerns and the expertise required for a lasting fix.
Discussion
Loading comments…