Tools & materials you'll need
Affiliate linksAs an Amazon Associate FixlyGuide earns from qualifying purchases — at no extra cost to you. Prices and availability are accurate as of publication and subject to change.
Quick Answer
Your refrigerator is likely leaking water on the floor due to a clogged defrost drain line. This small tube, usually located at the back of the freezer compartment, is designed to channel meltwater from the defrost cycle into an evaporation pan beneath the fridge. When it becomes blocked by ice, food particles, or mold, water has nowhere to go but to overflow from the freezer and drip onto your kitchen floor, often pooling near the front or side of the appliance. Clearing this blockage is a straightforward DIY task that can restore proper drainage.
The Problem
Imagine discovering a puddle of water stealthily spreading across your kitchen floor, seemingly originating from your refrigerator. This isn't just an unsightly mess; it's a potential safety hazard, a slip risk, and a sign of an underlying issue within your appliance. While a refrigerator leaking water can stem from several problems, the most insidious and common culprit is often an obstructed defrost drain line. This blockage prevents the water generated during the automatic defrost cycle from reaching the drain pan and evaporating, leading to an overflow that manifests as a leak on your floor. Ignoring this leak can lead to subfloor damage, mold growth, and even costly repairs if the pooled water affects electrical components.
How It Works
Modern refrigerators utilize an automatic defrost system to prevent ice buildup on the evaporator coils inside the freezer compartment. Without this system, ice would eventually encapsulate the coils, severely reducing the refrigerator's cooling efficiency. Here's a simplified breakdown:
Periodically, usually every 6 to 10 hours, a timer or control board activates a defrost heater. This heater briefly warms the evaporator coils, melting any accumulated frost into liquid water. This meltwater then collects in a shallow trough or pan directly beneath the evaporator coils. From this trough, a small opening leads to the defrost drain line—a narrow tube that typically runs down the back of the refrigerator's interior, through the appliance's body, and empties into the defrost drain pan (also known as the evaporation pan) located on the bottom of the refrigerator, usually near the compressor. The heat from the compressor helps evaporate this water back into the air. This continuous cycle ensures efficient cooling and prevents frost buildup. When the drain line becomes clogged, the meltwater has no path to the evaporation pan. Instead, it backs up in the freezer, overflows the collection trough, and eventually finds its way out of the freezer door seal or through the back of the freezer compartment, dripping onto the floor.
Step-by-Step Fix
1. Safety First: Unplug the Refrigerator – Before attempting any repair, always disconnect the refrigerator from its power source.
- Safety Note: Never work on an appliance without unplugging it. This prevents electrical shock hazards. Pull the refrigerator away from the wall enough to access the power cord and unplug it from the outlet. If accessing the outlet is difficult, trip the circuit breaker for the kitchen. Gather your tools before you begin.
2. Locate the Defrost Drain Opening – Identify where the meltwater typically collects and drains within the freezer.
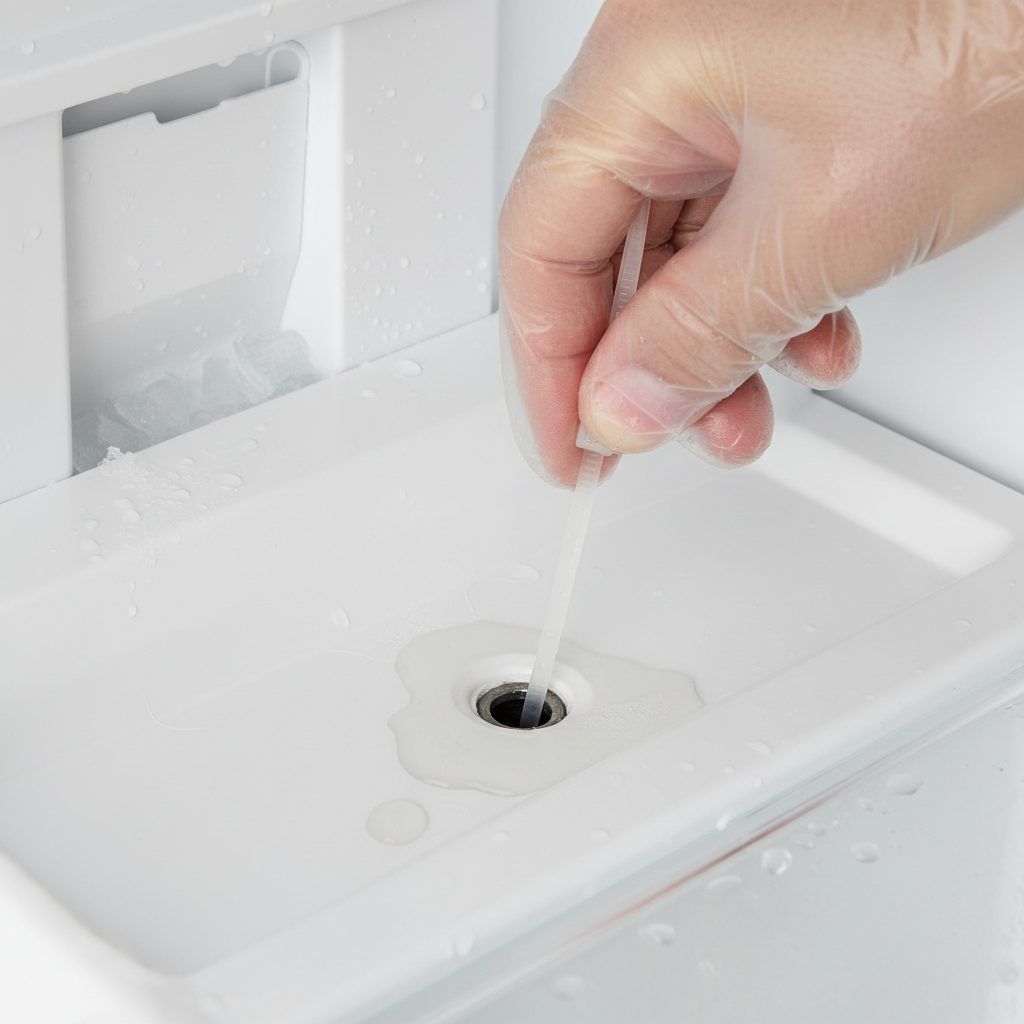
- Open your freezer door and remove all food items. You'll likely need to remove the lowest shelf or freezer basket. Look at the back wall of the freezer compartment, often near the bottom. You should see a small opening, sometimes covered by a plastic cap or grate, where the water from the defrost cycle collects before entering the drain tube. This is typically directly beneath the evaporator coils, which are usually hidden behind a panel.
- If you can't see the opening immediately, you may need to remove an access panel from the back of the freezer. This usually involves unscrewing a few Phillips head screws. Take a picture as you disassemble so you remember how to put it back together.
3. Clear Visible Ice/Debris in the Access Area – Remove any obvious obstructions blocking the drain opening.
- Use a hairdryer on a low, warm setting (not hot) to gently melt any ice visible around the drain opening. Be careful not to hold it too close or for too long, as excessive heat can damage plastic components. You can also use a turkey baster or syringe to squirt warm (not boiling) water directly into the drain opening. Allow the water to sit for a minute or two to soften any blockages.
- Use a small, non-metal probe (like a plastic zip tie, a pipe cleaner, or a piece of insulated electrical wire with the end bent into a hook) to carefully dislodge any visible food particles, mold, or ice chunks from the drain opening. Avoid using sharp metal objects that could puncture the drain tube or damage the freezer lining.
4. Clear the Drain Line from the Bottom (If Accessible) – Access the other end of the drain line near the compressor to clear blockages.
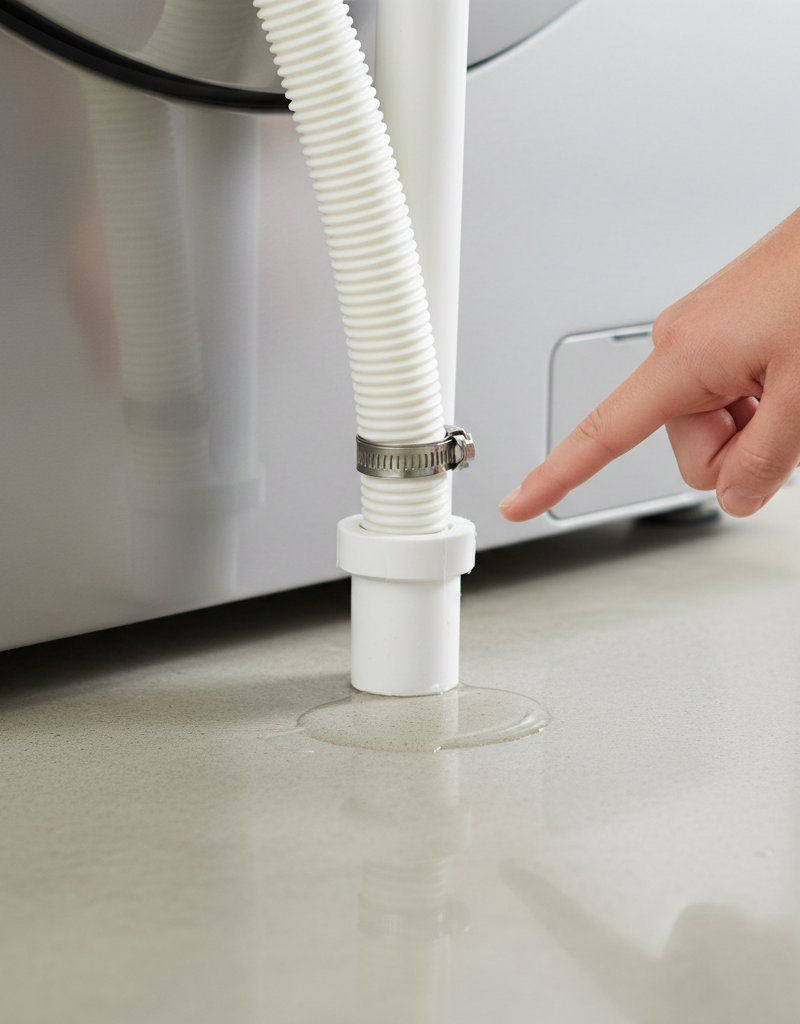
- Carefully pull the refrigerator out from the wall to access the back panel. Many refrigerators have an access panel at the bottom rear that can be removed by unscrewing a few screws. Once removed, you should see the compressor, the condenser coils, and the defrost drain pan. The drain line usually terminates directly over this pan.
- Locate the end of the drain tube. Sometimes it's a flexible hose, other times it's a rigid plastic tube. Gently pull the tube free from its mounting if possible, ensuring you don't damage it. Clear any visible gunk from the end of the tube. You can use a bottle brush specifically designed for narrow tubes, or a flexible brush like a drain snake for aquariums.
- If this doesn't work: If you can't locate the drain line from the bottom or it's not easily accessible, proceed to clearing from the top or an alternative method.
5. Flush the Drain Line – Once cleared, flush the line to remove any remaining residue.
- Once you've cleared the visible blockage from both ends (if accessible), use a turkey baster, syringe, or small funnel with tubing to pour a mixture of warm water and a capful of bleach (or white vinegar) down the drain opening in the freezer. This will help flush out any remaining debris, mold, or mildew and sanitize the line.
- Pro Tip: If you're using bleach, ensure proper ventilation. Pour about a cup of the mixture and wait a few minutes, then pour another cup of plain warm water to rinse.
- Observe if the water flows freely into the defrost drain pan under the refrigerator. If it does, you've likely succeeded. If not, repeat the clearing steps.
6. Clean the Defrost Drain Pan – Remove any accumulated water and debris from the pan.
- While you have the back panel off, inspect the defrost drain pan. It may contain stagnant water, mold, or mildew. Carefully slide the pan out (it often just lifts or slides free without fasteners) and empty it. Wash it thoroughly with warm, soapy water and a capful of bleach to sanitize it. Rinse it well before placing it back.
- Ensure the pan is securely seated and positioned correctly to catch the water from the drain line.
7. Reassemble and Test – Put everything back together and monitor for leaks.
- Reattach any access panels you removed, ensuring all screws are tightened appropriately. Push the refrigerator back into its position, leaving enough space for proper air circulation if your condenser coils are in the back. Plug the refrigerator back in or restore power at the circuit breaker.
- Place paper towels or a shallow pan under the front of the refrigerator where the leak previously occurred. Monitor for several hours, or even a full day, to ensure that no more water appears. The refrigerator will go through several defrost cycles before you can be certain the problem is resolved.
Common Causes
-
Clogged Defrost Drain Line: As detailed above, this is the most frequent culprit. Ice, food debris, and mold/mildew accumulate in the narrow tube, blocking the path for meltwater. This often happens in both frost-free freezers and refrigerator compartments with their own evaporator. Many homeowners forget this small line exists.
-
Iced-Up Evaporator Coils: If the defrost system itself is failing (e.g., a faulty defrost heater, thermostat, or control board), ice can build up excessively on the evaporator coils. When this massive amount of ice eventually melts, it can overwhelm the drain system, even if the line is partially clear, causing overflow.
-
Cracked or Misaligned Drain Pan: The large pan under the refrigerator that collects and evaporates the defrost water can crack over time due to age or stress. Alternatively, if the refrigerator has been moved or serviced, the drain pan might have been jostled out of position, causing water to miss the pan entirely and drip onto the floor.
-
Blocked Water Dispenser/Ice Maker Line: While less common for widespread floor leaks, a leak in the water supply line to the ice maker or water dispenser can sometimes drip internally and pool, eventually finding its way to the floor. Check fittings and hoses behind the refrigerator and inside the freezer compartment.
-
Door Gasket Leaks: A damaged or dirty door gasket (the rubber seal around the refrigerator or freezer door) can allow warm, moist air to enter the appliance. This leads to excessive condensation and ice buildup inside, which, during defrost cycles, can produce more water than the drain system can handle, leading to overflow.
Common Mistakes
- Ignoring the Leak: A small puddle might seem harmless, but chronic leaking can damage your flooring, subfloor, and create conditions for mold and mildew, potentially leading to expensive repairs if left unaddressed.
- Using Sharp Objects in the Drain Line: Poking a metal hanger or sharp tool into the drain line can easily puncture the tube or the delicate evaporator coils, turning a simple clog into a costly professional repair.
- Not Unplugging the Appliance: Forgetting to disconnect power before working on the refrigerator is a serious electrical safety hazard. Always unplug it first.
- Overlooking the Defrost Drain Pan: While clearing the drain line, many DIYers forget to inspect and clean the drain pan outside the internal workings of the freezer. A dirty or misaligned pan can also contribute to leakage.
- Immediately Assuming a Major Issue: While other issues can cause leaks, the defrost drain line is by far the most common. Starting with this simple fix can save you money before calling a technician for more complex problems.
- Using Excessive Heat: Applying a high-heat hairdryer or boiling water too close or for too long can warp or melt plastic components inside the freezer, causing further damage.
Cost & Time Breakdown
| Task | DIY Cost | Pro Cost | Time |
|---|---|---|---|
| Clear Defrost Drain Line | $0–$10 | $75–$200 | 20–45 minutes |
| Clean Drain Pan | $0 | Included above | 5–10 minutes |
| Inspect Door Gaskets | $0 | Included above | 5 minutes |
| Check Water Supply Lines | $0 | Included above | 5–10 minutes |
| Drain Line Replacement (if needed) | $15–$30 | $150–$300 | 1–2 hours |
Tips & Prevention
- Regular Cleaning: Periodically clean the drain opening in the freezer and consider flushing the drain line with a warm water/bleach solution a few times a year, especially if you get frequent ice buildup.
- Check Door Seals: Regularly inspect your refrigerator and freezer door gaskets for cracks, tears, or signs of wear. Clean them with warm, soapy water. A tight seal prevents warm, moist air from entering, reducing condensation and ice buildup.
- Maintain Proper Airflow: Do not overpack your freezer compartment. Ensure there's adequate space for air to circulate around food items. This helps the defrost system work more efficiently.
- Monitor for Warning Signs: Pay attention to excessive frost buildup in your freezer, unusual noises, or noticeable condensation on the inside walls of the refrigerator. These can be early indicators of a malfunctioning defrost system.
- Keep it Level: Ensure your refrigerator is level. An unlevel appliance can affect door seals and the proper drainage of water into the defrost pan.
When to Call a Professional
While clearing a clogged defrost drain line is a manageable DIY task, there are specific situations where professional help is warranted. If, after cleaning the drain line thoroughly, the leak persists, it might indicate a more complex issue such as a faulty defrost heater, a malfunctioning defrost sensor or thermostat, a failing control board, or a compromised evaporator coil. These components often require specialized diagnostic tools and experience to properly troubleshoot and replace. Additionally, if the water leak appears significantly warm, it could signal a refrigerant leak, which requires immediate professional attention due to safety concerns and environmental regulations. If you suspect an issue with the sealed refrigeration system (compressor, condenser, evaporator, or refrigerant lines), or if you're uncomfortable disassembling parts of your refrigerator, it's always best to contact a licensed appliance repair technician. Attempting repairs on complex components without proper knowledge can lead to further damage to your appliance and potentially void your warranty. A professional can quickly diagnose the root cause and ensure the repair is done safely and correctly, saving you time, frustration, and potentially greater costs down the line.
Related Articles
Keep troubleshooting with these hand-picked guides from FixlyGuide:
- The Secret Culprit Behind Your Leaky Refrigerator (It’s Not Always the Water Line) — Discover the most common, often overlooked, reasons your refrigerator is leaking water and how to fix them with simple DIY steps.
- The Secret Culprit Behind Your Leaky Refrigerator (It’s Not Always a Hose) — Discover the hidden causes of your refrigerator leaking water and how to fix them with our comprehensive troubleshooting guide.
- The Surprising Culprit Behind Your Refrigerator's Water Leak (It's Not Always the Ice Maker) — Discover the most common, often overlooked reason your refrigerator is leaking water and how to fix it with simple steps.
- The Secret Culprit Behind Your Leaking Refrigerator (It’s Not Always a Big Fix) — Discover the most common and often overlooked reasons why your refrigerator is leaking water on the floor, and how to fix them yourself.
- The $5 Secret to Fixing a Clogged AC Drain Line (and Avoiding a Costly Flood) — A clogged AC drain line can lead to water damage and mold, but a simple, inexpensive DIY fix can prevent costly repairs.
- The $5 Part That Stops Your Dryer From Heating (And How to Replace It in 30 Min) — Discover the most common, inexpensive culprit behind a dryer not heating up and learn how to quickly diagnose and replace it yourself.
Frequently asked questions
How do I know if my defrost drain is clogged?+
The most common sign is water leaking from the freezer compartment or pooling on the floor in front of or under the refrigerator. You might also notice excessive ice buildup on the back wall of your freezer, even if it's a 'frost-free' model.
Can I use boiling water to clear a clogged drain line?+
No, avoid using boiling water directly. While warm water is helpful, very hot or boiling water can warp or damage the plastic components of your refrigerator's drain line and internal parts. Use warm (never boiling) water, ideally with a turkey baster or syringe, to gently melt ice and flush the line.
How often should I clean my refrigerator's defrost drain?+
There's no strict schedule, but if you've experienced a leak, it's a good idea to flush the drain line with a warm water and bleach/vinegar solution every 6-12 months. Regular cleaning of the freezer interior and ensuring food items aren't blocking the drain opening can also help prevent future clogs.
What if my refrigerator is still leaking after I clear the drain?+
If the leak persists after you've thoroughly cleared the defrost drain line and ensured the drain pan is correctly positioned, the issue might be more complex. It could indicate a problem with the defrost system components (heater, thermostat), a cracked drain pan, or a leak in the water supply line for the ice maker/dispenser. At this point, it's best to call a professional appliance repair technician for diagnosis and repair.


Discussion
Loading comments…