Tools & materials you'll need
Affiliate linksAs an Amazon Associate FixlyGuide earns from qualifying purchases — at no extra cost to you. Prices and availability are accurate as of publication and subject to change.
Quick Answer
If your toaster oven burns one side of your bread, the most likely cause is incorrect rack placement. For even toasting, the rack should always be in the middle position, equidistant from the top and bottom heating elements. This ensures both sides receive a similar amount of radiant heat, cooking them at the same rate.
The Problem
It’s a deceptively frustrating start to the morning. You place a perfect slice of bread into your trusty toaster oven, expecting a uniformly golden-brown piece of toast. A few minutes later, the smell of burning hits your nose. You pull out the rack to find a culinary tragedy: one side is charred black, while the other remains stubbornly pale and untoasted. This common kitchen grievance—where the toaster oven burns one side of your food—isn't just an annoyance; it points to a fundamental misunderstanding of how these countertop workhorses operate. You might blame the appliance, thinking it’s faulty, but more often than not, the culprit is a simple user error that even seasoned home cooks make.
How It Works
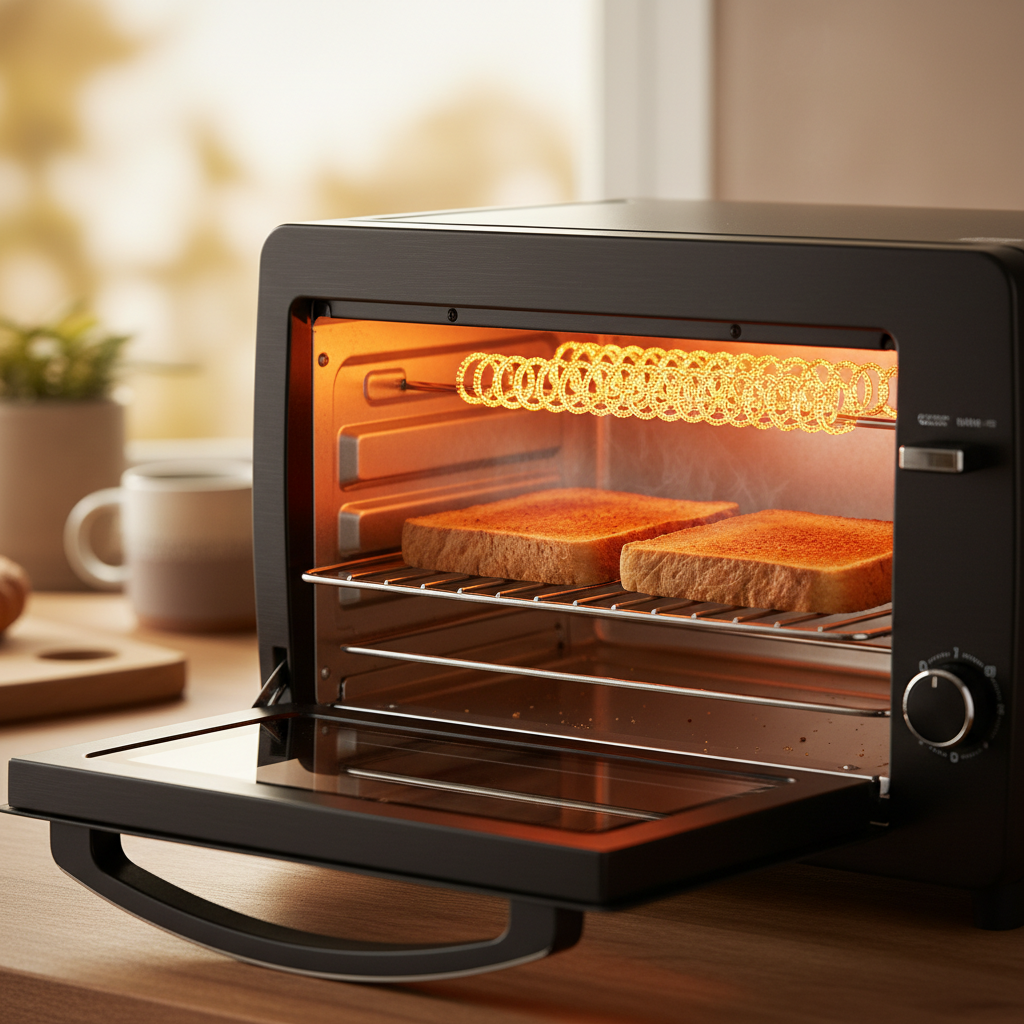
Toaster ovens cook with radiant heat, a form of energy that travels in straight lines, much like light. The heat source comes from quartz or Calrod heating elements—those glowing orange tubes at the top and bottom of the oven cavity. When you select the "Toast" function, the oven's circuitry is designed to activate both the upper and lower elements simultaneously.
The intensity of this radiant heat follows the inverse-square law: the closer an object is to the heat source, the more energy it receives. If you double the distance, the energy received is quartered. This principle is the absolute key to understanding your toaster oven. Placing your bread on a rack positioned too high puts the top surface mere inches from the upper elements, bombarding it with intense, direct heat. Meanwhile, the bottom of the slice is significantly farther from the lower elements, receiving far less energy. The result is a burnt top and a soft, undercooked bottom. The opposite happens if the rack is too low. The "Toast" setting is calibrated with the expectation that the food will be placed in the geometric center of the oven, allowing both sides to be cooked evenly by their respective heating elements. This is the entire secret: balance is achieved only in the middle.
Step-by-Step Fix
Follow these diagnostic and corrective steps to solve your uneven toasting problem for good.
SAFETY FIRST: Unplug the Appliance Before any inspection or cleaning, always unplug the toaster oven from the wall outlet. This eliminates the risk of electric shock. Wait at least 10-15 minutes for the heating elements to cool down completely if it was recently used.
1. The Obvious Check: Observe the Elements Plug the oven back in, place the rack in the middle position, and set it to "Toast" on a medium setting. Look through the glass door. You should see both the upper and lower heating elements glowing a consistent, bright orange. If one set of elements (or a single element in a set) remains dark, you’ve found your culprit: a failed heating element.
2. Master the Rack Position This is the most crucial step and the most common fix. Toaster ovens typically have two or three rack slots. For the "Toast" function, the only correct position is the middle slot. Slide the wire rack out and re-insert it into the horizontal guides located halfway between the upper and lower elements.
3. Run a Controlled Test Place a single slice of standard white or wheat bread directly in the center of the middle rack. Do not place it to the left or right. Close the door and set the toast function to a medium-darkness level. Stay and watch the process.
4. Analyze the Results Once the cycle is complete, carefully remove the toast. Is it evenly cooked? If so, your problem was simply rack position. If it’s still slightly uneven (e.g., the back is darker than the front), it could indicate uneven heat distribution, which is common in some models. The fix is to rotate the bread halfway through the cooking cycle.
5. Check for Debris and Obstructions Unplug the oven again and let it cool. Remove the rack and the crumb tray. Use a flashlight to inspect the heating elements closely. Sometimes, a piece of cheese, bread crumb, or sugary topping can fall and fuse to an element. This creates a hot spot and can also block heat, leading to uneven cooking.
6. Carefully Clean the Elements If you see debris, you can gently clean the elements. Make sure they are completely cool. You can use a soft, damp cloth with a tiny bit of vinegar or a specialized element cleaning paste. Be extremely gentle; the quartz elements are fragile. Wipe away any residue with a clean, dry cloth. Never spray cleaner directly onto the elements.
7. Test Your Thermostat's Accuracy While less critical for the "Toast" function (which is often timer-based), a faulty thermostat can affect other functions and hint at larger electrical issues. Place a reliable oven thermometer on the middle rack. Set the oven to "Bake" at 350°F. Let it preheat for 15 minutes, then check the thermometer reading. If it's off by more than 25-30°F, your thermostat may be failing and require replacement.
8. The Professional’s Test: Element Continuity If you suspect a dead element and are comfortable with basic electrical testing, you can check its continuity. Warning: This is an advanced step. Unplug the oven and gain access to the element terminals (this usually requires removing the outer casing). Set a multimeter to the continuity or resistance (Ohms, Ω) setting. Touch one probe to each terminal of the element. A healthy element will show a reading (typically 10-50 Ohms). A broken element will show no continuity or infinite resistance (often displayed as "OL" or "1").
Common Causes
Understanding the root cause will prevent the issue from recurring.
- Incorrect Rack Position: By far the most common cause. Using the top rack position for toast will always burn the top. This position is intended for "Broil," where only the top elements are used to melt cheese or sear meats. The bottom position is for specific baking needs.
- Failed Heating Element: Toaster oven elements have a finite lifespan. If either the upper or lower set fails, you’ll only be cooking from one side. This is the second most likely cause if correcting the rack position doesn't solve the toaster oven burns one side problem.
- Using the Wrong Function: Accidentally setting the oven to "Broil" instead of "Toast" is a frequent mistake. "Broil" activates only the top elements at maximum intensity, guaranteeing a burnt top and raw bottom.
- Dirty Elements or Interior: A thick layer of grease or carbonized food on an element acts as an insulator, preventing it from radiating heat properly. This can create hot and cold spots throughout the oven.
- Faulty Selector Switch or Control Board: The knob or button you use to select "Toast" sends a signal to activate both elements. If this switch or the underlying electronic board is faulty, it might only activate one set of elements, mimicking a failed element.
Common Mistakes
Avoid these pitfalls to ensure your toaster oven operates as intended.
- Forgetting to Move the Rack: Many people use the top rack to broil garlic bread or melt cheese, then forget to move it back to the middle for their morning toast.
- Placing Food Off-Center: Placing your bread against the left or right wall can cause uneven cooking, as it may be closer to one part of the heating element loop than another.
- Ignoring a Dead Element: Continuing to use a toaster oven with a known dead element is inefficient and will never produce good results. It’s a sign that a simple repair is needed.
- Never Cleaning the Crumb Tray: An overflowing crumb tray can catch fire. More commonly, it can smolder and create hot spots and uneven temperatures within the small oven cavity.
- Using Abrasive Cleaners: Never use harsh chemicals or steel wool to clean the interior or the elements. This can damage the reflective surfaces that help distribute heat and can scratch the fragile elements, leading to premature failure.
Cost & Time Breakdown
Here’s what to expect in terms of cost and time for fixing an unevenly toasting oven.
| Task | DIY Cost | Pro Cost | Time Commitment |
|---|---|---|---|
| Rack Repositioning & Basic Cleaning | $0 | N/A | 5-10 minutes |
| Oven Thermometer Test | $5 - $15 | N/A | 20 minutes |
| Heating Element Replacement | $20 - $50 (for the part) | $100 - $150 | 1-2 hours |
| Thermostat Replacement | $15 - $40 (for the part) | $120 - $180 | 1.5-2.5 hours |
| Selector Switch Replacement | $20 - $45 (for the part) | $120 - $180 | 1.5-2.5 hours |
| Buying a New Toaster Oven | $50 - $300+ | N/A | 30 minutes (shopping) |
Tips & Prevention
- Make Middle-Rack the Default: Get into the habit of always returning the toaster oven rack to the middle position after each use. Make it the default resting state.
- Clean Crumb Tray Weekly: Pull out and empty the crumb tray at least once a week. This prevents buildup, reduces fire risk, and promotes even heating.
- Quarterly Deep Clean: Every three months, unplug the oven and do a thorough interior cleaning. Wipe down the walls and clean any residue off the elements themselves.
- Know Your Functions: Take two minutes to read the manual. Understand the difference between Toast, Bake, Broil, and any convection settings your oven may have.
- Rotate for Perfection: Even in a perfectly functioning oven, some slight unevenness can occur. For bakery-quality results, simply open the door and rotate your food 180 degrees halfway through the cooking time.
When to Call a Professional
While the most common fix is incredibly simple, there are times when you should step back and call an appliance repair technician. If you’ve confirmed the rack is in the middle and you’ve identified a non-glowing heating element, replacing it is a common DIY job, but it involves opening the appliance's casing. If you are not 100% comfortable with electrical safety procedures, it's best to call a pro. Furthermore, if you suspect the issue is a faulty thermostat or selector switch, these repairs can be complex. Any signs of trouble beyond a simple element failure, such as a smell of burning plastic or wires, sparks, or the appliance tripping your circuit breaker, are immediate signals to unplug the unit and seek professional service. Given the relatively low cost of a new toaster oven, most professionals will recommend replacement over a costly electrical repair, unless the appliance is a high-end, expensive model.
Frequently asked questions
Why does my toaster oven burn bagels on top?+
This almost always happens when you use the 'Toast' setting with the rack positioned too high. For bagels, many ovens have a specific 'Bagel' function which often only activates the top elements to toast the cut side while warming the bottom. If your oven has this, use it with the rack in the middle. If not, use the 'Toast' setting and keep the rack in the middle for the most even results.
Can a dirty toaster oven cause uneven cooking?+
Yes, absolutely. A thick layer of grease or carbonized food on the interior walls can absorb heat instead of reflecting it, creating cold spots. Similarly, debris fused to a heating element can block heat, causing both hot and cold spots that lead to uneven results.
Is it worth repairing a toaster oven?+
It depends on the cost of the appliance and the repair. For an inexpensive toaster oven (under $100), a simple DIY heating element replacement (a $30 part) can be worthwhile. However, paying a professional $150 to repair a $70 appliance is not economical. For high-end models ($200+), professional repair is often a more cost-effective choice than replacement.
How do I know if my toaster oven heating element is bad?+
The easiest way is a visual check. Set the oven to 'Toast' and look for the tell-tale orange glow from all elements (both top and bottom). If one or more elements remain dark after a minute, it has failed and needs to be replaced. For a definitive test, a multimeter can be used to check for electrical continuity when the appliance is unplugged.


Discussion
Loading comments…