- Paint Peeling in an Old House? Lead Dust Safety for DIY Repairs — If your home was built before 1978, repairs that disturb painted surfaces can create hazardous lead dust—here's how to test and work safely.
- Contractor Quote Too High? 5 Hidden Reasons and How to Fix It — Stunned by an outrageously high contractor bid? Learn the real reasons behind bloated estimates, what drives risk pricing, and how to negot…
- Hidden Water Leak in Your House? 5 Spots Homeowners Miss and the Fix for Each — Hidden water leaks can quietly destroy your home and drive up bills. Here are five concealed leak zones, how to test them, and step-by-step…
- The 12 Checks That Prevent 80% of Costly Home Repairs — Don't wait for a disaster. Our comprehensive monthly home maintenance checklist reveals the surprising, simple tasks that catch small issue…
- The 3 Hidden Ways Your — Uncover the surprising habits and hidden household issues that are silently increasing your homeownership costs and learn how to fix them.
Published November 9, 2026Last updated November 9, 2026
Tools & materials you'll need
Affiliate links- AmazonNon-silicone paste wax1 can · To lubricate bed plate and prevent wood binding
- AmazonDenatured alcohol or mineral spirits1 pint · For cleaning pitch off feed rollers
- AmazonReplacement planer knives or carbide inserts1 set · Matching your specific model's cutterhead
- AmazonFine #0000 steel wool1 pad · For scrubbing oxidation and sap off steel beds
- AmazonDry PTFE lubricant spray1 can · For chain drive and elevation threaded rods
As an Amazon Associate FixlyGuide earns from qualifying purchases — at no extra cost to you. Prices and availability are accurate as of publication and subject to change.
Quick Answer
A benchtop thickness planer gives you flat, parallel board faces and knocks out mill marks, but you’ve gotta set it up right if you want clean cuts. To fix rough surfaces, snipe, or feeding stalls, keep the depth of cut at no more than 1/32-inch (or roughly a quarter-turn of the elevation crank), support workpieces with coplanar infeed and outfeed tables, and clean gummed-up feed rollers with denatured alcohol. If boards stall mid-cut or chatter violently, check the blades right away, rotate them, or replace the high-speed steel (HSS) or carbide knives. No sense pretending that thing’s gonna “work itself out.”
The Problem
Rough-sawn lumber, reclaimed fence pickets, and twisted 2x4s are cheap gold for DIY home repairs, but they rarely sit flat, square, or true. When you run unplaned stock through a table saw or try to assemble cabinet face frames with uneven material, gaps show up, joints bind, and glue lines fail. You’ll fight it every time.
A benchtop planer is the workhorse built to handle that. Still, homeowners run into maddening problems fast: deep gouges at the leading and trailing ends of boards (snipe), ridges running the length of the timber, boards stalling halfway through the carriage, or a motor bogging hard with that hot electrical smell. Instead of glassy, dimensionally identical boards, you end up with scalloped firewood. I’ve seen folks blame the machine when it wasn’t the machine at all — it was the setup, the blades, or pushing too much bite in one pass.
How It Works
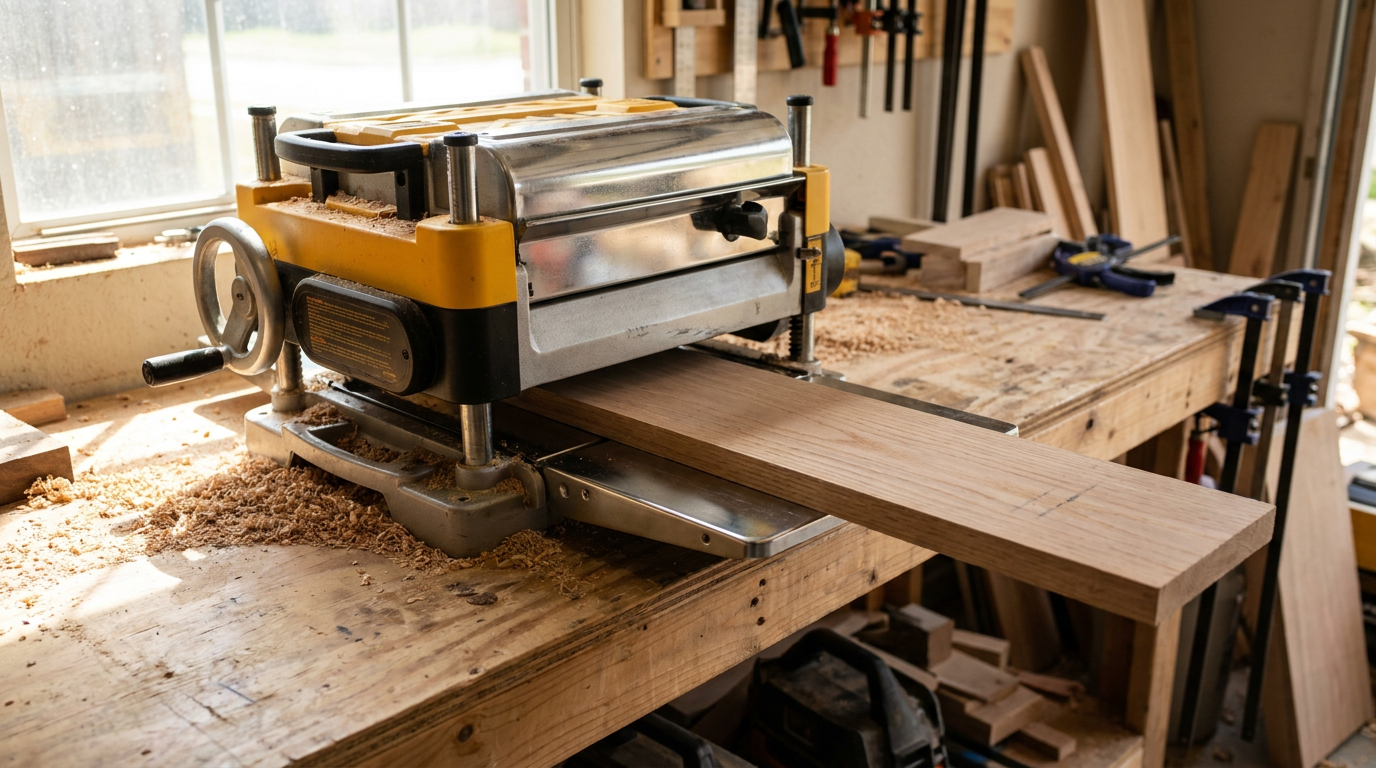
A benchtop thickness planer doesn’t flatten a cupped or bowed board by magic—it makes the top face strictly parallel to whatever face rides on the bed. Inside the machine's cutterhead carriage sits an electric universal motor (typically drawing 15 amps at 120 volts) spinning a cylindrical cutterhead between 8,000 and 10,000 RPM. That cutterhead holds either straight knives (typically two or three disposable HSS blades) or a helical-style cutterhead studded with dozens of four-sided indexable carbide inserts.
Flanking the spinning cutterhead are two spring-loaded rubber or knurled steel feed rollers. Powered by a chain-and-sprocket gearbox, the infeed roller grabs the rough board and pushes it past the rotating knives at a feed rate of roughly 14 to 26 feet per minute, while the outfeed roller pulls it out the back. A flat cast-aluminum bed, often covered by a polished stainless steel sheet, gives you the reference plane underneath. Simple on paper. A little fussy in real life.
When you lower the carriage via the depth-adjustment crank, you set the cut depth. If your infeed or outfeed wings tilt downward even 1/16-inch below the main bed, the board tips as its end clears the roller. That tiny pivot lifts the wood right into the whirling blades, carving out a classic 0.015-inch scooped depression known as snipe. I pulled a planer in Frisco last month that had exactly this problem—the wings were off just enough to make every board look like it got chewed on at the ends. That rigid mechanical triangle—roller, cutterhead, reference bed—is the whole game.
Step-by-Step Fix
Before tuning a benchtop planer, unplug it from the wall outlet. Don’t reach inside the cutterhead cavity while it’s connected to mains power. That’s not a shortcut. That’s a bad afternoon.
-
Unplug and Clear the Machine — Kill all power by disconnecting the 120V plug directly from the receptacle or extension cord. Vacuum out all packed sawdust, chips, and pitch buildup around the cutterhead, elevation screws, and drive chain housing.
- Tools required: Shop vacuum, nylon utility brush.
- Safety note: Verify the power switch stays locked in the "off" position using a padlock or safety key.
-
Clean Pitch Off the Feed Rollers — Wipe down both the front infeed and rear outfeed rubber rollers with a clean shop rag soaked in denatured alcohol or mineral spirits. Rotate the cutterhead assembly by hand (wearing heavy leather work gloves) to expose all sides of the rubber sleeves.
- Tip: Avoid harsh solvents like acetone or lacquer thinner, which dry out, glaze, and crack synthetic rubber feed tires.
- If rollers still slip: Lightly scuff glazed rubber using 320-grit wet/dry sandpaper wrapped around a wooden block, then wipe with alcohol again.
-
Wax and Polish the Bed Plates — Clean off hardened wood sap and glue drips from the center stainless steel bed and folding wings using fine #0000 steel wool soaked in mineral spirits. Once dry, rub two generous coats of non-silicone paste wax over all metal bed surfaces and buff briskly with a microfiber rag.
- Tools: Non-silicone paste wax (like Johnson's or Renaissance), microfiber towel, #0000 steel wool.
- Why this matters: Paste wax cuts sliding friction way down, which helps keep the board moving, the motor happier, and the chatter out of the cut.
-
Align Infeed and Outfeed Tables to Eliminate Snipe — Lay a machined 24-inch or 36-inch aluminum straightedge across the center planer bed, extending halfway out across the infeed table. Adjust the wing support set-screws beneath the table until the far outer tip of the infeed wing sits roughly 1/32-inch to 1/16-inch higher than the center bed plate. Repeat this exact process for the rear outfeed wing.
- Target: A very slight upward tilt (an upward "smile") forces the board's tail down against the bed as it enters and exits, neutralizing cutterhead lift.
- Tools: Machinist straightedge, hex keys / Allen wrenches matching your machine's set-screws.
-
Inspect the Knives for Nicks and Scallops — Remove the top dust hood and plastic cutterhead shroud to expose the blades. Shine a high-lumen work light across the knife edge while slowly rotating the cutterhead with a wooden push stick.
- What to look for: Shiny flat spots, micro-chips, or parallel lines of sap. A nick as small as 0.005-inch leaves a raised bead running the full length of every board you run.
-
Shift or Flip Reversible Straight Blades — If your planer uses standard reversible straight knives, loosen the blade clamp gib bolts using the manufacturer's magnetic wrench or a socket. If you see a tiny nick, shift one blade horizontally by 1/32-inch (if your alignment pins allow slotted play) so the nicks on separate knives don't line up, or flip the blades over to their fresh factory edge.
- Torque specification: Tighten gib bolts starting from the center outward, torquing firmly to approximately 45 to 55 in-lbs. Do not over-torque, which warps the gib plate and causes wavy cuts.
- If using helical/spiral heads: Rotate only the chipped square carbide insert 90 degrees to a fresh edge using a Torx T20 driver; torque to 40 in-lbs.
-
Level the Cutterhead Carriage — Place two identical hardwood gauge blocks (milled to roughly 2x2x4 inches on a table saw) on opposite edges of the center bed plate, right beneath the cutterhead edges. Lower the carriage gently until one blade lightly touches the first block, then inspect the opposite block.
- Correction: If one side has daylight and doesn't touch, loosen the carriage elevation chain underneath the chassis and advance the low-side lifting screw by one tooth until both sides measure within 0.003-inch of parallel.
-
Tension the Drive Belt and Chain Drive — Remove the left-side plastic access panel to check the primary motor ribbed belt and feed-roller drive chain. Push down on the center of the rubber drive belt with your thumb; it should deflect no more than 1/4-inch under moderate pressure.
- If loose: Loosen the motor mounting bolts, lever the motor bracket downward with a small pry bar to pull out slack, and retighten.
- Maintenance: Apply dry PTFE lubricant or dry graphite to the drive chain; avoid wet oil or sticky aerosol grease, which attracts airborne wood dust and locks up sprockets.
-
Run a Test Stock Pass at Conservative Depth — Plug the machine back into a dedicated 20-amp, 120V outlet. Grab a scrap piece of 3/4-inch pine or poplar at least 18 inches long. Power up the dust collector, turn the planer on, and feed the board with a depth setting of no more than 1/64-inch to verify smooth tracking and zero roller slip.
- Listen carefully: The motor should maintain a steady, high-pitched whine. A sudden drop in RPM indicates an aggressive depth of cut or dull knives.
-
Measure Output with Digital Calipers — Pull the finished board from the outfeed table and measure its thickness across all four corners using a digital caliper. If the left and right edges differ by more than 0.005-inch, revisit Step 7 to fine-tune your carriage parallel stops.
Common Causes
- Dull or Pitch-Glazed Knives: Knives coated in pine resin or blunted by knots don't slice wood fibers cleanly; they crush them. That creates serious heat, tear-out around grain changes, and a motor that sounds like it’s begging for mercy.
- Misaligned Bed Wings (Snipe): If the infeed and outfeed tables sag lower than the central cutter bed, the workpiece acts like a seesaw. The board's ends lever upwards into the knives, cutting deeper during the first and last 2 to 3 inches of the pass.
- Dirty, Glazed Rubber Feed Rollers: As boards slide through, natural oils, sawdust, and sap coat the rollers. Once traction drops, the rollers slip over the stock, leaving the wood stationary beneath spinning knives that burn deep grooves into the surface.
- Aggressive Depth of Cut: Trying to strip 1/16-inch or 1/8-inch of hardwood (like oak, maple, or walnut) in a single pass overtaxes the 15-amp universal motor, causes drive belts to slip, and induces heavy chatter marks.
- Running Twisted or Cupped Stock Unfaced: A thickness planer has spring-loaded rollers exerting up to 100 pounds of downward force. Those rollers smash a cupped board flat against the bed while it cuts, but the board simply springs right back into its warped shape once it clears the outfeed table.
Common Mistakes
- Skipping the Jointer Sled for Warped Stock: Feeding a bowed, cupped, or twisted board directly into a planer won’t flatten it. The feed rollers squash it flat temporarily, the cutter cuts it, and the wood springs right back into its warped profile. Always flatten one face on a jointer first, or shim your board securely inside a melamine planer sled before running it through.
- Using Silicone-Based Spray Lubricants: Reaching for WD-40, automotive grease, or standard silicone spray to lube the metal bed is a disaster. Silicone sinks deep into the raw wood pores, which means stain, polyurethane, and wood glue won’t bond the way they should. Use paste wax without silicone.
- Plugging into Undersized Extension Cords: Benchtop planers pull continuous 15-amp loads under full cut. Running them on a thin, 50-foot, 16-gauge orange extension cord starves the motor of voltage, drops RPMs, causes surface ripples, and blows thermal breakers. If an extension cord is mandatory, use a heavy-duty 10-gauge cord under 25 feet.
- Planer-Feeding End Grain: Never run cutting boards with exposed vertical end grain through a benchtop thickness planer. The horizontal knives catch the unsupported end fibers, violently exploding the board into flying wooden shrapnel and wrecking your cutterhead.
- Planer-Cutting Wood Shorter than Roller Centers: Every machine has a strict minimum stock length (typically 12 to 14 inches) determined by the distance between the infeed and outfeed rollers. Feeding a 6-inch block means the infeed roller releases the board before the outfeed roller grabs it, causing the piece to kick back, jam, or shatter.
Cost & Time Breakdown
| Task | DIY Cost | Pro Cost | Time |
|---|---|---|---|
| Roller Cleaning & Bed Waxing | $12–$25 (wax & solvent) | N/A (Standard DIY) | 20–30 mins |
| Reversible Straight Knife Replacement | $35–$65 (pair/set) | $120–$180 (service shop) | 30–45 mins |
| Table Coplanar Alignment (Anti-Snipe) | $0 (existing tools) | $90–$140 (service shop) | 25–40 mins |
| Carriage Leveling & Chain Re-timing | $0 (calipers/blocks) | $150–$220 (service shop) | 45–60 mins |
| Helical Cutterhead Retrofit Upgrade | $350–$500 (aftermarket head) | $550–$750 (machinist install) | 2–3 hours |
Tips & Prevention
- Light Passes Beat Heavy Cuts Every Time: Take no more than 1/32-inch (roughly one quarter-turn on the height crank) for hardwoods like white oak, and no more than 1/64-inch on extra-wide boards over 10 inches wide. You’ll stretch knife life way out and keep the motor brushes happier.
- Support Long Stock with Outfeed Stands: When running boards longer than 5 feet, never let them cantilever out over the outfeed wing unsupported. Use an adjustable roller stand or build an extended auxiliary plywood bed to hold boards dead level as they exit.
- Dedicate a Metal Detector for Reclaimed Lumber: If you plane pallet wood, barn siding, or old fence boards, pass a handheld wand metal detector over every inch. A single rusted finish nail will instantly snap carbide inserts or ruin an entire set of high-speed steel straight blades.
- Check Carbon Brushes Every 100 Hours: Most universal planer motors feature external plastic access caps on the housing. Unscrew them twice a year; if the carbon blocks wear down past 1/4-inch long or exhibit heavy pitting, replace them immediately to protect the armature commutator.
- Hook Up a High-CFM Dust Collector: Planers spit out massive, thick chips that easily overwhelm small home shop vacs. If chips pack inside the cutterhead shroud, they get stamped right back into the freshly planed wood by the rollers, leaving small divots and dents across the board. Use a 4-inch dust port connected to at least 400 CFM of suction.
When to Call a Professional
Most benchtop planer maintenance is well within reach of a handy homeowner. However, you should take the unit to an authorized power tool repair center or machinery rebuild shop if the motor hums loudly without turning (indicating a blown start capacitor or shorted armature winding) or if you see blue electrical smoke billowing from the motor vents.
If the cast-aluminum base has warped, cracked from dropping, or if the cutterhead arbor shaft bearings have seized—evident when you hear an ear-splitting grinding sound and cannot spin the cutterhead smoothly by hand even with the drive belt removed—the precision tolerances require specialized arbor presses and factory alignment jigs beyond typical home workshop capabilities.
Related Articles
Keep troubleshooting with these hand-picked guides from FixlyGuide:
- Paint Peeling in an Old House? Lead Dust Safety for DIY Repairs — If your home was built before 1978, repairs that disturb painted surfaces can create hazardous lead dust—here's how to test and work safely.
- Contractor Quote Too High? 5 Hidden Reasons and How to Fix It — Stunned by an outrageously high contractor bid? Learn the real reasons behind bloated estimates, what drives risk pricing, and how to negot…
- Hidden Water Leak in Your House? 5 Spots Homeowners Miss and the Fix for Each — Hidden water leaks can quietly destroy your home and drive up bills. Here are five concealed leak zones, how to test them, and step-by-step…
- The 12 Checks That Prevent 80% of Costly Home Repairs — Don't wait for a disaster. Our comprehensive monthly home maintenance checklist reveals the surprising, simple tasks that catch small issue…
- The 3 Hidden Ways Your — Uncover the surprising habits and hidden household issues that are silently increasing your homeownership costs and learn how to fix them.
- Why Your Cabinet Doors Aren't Square (And How to Fix That Gap) — Frustrated by cabinet doors that won't close flush or hang crooked? I'll show you how to diagnose and fix those annoying gaps, hinges, and…
What should this project cost?
Enter your project details for a realistic cost range before you call anyone.
Cost depends heavily on which system turns out to be the source.
- Regional adjustment
- National average
- Labor share (typical)
- ~$1,620
- Quotes to collect
- 3 written estimates
Educational estimate based on national averages — not a binding quote. Always confirm with written local estimates.
Get the print-ready PDF of this guide
A clean, ad-free, printable version you can keep on your phone or pin to the workshop wall. Free with a FixlyGuide account.
- Print-optimized layout
- Tools, materials & every step included
- Saved to your account
This article was independently written by FixlyGuide based on the source topic.
Frequently asked questions
Why does my benchtop planer leave a gouge (snipe) at the ends of my boards?+
Snipe occurs when an unsupported board tips slightly into the spinning cutterhead as it enters or leaves the machine. To stop it, tilt the outer ends of your infeed and outfeed tables upward by roughly 1/32-inch above the main bed, lift upward gently on long boards as they feed, or run cheap sacrificial scrap boards of identical thickness butted end-to-end with your workpiece.
Can I flatten a cupped or twisted board using only a thickness planer?+
No. A thickness planer only cuts a face parallel to the bottom face riding on the bed. If the bottom is twisted or cupped, the feed rollers will squeeze it flat against the table temporarily, but the board will spring back into its crooked shape immediately after exiting. You must flatten one face using a jointer, hand plane, or a shimmed planer sled first.
How much material should I remove in a single planer pass?+
For hardwoods like oak and maple, limit each pass to 1/32-inch (about a quarter-turn on most height cranks). For wider stock exceeding 8 to 10 inches, drop down to 1/64-inch. You can take slightly deeper cuts (up to 1/16-inch) on narrow softwoods like pine, but multiple shallow passes yield cleaner surfaces and extend blade life.
What is the difference between straight blades and a helical cutterhead?+
Straight knives cost less upfront and leave a glassy surface on straight-grain softwoods, but they dull faster and must be sharpened or replaced entirely if nicked by a nail or knot. Helical heads feature dozens of individual four-sided carbide inserts; they run significantly quieter, handle swirling wild grain without tear-out, and allow you to simply rotate a single nicked tooth instead of changing an entire blade.
Why does my wood stop feeding halfway through the planer?+
Clean the rubber feed rollers with a shop rag soaked in denatured alcohol or mineral spirits to remove sawdust and wood resins, then scuff them lightly with 320-grit sandpaper. Next, apply two coats of non-silicone paste wax to the cast metal bed plate and buff it smooth. This eliminates friction and restores the rollers' grip on the stock.
What is the shortest board I can safely run through a benchtop planer?+
Never feed any board shorter than the distance between the infeed and outfeed rollers—which is typically between 12 and 14 inches depending on the machine model. Short stock loses contact with the infeed roller before reaching the outfeed roller, causing it to kick back violently or catch in the cutterhead.
How long do benchtop planer blades usually last?+
Reversible high-speed steel (HSS) planer knives typically stay sharp for around 50 to 100 board feet of clean hardwood, but abrasive timbers or dirty reclaimed lumber can dull them in under 20 board feet. Carbide inserts on helical heads typically outlast HSS blades by a factor of 10 to 15 before needing an edge rotation.
Can I plane end-grain cutting boards through a benchtop thickness planer?+
No, running exposed vertical end grain (such as an assembled end-grain butcher block) through a thickness planer is extremely dangerous. The spinning knives catch the unsupported end fibers, which can explode the glue joints, shatter the wood, cause severe kickback, and damage your planer's internal cutterhead components.

Discussion
Loading comments…