- Insufficient Window Cleaning: Any speck of dust, dirt, or grease left on the glass will create a bubble or impede adhesion, leading to peeling over time.
- Improper Heat Shrinking: On curved windows, failing to fully shrink the film to the glass's contour results in large 'fingers' or creases that cannot be squeegeed out, leading to a wavy or unprofessional look.
- Not Enough Slip Solution: Applying insufficient slip solution to both the film's adhesive and the window prevents proper repositioning and can lead to premature adhesion, trapping air and creating creases.
- Using a Dull Blade: A dull utility knife or razor blade will tear, snag, or leave jagged edges on the film, ruining the clean lines essential for a professional finish.
- Rushing the Squeegee Process: Inadequate or haphazard squeegeeing leaves trapped water and air. These will manifest as bubbles as the film dries and cures, weakening the bond.
Published June 11, 2026Last updated August 17, 2026
Tools & materials you'll need
Affiliate linksAs an Amazon Associate FixlyGuide earns from qualifying purchases — at no extra cost to you. Prices and availability are accurate as of publication and subject to change.
Quick Answer
Achieving a professional-looking DIY car window tint requires meticulous cleaning, precise cutting, proper heat shrinking, and careful application to prevent bubbles, creases, and peeling. Rushing the process or neglecting crucial steps like thorough glass preparation are common mistakes that lead to poor results. With patience and attention to detail, homeowners can successfully tint their own car windows, enhancing privacy, reducing glare, and protecting their car's interior from harmful UV rays.
The Problem
Many homeowners attempt to tint their car windows themselves, only to be met with frustrating results: unsightly bubbles, peeling edges, visible creases, and a generally unprofessional appearance. This often leads to wasted money on tint film and a car that looks worse than before. The root of these problems usually lies not in the difficulty of the task itself, but in a lack of understanding of the underlying principles and common mistakes made during the application process. Without proper preparation, technique, and patience, even high-quality tint film will fail to adhere correctly or maintain its pristine look over time. Understanding what goes wrong, and why, is key to avoiding these pitfalls and achieving a durable, factory-like finish.
How It Works
Car window tinting involves applying a thin, multi-layered polyester film to the inside surface of a vehicle's windows. This film is designed to block various percentages of visible light, UV radiation, and infrared heat. Most modern tint films consist of several layers: a clear protective liner, an adhesive layer, a polyester film layer (which may contain dyes, metals, or ceramic particles for specific properties), and a scratch-resistant coating on the exposed side. When applied, the adhesive forms a bond with the glass, creating a seamless, tinted surface. The key to successful application lies in activating this adhesive evenly and completely, while simultaneously expelling all trapped air and excess water between the film and the glass.
The process typically begins with meticulous cleaning of the window to remove any contaminants that could interfere with adhesion. Next, the tint film is trimmed to roughly fit the window's shape. For curved windows, a heat gun is used to 'shrink' the film to the exact curvature of the glass (a process called 'dry shrinking'). This crucial step ensures the film lays flat without large wrinkles. Once shaped, the protective liner is peeled back, and the adhesive side is sprayed with a slip solution – typically soapy water. This solution allows the installer to reposition the film freely on the glass. The film is then carefully placed, aligned, and excess water and air are systematically squeegeed out from the center outwards, ensuring a strong, bubble-free bond. The water eventually evaporates, leaving behind a fully adhered, smooth tint film. The final step involves carefully trimming the edges for a precise, factory-like fit against the window's frame.
Step-by-Step Fix
1. Gather Your Tools and Clean the Work Area — Before you even touch the tint film, ensure you have all necessary tools and a clean, dust-free environment. Dust is the enemy of a perfect tint job, leading to unsightly specks under the film. Clean your garage or driveway thoroughly.
* **Tip:** If working outdoors, choose a calm, windless day. Humidity can also affect drying times.
2. Deep Clean the Windows - Inside and Out — Proper adhesion depends entirely on a pristine glass surface. Spray the windows heavily with a tint application solution (or mild dish soap and water solution), and use a fresh razor blade to scrape every inch of the glass, removing stubborn residues like sap, tar, and old adhesive. Follow with a thorough wipe-down using a lint-free cloth or paper towel.
*   **Safety Note:** Always use a fresh, sharp razor blade and apply light, even pressure. Dull blades can scratch glass. Wear gloves to protect your hands.
*   **If this doesn't work:** If deep scratches appear after cleaning, the glass may be damaged beyond DIY repair. Consider professional window replacement or an alternative solution for those specific windows.
3. Rough Cut the Tint Film — Unroll the tint film onto the exterior of the window (liner side facing out). Spray the window with slip solution to help the film adhere temporarily. Use a sharp utility knife to roughly cut the film, leaving an overhang of about 1-2 inches around all edges. This excess is necessary for heat shrinking.
* **Tip:** Use specialized tint film cutting tools, which often have an extended handle, for easier precision.
4. Heat Shrink the Film (for Curved Windows) — This is arguably the most critical step for a professional finish on curved glass. With the film still on the outside, a slip solution sprayed, and the liner side facing out, use a heat gun on a low to medium setting. Gently apply heat to the film, using your squeegee to push out any 'fingers' (long wrinkles) from the center outwards. Work slowly and patiently until the film perfectly conforms to the window's curvature. This process 'trains' the film to lay flat.
*   **Tool Tip:** A good quality heat gun with adjustable temperature settings is crucial. Practice on a small scrap piece of film first.
*   **Safety Note:** Keep the heat gun moving constantly to avoid overheating and scorching the film or cracking the glass.
5. Final Trim and Edge Preparation — Once shrunk (or for flat windows, after rough cutting), carefully trim the film to the exact size of the window pane. For roll-up windows, leave a tiny gap (1/16 to 1/8 inch) at the top edge to prevent peeling when the window rolls up and down. For fixed windows, trim flush with the rubber gasket. Use a hard card wrapped in a lint-free cloth to push the film into the gasket edges, creating a tight seal.
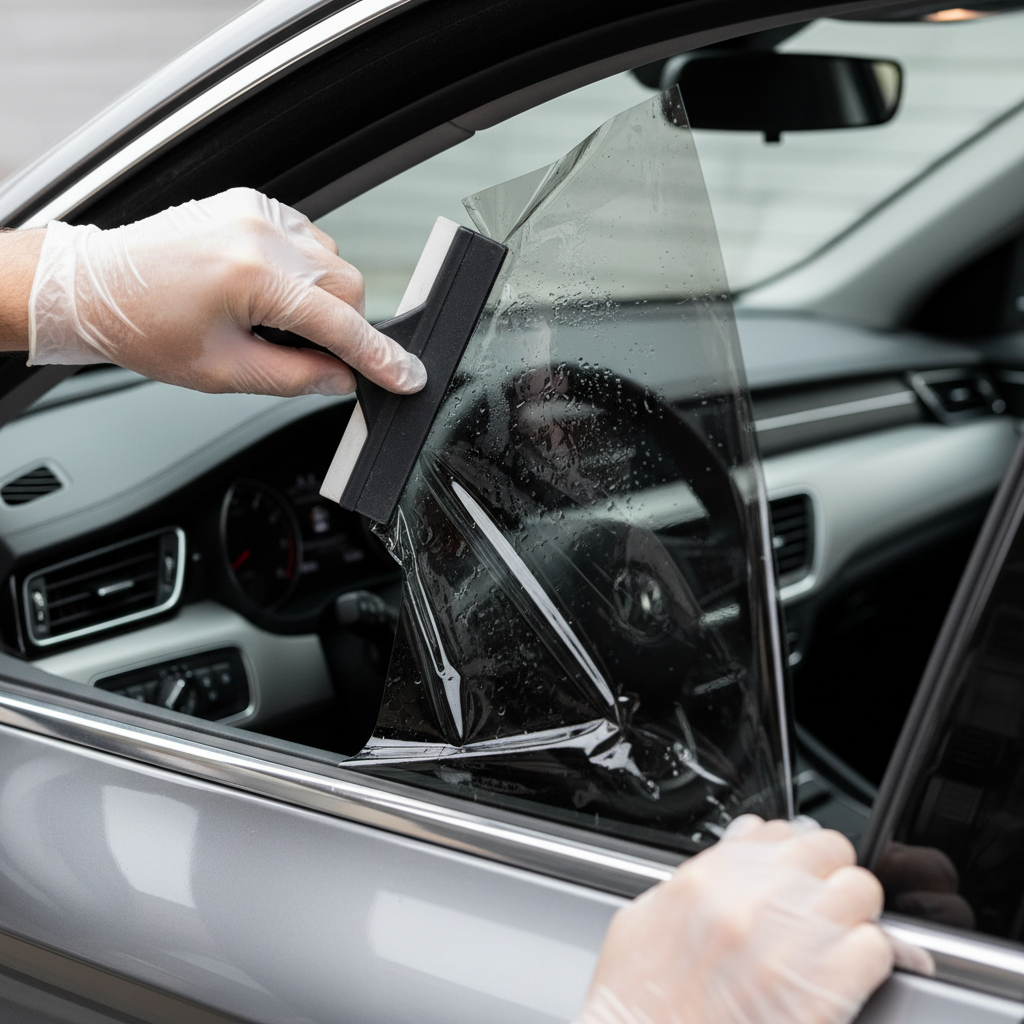
6. Wet Application: Peel, Spray, and Position — Thoroughly re-clean the interior of the window, ensuring no dust or debris resettled. Then, carefully peel off the clear liner from the tint film, generously spraying the adhesive side with slip solution as you go. Also, spray the interior of the window thoroughly. This lubricated surface is what allows you to slide and position the tint until it's perfectly aligned.
* **Pro Tip:** Have a helper assist with peeling the liner off larger pieces of film to prevent it from folding onto itself.
7. Squeegee Out Water and Air — Starting from the center of the film, use a firm squeegee to systematically push water and air bubbles outwards. Use overlapping strokes, maintaining consistent pressure. Work from top to bottom, or center to edges, ensuring all moisture is expelled. Pay extra attention to the edges and corners. A small amount of moisture will remain, which will evaporate over several days.
* **If this doesn't work:** If stubborn bubbles remain, lift the film gently with a corner of your razor or a fine needle, spray more slip solution underneath, and re-squeegee. For creases, the film may be permanently damaged and might require replacement of that section.
8. Cure Time and Final Inspection — Allow the tinted windows to cure for at least 3-5 days, or longer in colder weather, before rolling them down. The adhesive needs time to fully bond and the remaining water to evaporate. Inspect the windows daily for any new bubbles that might appear and gently push them out with a squeegee if possible. During this time, the tint may appear hazy or streaky – this is normal and will clear as it cures.
* **Warning:** Rolling windows down too early can cause the tint to peel at the edges, requiring reapplication.
Common Causes
- Insufficient Window Cleaning: Any speck of dust, dirt, or grease left on the glass will create a bubble or impede adhesion, leading to peeling over time.
- Improper Heat Shrinking: On curved windows, failing to fully shrink the film to the glass's contour results in large 'fingers' or creases that cannot be squeegeed out, leading to a wavy or unprofessional look.
- Not Enough Slip Solution: Applying insufficient slip solution to both the film's adhesive and the window prevents proper repositioning and can lead to premature adhesion, trapping air and creating creases.
- Using a Dull Blade: A dull utility knife or razor blade will tear, snag, or leave jagged edges on the film, ruining the clean lines essential for a professional finish.
- Rushing the Squeegee Process: Inadequate or haphazard squeegeeing leaves trapped water and air. These will manifest as bubbles as the film dries and cures, weakening the bond.
- Rolling Down Windows Too Soon: The adhesive needs a full cure time (typically 3-5 days, sometimes longer in cold or humid conditions) to bond completely. Rolling down windows prematurely will cause the edges to peel or the film to shift.
- Working in a Dusty Environment: Airborne dust particles can easily float onto the wet film or window during application, becoming permanently trapped beneath the tint, creating small, visible imperfections.
Common Mistakes
- Skipping the Deep Clean: Homeowners often wipe glass with Windex and call it good. Instead, use a razor blade and tint solution to meticulously scrape every square inch of the glass, removing invisible contaminants.
- Cutting the Film Too Small: Many DIYers cut the film flush with the window initially. Always rough-cut with an overhang for easier shaping and a more precise final trim against the gaskets.
- Overheating the Film During Shrinking: Leaving the heat gun in one spot for too long warps or melts the film, creating permanent damage. Keep the heat gun moving constantly.
- Not Using Enough Slip Solution: A common mistake is a timid spray. You want the window and the adhesive side of the film thoroughly saturated. This provides ample working time for positioning.
- Improper Squeegee Technique: Don't just push water aimlessly. Start from the center and use firm, overlapping strokes, always working towards the edges to systematically expel all air and water.
- Applying Tint in Direct Sunlight: The film can dry too quickly, making it difficult to position and increasing the risk of premature adhesion and trapped bubbles. Work in a shaded area or garage.
- Using Dirty Tools: Reusing dirty squeegees or cloths introduces contaminants. Always use clean, lint-free tools and fresh razor blades.
Cost & Time Breakdown
| Task | DIY cost | Pro cost | Time |
|---|---|---|---|
| Prep & Clean Windows | $5–$15 | Included | 30 min – 1 hr |
| Purchase Tint Film (2-4 windows) | $20–$80 | Included | N/A |
| Heat Shrink & Rough Cut Film | N/A | Included | 1–2 hours |
| Final Trim & Application | $0 | Included | 2–3 hours |
| Curing Time | N/A | N/A | 3–5 days |
| Total | $25–$95 | $200–$500+ | 3.5–6 hours |
Tips & Prevention
- Buy Quality Film: Invest in a good quality tint film. Cheap film is harder to work with, fades faster, and is more prone to bubbling and peeling.
- Practice on Scraps: Before tackling your car windows, practice the heat shrinking and application techniques on a small piece of glass or a spare window from a junkyard.
- Work in a Clean Environment: A garage or a very still day outdoors is ideal. Avoid windy conditions or areas with lots of floating debris.
- Be Patient with Curing: Resist the urge to roll down windows. The curing time is crucial for the adhesive to fully bond and prevent edge peeling.
- Regular Cleaning: Once cured, clean tinted windows with ammonia-free window cleaner and a soft microfiber cloth to prevent damage to the film's surface.
- Check Local Laws: Be aware of your local and state laws regarding tint darkness (VLT - Visible Light Transmission) before applying film.
When to Call a Professional
While DIY window tinting can be rewarding, there are clear instances when calling a professional is the smarter choice. If you've attempted to tint windows yourself and experienced persistent large bubbles, irreparable creases, severe peeling, or significant scratches on the film, a professional can remove the damaged tint and reapply it correctly. For vehicles with complex window curvatures, such as some sports cars or rear hatches with extreme convex or concave shapes, the heat shrinking process can be exceptionally difficult, requiring specialized tools and extensive experience; a professional will have the expertise to handle these without damaging the film or glass. Additionally, if strict adherence to local tint laws is critical for inspection or resale, a professional will guarantee compliance with specific VLT percentages using calibrated equipment. Finally, if you simply lack the patience or time required for the meticulous preparation and application, or if you want a perfect, factory-grade finish without any DIY imperfections, the investment in professional installation is well justified for peace of mind and quality assurance.
Related Articles
Keep troubleshooting with these hand-picked guides from FixlyGuide:
- The Secret to Lush Raised Beds? It's Not Just About How You Water — Smart irrigation for raised garden beds isn't just about automation; it's about delivering the right amount of water precisely when your pl…
- The Hidden Reason Your GFCI Trips (It's Not Always a Faulty Outlet) — A continuously tripping GFCI outlet is a critical safety warning, often indicating moisture, a faulty appliance, or a wiring problem that r…
- The #1 Mistake Owners Make With New Pellet Grills (And How to Fix It) — Avoid a bitter first cook by properly seasoning your new pellet grill before its inaugural use.
- The 6 Cleaning Secrets Hiding in Your Power Drill (Plus Attachments to Master) — Your power drill isn't just for DIY projects; with the right attachments, it's a powerful and efficient cleaning tool for tackling tough gr…
- The Hidden Reason Your GFCI Trips (It’s Not Always a Bad Outlet) — A tripping GFCI outlet is a safety mechanism doing its job, often indicating a problem like moisture, a faulty appliance, or a wiring issue…
- The #1 Mistake Homeowners Make When Caulking a Bathroom Sink (And How to Fix It) — Discover the most common caulk mistake homeowners make around bathroom sinks and follow simple steps to achieve a lasting, watertight seal.
Should you do this yourself?
Answer five quick questions before you start. Safety outranks savings every time.
Your experience with work like this
How high do you have to work?
Does the job involve any of these?
Will it need a permit?
Specialty tools
Free and instant. Educational guidance only — not a quote, inspection, or professional diagnosis.
What should this project cost?
Enter your project details for a realistic cost range before you call anyone.
Per-window replacement commonly $450–$1,400 installed; hardware repairs often under $300.
- Regional adjustment
- National average
- Labor share (typical)
- ~$281
- Quotes to collect
- 3 written estimates
Educational estimate based on national averages — not a binding quote. Always confirm with written local estimates.
Before you start
Check the difficulty, permits, and safety risk — then decide whether to call a pro.
- Estimate this projectGet a cost range for your scope and ZIP before you call anyone.Open
- Get local estimatesSend one request and compare written estimates from vetted pros.Open
Free, no signup required. Estimates are educational guidance, not a quote or an inspection.
This article was independently written by FixlyGuide based on the source topic.
Frequently asked questions
How long does car window tint last?+
The lifespan of car window tint varies significantly based on the quality of the film and the installation. High-quality tint professionally installed can last 5-10 years or even longer. Cheaper films or poorly applied tint may show signs of bubbling, fading, or peeling within 1-3 years.
Can I remove old window tint myself?+
Yes, you can remove old window tint yourself, though it can be a tedious process. Common methods involve using a steamer, heat gun, or ammonia-based cleaners to loosen the adhesive, followed by scraping the film and adhesive residue off the glass. Always wear gloves and ventilate the area well if using chemicals.
What causes car window tint to turn purple?+
Tint turning purple is a common sign of a low-quality, dyed tint film that has degraded due to prolonged exposure to UV light. The dyes in the film break down, causing the color shift. Higher-quality carbon, ceramic, or metallic films are much more resistant to this fading.


Discussion
Loading comments…