
Tools & materials you'll need
Affiliate linksAs an Amazon Associate FixlyGuide earns from qualifying purchases — at no extra cost to you. Prices and availability are accurate as of publication and subject to change.
Quick Answer
An interior door that consistently sticks is a common, frustrating issue often misattributed solely to humidity. While moisture plays a role, fundamental problems like a shifting house foundation, loose hinge screws, or even improper paint application are frequently the true culprits. The fix usually involves methodically identifying the exact point of friction and applying targeted solutions, such as tightening hardware, planing down the door's edge, or shimming hinges for proper alignment. Most solutions are well within the grasp of a confident DIYer, saving you the expense of a professional.
The Problem
There's that familiar resistance, the tell-tale scrape, or the need for an extra shove just to close a door that once swung freely. A sticking interior door isn't just an annoyance; it can be a symptom of underlying issues in your home. The consistent friction can damage door finishes, loosen hardware even further, and sometimes indicate structural shifts that warrant attention. Ignoring a sticking door doesn't make it better; it usually exacerbates the problem, leading to more significant wear and tear on your door and frame over time. This guide will walk you through diagnosing the exact cause and implementing a lasting solution, turning that frustrating jam into smooth operation.
How It Works
To understand why a door sticks, it helps to visualize the door system as a finely tuned machine. A door slab hangs within a rectangular door frame, secured by hinges that pivot. When hinges are properly installed and tight, the door maintains a consistent gap (known as a 'reveal') of roughly 1/8 inch around its perimeter, allowing it to swing without touching the jamb. The latch plate on the door aligns perfectly with the strike plate on the door frame, allowing the door to close and latch securely.
Several forces can disrupt this delicate balance. Wood, being a hygroscopic material, absorbs and releases moisture from the air, causing it to swell in humid conditions and shrink when dry. This dimensional change, especially noticeable in older, solid wood doors, can cause the door edges to expand and rub against the frame. However, wood movement isn't always the primary factor. Your house's foundation, though seemingly solid, is constantly subjected to soil expansion and contraction, settling, and seismic activity. This subtle movement can slightly rack (twist or warp) door frames, pulling them out of square. When a frame is no longer perfectly rectangular, the consistent reveal around the door is compromised, leading to contact points. Loose hinge screws are another major contributor. Over time, the weight of the door, combined with repeated opening and closing, can cause screws to back out or ream out the wood in the hinge mortises. This allows the door to sag, dropping its top corner and causing the bottom edge or the top corner on the latch side to drag against the frame. Finally, layers of paint or an uneven application can incrementally build up on door edges and frame surfaces, reducing the necessary clearance to the point of friction. Understanding these mechanisms is the first step to accurately diagnosing and fixing your sticky door.
Step-by-Step Fix
Safety Note: Always wear appropriate eye protection when using power tools like a sander or planer. Disconnect power to any nearby electrical outlets before working in the area if you suspect a wiring issue, though it's unlikely for a standard door fix.
-
Identify the Sticking Point — Use a piece of paper or chalk to pinpoint the exact friction.
- Open and close the door slowly, observing where it snags. Is it the top corner, the bottom edge, the hinge side, or the latch side?
- For a more precise diagnosis, close the door until it just touches the frame at the sticking point. With the door almost closed, try to slide a piece of paper or a thin business card into the gap around the entire perimeter of the door. The area where the paper snags or can't enter is where the door is making contact.
- Alternatively, rub chalk or lipstick on the suspected sticking edge of the door, then open and close it. The chalk mark left on the door frame will clearly show the contact point.
-
Check Hinge Tightness — Loose hinges are a common and easy fix.
- Open the door wide. Use a Phillips head screwdriver to check every screw on both the door and frame sides of all hinges.
- Tighten any loose screws. Be careful not to overtighten, which can strip the wood.
- If a screw spins freely: The hole is stripped. Remove the screw, insert a few wooden toothpicks (or a golf tee) with wood glue into the hole, let it dry for an hour, then break off the excess and reinsert the screw. This gives the screw new wood to bite into. Use longer screws (up to 3 inches) for the top hinge on the frame side – these can reach the framing stud, providing much better support and often pulling the frame back into square.
-
Address Paint Buildup — Scrape and sand away excess paint.
- If paint is clearly the issue, use a sharp utility knife or paint scraper to carefully scrape away the built-up paint along the door's edge or the frame's rabbet.
- Follow up with 120-grit sandpaper on a sanding block to smooth the surface. This is a common problem in older homes with many layers of paint.
-
Shim the Hinges (If Door is Sagging) — Adjusting hinge depth can lift or shift the door.
- If the door is sticking at the top or bottom on the latch side, it's likely sagging on the hinge side. You can often correct this by shimming the hinges.
- To lift the latch side (if bottom is sticking): Remove the screws from both leaves of the bottom hinge on the frame side. Place thin cardboard shims (from a cereal box or similar) behind the hinge plate, then reattach the screws. This effectively pushes the door away from the frame at the bottom, lifting the latch side.
- To move the latch side closer (if top is sticking on latch): You'll need to slightly recess the top hinge. Remove the top hinge from the door frame. If the mortise is too deep, you can add a shim behind it. If the door isn't closing properly on the latch, you may need to ever-so-slightly deepen the top hinge mortise or shave down the hinge side of the door. This is where you might need to try planing the hinge side if the door itself is swollen.
-
Planing the Door Edge — Carefully remove material from the sticking edge.
- This step requires caution and should only be done if other methods fail. If you've identified a specific edge of the door rubbing consistently and it's not due to loose hinges or paint, you may need to plane it.
- Remove the door: Recruit help, remove the hinge pins, and carefully lift the door off its frame. Lay it flat on sawhorses or a workbench.
- Mark the area: Use a straightedge and pencil to clearly mark the area to be planed. Start by removing very little material – you can always remove more, but you can't add it back.
- Plane the door: Using a block plane or a power planer, make shallow passes along the marked edge, always planing in the direction of the wood grain. Check frequently by holding the door up to the frame or reinstalling it temporarily.
- Sand and finish: Once the door fits, sand the planed edge smooth with 150-grit sandpaper, then prime and paint or stain to match the rest of the door.
-
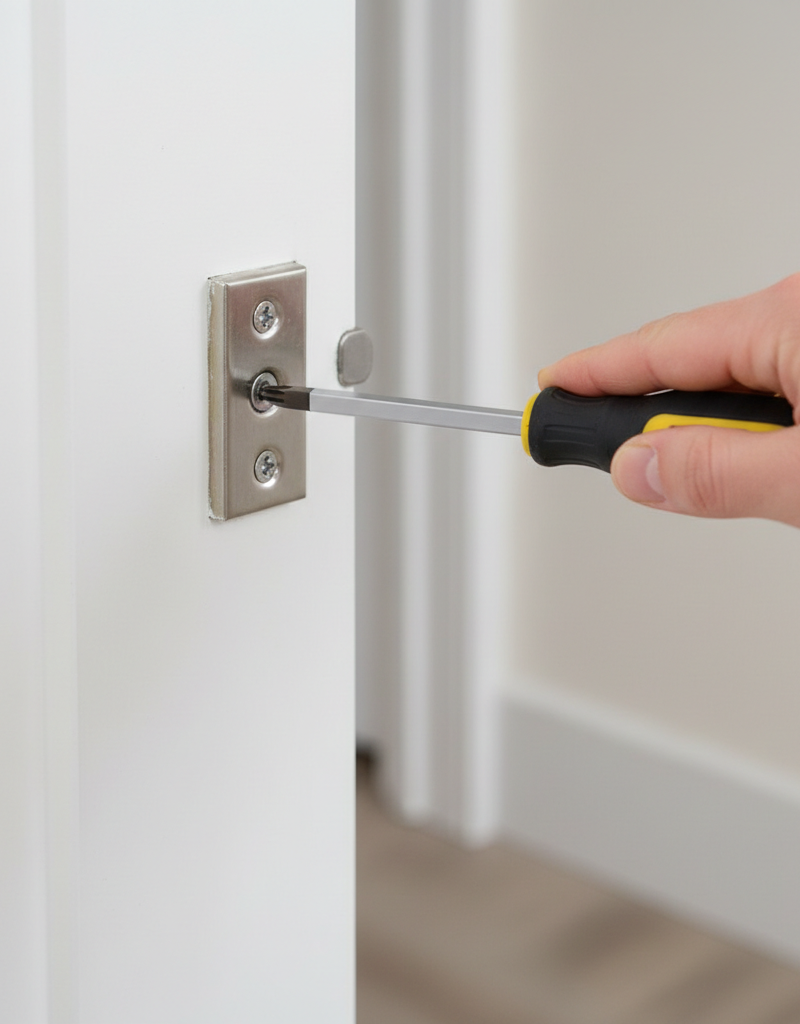
Adjusting the Strike Plate — Small adjustments can make a big difference for latching.
- If the door closes but doesn't latch easily, or if you have to push hard to engage the latch, the strike plate might be slightly misaligned. This can happen if the door (or frame) has shifted.
- Use a screwdriver to loosen the strike plate screws. You might be able to slide the plate slightly up, down, in, or out, just enough to catch the latch.
- If more significant adjustment is needed, remove the strike plate. Use a chisel to carefully enlarge the opening in the jamb mortise in the required direction. Test frequently. Once correct, reposition and re-screw the strike plate. Fill any visible gaps with wood putty before re-screwing if the original screw holes are too far off.
Common Causes
- Seasonal Humidity Changes: Wood absorbs moisture, causing doors to swell in summer and shrink in winter. This is a primary, but often not sole, cause.
- House Settling or Foundation Movement: Over time, homes settle. This can subtly rack door frames out of square, leading to inconsistent gaps around the door.
- Loose or Worn Hinges: The constant weight and movement of a door can cause hinge screws to loosen or the hinge leaves themselves to bend slightly, allowing the door to sag.
- Excessive Paint Buildup: Multiple layers of paint on the door edges or frame rabbets can gradually eliminate the necessary clearance for the door to swing freely.
- Improper Door Installation: A door or frame may not have been installed perfectly plumb and square from the beginning, leading to issues that appear over time.
- Warped Door Slab: Less common for interior doors, but a severe warping of the door slab itself can cause widespread sticking that's difficult to correct with minor adjustments.
Common Mistakes
- Planing Before Checking Hinges: Many homeowners jump straight to planing the door. Always check and tighten hinges first; it's a much easier fix and often solves the problem without removing material.
- Planing Too Much Material: It's impossible to add wood back after planing. Start with very shallow passes and check the fit frequently. Err on the side of caution.
- Ignoring Stripped Screw Holes: Simply re-inserting a screw into a stripped hole won't hold. The toothpick and glue trick is essential for creating new purchase for the screw.
- Using the Wrong Tools: Trying to plane a door with sandpaper alone is ineffective. Invest in a sharp hand plane or a power planer for clean, precise material removal.
- Not Repainting/Refinishing Cut Edges: Any exposed, raw wood after planing or sanding will be more susceptible to moisture absorption, leading the door to swell again. Always seal the exposed wood.
- Only Checking One Sticking Point: A door can stick in multiple places due to different issues. Thoroughly check the entire perimeter with a piece of paper.
Cost & Time Breakdown
| Task | DIY cost | Pro cost | Time |
|---|---|---|---|
| Tighten hinges | $0–$5 | $50–$100 | 5–15 min |
| Fix stripped hinge holes | $2–$10 | $60–$120 | 15–30 min |
| Adjust strike plate | $0–$5 | $50–$100 | 10–20 min |
| Plane door edge | $10–$50 | $100–$250 | 1–2 hours |
| Sand and repaint edges | $15–$40 | $75–$150 | 1–3 hours |
| Install longer hinge screws | $3–$10 | $50–$100 | 15–30 min |
Tips & Prevention
- Maintain Consistent Humidity: In homes with significant seasonal swelling/shrinking, consider using a whole-house humidifier in dry months and a dehumidifier in humid months to stabilize the relative humidity.
- Check Hinges Annually: Make it a habit to check and tighten all hinge screws on your interior doors once a year. This small maintenance step can prevent major sticking issues.
- Proper Painting Technique: When painting doors, always remove them from the frame and paint them flat. Avoid heavy coats on the edges, and never paint a closed door to the frame, as this will seal it shut.
- Inspect Reveals Regularly: Periodically open and close your doors, observing the reveal (the gap) around the edges. Any significant change could be an early warning sign.
- Use the Right Fasteners: If you frequently have stripped hinge screws, replace them with slightly longer, coarser-threaded screws (e.g., #9 or #10 x 1.5-inch screws) for better holding power in the door and frame.
When to Call a Professional
While most sticking door issues are fixable by a diligent homeowner, there are situations where calling a licensed professional is the smarter, safer, or more efficient choice. If, after attempting the steps above, the door continues to stick or the problem seems more severe, it's time to consider professional help. Specifically, if you suspect the door frame itself is significantly out of square or plumb due to foundation issues, a general contractor or a foundation specialist should be called to assess the structural integrity of your home. If a door is severely warped beyond simple planing, or if you need to replace a door slab and custom fitting is required, a skilled carpenter can ensure a perfect fit and operation. Additionally, if the issue affects multiple doors throughout the house, it's a stronger indication of a broader structural problem that warrants professional investigation rather than piecemeal DIY fixes. A professional can quickly diagnose complex issues, has specialized tools for precise adjustments, and can provide long-lasting solutions for problems beyond basic maintenance.
Related Articles
Keep troubleshooting with these hand-picked guides from FixlyGuide:
- The Surprising Reason Your Interior Door Sticks (It's Not Always Humidity) — Before you blame humidity, learn the common culprits behind a sticking interior door and how to fix them with simple DIY steps.
- The 4 Hidden Reasons Your Window Won't Stay Up (And the Easy Fixes) — Before you blame a broken window, learn the common culprits behind window sashes that won't stay open and how to fix them yourself.
- Your Door Won't Latch? The 5-Minute Fix Nobody Talks About — Tired of a door that swings open? Learn the secret 5-minute fix for a door that won't latch. This simple adjustment to your strike plate ca…
- That ONE Reason Your Closet Door Keeps Derailing — Stop just putting your sliding closet door back on the track. We reveal the hidden—and surprisingly simple—hardware issue that causes 90% o…
- The 3 Hidden Reasons Your Door Won't Latch (And the Easy Fixes) — Discover the surprising reasons your interior door isn't latching and how to quickly diagnose and fix the issue with simple tools.
- The Secret Culprit Behind Your Leaky Refrigerator (It’s Not Always the Water Line) — Discover the most common, often overlooked, reasons your refrigerator is leaking water and how to fix them with simple DIY steps.
Get the print-ready PDF of this guide
A clean, ad-free, printable version you can keep on your phone or pin to the workshop wall. Free with a FixlyGuide account.
- Print-optimized layout
- Tools, materials & every step included
- Saved to your account
Recommended for DIYers & woodworkers
Sponsored
The Top 20 Tools for Workshops of Any Budget
No stationary machines or power tools required — plus 3 fundamental tools that can't be bought at any price.
Get the free guide
Ted's Woodworking — The #1 Woodworking Resource
Detailed instructions, dimensioned drawings, materials & cutting lists, and 3D schematics for every skill level.
See the plansSponsored: links above are affiliate links. FixlyGuide may earn a commission on qualifying purchases — at no extra cost to you.
Frequently asked questions
Why would an interior door suddenly start sticking?+
An interior door can suddenly start sticking due to seasonal humidity changes causing wood to swell, shifting house foundations racking the door frame, or loose hinge screws allowing the door to sag. Less often, new layers of paint can incrementally reduce clearance.
Can I fix a sticking door without removing it?+
Often, yes. Many sticking door issues can be resolved by tightening hinge screws, fixing stripped screw holes, sanding down minor paint buildup, or shimming hinges, all without removing the door. Planing the door edge is typically the only fix requiring door removal.
How do I know if the door or the frame is the problem?+
Identifying the sticking point is key. If the door rubs consistently in one specific area, especially on the latch side or a corner, it's a good indication the door itself or its alignment is the issue. If the gap around the door is uneven all the way around, the frame might be out of square. Using chalk or a piece of paper to find the exact friction point will help diagnose whether it's the door's edge or the frame's rabbet causing contact.
What tools do I need to fix a sticking door?+
Basic tools include a Phillips head screwdriver, a utility knife or paint scraper, 120-grit sandpaper, and possibly a hand plane or power planer. For stripped screw holes, wood glue and toothpicks or golf tees are useful. A straightedge and pencil are helpful for marking.


Discussion
Loading comments…