- Sanding for a Smooth Finish: The number one cause of widespread contamination. Homeowners trying to get a perfect, glass-smooth surface before repainting will power-sand old layers, unknowingly blasting toxic dust everywhere.
- Window and Door Friction: Old double-hung windows and sticky doors that rub against their frames can generate lead dust with every use. That constant friction grinds the paint into a fine powder that settles on sills and floors.
- Scraping Peeling Paint: When old paint starts to alligator or peel, the first instinct is to scrape it off. Dry scraping sends chips and dust flying. Even if the chips are large, microscopic particles are still released.
- Demolition Projects: Tearing out a wall, removing old trim, or gutting a bathroom with lead paint is a big contamination event if it’s not handled with proper containment.
- Drilling and Cutting: Just drilling a hole to hang a picture or cutting into a wall to install a new electrical outlet can release a surprising amount of lead dust from the affected area.
General remodeling · Renovation planning
| Project category | General remodeling |
|---|---|
| Problem type | Renovation planning |
| Trade required | General contracting |
| Urgency | Planned project |
| Safety risk | Low safety risk |
| DIY suitability | Pro recommended |
| Cost category | Major investment |
| Typical timeline | Design and permitting often 2–4 months before work starts |
| Contractor type | General contractor |
Repair option
Phase the work and fix the building envelope first.
Replacement option
Full renovation with permits, design, and a general contractor.
Common causes
- Space no longer fits how the household lives
- Resale preparation
- Deferred maintenance stacking up
Relevant tools:project cost estimatorcompare quoteshome improvement material prices
Published October 5, 2026Last updated October 5, 2026
Tools & materials you'll need
Affiliate linksAs an Amazon Associate FixlyGuide earns from qualifying purchases — at no extra cost to you. Prices and availability are accurate as of publication and subject to change.
Quick Answer
If your house was built before 1978, I’d assume painted surfaces contain lead until I proved otherwise. The real danger isn’t the paint sitting there all nice and quiet — it’s the dust you make when you sand, scrape, or tear into it. Test the surface before you start with an EPA-recognized test kit, then use lead-safe work practices like sealing off the area, running a HEPA vacuum, and wearing a P100 respirator. No shortcuts. Not on this one.
The Problem
That old window you want to restore or the dated baseboards you're itching to replace might be hiding a serious hazard: lead-based paint. For decades, lead was a go-to ingredient in residential paint because it held up well and looked good. We didn’t understand the health fallout until later. Now we know lead’s a nasty neurotoxin, especially for kids and pregnant women. It can cause permanent learning disabilities, behavioral problems, and other serious health issues. For adults, it can lead to high blood pressure, joint pain, and memory loss.
The real problem for a DIYer isn’t a perfectly intact wall of lead paint. The danger gets kicked up—literally—when you disturb it. Any action that creates dust or chips, like sanding, scraping, drilling, or demolition, releases microscopic lead particles into the air. That dust settles on every surface, gets tracked through the house, and can be inhaled or swallowed without anybody noticing. It’s invisible, odorless, and it doesn’t just disappear because you’re done for the day. One bad project can contaminate the whole house, and then you’re dealing with the mess for years.
How It Works
Lead paint was officially banned for residential use in the United States in 1978. If your home was built before then, there’s a very high probability you have it somewhere. The older the house, the higher the chance. It’s often buried under layers and layers of newer, safer latex or acrylic paint. You can’t see it, smell it, or taste it. That’s why I tell people to assume it’s there first and ask questions later.
When you disturb lead paint, you create lead dust. Think of it like glitter, but toxic. It’s incredibly fine and spreads everywhere. A standard shop vac or household vacuum cleaner won’t catch those tiny particles; in fact, they’ll just blow the smallest, most dangerous stuff right back into the air, which makes the contamination worse. That’s why specialized equipment, like a vacuum cleaner equipped with a High-Efficiency Particulate Air (HEPA) filter, is non-negotiable. A HEPA filter is certified to capture 99.97% of particles that are 0.3 microns in size—the size of lead dust particles. Same deal with breathing protection: a simple dust mask won’t cut it. You need a respirator with P100 cartridges, which are built to filter out these fine particulates and keep them out of your lungs. The whole game is about containing the dust, protecting yourself from it, and cleaning it up like you mean it when you’re finished.
Step-by-Step Fix
Here’s how I’d handle a small-scale DIY project in a pre-1978 home. This is for minor repairs, not whole-room renovations.
-
Test for Lead First.
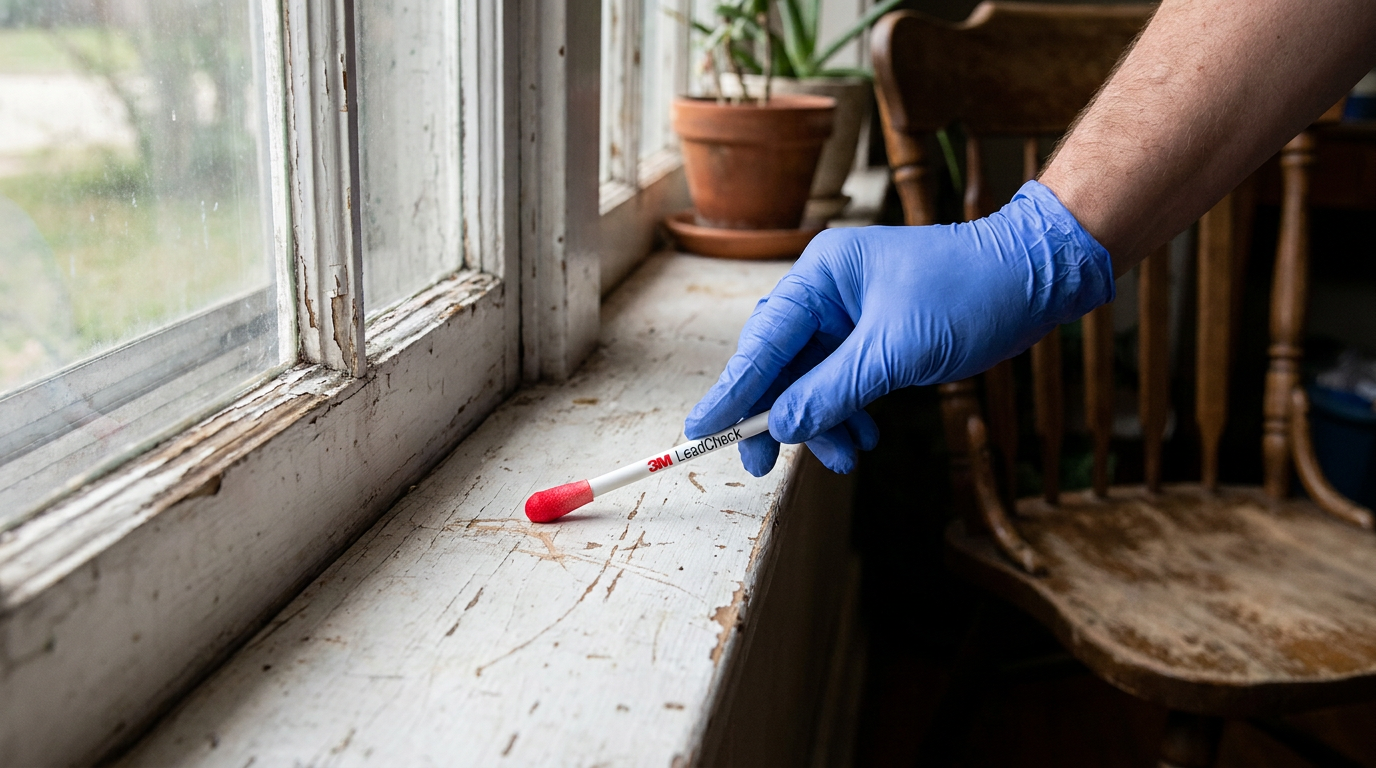
- Before you touch anything else, find out if you’re actually dealing with lead. Buy an EPA-recognized lead test kit. The most common ones are 3M LeadCheck swabs. Follow the instructions exactly. You’ll usually need to score the painted surface with a utility knife to expose all the layers down to the bare wood or plaster, then swab the cut. If the swab turns red or pink, you’ve got lead.
-
Isolate the Work Area.
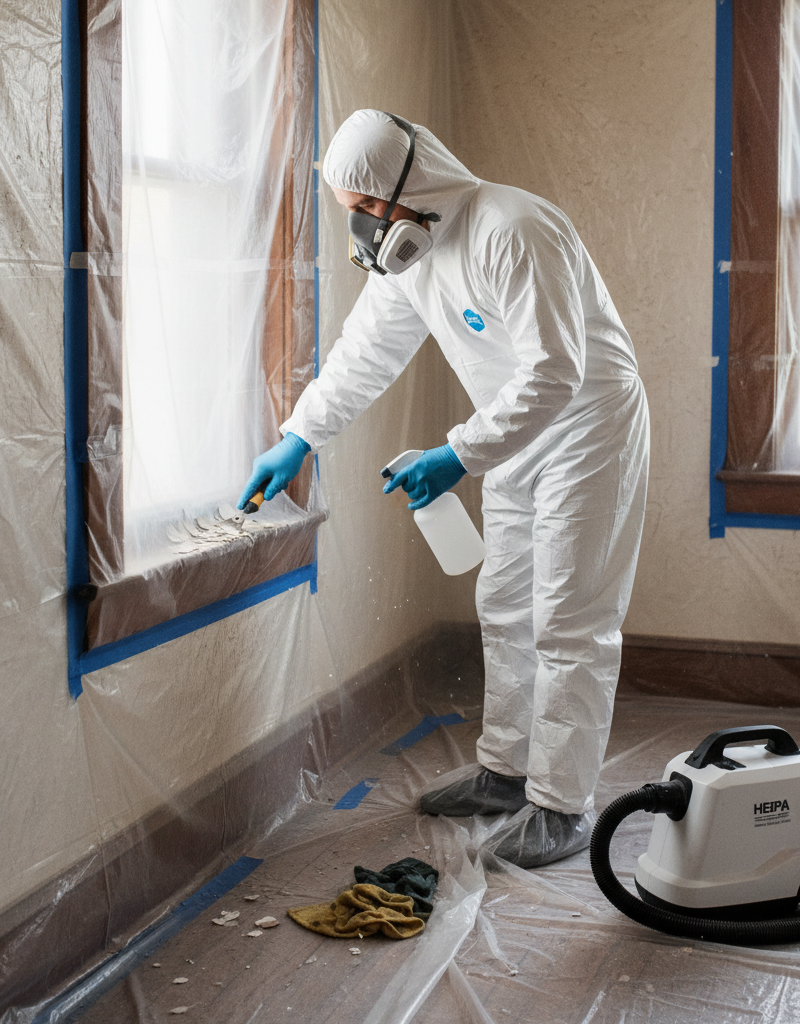
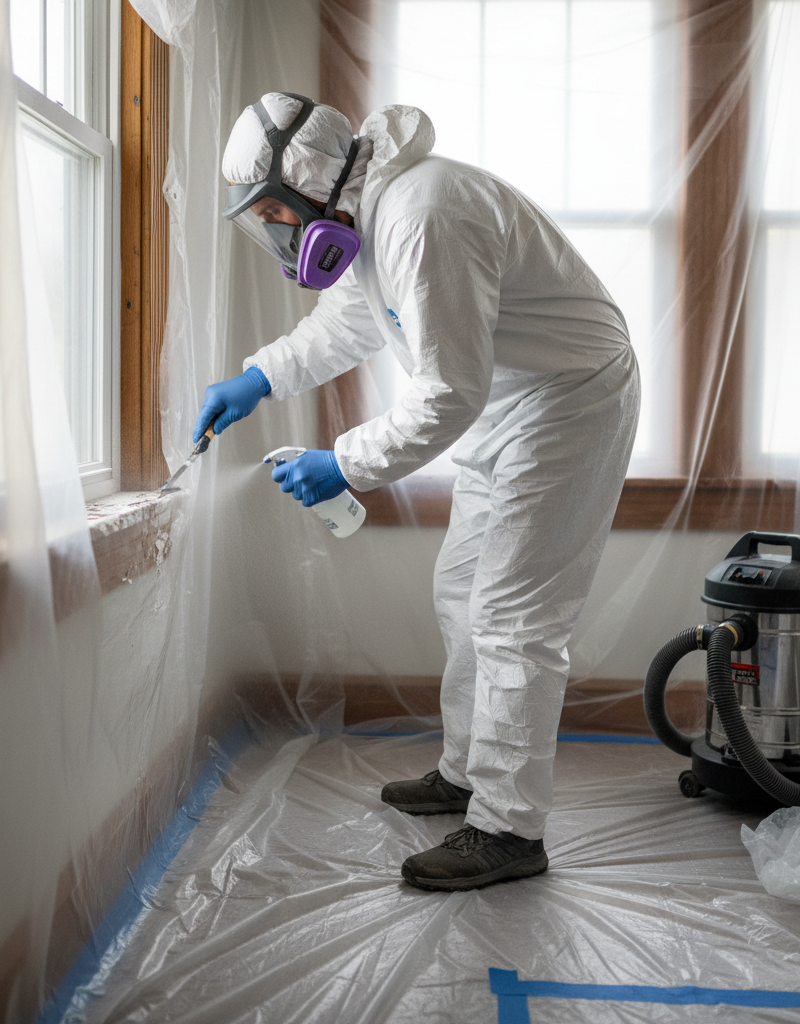
- Your goal is to make a sealed bubble around the project. Clear out furniture, rugs, and decor from the room. Anything you can’t move, cover with two layers of 6-mil plastic sheeting and tape it down tight. Shut off your HVAC system completely, then seal vents, outlets, and the gaps around doors with plastic and tape so dust can’t travel through the house.
-
Gear Up with PPE.
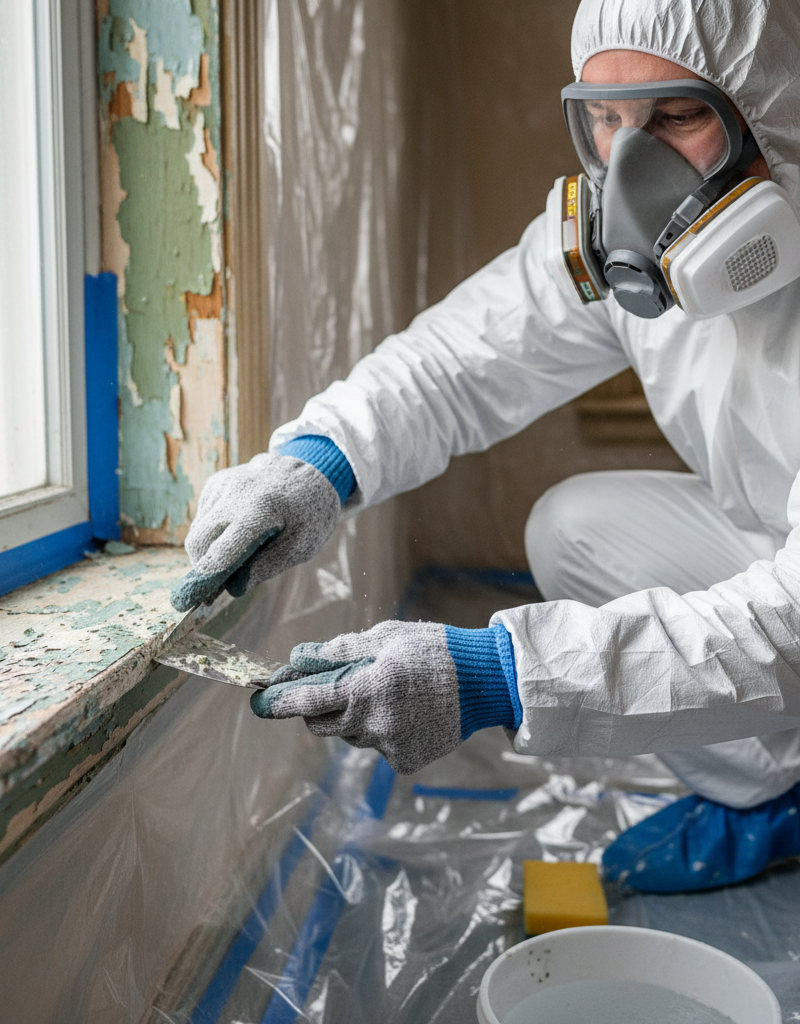
- This isn’t optional. Put on your P100 respirator, disposable coveralls with a hood, safety goggles, and nitrile gloves. Check the respirator fit. It needs to seal tight around your face. You shouldn’t smell anything through it. That gear keeps you from breathing dust and keeps you from carrying it out on your clothes—simple as that.
-
Work Wet.
- Never sand, scrape, or drill a lead-painted surface dry. Use a spray bottle filled with water and keep misting the area as you work. The water turns the dust into a sludge instead of letting it go airborne. That’s one of the best ways to keep the mess under control.
-
Use the Right Tools.
- Stay away from high-speed power tools that fling dust everywhere. That means no power sanders, grinders, or open-flame torches. Use hand scrapers, hand sanders with wet-sanding paper, or a heat gun kept below 1,100°F. Anything hotter can vaporize the lead, and that’s even uglier than dust. I pulled a water heater in Frisco last month that had exactly this kind of sloppy dust trail nearby — one bad cleanup and the whole room was on me to protect.
-
Contain Debris as You Go.
- Don’t just let paint chips and dust fall onto the floor, even if it’s covered. Lay a sheet of 6-mil plastic directly below your work area to catch debris. As waste builds up, bag it right away in a heavy-duty contractor bag. Don’t let it stack up and don’t kick it around.
-
Clean Up Meticulously.
- This is the big one. First, bag all your plastic sheeting, coveralls, and any other disposable materials. Use a goose-neck tie to seal the bag tightly. Then vacuum everything—walls, ceiling, floor, tools—with a HEPA-filtered vacuum. Don’t use your household vac. After vacuuming, it’s time for a three-bucket wash. Bucket one has a lead-specific cleaning solution (like a phosphate-based cleaner), bucket two is for your first rinse, and bucket three is for your final rinse. Wash all surfaces, then rinse, then rinse again, changing your water frequently.
-
Dispose of Waste Properly.
- Don’t just toss the contractor bag in your regular trash. Call your local municipal waste authority or hazardous waste facility. They’ll have specific procedures and drop-off days for lead-contaminated debris. It counts as hazardous waste, and you’ve got to follow the rules.
Common Causes
Why does lead paint become a problem? It’s almost always because something disturbed it, usually a home project somebody thought was harmless.
- Sanding for a Smooth Finish: The number one cause of widespread contamination. Homeowners trying to get a perfect, glass-smooth surface before repainting will power-sand old layers, unknowingly blasting toxic dust everywhere.
- Window and Door Friction: Old double-hung windows and sticky doors that rub against their frames can generate lead dust with every use. That constant friction grinds the paint into a fine powder that settles on sills and floors.
- Scraping Peeling Paint: When old paint starts to alligator or peel, the first instinct is to scrape it off. Dry scraping sends chips and dust flying. Even if the chips are large, microscopic particles are still released.
- Demolition Projects: Tearing out a wall, removing old trim, or gutting a bathroom with lead paint is a big contamination event if it’s not handled with proper containment.
- Drilling and Cutting: Just drilling a hole to hang a picture or cutting into a wall to install a new electrical outlet can release a surprising amount of lead dust from the affected area.
Common Mistakes
I’ve seen a lot of well-meaning DIYers make these mistakes. Don’t be one of them.
- Using a Regular Shop Vac: This is the cardinal sin. A standard vacuum filter isn’t fine enough to trap lead particles. It acts like a dust-blower, aerosolizing the most dangerous stuff and spreading it all through your home’s air.
- Wearing a Paper Dust Mask: Those cheap paper or cloth masks you use for woodworking are useless against lead. They don’t seal to your face and can’t filter out the microscopic particles. You must use a NIOSH-approved respirator with P100 cartridges.
- Dry Sanding or Scraping: Creating airborne dust is the whole problem you’re trying to avoid. Always use wet methods to keep dust down.
- Forgetting to Seal HVAC Vents: If you leave your vents open and the system kicks on, you’ve just sent lead dust to every single room in the house through the ductwork. That’s a brutal way to spread it.
- Working in Your Regular Clothes: You will get dust on your clothes. If you then walk through the house or flop down on the sofa, you’re spreading the contamination. Worse, if you wash those clothes in your washing machine, you can contaminate the machine itself.
- Improper Waste Disposal: Tossing a bag of lead debris in your curbside bin is often illegal and always reckless. It can expose sanitation workers and contaminate the environment.
Cost & Time Breakdown
Here’s what I’d expect for testing and setting up for a small DIY repair job, like fixing one peeling window sill.
| Task | DIY Cost | Pro Cost | Time (DIY) |
|---|---|---|---|
| Lead Test Kits | $10 - $30 | (Included in assessment) | 5-10 minutes |
| Personal Protective Equipment (PPE) | $50 - $100 | (Included) | 15 minutes |
| Containment Supplies (plastic, tape) | $40 - $75 | (Included) | 30-45 minutes |
| HEPA Vacuum Rental | $50 - $90 per day | (Included) | N/A |
| Pro Lead Risk Assessment | N/A | $300 - $700 | N/A |
| Small-Scale Pro Abatement | N/A | $500 - $2,000+ | 1-2 days |
Tips & Prevention
- Assume and Test: If your home is from 1978 or earlier, just assume lead is present. Test before you disturb any painted surface. That’s the only way to know for sure.
- Encapsulate, Don't Remove: A lot of the time, the safest and easiest move is to leave the lead paint where it is and cover it. You can paint over it with a special-purpose encapsulant paint, which builds a thick, durable barrier. You can also cover it with new drywall or paneling.
- Monitor for Deterioration: Check the areas you know have lead paint, or might have it, for chipping, peeling, or chalking. Pay close attention to friction spots like window sashes, door jambs, and stair treads.
- Clean Regularly with a HEPA Vac: Even if you aren’t renovating, using a HEPA-filtered vacuum for regular cleaning, especially around window sills and baseboards, can help grab dust that gets made from everyday wear and tear.
- Teach Your Kids: Make sure children don’t chew on painted surfaces like window sills or old furniture. Wash their hands frequently, especially before eating.
When to Call a Professional
This guide is for very small-scale, contained repairs. You need to stop and call an EPA-certified lead abatement professional if you run into any of these situations.
If your test comes back positive and the project involves more than a very small area—the EPA's "de minimis" level is 6 square feet per room indoors—you need a pro. Don’t try to strip an entire room of trim or sand down a whole wall yourself. If you’ve got widespread peeling or chipping paint throughout the house, that’s an abatement contractor’s problem. If you need to use power tools like sanders or grinders for the job, you need professional-grade dust collection shrouds and containment that go way beyond a DIY setup. And if you’ve got young children or a pregnant person in the home, the risk is just too high. It’s always smarter to hire a certified firm so the work gets done safely and your home is verified to be lead-free at the end.
Related Articles
Keep troubleshooting with these hand-picked guides from FixlyGuide:
- The 1978 Homeowner's Mistake: How to Safely Handle Lead Paint — Many homes built before 1978 contain lead-based paint, posing serious health risks if disturbed during DIY projects.
- The Silent Killer in Your Old Home: Why DIY Paint Jobs Can Poison You — If your home was built before 1978, disturbing old paint could release toxic lead dust, putting your family at risk during DIY projects.
- The One Mistake DIYers Make with Old Paint (It Could Cost You Your Health) — If your home was built before 1978, disturbing old paint during DIY projects can release dangerous lead dust. Learn how to protect your fam…
- 7 Inspection Red Flags That Secretly Signal a $20,000 Bill — Don't let your dream home become a money pit. Many buyers and even some inspectors overlook subtle home inspection red flags that lead to f…
- The 12 Checks That Prevent 80% of Costly Home Repairs — Don't wait for a disaster. Our comprehensive monthly home maintenance checklist reveals the surprising, simple tasks that catch small issue…
- That Annoying Water Stain on Your Ceiling? What Your Roof Isn't Telling You — Don't just paint over that ugly ceiling water stain! This guide helps you pinpoint the real leak source, from roof issues to plumbing probl…
Should you do this yourself?
Answer five quick questions before you start. Safety outranks savings every time.
Your experience with work like this
How high do you have to work?
Does the job involve any of these?
Will it need a permit?
Specialty tools
Free and instant. Educational guidance only — not a quote, inspection, or professional diagnosis.
Estimate your own project cost
National averages are a starting point. Enter your details for a range that fits your house.
Interior paint estimator
- Paint$96
- Supplies (tape, rollers, drop cloth)$35
- Estimated total (DIY)$131
Hiring a pro? Add roughly $1.50–$4.00/sq ft for labor depending on prep work and trim detail.
Educational estimate only — always confirm with written local bids.
What should this project cost?
Enter your project details for a realistic cost range before you call anyone.
Cost depends heavily on which system turns out to be the source.
- Regional adjustment
- National average
- Labor share (typical)
- ~$1,620
- Quotes to collect
- 3 written estimates
Educational estimate based on national averages — not a binding quote. Always confirm with written local estimates.
Before you start
Check the difficulty, permits, and safety risk — then decide whether to call a pro.
Free, no signup required. Estimates are educational guidance, not a quote or an inspection.
Get the print-ready PDF of this guide
A clean, ad-free, printable version you can keep on your phone or pin to the workshop wall. Free with a FixlyGuide account.
- Print-optimized layout
- Tools, materials & every step included
- Saved to your account
This article was independently written by FixlyGuide based on the source topic.
Frequently asked questions
How do I know if I have lead paint?+
If your home was built before 1978, you should assume you have lead paint. The only way to know for certain is to test. You can use an EPA-recognized home test kit, like a 3M LeadCheck swab, or hire a certified lead risk assessor for a comprehensive inspection.
Is it safe to live in a house with lead paint?+
Yes, as long as the paint is in good condition. Intact, well-maintained lead paint that isn't peeling, chipping, or on a friction surface (like a window) is generally not a hazard. The danger comes from disturbing it, which creates toxic dust.
What's the difference between a dust mask and a respirator?+
A paper dust mask is not effective against lead particles. A respirator, specifically a half-face model with P100 (magenta) cartridges, creates a seal on your face and is certified to filter out 99.97% of the fine particles that make lead dust so dangerous.
Can I just paint over lead paint?+
Yes, this is often the safest approach. This is called encapsulation. You can use a standard premium paint if the old paint is in perfect shape, or use a special encapsulant product designed to create a thick, durable barrier over the lead paint.
How do I clean up lead dust?+
Never dry sweep or use a regular vacuum. First, use a HEPA-filtered vacuum to clean the entire area. Then, use a wet-cleaning method, ideally with a phosphate-based cleaner, to wash all surfaces. Use a two-bucket system (one for washing, one for rinsing) to avoid re-contaminating surfaces.
Is lead paint dangerous for adults?+
Yes. While children are most vulnerable, lead is toxic to adults as well. High exposure can cause high blood pressure, joint and muscle pain, memory and concentration problems, and other long-term health issues.
What does 'working wet' mean?+
It means using water to suppress dust while you work. Keep a spray bottle of water on hand and continuously mist the surface as you scrape or sand. This turns the hazardous dust into a less-dangerous sludge that's easier to clean up.
How hot can a heat gun be for stripping lead paint?+
Keep your heat gun below 1,100°F. Temperatures above this can vaporize the lead, creating toxic fumes that are even more easily inhaled than dust. Use the low setting on your heat gun and keep it moving to avoid overheating any single spot.
Discussion
Loading comments…