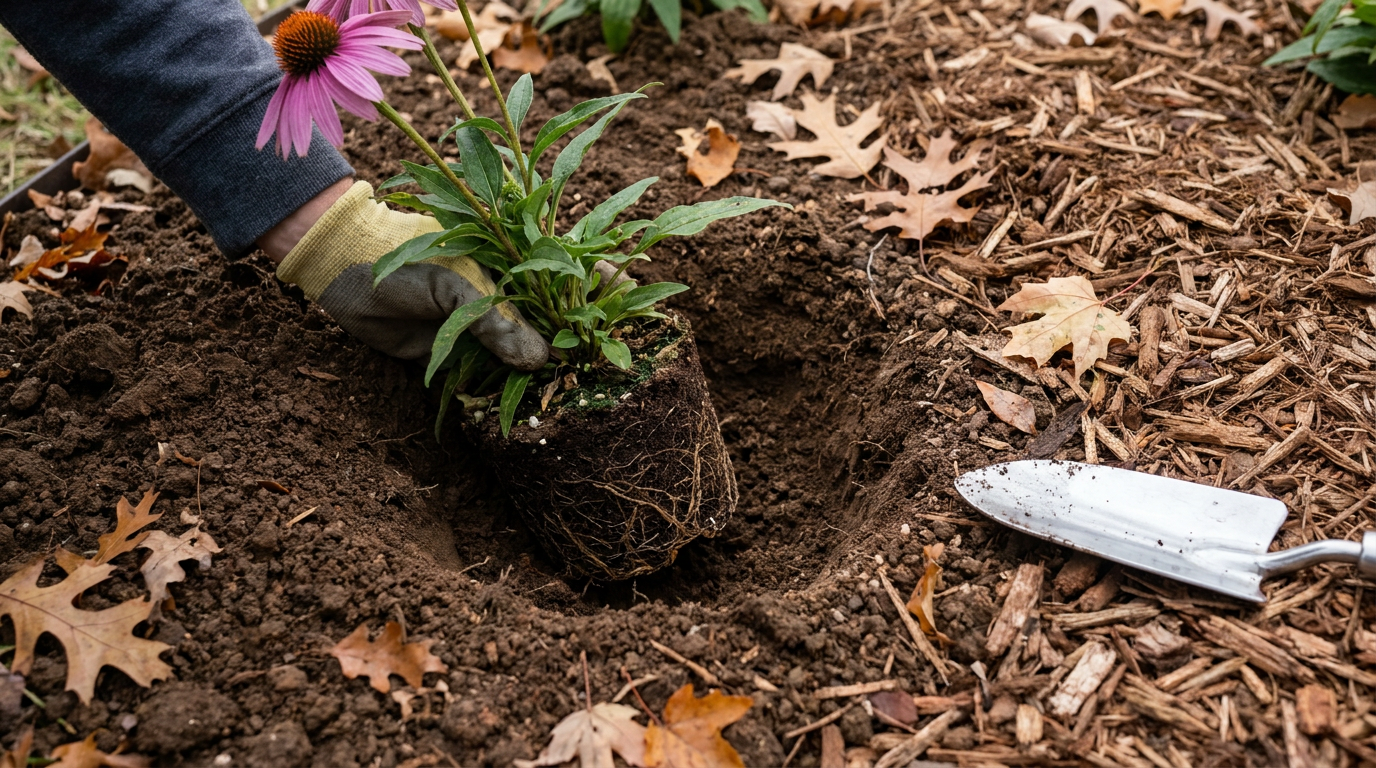
- Dig a wide, shallow saucer — Excavate a hole two to three times the width of the nursery pot, but keep it exactly the same depth as the soil inside the pot.
- Tool: Use a sharp round-point digging shovel or a heavy-duty garden spade.
- Crucial rule: Never dig deeper than the root ball. Set a perennial in loose dirt and it settles below grade over winter, and then you’re inviting crown rot.
Published November 5, 2026Last updated November 5, 2026
Tools & materials you'll need
Affiliate linksAs an Amazon Associate FixlyGuide earns from qualifying purchases — at no extra cost to you. Prices and availability are accurate as of publication and subject to change.
Quick Answer
Planting perennials in early to mid-autumn—roughly six weeks before your area's first hard frost—gives root systems months to get settled without fighting summer heat. The soil still holds warmth, usually 55°F to 65°F, while cooler air knocks water stress way down. Dig holes twice as wide as the root ball, work 2 inches of compost into dense native soil, set the crown flush with ground level, soak it good, and top it with 2 to 3 inches of shredded bark mulch so frost heave doesn’t shove everything up and out.
The Problem
Most homeowners get the planting itch in April or May. You hit the nursery, grab flowering perennials in 1-gallon pots, punch a hole in the ground, and then wonder why the whole thing falls apart once July rolls in at 95°F.
Here’s what’s going on below grade: a spring-planted perennial has to split its energy. It’s trying to grow top leaves and flowers while also pushing roots into dirt it doesn’t know yet. Toss in brutal sun, fast evaporation, and weeds stealing water, and that plant spends its first season barely hanging on. Miss two watering cycles in Texas—or anywhere that gets real summer heat—and that $18 coneflower turns crispy in a hurry. I pulled a water heater in Frisco last month and the homeowner had the same look on her face about a badly planted salvia: “I swear I watered it.” Sure, but not enough. Plants don’t care about good intentions.
Planting in autumn flips the script. Above ground, deciduous perennials are shutting down, so they barely ask for anything in the way of foliage or blooms. Below ground, the earth hangs onto summer heat for weeks after the air cools off. Root growth keeps rolling until soil temperatures drop below 40°F. By spring, your plants aren’t acting like shaky little transplants—they’re already rooted in and ready to go with a drought-hardy system locked into your native soil.
How It Works
Once you understand root biology, the whole thing makes more sense. Roots soak up water and dissolved nutrients through microscopic root hairs, but they do most of their expanding when soil temperatures sit between 50°F and 70°F. In late autumn, the air can dip into the 50s and low 60s, but soil hangs onto thermal mass. That difference sends a signal to the plant: stop spending energy on green growth and pour those carbohydrates into root mass.
Soil moisture acts a lot friendlier in late autumn and winter, too. Lower sun angles and cooler days hammer evapotranspiration. That means the water you put in the root zone stays there longer than it would in June, which cuts transplant shock way down.
There’s another little bonus called mycorrhizal colonization. Helpful soil fungi hook onto young roots better in cool, damp soil. Those tiny fungal networks basically multiply the surface area of your root system tenfold, pulling in phosphorus and trace minerals the plant couldn’t reach on its own. By the time spring starts pushing new growth, the plant’s plumbing is already in place and working right.
Step-by-Step Fix
Here’s the exact playbook for getting perennials in the ground this fall so they make it through winter freezes and take off next spring.
-
Check your local first freeze date — Look up your county's average first killing frost (28°F or below) and count backward six weeks. That window gives roots enough time to stitch into the surrounding soil before sub-surface freezing shuts everything down.
- Safety note: If you’re working near your foundation or utility easements, call 811 to get underground lines marked before you put a shovel in the ground.
- If you are late: If you missed the six-week window and frost is only two weeks out, you can still plant, but you’ll need to double your mulch layer to hold soil heat in place.
-
Hydrate your nursery stock before digging — Soak every potted perennial in its plastic container an hour before you plant. Dry root balls push water away once they’re buried under dry soil; a fully soaked root ball slides into the ground a lot smoother.
-
Dig a wide, shallow saucer — Excavate a hole two to three times the width of the nursery pot, but keep it exactly the same depth as the soil inside the pot.
- Tool: Use a sharp round-point digging shovel or a heavy-duty garden spade.
- Crucial rule: Never dig deeper than the root ball. Set a perennial in loose dirt and it settles below grade over winter, and then you’re inviting crown rot.
-
Break up the planting perimeter — Score the smooth, glazed sides of your planting hole with the tip of a hand trowel or garden fork. In heavy clay, digging can leave you with a slick wall roots can’t push through—scoring opens little pathways for root penetration.
-
Amend backfill soil lightly (if necessary) — Blend no more than 20% to 25% organic compost into the native soil you dug out.
- If working with dense clay: Don’t fill the hole with 100% potting soil or bagged compost. That creates the "bathtub effect," where water sits in the hole and suffocates roots. Native soil needs to stay the main ingredient.
-
Tease out bound roots — Slide the perennial out of its plastic pot and check the root ball. If the roots are circling tight like a bird's nest, use your fingers, a hori-hori garden knife, or hand pruners to slice vertically 1/2-inch deep down four sides, then gently spread the bottom roots outward.
-
Position the crown perfectly level — Set the plant in the center of your hole, laying your shovel handle flat across the rim of the hole to check the height. The crown—where the stems meet the root mass—needs to sit dead level with, or up to 1/2-inch above, the surrounding turf grade.
-
Backfill and eliminate air pockets — Shovel your soil blend back into the hole in two stages. Fill it halfway, firm it gently with your knuckles—don’t stomp on it with work boots—and flood it with water to settle the dirt around the root crevices.
- Finish backfilling to the rim, firming gently once more.
-
Construct a temporary watering berm — Ring the perimeter of your excavation hole with a 2-inch-high raised ring of leftover dirt. That little dike keeps supplemental irrigation from running off into the lawn and sends it straight down into the root system.
-
Apply the foundational soaking — Apply 2 to 3 gallons of water slowly at the base of each perennial using a watering wand or hose set to a trickle. Avoid wetting dormant foliage if you’re planting in late afternoon, since that can invite fungal leaf spot.
-
Mulch to insulate the root zone — Spread a 2- to 3-inch blanket of coarse shredded hardwood mulch or pine straw over the entire excavated circle.
- Critical gap: Keep mulch 1 to 2 inches away from the actual stems or crown of the plant. Mulch packed against stems causes rot and gives burrowing rodents a nice winter hideout.
Common Causes
Why do so many homeowners struggle with autumn-planted perennials? These are the main failure modes that wreck fall installs:
- Late planting into frozen soil: Once the soil drops below 40°F, the plant can’t generate new root cells. The root ball just sits in wet dirt like an ice cube and rots over winter.
- Frost heaving from bare ground: Wet ground freezes and thaws over and over, and the soil expands and contracts. Without a thick mulch blanket, that action lifts unanchored perennials right out of the dirt and leaves bare roots exposed to freezing winter winds.
- Winter drought: Homeowners shut off irrigation in October and forget evergreen or semi-dormant perennials still lose water during dry, windy winter cold snaps.
- Buried crowns: Sink a perennial 2 inches too deep and you trap stagnant moisture around the base of the stems, which suffocates the plant before spring shows up.
Common Mistakes
- Tossing high-nitrogen fertilizer into the hole. Don’t feed fall-planted perennials with quick-release synthetic fertilizer. High nitrogen pushes tender green foliage that gets blackened by the first freeze. Use bone meal or a slow-release root stimulator high in phosphorus instead.
- Stomping down the soil with your boots. You want to get rid of big voids, not pack the soil into concrete. Compacted dirt crushes pore space and blocks the oxygen roots need. Firm it with your hands and let water do the rest.
- Piling mulch like a volcano. Mulch should look like a flat donut, not a cone. Piling wet mulch against perennial stems traps moisture, creates fungal entry points, and gives voles a cozy winter tunnel to chew through crowns.
- Cutting perennials to the ground immediately. Leave dead stems and dried seed heads on plants like echinacea, black-eyed Susans, and ornamental grasses. They insulate the crown, feed overwintering birds, and give native pollinators hollow tubes to use. Cut them back in late February instead.
- Assuming fall rain is enough. A couple of light autumn drizzles barely soak through the top half-inch of mulch. Check the soil moisture 2 inches down with your finger once a week until the ground freezes solid.
Cost & Time Breakdown
| Task | DIY Cost | Pro Cost | Time |
|---|---|---|---|
| Soil Test & Prep (100 sq ft) | $15–$30 (kit + compost) | $100–$175 | 1–2 hours |
| Planting 5 Perennials (1-gal pots) | $60–$110 (plants + materials) | $175–$300 | 1–1.5 hours |
| Bed Mulching (2 bags shredded bark) | $8–$14 | $50–$80 | 30 minutes |
| Fall Drip Line Setup (50 ft zone) | $35–$60 | $150–$250 | 1–2 hours |
| Winter Freeze Protection (Frost cloth) | $15–$30 | $60–$100 | 20 minutes |
Tips & Prevention
- Top performers for fall installation: Put your money on tough, winter-hardy staples. Coneflower (Echinacea), black-eyed Susan (Rudbeckia), salvia, hostas, daylilies, and catmint (Nepeta) all settle in really well in autumn soil.
- Inspect root balls at the nursery: Late-season nursery stock has often sat in pots all summer. Pull the plant gently out of the container before you pay; if the roots are a thick, woody mat spiraling tight, find a looser one or plan to score the roots hard.
- Winter watering routine: If your region goes more than 3 weeks without measurable snow or rain, grab a 5-gallon bucket on a warm afternoon (above 45°F) and give your new perennials a drink.
- Watch for early spring thaws: When unseasonably warm weather hits in February, don’t rake away mulch too soon. Mulch keeps the ground cooler and more even, which helps prevent premature sprouting that gets smoked when winter swings back a week later.
When to Call a Professional
Most perennial planting is solid DIY work, but a few situations are worth handing off to a pro landscape contractor. If you’re turning over a big turf area—say, over 500 square feet—with grading headaches, poor drainage that leaves standing water for more than 24 hours, or serious slope erosion, bring in an expert. Moving cubic yards of dirt, regrading hard clay, or installing heavy-duty drainage swales takes machinery, and that machinery can chew up a yard fast if you don’t know what you’re doing. And if you’re planting around large, mature trees, a professional landscape designer or certified arborist knows how to work around major structural roots without hurting the tree or messing with its wind resistance.
Related Articles
Keep troubleshooting with these hand-picked guides from FixlyGuide:
- OTR on a Truck? What It Means and 8 Ways to Protect Your Driveway — Spotting OTR on a truck means an 80,000-lb long-haul freight rig is near. Learn what it means for residential deliveries, driveway protecti…
- Lead Paint Safety for DIY Home Repairs: 10 Steps to Contain Toxic Dust — Working on a pre-1978 home? Learn how to identify lead paint, set up safe containment, and prevent toxic dust exposure during DIY repairs.
- Winter Storm Watch vs. Winter Storm Warning? 9 Steps to Protect Your Home — Know the exact operational difference between a Winter Storm Watch and Warning, and learn the step-by-step protocol to protect your home's…
- The Bathroom Fan's Dirty Secret: Why It Stinks (And What It's Hiding) — Discover why your bathroom exhaust fan smells terrible, how to track down the root cause, and the surprisingly simple steps you can take to…
- Heart Attack Snow? Why Wet Winter Slush Is Dangerous—and 9 Steps to Clear It Safely — "Heart attack snow" is heavy, water-logged slush that spikes cardiovascular strain. Learn the physics behind it, how to clear it safely, an…
- Glass Cooktop Burnt? 10 Steps to Remove Baked-On Rings Without Scratching — Struggling to clean burnt food rings off your glass cooktop? Learn the proper razor technique and soaking fix to restore your stove without…
Your seasonal maintenance checklist
The small jobs that prevent the expensive repairs. Tick them off — progress saves on this device.
Free, no signup. Skip anything that requires roof access or working near live electrical.
What should this project cost?
Enter your project details for a realistic cost range before you call anyone.
Cost depends heavily on which system turns out to be the source.
- Regional adjustment
- National average
- Labor share (typical)
- ~$1,620
- Quotes to collect
- 3 written estimates
Educational estimate based on national averages — not a binding quote. Always confirm with written local estimates.
Stay ahead of the next repair
Turn this guide into a schedule you will actually follow.
- Is this a safe DIY job?Check permits, tools, and risk before you start the steps below.Open
- Estimate this projectGet a cost range for your scope and ZIP before you call anyone.Open
Free, no signup required. Estimates are educational guidance, not a quote or an inspection.
Get the print-ready PDF of this guide
A clean, ad-free, printable version you can keep on your phone or pin to the workshop wall. Free with a FixlyGuide account.
- Print-optimized layout
- Tools, materials & every step included
- Saved to your account
This article was independently written by FixlyGuide based on the source topic.
Frequently asked questions
When is the absolute latest you can plant perennials in the fall?+
Shoot for roughly six weeks before your historical first killing freeze (28°F). In northern zones, that is typically late August to mid-September; in middle and southern zones, late September through early November is ideal.
Can you plant perennials if a frost has already occurred?+
Yes, you can, but you must take extra precautions. Water the plants thoroughly, plant them immediately, and double your mulch layer to 4 inches once the ground cools to prevent the shallow root ball from popping out during freeze-thaw cycles.
Why is fall better than spring for planting perennials?+
Spring planting forces a plant to divide energy between root establishment and blooming while enduring intense summer heat. Fall planting lets roots grow in warm, moist soil with zero heat stress and minimal foliage demands.
How often do you water perennials after planting them in autumn?+
Until the ground freezes solid, water deeply once a week if rain falls below 1 inch. During winter, check the soil monthly during extended dry spells and provide a light watering on days when temperatures rise above 45°F.
Should I fertilize newly planted fall perennials?+
No. Adding high-nitrogen fertilizer in the fall forces tender green shoots that will be destroyed by hard frost, sapping energy from the plant. Use a small amount of bone meal or phosphorus-rich root stimulator instead.
Should you cut back fall-planted perennials after planting them?+
For most perennials, leaving foliage and seed heads intact through winter protects the crown from sub-zero winds and feeds local wildlife. Cut back the dead stems in late winter or early spring just before new growth emerges.
Is it safe to buy perennials from clearance racks in late autumn?+
Yes, late-season sales are a fantastic way to save 40% to 70% on perennials. Just ensure the root ball is still white or tan and fleshy—avoid plants that are completely dried out, rotten, or heavily infested with pests.
Which perennials handle fall planting the best?+
Cold-hardy native perennials like coneflowers, black-eyed Susans, Russian sage, sedum, salvia, daylilies, and hostas establish exceptionally well during fall planting.
Discussion
Loading comments…