- The 4 Hidden Reasons Your Lawn Stays Yellow (And How to Fix It FAST) — Uncover the surprising culprits behind a yellow lawn and learn the quick, effective fixes to restore vibrant green growth.
- The Secret to Surviving Power Outages: Why Your HVAC Isn't the Real Power Hog — Discover how a whole-home battery system can keep your essential appliances running during a power outage, even when the grid fails.
- The Hidden Reason Your GFCI Trips (and 7 Ways to Stop It) — A persistently tripping GFCI outlet is a safety warning, often indicating moisture, a faulty appliance, or a wiring problem that homeowners…
- The Secret Power Tool Hiding in Your Garage for a Speedier Clean — Unlock the hidden potential of your cordless drill to tackle stubborn household grime, soap scum, and dirt with specialized cleaning attach…
- The Hidden Reason Your GFCI Trips (and Why Most Homeowners Miss It) — A continuously tripping GFCI outlet is a safety warning, often signaling common but overlooked issues like moisture intrusion, appliance fa…
Published August 6, 2026Last updated August 17, 2026
Tools & materials you'll need
Affiliate links- AmazonTubing cutterFor clean, precise cuts on RO tubing
- AmazonAdjustable wrenchIf your unit uses compression fittings
- AmazonPhillips head screwdriverFor mounting screws
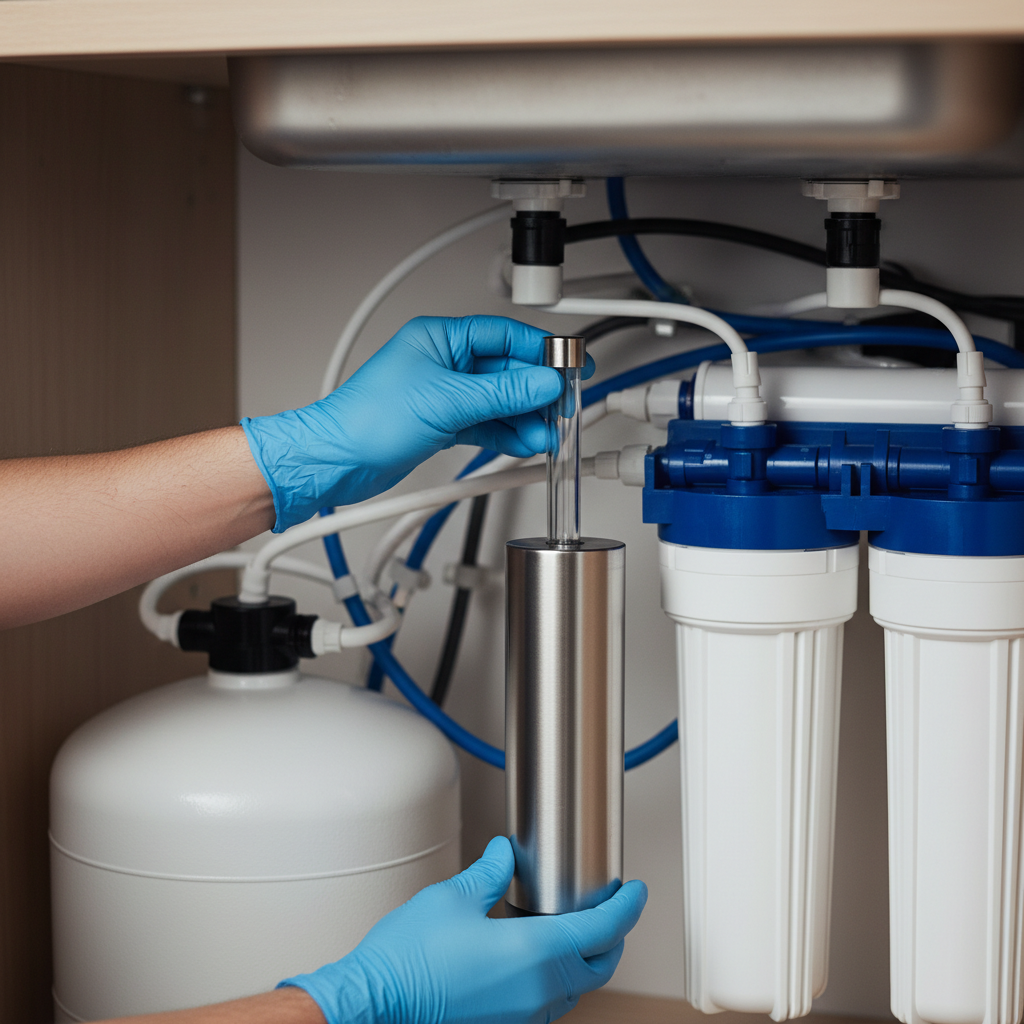
- AmazonGlovesTo avoid touching the UV lamp directly
- AmazonBucketFor catching water during cuts
- AmazonClean towelsFor cleanup and drying
- AmazonPermanent markerFor marking tubing cuts
As an Amazon Associate FixlyGuide earns from qualifying purchases — at no extra cost to you. Prices and availability are accurate as of publication and subject to change.
Quick Answer
Look, I’ve been in and out of enough houses to know homeowners get real serious about their water. And they should. A reverse osmosis system does a heck of a job stripping out the ugly stuff — chemicals, heavy metals, pesticides, all the junk you don’t want anywhere near a glass. But RO membranes aren’t magic. They’re good. Real good. Just not perfect.
Bacteria and viruses can still sneak through on occasion. That’s where a UV sterilizer earns its keep. It’s the last guy standing at the gate, blasting anything biological with ultraviolet light so what comes out of your faucet is actually safe to drink. If you’re on well water, or you just don’t trust the city supply, that extra layer makes a whole lot of sense.
The Problem
I’ve seen plenty of homeowners spend good money on a reverse osmosis system thinking they’re locked and loaded. Water tastes better, everything looks clear, and everybody relaxes. Then a few months later, maybe somebody in the house keeps getting stomach trouble, or they just can’t shake that little voice in the back of their head.
Here’s the deal: traditional reverse osmosis systems are excellent at removing dissolved solids and chemical contaminants. Lead, chlorine, fluoride, PFAS — all that mess. They push water through a semi-permeable membrane that rejects particles as tiny as 0.0001 microns. That’s tiny-tiny. But bacteria can run around 0.2 to 2 microns, and viruses are even smaller, down to 0.02 microns. So yeah, a good RO membrane catches a lot, but some stuff can still get by, especially if the membrane has a flaw or it’s been beat up over time.
So you can be drinking water that looks spotless and tastes fine, while something you can’t see is still hanging around. I pulled a water heater in Frisco last month that had exactly this kind of “everything looks fine” problem — and that’s usually how these things go. No drama until there is. A UV sterilizer fills that gap.
How It Works
Alright, let’s crack it open and talk about how these systems actually work together. Your reverse osmosis setup is really a chain of defenses. First up is the sediment filter — that’s the rough-in guy grabbing rust, dirt, and anything over about 5 microns. Then you’ve got the carbon filter, which handles chlorine, volatile organic compounds (VOCs), and the stuff that makes water smell like a swimming pool or taste off. After that comes the RO membrane, the real workhorse, pushing water through under pressure and kicking dissolved solids to the curb. The waste goes down the drain.
The UV sterilizer comes in at the end. It’s usually installed after the RO membrane and often after the post-carbon filter too. The unit itself is pretty simple: an ultraviolet lamp inside a quartz sleeve, all of it housed in a stainless steel or plastic chamber. As the cleaned-up water moves through, it gets hit with UV-C light. That wavelength — typically 254 nanometers — doesn’t remove anything from the water. It messes with the DNA and RNA of bacteria, viruses, cysts, and other microorganisms so they can’t reproduce or infect anybody. Dead in the water. That’s the whole trick.
And it doesn’t add chemicals, which I like. No chlorine, no disinfectant taste, no extra nonsense. It’s a physical process, plain and simple. Most of these units are rated for a flow rate, like 1 gallon per minute (GPM) or 6 GPM, so you know how much water they can handle and still do the job right. For most under-sink RO systems, a 1 GPM unit is plenty.
Step-by-Step Fix
Adding a UV sterilizer to an existing reverse osmosis system isn’t rocket science, but you do need to be careful and methodical. This is usually an add-on, so you’re tying it into what’s already there. And yeah, read the manufacturer’s instructions for your exact unit — they’re all a little different.
-
Safety First! — Shut off the water supply and unplug everything. Find the main water shut-off valve, usually in the basement or utility room, and turn it clockwise until it stops. Then unplug the RO system from the wall. If there’s a separate pump, unplug that too. Open the RO faucet to bleed off pressure. Don’t skip that part.
-
Gather Your Gear — Get all your tools and materials ready. Lay everything out before you start: UV sterilizer, mounting clips, tubing cutter, quick-connect fittings or compression fittings, and whatever else came in the box. If you need extra 1/4-inch RO tubing, have it on hand. A bucket and a couple towels? Yeah, you’ll want those within arm’s reach.
-
Locate the Post-Filter Line — Identify where the UV unit will go. The UV sterilizer has to be the absolute last thing before the water hits the faucet. Trace the line coming out of your RO post-carbon filter — that’s the final filter before the tank or faucet, depending on your setup. This is usually 1/4-inch tubing. If there’s a permeate pump in the line, the UV goes after that too.
-
Mark and Cut the Tubing — Prepare for the UV unit's insertion. Measure out about 6-8 inches of straight tubing where you’re placing the unit. Mark your cut points with a marker. Use a proper tubing cutter, not a utility knife — those leave rough edges and no one needs that headache. Make two clean cuts. Keep the bucket nearby because there’s usually some leftover water in the line.
-
Mount the UV Unit — Secure the housing under your sink. Pick a spot under the sink that’s easy to reach and won’t get in the way of the drain, trap, or other parts. Usually the cabinet side wall works fine. Use the supplied clips and screws to mount the housing solid. Some units need to be horizontal, some vertical — follow the spec sheet so you don’t create yourself a problem later when it’s time to change the bulb.
-
Connect the Water Lines — Hook up the purified water to the UV. Take the cut ends of the RO tubing and push them into the inlet and outlet ports on the UV sterilizer. Most newer units use quick-connect fittings, so you’ll push until the tubing bottoms out. Give it a little tug to make sure it’s locked in. Check the flow arrow on the housing — that matters. Water needs to go into the UV from the RO system and out to the faucet.
-
Install the UV Lamp and Sleeve — Handle with care; don't touch the bulb. Carefully unpack the quartz sleeve and UV lamp. Do not touch the glass part of the UV lamp with your bare hands — skin oils can cause hot spots and shorten bulb life. Use gloves or a clean cloth. Slide the quartz sleeve into the housing and make sure the O-rings are seated right, then tighten the retaining nut or cap. After that, slide the lamp into the sleeve, line up the pins, and plug in the power connector. You’ll feel it click when it’s seated right.
-
Restore Water and Power — Check for leaks immediately. Turn the main water back on slowly. Before you plug in the UV unit, open the RO faucet and let it run a few minutes to clear out air. Watch every connection while it’s running. A little drip now can turn into a mess later. Once everything looks dry, plug in the UV sterilizer. The indicator light should come on if the lamp’s working.
-
Test and Enjoy — Confirm proper operation. Let the water run for another 5-10 minutes. That flushes the chamber and gets the system settled in. At that point, the water moving through the UV chamber is being sanitized. Enjoy it. And mark the install date somewhere — most UV lamps need replacing annually.
Common Causes
"Why do I even need this?" That
Related Articles
Keep troubleshooting with these hand-picked guides from FixlyGuide:
- The 4 Hidden Reasons Your Lawn Stays Yellow (And How to Fix It FAST) — Uncover the surprising culprits behind a yellow lawn and learn the quick, effective fixes to restore vibrant green growth.
- The Secret to Surviving Power Outages: Why Your HVAC Isn't the Real Power Hog — Discover how a whole-home battery system can keep your essential appliances running during a power outage, even when the grid fails.
- The Hidden Reason Your GFCI Trips (and 7 Ways to Stop It) — A persistently tripping GFCI outlet is a safety warning, often indicating moisture, a faulty appliance, or a wiring problem that homeowners…
- The Secret Power Tool Hiding in Your Garage for a Speedier Clean — Unlock the hidden potential of your cordless drill to tackle stubborn household grime, soap scum, and dirt with specialized cleaning attach…
- The Hidden Reason Your GFCI Trips (and Why Most Homeowners Miss It) — A continuously tripping GFCI outlet is a safety warning, often signaling common but overlooked issues like moisture intrusion, appliance fa…
- The Hidden Cause of Squeaky Hardwood Floors & The Real Fix — That persistent squeak from your hardwood floors isn't just an annoyance; it's a sign of movement. We'll uncover the hidden causes, from hu…
Should you do this yourself?
Answer five quick questions before you start. Safety outranks savings every time.
Your experience with work like this
How high do you have to work?
Does the job involve any of these?
Will it need a permit?
Specialty tools
Free and instant. Educational guidance only — not a quote, inspection, or professional diagnosis.
What should this project cost?
Enter your project details for a realistic cost range before you call anyone.
Cost depends heavily on which system turns out to be the source.
- Regional adjustment
- National average
- Labor share (typical)
- ~$1,620
- Quotes to collect
- 3 written estimates
Educational estimate based on national averages — not a binding quote. Always confirm with written local estimates.
Before you start
Check the difficulty, permits, and safety risk — then decide whether to call a pro.
- Estimate this projectGet a cost range for your scope and ZIP before you call anyone.Open
- Get local estimatesSend one request and compare written estimates from vetted pros.Open
Free, no signup required. Estimates are educational guidance, not a quote or an inspection.
Get the print-ready PDF of this guide
A clean, ad-free, printable version you can keep on your phone or pin to the workshop wall. Free with a FixlyGuide account.
- Print-optimized layout
- Tools, materials & every step included
- Saved to your account
This article was independently written by FixlyGuide based on the source topic.
Frequently asked questions
Can I just use a UV sterilizer without an RO system?+
While a UV sterilizer effectively kills bacteria and viruses, it doesn't remove dissolved solids, chemicals, or improve taste like an RO system does. For comprehensive water purification, combining both technologies is ideal, with the RO system handling filtration and the UV unit handling sterilization.
How often do I need to change the UV lamp?+
Most UV lamps are rated for about 9,000 hours of continuous operation, which translates to roughly one year. It's crucial to replace the lamp annually, even if it still appears to be working, as its germicidal effectiveness diminishes over time.
Does a UV sterilizer add any chemicals to my water?+
No, a UV sterilizer uses only ultraviolet light to inactivate microorganisms. It's a chemical-free disinfection method, making it a great choice for those who want to avoid adding anything to their water.
Will a UV sterilizer remove sediment or improve taste?+
No, a UV sterilizer is purely for disinfection. It will not remove sediment, chlorine, heavy metals, or improve the taste and odor of your water. It must be used with pre-filtration, like an RO system, to ensure the water is clear enough for the UV light to be effective.
What happens if I touch the UV lamp with my bare hands?+
Oils from your skin can leave residues on the quartz sleeve or UV lamp, creating hot spots that can shorten the lamp's lifespan and reduce its effectiveness. Always handle the lamp and sleeve with clean gloves or a soft, lint-free cloth.
How do I know if my UV lamp is working?+
Most UV sterilizer units have a visual indicator, often a small LED light on the power supply, that glows when the lamp is operating correctly. Some advanced units may also beep or have a fault indicator if the lamp fails.
Can UV light harm me during installation or maintenance?+
Yes, direct exposure to UV-C light can be harmful to your eyes and skin, causing irritation or burns. Always unplug the unit and ensure the lamp is off before opening the housing or performing any maintenance. Never look directly at an operating UV lamp.
What's the typical lifespan of a quartz sleeve?+
The quartz sleeve typically lasts much longer than the UV lamp, often 3-5 years or more. However, it should be inspected annually when you change the lamp for any cracks, cloudiness, or mineral buildup that might impede UV light transmission. Clean it with a vinegar solution if you see buildup.

Discussion
Loading comments…