
Tools & materials you'll need
Affiliate linksAs an Amazon Associate FixlyGuide earns from qualifying purchases — at no extra cost to you. Prices and availability are accurate as of publication and subject to change.
Quick Answer
AMost running toilets are caused by a faulty flapper or an improperly adjusted fill valve. The quickest DIY fix involves checking the flapper for wear or misalignment and ensuring the fill valve's float arm is set correctly, often costing less than $5 in parts. You can often diagnose and fix these issues yourself in under 30 minutes with basic tools.
The Problem
You're trying to relax, but that incessant sound of running water from the toilet just won't quit. It’s not just annoying; a running toilet can silently waste hundreds of gallons of water per day, leading to a noticeable spike in your water bill. When the toilet constantly runs, it means water is continuously flowing from the tank into the bowl and down the drain, even when it hasn't been flushed. This usually happens because a component inside the toilet tank isn't sealing properly, allowing water to escape or causing the tank to constantly try and refill itself.
How It Works
To understand why your toilet is running, it helps to know how a toilet's internal mechanisms work in harmony. When you flush, a chain lifts the flapper valve at the bottom of the tank, allowing water to rush into the bowl and create the siphoning action that clears waste. As the tank empties, the flapper falls back into place, sealing the tank's drain hole. Simultaneously, the float arm (or float cup) inside the tank drops with the water level. This drop activates the fill valve, which then starts refilling the tank with fresh water from the supply line. As the water level rises, the float arm or cup rises with it, eventually reaching a pre-set level that tells the fill valve to shut off the water supply. If any part of this system—the flapper, the chain, the fill valve, or the float—malfunctions, the toilet can continue to run. For instance, a worn-out flapper won't create a watertight seal, allowing water to seep into the bowl. An improperly adjusted float might not rise high enough to signal the fill valve to stop, causing it to continuously add water, which then overflows into the overflow tube and down the drain, leading to the constant running sound.
Step-by-Step Fix
1. Shut Off the Water — Prevent spills and control the flow.
Locate the small shut-off valve on the wall behind or beneath the toilet. Turn it clockwise until the water flow stops completely. Flush the toilet to empty most of the water from the tank, giving you a clear view of the internal components. This is a critical first step for any toilet repair.
2. Inspect the Flapper — The most common culprit for a running toilet.
Carefully lift the tank lid and examine the rubber flapper at the bottom of the tank. Look for any visible signs of wear, cracks, tears, or mineral buildup. Sometimes, the flapper might simply be misaligned and not sitting correctly over the drain hole. Gently run your finger along the edges of the flapper seal to check for roughness or damage. If the flapper looks degraded, it's likely the cause of your running toilet. If it looks fine, proceed to the next step.
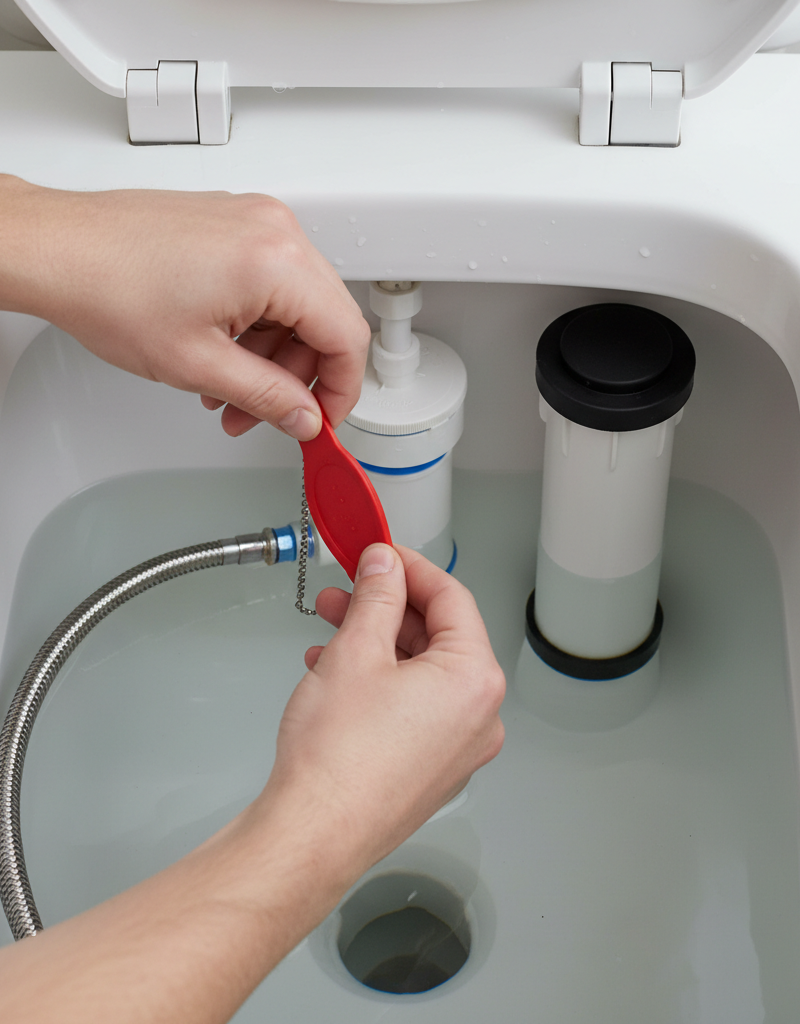
3. Check the Flapper Chain — Ensure proper tension and no obstructions.
Examine the chain connecting the flush lever to the flapper. The chain should have slight slack when the flapper is closed – about 1/2 to 1 inch. If the chain is too taut, it can prevent the flapper from sealing completely. If it's too loose, it might get caught under the flapper, also preventing a proper seal. Adjust the length of the chain by hooking it to a different link on the flush lever arm if necessary. Ensure no part of the chain is caught under the flapper or obstructing its movement.
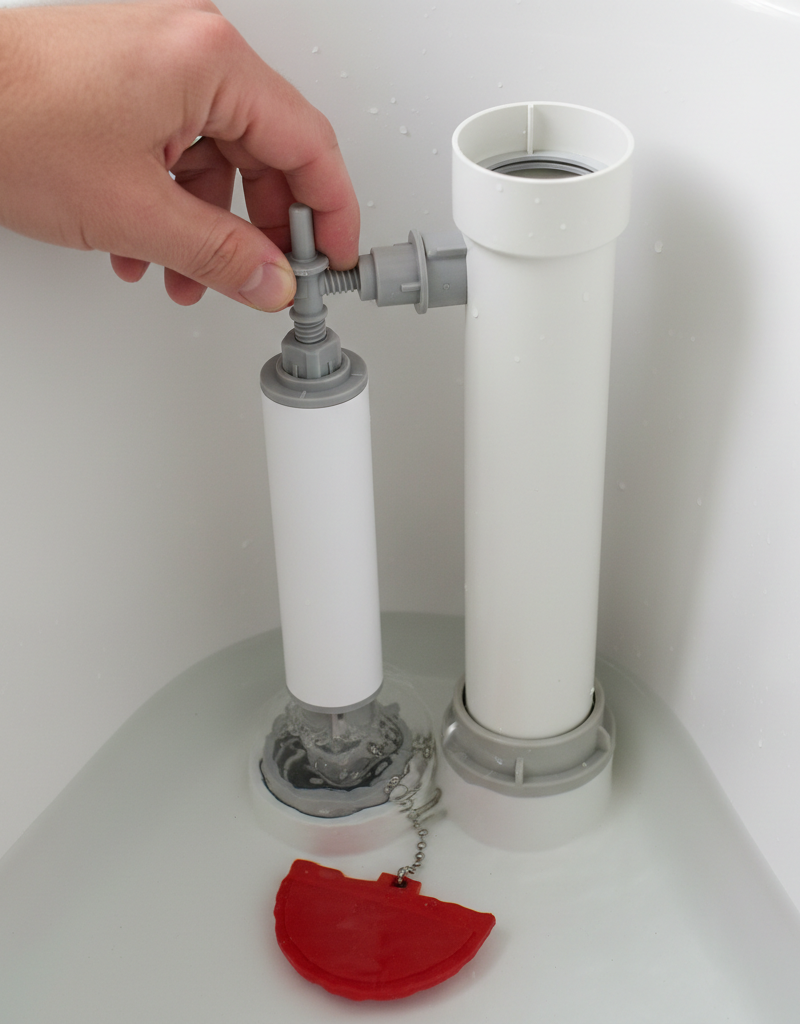
4. Adjust the Fill Valve Float — Ensure the water level is correct.
Most modern toilets have either a float cup or a float arm with a ball, which dictates the water level in the tank. The water level should typically be about 1 inch below the top of the overflow tube. If the water level is too high, it will continuously spill into the overflow tube and down the drain, mimicking a running toilet. Adjust the float by turning the adjustment screw (for float cups) or bending the float arm slightly (for older ball-float systems) to lower the water level. After adjustment, turn the water supply back on and observe if the running stops once the tank refills.
5. Clean the Flapper and Drain Seat — Remove built-up sediment that prevents a seal.
Even if the flapper itself isn't damaged, mineral deposits or grime can accumulate on the rim of the drain hole (the flapper seat) and on the flapper's sealing surface, preventing a watertight seal. With the water off and the tank mostly empty, gently clean the flapper and the flapper seat with a mild abrasive pad or an old toothbrush. Be thorough but careful not to damage the rubber. This simple cleaning can often resolve minor leaks.
6. Replace the Flapper — Worst-case scenario for a worn-out flapper.
If inspection reveals cracks, tears, or significant wear on the flapper, replacement is the best solution. Note the brand and model of your toilet if possible, or take the old flapper with you to the hardware store to ensure you get a compatible replacement. Installation typically involves unhooking the old flapper from the flush lever chain and unseating it from the two pegs at the base of the overflow tube. Install the new flapper in reverse order, ensuring the chain has appropriate slack. This is often the $5 trick that saves a plumber's visit.
7. Check the Fill Valve for Leaks — Is the fill valve itself malfunctioning?
If the flapper and its chain seem fine, and adjusting the float doesn't stop the running, the fill valve itself might be faulty. A quick test involves marking the water level inside the tank. Turn off the water supply to the toilet and wait 15-20 minutes. If the water level drops below your mark, it indicates a slow leak, likely through the flapper. However, if the water level remains constant but the toilet still runs when the water is on, the fill valve might be failing to shut off completely. Further diagnosis or replacement of the fill valve (a more involved repair) may be needed. If water continues to run into the overflow tube even when the float is set correctly, the fill valve is almost certainly the culprit.
8. The Dye Test — Confirming a slow, silent leak.
For a subtle leak, add a few drops of food coloring (blue or green works well) to the water in the toilet tank. Do not flush. Wait 15-20 minutes. If you see the colored water appear in the toilet bowl, it confirms that water is leaking from the tank into the bowl, most likely due to a faulty flapper or a bad seal at the tank bolts. This test helps rule out other causes and focuses your repair efforts.
Common Causes
- Worn-Out Flapper: The most frequent offender. The rubber flapper degrades over time, becoming less flexible and developing cracks, preventing a watertight seal over the drain hole.
- Improper Flapper Chain Length: If the chain is too short, it holds the flapper slightly open. If it's too long, it can get tangled and obstruct the flapper's closure.
- Misaligned Flapper: The flapper might not be seating squarely over the drain opening, causing water to seep past the seal.
- High Water Level/Malfunctioning Float: The float mechanism (ball float or float cup) might be set too high or be faulty, causing the tank to overfill and water to continuously flow into the overflow tube and down the drain.
- Faulty Fill Valve: The fill valve itself might be defective, failing to completely shut off the water supply once the tank reaches its desired level.
- Sediment Buildup: Mineral deposits or grime on the flapper or the flapper seat can create an uneven surface, preventing a proper seal.
Common Mistakes
- Ignoring the problem: Many homeowners let a running toilet continue for weeks or months, assuming it's a minor annoyance. This causes significant water waste and higher utility bills. Fix it promptly to save money and resources.
- Adjusting without diagnosis: Jumping straight to adjusting the float without first checking the flapper and chain can waste time and lead to unnecessary adjustments. Always start with the simplest and most common causes.
- Using the wrong replacement parts: Toilets are not entirely universal. Buying a generic flapper or fill valve that isn't compatible with your toilet's brand or model can lead to further leaks or improper function. Take the old part or note the toilet model when buying replacements.
- Over-tightening bolts/nuts: When replacing components like the fill valve, over-tightening nuts or bolts can crack the porcelain tank or strip threads, leading to much costlier repairs. Hand-tighten plus a quarter turn with a wrench is usually sufficient.
- Forgetting to clean: Overlooking the importance of cleaning the flapper and the drain seat. Even a brand-new flapper won't seal correctly if there's grit or mineral buildup on the surfaces it's supposed to seal against.
- Not checking the overflow tube: Assuming the running water is always due to the flapper. If water is constantly flowing into the overflow tube, the issue is with the fill valve or the float setting, not directly the flapper.
Cost & Time Breakdown
| Task | DIY Cost | Pro Cost | Time |
|---|---|---|---|
| Flapper Inspection & Adjust | $0 | $75–$150 | 10–20 minutes |
| Flapper Replacement | $5–$20 | $100–$200 | 20–30 minutes |
| Fill Valve Adjustment | $0 | $75–$150 | 15–25 minutes |
| Fill Valve Replacement | $20–$40 | $150–$300 | 45–90 minutes |
| Minor Cleaning (Sediment) | $0 | Included | 10–15 minutes |
| Diagnosing & Initial Tests | $0 | $75–$150 | 15–30 minutes |
Tips & Prevention
- Regular Flapper Inspection: Once a year, remove the tank lid and visually inspect your flapper for signs of wear, cracks, or stiffness. Replace it proactively if it shows signs of degradation, even if it's not actively leaking yet.
- Cleanliness is Key: Periodically clean the inside of your toilet tank to prevent mineral buildup and mold growth, which can interfere with the proper sealing of components like the flapper and fill valve.
- Adjust Water Level: Ensure the water level in your tank is always about an inch below the overflow tube. This prevents unnecessary water loss and reduces strain on the fill valve mechanism.
- Check Flush Lever for Stickiness: Sometimes a sticky flush handle can keep the chain taut and the flapper slightly open. If your handle feels tight or doesn't return fully to its original position, it might need lubrication or replacement.
- Perform Dye Test Annually: A simple food coloring dye test once a year can catch slow, silent leaks before they become major water-wasting problems.
- Avoid Harsh Chemical Cleaners: Strong chemical drop-in tablet cleaners can degrade rubber components like flappers and seals over time, accelerating wear. Stick to manual cleaning with milder solutions.
When to Call a Professional
While many running toilet issues are DIY-friendly, there are specific situations where calling a licensed plumber is the smartest and safest course of action. If you've tried all the basic troubleshooting steps—inspecting and adjusting the flapper, checking the chain, and adjusting the fill valve float—and the toilet continues to run, the problem might be more complex, potentially involving an internal leak in the bowl, a more serious fill valve malfunction that's beyond your comfort level, or issues with the toilet's water supply line. Additionally, if you notice water leaking from the base of the toilet, signs of damage to the porcelain, or if the shut-off valve behind the toilet is seized or leaking and you can't turn off the water, it's time to call a professional. Plumbers have specialized tools and expertise to diagnose hidden issues, replace difficult-to-access components, and ensure the repair is done correctly without causing further damage.
Related Articles
Keep troubleshooting with these hand-picked guides from FixlyGuide:
- The $5 Secret to Silencing a Running Toilet (Plumbers Hope You Don't Know) — A running toilet is usually caused by a simple issue with the flapper or its chain, leading to constant water waste and higher utility bill…
- The $2 Trick to Stop a Running Toilet (Plumbers Don't Want You to Know) — Discover the simple, two-dollar fix that can stop your running toilet in minutes, saving water and preventing costly repairs.
- The 30-Second Toilet Fix Plumbers Don't Want You to Know — A running toilet can waste hundreds of gallons of water per day, but often the fix is incredibly simple and takes under a minute.
- The 3 Hidden Reasons Your Toilet Tank Fills Slowly (And How to Fix Each) — Discover the common culprits behind a slow-filling toilet tank, from crucial valve issues to subtle obstructions, and learn how to restore…
- The $5 Secret to Silencing That Annoying Dripping Faucet (Single-Handle Fix) — Stop a dripping single-handle faucet with a simple and inexpensive DIY fix by replacing a worn-out o-ring or washer.
- Is Your Gutter Sagging After Every Storm? The Hidden Flaw Most Homeowners Miss — Discover the overlooked reason your gutters sag after every storm and learn the lasting fix that most homeowners miss.
Frequently asked questions
Why does my toilet keep running after I flush?+
The most common reasons are a worn-out flapper that isn't sealing properly, an incorrect flapper chain length, or a fill valve that isn't shutting off the water supply once the tank is full.
How do I know if the flapper or the fill valve is the problem?+
To check the flapper, perform a dye test: add food coloring to the tank water and wait 15-20 minutes. If colored water appears in the bowl, the flapper is leaking. If the tank overfills and water constantly flows into the overflow tube, the fill valve or float setting is the issue.
Can a running toilet really increase my water bill significantly?+
Yes, absolutely. A continuously running toilet can waste hundreds, even thousands, of gallons of water per day, leading to a substantial increase in your water bill. Fixing it promptly can save you a lot of money.
How often should I replace my toilet’s flapper?+
While there's no strict schedule, it's good practice to inspect your flapper annually. If you notice it's becoming stiff, shows cracks, or if your toilet starts running intermittently, replace it. Flappers typically last 3-5 years, but can vary by water quality and usage.
Is it safe to fix a running toilet myself?+
Yes, fixing a running toilet is one of the safest and most common DIY plumbing repairs. The only safety concern is ensuring the water supply is turned off to prevent spills and accidental flooding during the repair.

Discussion
Loading comments…