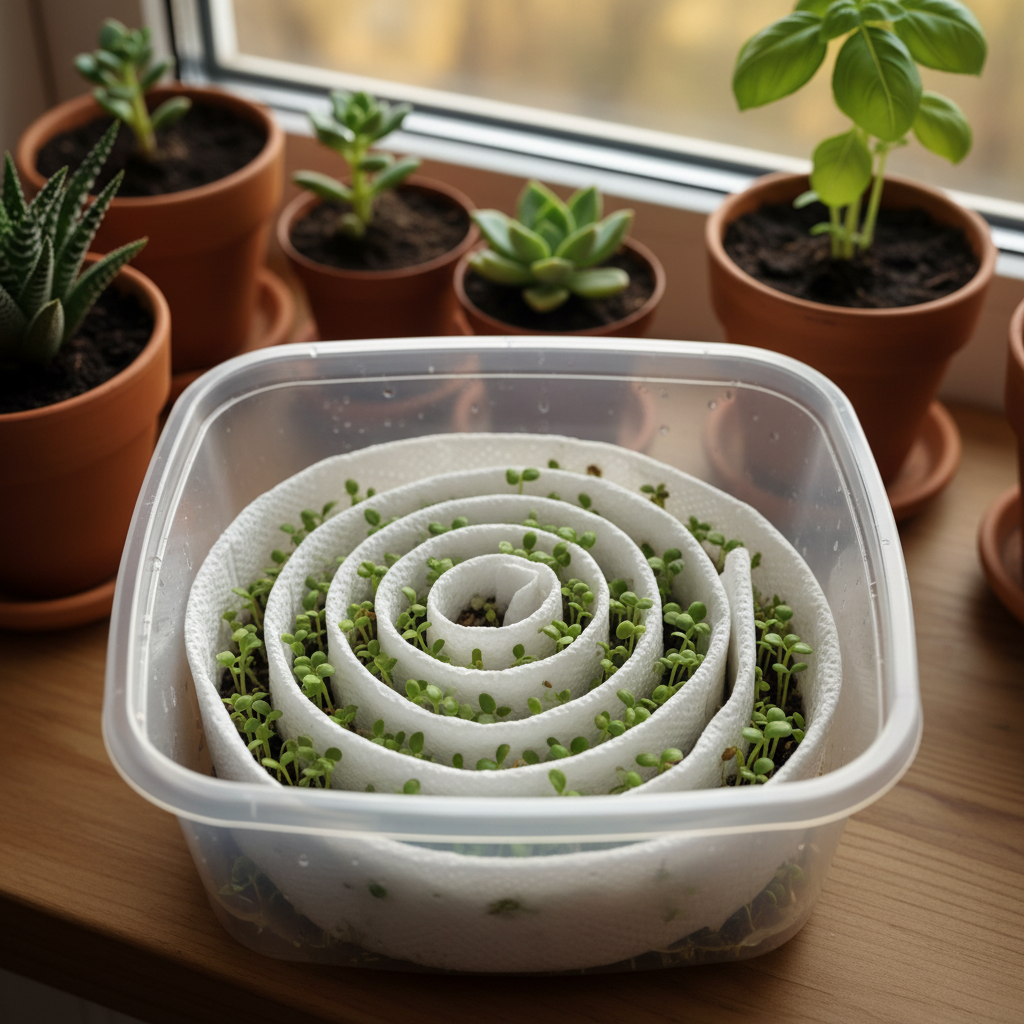
- Moisture Retention: The absorbent material wicks and holds water consistently around the seeds, crucial for breaking dormancy. The coiled structure helps prevent rapid evaporation.
- Warmth: Placing the container in a warm spot (like the top of a refrigerator or on a seedling heat mat) encourages faster germination for most heat-loving seeds. The enclosed environment helps trap this warmth.
- Humidity: The lidded container creates a high-humidity environment, preventing the seeds from drying out and promoting cotyledon (first leaf) development once they sprout.
- Space Efficiency: By rolling the seeds, you condense what would typically be a long row of seeds into a compact cylinder, maximizing vertical space over horizontal spread.
- Observation: The clear plastic container allows for easy, non-disruptive observation of germination progress without disturbing the seeds.
Published May 24, 2026Last updated August 17, 2026
Tools & materials you'll need
Affiliate linksAs an Amazon Associate FixlyGuide earns from qualifying purchases — at no extra cost to you. Prices and availability are accurate as of publication and subject to change.
Quick Answer
The 'seed snail' method, often seen on social media, offers a compact way to germinate numerous small seeds indoors, ideal for gardeners with limited space. By coiling seeds within a moist strip of absorbent material inside a plastic container, it creates a humid, controlled environment conducive to sprouting. While effective for many seed types, particularly those that are small and don't require deep planting, its success depends heavily on maintaining consistent moisture, providing adequate warmth, and carefully transplanting the delicate seedlings to prevent damage. With attention to these crucial details, it can be a valuable tool for maximizing your seed-starting efforts.
The Problem
Starting seeds indoors can quickly become a space hog. Trays, pots, and domes can take over benchtops, windowsills, and dedicated growing areas, especially when you're trying to get a head start on a large number of plants for your spring garden. Traditional seed-starting methods, while reliable, demand significant real estate, specialized lighting, and careful monitoring of individual cells. For apartment dwellers, urban gardeners, or anyone simply short on horizontal surfaces, the ambition of starting dozens or hundreds of vegetable, herb, or flower seeds often clashes with the reality of available space. This leads many to seek alternative, more compact methods that promise ample germination without the footprint of conventional trays. The 'seed snail' method emerges as a popular solution, but its efficacy for the average homeowner requires a closer look.
How It Works
The seed snail method fundamentally relies on creating a miniature, controlled environment that mimics ideal germination conditions within a very small footprint. Imagine a roll cake, but instead of cake and frosting, you have a strip of absorbent material (like toilet paper, paper towels, or even thin strips of non-woven fabric) that serves as your growing medium. Seeds are placed at intervals along this strip, which is then moistened and carefully rolled up into a 'snail' shape. This coil is then placed upright, either in a shallow container with a small amount of water or directly into a plastic container with a lid, which then acts as a mini-greenhouse.
Here’s the breakdown of the science:
- Moisture Retention: The absorbent material wicks and holds water consistently around the seeds, crucial for breaking dormancy. The coiled structure helps prevent rapid evaporation.
- Warmth: Placing the container in a warm spot (like the top of a refrigerator or on a seedling heat mat) encourages faster germination for most heat-loving seeds. The enclosed environment helps trap this warmth.
- Humidity: The lidded container creates a high-humidity environment, preventing the seeds from drying out and promoting cotyledon (first leaf) development once they sprout.
- Space Efficiency: By rolling the seeds, you condense what would typically be a long row of seeds into a compact cylinder, maximizing vertical space over horizontal spread.
- Observation: The clear plastic container allows for easy, non-disruptive observation of germination progress without disturbing the seeds.
Once germinated, the delicate seedlings' roots embed themselves into the moist material. When ready for transplant, the snail is carefully unrolled, and the seedlings are gently separated, making it easier to handle many sprouts at once compared to pricking out from a densely sown flat.
Step-by-Step Fix
1. Gather Your Materials — Prepare your workspace with everything you'll need before you begin to ensure a smooth process. * Tools: Scissors, permanent marker, spray bottle. * Materials: A roll of toilet paper (unscented, undyed is best), small clear plastic container (like a takeout container or deli cup with a lid), spray bottle with room-temperature water, your chosen seeds, seed-starting mix, small trowel or spoon, seedling heat mat (optional).
2. Prepare the Toilet Paper Strip — The foundation of your seed snail is a long, narrow strip of absorbent material. * Unroll several feet of toilet paper. Carefully cut it lengthwise into a strip approximately 2–3 inches wide. You'll want it long enough to accommodate all your seeds, usually 3-4 feet depending on seed quantity. Avoid tearing it, as a clean edge makes for a more stable roll.
3. Place Your Seeds — Proper spacing is key to avoid overcrowding and make transplanting easier later. * Lay the toilet paper strip flat on a clean surface. Place individual seeds about 1/2 to 1 inch apart along one edge of the strip, approximately 1/2 inch from the edge. For very tiny seeds, use tweezers. Avoid placing seeds too close to the center line, as they might get crushed when rolling. For different varieties, you can mark sections with your permanent marker at this stage.
4. Gently Moisten the Strip — Consistent, even moisture is vital for germination. * Using your spray bottle, lightly mist the entire strip of toilet paper where the seeds are placed until it is thoroughly damp but not soggy. The goal is to ensure good seed-to-paper contact. Avoid over-saturating, which can lead to mold.
5. Carefully Roll the Snail — This step requires a delicate touch to keep seeds in place. * Starting from one end, gently roll the toilet paper strip into a tight coil. As you roll, ensure the seeds remain in their positions and don't clump together. The roll should be snug enough to hold its shape but not so tight that it crushes the seeds. You want the seeds to be exposed to air at the top edge of the roll.
6. Place in Container & Label — Provide the right environment for germination. * Place the rolled-up 'snail' upright in your clear plastic container, with the edge containing the seeds facing upwards. Add about 1/4 inch of water to the bottom of the container – this will wick up and keep the toilet paper moist. Snap the lid securely onto the container to create a humid microclimate. Use your permanent marker to label the container with the seed type and date.
7. Provide Warmth & Light — Create ideal conditions for sprouting. * Place the lidded container in a warm location, ideally between 70-80°F (21-27°C) for most seeds. A seedling heat mat is perfect, or the top of a refrigerator can work. Once seeds begin to germinate (you'll see tiny sprouts), move the container to a bright location with indirect light, or under grow lights, to prevent leggy growth. Open the lid daily for a few minutes to allow for air circulation and prevent mold.
8. Monitor & Replenish Water — Consistency is key. * Check the water level in the bottom of the container every 1-2 days. If it's low, add a small amount of room-temperature water. Ensure the toilet paper remains consistently damp but never waterlogged. If mold appears, consider increasing air circulation or using a fungicide-treated seed.
9. Transplant Seedlings — The most delicate part of the process. * Once seedlings have developed their first true leaves (not just the cotyledons) and are about 1-2 inches tall, they are ready to transplant. Carefully unroll the snail. Using a small trowel, a spoon, or even a toothpick, gently pry each seedling from the toilet paper, holding it by a leaf (never the stem!) and plant it into individual pots filled with seed-starting mix. Avoid pulling the seedling by its stem, as this can easily damage it. Water immediately after transplanting.
Common Causes
- Limited Space: The primary driver for adopting the seed snail method is often the lack of horizontal space for traditional seed-starting trays or pots.
- Small Seed Quantity: It's particularly effective for starting a moderate number of very small seeds, where precise individual placement in trays would be tedious.
- High Humidity Needs: Seeds that benefit from consistent high humidity for germination can thrive in the enclosed snail environment.
- Curiosity/Experimentation: Many gardeners are drawn to the method after seeing it on social media, eager to try a novel approach.
Common Mistakes
- Over-Saturating the Toilet Paper: Too much water can lead to anaerobic conditions and foster mold or rot, killing the seeds. Aim for damp, not dripping.
- Rolling Too Tightly: Crushing seeds or making the roll too dense can inhibit air circulation and root development.
- Incorrect Seed Spacing: Placing seeds too close together leads to leggy, weak seedlings that compete for resources and are harder to separate without damage.
- Lack of Air Circulation: Keeping the lid completely sealed for too long can create an overly humid, stagnant environment ripe for mold and damping-off disease. Open it daily.
- Transplanting Too Early or Late: Transplanting too early when seedlings are too small or too late when they are root-bound in the toilet paper can cause significant transplant shock.
- Pulling Seedlings by the Stem: Always handle seedlings by their leaves or root ball when transplanting, as the stem is incredibly fragile and easily damaged.
Cost & Time Breakdown
| Task | DIY cost | Pro cost | Time |
|---|---|---|---|
| Gather Materials & Prep TP Strip | $0–$5 | N/A | 10–15 mins |
| Place Seeds & Roll Snail | $0 | N/A | 15–30 mins |
| Monitor Germination & Water | $0 | N/A | 5 mins/day |
| Transplant Seedlings | $5–$20 | N/A | 30–60 mins |
| Total (excluding initial seed cost) | $5–$25 | N/A | 1–2 hours initial, plus daily checks |
Tips & Prevention
- Choose the Right Seeds: This method works best for small- to medium-sized seeds that don't require deep planting or specific scarification. Avoid very large seeds or those that need significant stratification (cold period) here.
- Ventilate Daily: Even a few minutes of opening the lid daily will allow for crucial air exchange, preventing stagnant air and reducing the risk of fungal issues like damping-off.
- Bottom Watering: Always keep a small reservoir of water at the bottom of the container. This allows the toilet paper to wick up exactly what it needs, preventing both drought and overwatering.
- Sterile Medium: Ensure your toilet paper and container are干净 (clean or sterile) to minimize the introduction of pathogens that could lead to mold or disease.
- Harden Off: Before moving seedlings outdoors (if applicable), gradually acclimate them to outdoor conditions. This
Related Articles
Keep troubleshooting with these hand-picked guides from FixlyGuide:
- The 4 Critical Dimensions of a Bluebird House (Most DIY Plans Miss One) — Discover the precise measurements and often-overlooked design elements essential for building a bluebird house that truly attracts nesting…
- The Surprising Trick to Cutting Your Dryer Bill By $100 Per Year — Installing a clothesline can significantly reduce your energy bills and add a fresh scent to your laundry. This guide covers how to choose…
- The Surprising Yard Tool That Vaporizes Weeds (No Chemicals Needed) — A weed torch offers an efficient, chemical-free method for removing unwanted plants from hardscaped areas like driveways, patios, and grave…
- Is a Wall-Mounted Pressure Washer Right for Your Garage? The Unvarnished Truth — Discover if a wall-mounted pressure washer is the right cleaning solution for your home, offering a powerful and space-saving alternative t…
- The Single Cedar Board Secret to Attracting Bluebirds to Your Yard — Discover how to construct an ideal bluebird nesting box using just one cedar board, providing a safe and inviting habitat for these cherish…
- That Drywall Hole Isn't Just Ugly, It's a Bat Signal — Learn the pro-approved method for patching drywall holes of any size. We cover the surprising science behind a lasting repair and common mi…
What should this project cost?
Enter your project details for a realistic cost range before you call anyone.
Cost depends heavily on which system turns out to be the source.
- Regional adjustment
- National average
- Labor share (typical)
- ~$1,620
- Quotes to collect
- 3 written estimates
Educational estimate based on national averages — not a binding quote. Always confirm with written local estimates.
This article was independently written by FixlyGuide based on the source topic.
Frequently asked questions
What is the seed snail method?+
The seed snail method is a compact seed-starting technique where seeds are placed on a moist strip of absorbent material (like toilet paper) which is then rolled into a coil and placed in a lidded container. This creates a mini-greenhouse, ideal for germinating many seeds in a small space.
Does the seed snail method actually work?+
Yes, the seed snail method can be quite effective for germinating many types of small seeds, particularly if you're short on space. Success depends on maintaining consistent moisture, warmth, and careful handling during transplantation.
What kind of seeds work best with the seed snail method?+
This method is best suited for small to medium-sized seeds that don't require deep planting or complex stratification. Herbs, lettuce, small flower seeds, and many vegetable seeds (like tomatoes and peppers) work well. Avoid very large seeds.
What are the common mistakes to avoid with the seed snail method?+
Common mistakes include over-saturating the paper, rolling the snail too tightly, incorrect seed spacing, lack of air circulation leading to mold, and improper handling of delicate seedlings during transplanting. Always handle by leaves, not stems.
Discussion
Loading comments…