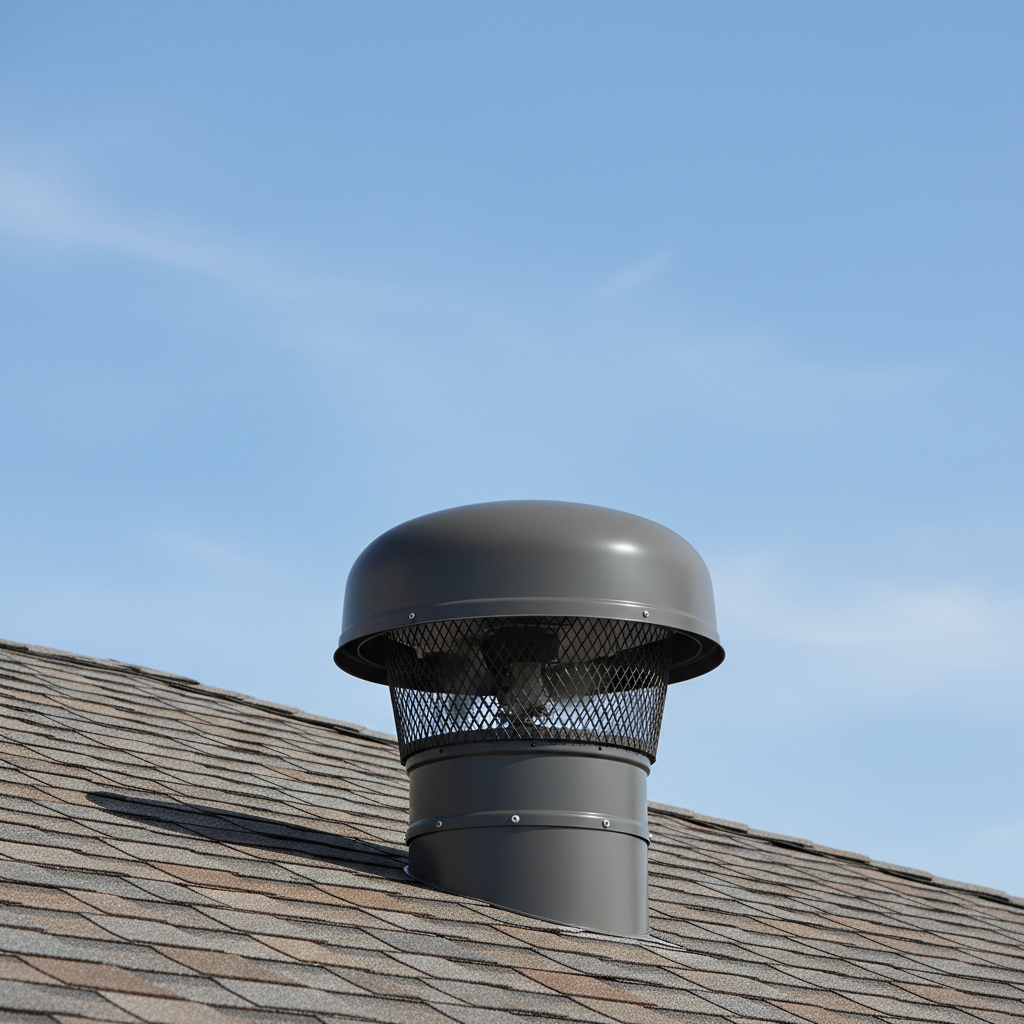
- Motor Burnout: Constant exposure to extreme heat and dust can cause the motor to overheat and seize up. This is probably the most common failure I see.
- Thermostat Failure: The thermostat, which tells the fan when to turn on and off, can simply wear out or get stuck, preventing the fan from operating when it should.
- Bearing Failure: The bearings in the fan motor can dry out or seize, leading to loud operation or complete failure.
- Electrical Issues: Loose wiring, a tripped breaker, or a faulty capacitor can prevent the fan from getting power or starting correctly.
- Debris Buildup: Leaves, bird nests, or even insect nests can get into the fan housing and impede the blades, causing strain on the motor.
HVAC · High energy usage
| Project category | HVAC |
|---|---|
| Problem type | High energy usage |
| Trade required | HVAC |
| Urgency | Planned project |
| Safety risk | Low safety risk |
| DIY suitability | DIY for experienced homeowners |
| Cost category | High cost |
| Typical timeline | Assessment within weeks; replacement planned off-season |
| Contractor type | Licensed HVAC technician |
Repair option
Duct sealing, insulation, and a tune-up before touching the equipment.
Replacement option
High-efficiency replacement sized by a load calculation, not a rule of thumb.
Common causes
- Aging, low-efficiency equipment
- Leaking ducts losing conditioned air
- Insufficient attic insulation
- Oversized system short-cycling
Relevant tools:project cost estimatorrepair or replace
Published August 5, 2026Last updated August 17, 2026
Tools & materials you'll need
Affiliate linksAs an Amazon Associate FixlyGuide earns from qualifying purchases — at no extra cost to you. Prices and availability are accurate as of publication and subject to change.
Quick Answer
Your attic is a furnace, plain and simple. Even if you've got killer insulation, that trapped heat bakes right down into your living space and makes your AC work overtime. An attic fan actively kicks that hot air out and pulls in cooler outside air, which means the whole house feels better, your AC runs less, and your utility bills usually drop. It also helps protect your roof and keeps moisture from hanging around up there.
The Problem
I've been up in literally hundreds of attics over the years, from cozy little bungalows in San Jose to sprawling two-stories in Willow Glen, and I can tell you one thing: without proper ventilation, they're ovens. I've seen temperatures hit 150°F (65°C) on a mild summer day, and that's not just uncomfortable—it's actively beating up your home. That superheated air radiates down through your ceiling, making your AC unit struggle to keep up. You're constantly cranking the thermostat down, and it feels like you're tossing money right out the window with your power bill. Beyond comfort, that kind of heat cooks roof shingles from the underside, and I've seen them crack and curl long before they should. It also breaks down insulation, so it doesn't do its job anymore, and then you're stuck in a nasty little loop of heat transfer. And if there's any moisture in there, that hot, stagnant air turns into a breeding ground for mold and mildew. No thanks.
How It Works
Think of your attic as a giant lung for your house. Without a fan, it's holding its breath, trapping all that hot, humid air. An attic fan, whether it's a gable-mounted unit or a roof-mounted one, works like an exhaust fan for that lung. It's got a thermostat, so when the attic temperature hits a certain point—say, 100°F to 110°F (38°C to 43°C)—it kicks on. The fan starts pulling the superheated air right out of the attic.
But here's the part that trips people up: it needs somewhere to pull air from. That's where your soffit vents come in. These are the small, often screened openings along the underside of your roof eaves. As the fan expels the hot air, it creates a negative pressure, drawing cooler, fresher air in through those soffit vents and any other intake vents you might have. That steady exchange flushes out heat and moisture instead of letting it stew up there. Some fancier models, like solar attic fans, don't even need to be wired into your home's electrical system; they just hum along powered by the sun. Same basic idea either way: get the hot air out, bring the cooler air in. That circulation can knock attic temperatures down by 30°F to 50°F (17°C to 28°C) in no time, and homeowners always notice the difference in comfort and utility bills.
Step-by-Step Fix
Alright, let's talk about installing a roof-mounted attic fan. This is a solid intermediate DIY project. If you're not comfortable on a ladder or working with electrical, definitely call a pro. Safety first, always.
-
Safety First — Kill the Power! — Before you even think about cutting wires or touching anything electrical, go to your main electrical panel and turn off the circuit that feeds the attic fan's intended location. Test with a voltage tester to make sure the power's off. You'll thank me later.
- Tools: Voltage tester
- Safety: Always assume wires are live until tested. Don't work alone on ladders.
-
Pick Your Spot and Mark It — Head up into the attic during the hottest part of the day. You want to install the fan as close to the ridge of the roof as possible, but still leaving room for the fan's housing and flashing. Aim for a spot roughly equidistant from the gable ends for even ventilation. Mark the center point of where the fan will go, keeping in mind the fan unit's exact diameter.
- Tip: Most roof-mounted fans come with a template. Use it! If not, measure carefully.
-
Cut the Hole in the Roof — This is where it gets real. From the attic side, use a jigsaw or reciprocating saw to cut the marked circle through the roof sheathing. Be careful not to cut into any roof trusses. Once the sheathing is cut, head up onto the roof. You'll need to carefully cut through the shingles and roofing felt. Clean away any debris. Make sure your hole is perfectly round and smooth.
- Tools: Jigsaw or reciprocating saw, utility knife
- Caution: Wear gloves to protect your hands from sharp shingle edges.
-
Dry-Fit the Fan and Flashing — Position the fan's flashing—that's the metal skirt around the fan that slides under the shingles—around the hole. Make sure it sits flat and the fan opening lines up perfectly with the hole. This step is critical for preventing leaks. If it doesn't fit right, you'll need to trim more of the shingle or sheathing.
-
Secure the Flashing — Apply a generous bead of roofing cement to the underside of the flashing, especially around the perimeter that will sit on the existing shingles. Slide the top edge of the flashing under the row of shingles above it, and the sides over the adjacent shingles. Secure the flashing to the roof deck with roofing nails—don't nail through the flashing's flange that will be covered by shingles, just the exposed parts. Seal all nail heads with roofing cement.
- Materials: Roofing cement, roofing nails (1.25-inch or 1.5-inch)
- Pro Tip: Overlap correctly! Water flows down. The upper shingles always overlap the flashing, and the flashing overlaps the lower shingles.
-
Mount the Fan Unit — Carefully place the fan housing onto the flashing, making sure the fan blade is centered in the opening. Secure the fan to the flashing according to the manufacturer's instructions, usually with screws provided.
-
Wire It Up (Carefully!) — If you're installing a standard electric fan, run an electrical cable (usually 14/2 with ground or 12/2 with ground, depending on the fan's amperage) from your power source (a junction box or new circuit) to the fan's junction box. Strip the wires and connect them: black to black (hot), white to white (neutral), and bare copper or green to the ground screw. Secure all connections with wire nuts. Install the thermostat and humidistat (if included) per instructions. I had a homeowner once in Santa Clara try to wire one up without turning off the power. He learned a hard lesson about arc flashes. Don't be that guy.
- Tools: Wire strippers, screwdriver, wire nuts, electrical tape
- Safety: If you're unsure about electrical wiring, please call a licensed electrician. This is not the place to guess.
-
Test the Fan — Once all connections are secure and the fan is mounted, go back to your electrical panel and restore power to the circuit. Head up to the attic and listen. You should hear the fan turn on if the attic temperature is above the thermostat setting. If it doesn't, recheck your wiring, power source, and thermostat settings. Make sure there are no obstructions to the fan blade.
-
Seal and Finish — Apply a final bead of roofing cement around any exposed seams or nail heads on the flashing. Ensure all shingles are properly seated and no gaps exist. For gable-mounted fans, you'll usually secure them directly to the framing of the gable vent opening and run wiring from there.
Common Causes
Attic fans generally fail due to a few common culprits:
- Motor Burnout: Constant exposure to extreme heat and dust can cause the motor to overheat and seize up. This is probably the most common failure I see.
- Thermostat Failure: The thermostat, which tells the fan when to turn on and off, can simply wear out or get stuck, preventing the fan from operating when it should.
- Bearing Failure: The bearings in the fan motor can dry out or seize, leading to loud operation or complete failure.
- Electrical Issues: Loose wiring, a tripped breaker, or a faulty capacitor can prevent the fan from getting power or starting correctly.
- Debris Buildup: Leaves, bird nests, or even insect nests can get into the fan housing and impede the blades, causing strain on the motor.
Common Mistakes
Here are some of the blunders I've seen homeowners make with attic fans:
- Blocking Soffit Vents: You need intake! The fan pulls air from somewhere. If your soffit vents are blocked by insulation, paint, or debris, the fan just pulls air from your living space, creating negative pressure and potentially drawing conditioned air out. Keep those vents clear!
- Improper Sizing: A fan that's too small won't move enough air. One that's too big can create too much negative pressure, pulling air from unintended places. You typically want to move 700-1000 CFM (cubic feet per minute) per 1,000 square feet of attic space, with an 8-foot ceiling. My rule of thumb is to calculate the cubic feet of your attic (length x width x height) and divide by 2 for the CFM needed.
- Incorrect Thermostat Setting: Setting the thermostat too low means the fan runs constantly, wasting energy and wearing out the motor. Too high, and it won't kick on until your attic is an inferno. I usually set mine between 100°F and 110°F (38°C to 43°C).
- Ignoring Humidity: Some fans have a humidistat. If you're in a humid climate, setting this correctly is key to preventing moisture buildup. Overly aggressive dehumidification can sometimes lead to other issues if not balanced.
- Shoddy Roof Sealing: This is a big one. Any cut in your roof is an invitation for leaks. If the flashing isn't installed correctly—under upper shingles, over lower ones, and sealed with roofing cement—you're going to have problems.
- Not Checking Breaker First: I get calls all the time for
Related Articles
Keep troubleshooting with these hand-picked guides from FixlyGuide:
- The Surprising Trick to Cutting Your Dryer Bill By $100 Per Year — Installing a clothesline can significantly reduce your energy bills and add a fresh scent to your laundry. This guide covers how to choose…
- The Secret to Endless Hot Showers? It's Not Your Water Heater's Age — Inconsistent hot water or no hot water at all often points to a single, often overlooked culprit: the thermostat. Understanding its role is…
- The Secret Window AC Trick That Slashes Your Summer Electric Bill By 30% — Mastering simple window AC maintenance can significantly reduce your cooling costs and extend the life of your unit, often by more than 30%.
- The 12 Checks That Prevent 80% of Costly Home Repairs — Don't wait for a disaster. Our comprehensive monthly home maintenance checklist reveals the surprising, simple tasks that catch small issue…
- 7 Inspection Red Flags That Secretly Signal a $20,000 Bill — Don't let your dream home become a money pit. Many buyers and even some inspectors overlook subtle home inspection red flags that lead to f…
- The Secret Reason Your Thermostat Lies (and 5 Fixes That Actually Work) — If your thermostat isn't reaching its set temperature, understanding the underlying cause is key to a comfortable home and lower energy bil…
Should you do this yourself?
Answer five quick questions before you start. Safety outranks savings every time.
Your experience with work like this
How high do you have to work?
Does the job involve any of these?
Will it need a permit?
Specialty tools
Free and instant. Educational guidance only — not a quote, inspection, or professional diagnosis.
Estimate your own project cost
National averages are a starting point. Enter your details for a range that fits your house.
Roof replacement cost
- Per square (installed)$604 – $866
Add $500–$2,500 if decking is rotten and needs replacement. Storm damage may be covered by insurance.
Educational estimate only — always confirm with written local bids.
What should this project cost?
Enter your project details for a realistic cost range before you call anyone.
Spot repairs commonly run $400–$1,800; full replacement typically $9,000–$18,000 for an average home.
- Regional adjustment
- National average
- Labor share (typical)
- ~$2,948
- Quotes to collect
- 3 written estimates
Educational estimate based on national averages — not a binding quote. Always confirm with written local estimates.
Fixly Project Decision Box
- DIY difficulty
- Professional Recommended
- Estimated time
- Inspection 1–2 hours · repairs 1–3 days
- Cost level
- High
Main tools / materials
- Binoculars for a ground-level look
- Flashlight for attic checks
- Moisture meter
- Roofing cement (temporary patch only)
When to stop and call a pro
- Active leak near lights, fans, or any wiring
- Sagging, bulging, or water-filled ceiling
- Steep, wet, or two-story roof — do not climb it
- Storm or hail damage you plan to claim on insurance
Need professional help?
Free roof assessment first — no phone calls until you ask for them.
Get Local Roofing HelpDecide what your roof needs
Two minutes of questions turns "something is wrong up there" into a clear next step.
- Repair or replace your roof?Answer 10 questions about age, leaks, and damage to get a clear next step.Open
- Compare contractor quotesScore up to four bids on price, warranty, licensing, and timeline.Open
- Get local estimatesSend one request and compare written estimates from vetted pros.Open
Free, no signup required. Estimates are educational guidance, not a quote or an inspection.
Get the print-ready PDF of this guide
A clean, ad-free, printable version you can keep on your phone or pin to the workshop wall. Free with a FixlyGuide account.
- Print-optimized layout
- Tools, materials & every step included
- Saved to your account
This article was independently written by FixlyGuide based on the source topic.
Frequently asked questions
How do I know if my attic fan is working?+
The simplest way is to go into your attic on a hot day when the fan should be running. Listen for the motor and feel for air movement near the fan and your soffit vents. You can also carefully check the thermostat setting to ensure it's below the current attic temperature, which should trigger the fan.
How much electricity does an attic fan use?+
Most standard electric attic fans use about 100-300 watts of power when running, which is comparable to a few light bulbs. Over a summer, this might add $20-$50 to your electricity bill, but the savings on your AC can easily offset that, often by a significant margin.
Can an attic fan cause a backdraft in my water heater or furnace?+
Yes, if your attic fan is too powerful for your attic's intake ventilation (soffit vents), it can create excessive negative pressure. This can potentially pull combustion gases down your chimney or flue, a dangerous condition known as backdrafting. Ensure adequate intake ventilation and proper fan sizing to prevent this.
How long do attic fans typically last?+
Most electric attic fans are built to last 10-15 years, though some higher-quality models can go for 20 years or more. Solar attic fans, with fewer moving parts and no direct electrical connection, can often last even longer. Regular cleaning and inspection can extend their lifespan.
Do attic fans help with moisture or humidity?+
Absolutely. Beyond just heat, attic fans help expel humid air, which is crucial for preventing mold, mildew, and wood rot in the attic space. This is especially beneficial in climates with high humidity or during colder months when warm, moist air from the living space rises into the attic.
Should I turn off my attic fan in winter?+
It depends. If your attic fan has a humidistat, it will automatically manage moisture. Otherwise, many homeowners set their thermostat to a higher temperature (e.g., 120°F) or simply turn it off in winter to prevent it from pulling in cold air when it's not needed for heat reduction.
What's the difference between a roof-mounted and a gable-mounted attic fan?+
A roof-mounted fan is installed directly on the roof deck, typically near the ridge, and vents air straight up. A gable-mounted fan is installed inside an existing gable vent opening at the end of the house. Roof-mounted fans are generally more efficient at expelling heat from the highest point of the attic.
Can I install an attic fan myself?+
Yes, installing an attic fan is a moderate DIY project for someone comfortable with basic carpentry and electrical work, and working on a roof. However, if you're uncertain about cutting a hole in your roof, electrical wiring, or working safely on ladders, it's always best to hire a professional contractor.
How do solar attic fans compare to electric ones?+
Solar attic fans operate entirely on solar power, meaning zero electricity costs and a greener footprint. They're easier to install since they don't require electrical wiring. However, their performance can vary with sunlight intensity, and they might not move as much air as a powerful electric fan, especially on cloudy days or at night.
What's the ideal attic temperature in summer?+
Ideally, your attic temperature should be no more than 10-20°F (5-10°C) warmer than the outside ambient temperature. Without an attic fan, it can easily be 40-60°F (22-33°C) hotter than outside, which is where problems start.
Discussion
Loading comments…