Tools & materials you'll need
Affiliate linksAs an Amazon Associate FixlyGuide earns from qualifying purchases — at no extra cost to you. Prices and availability are accurate as of publication and subject to change.
Quick Answer
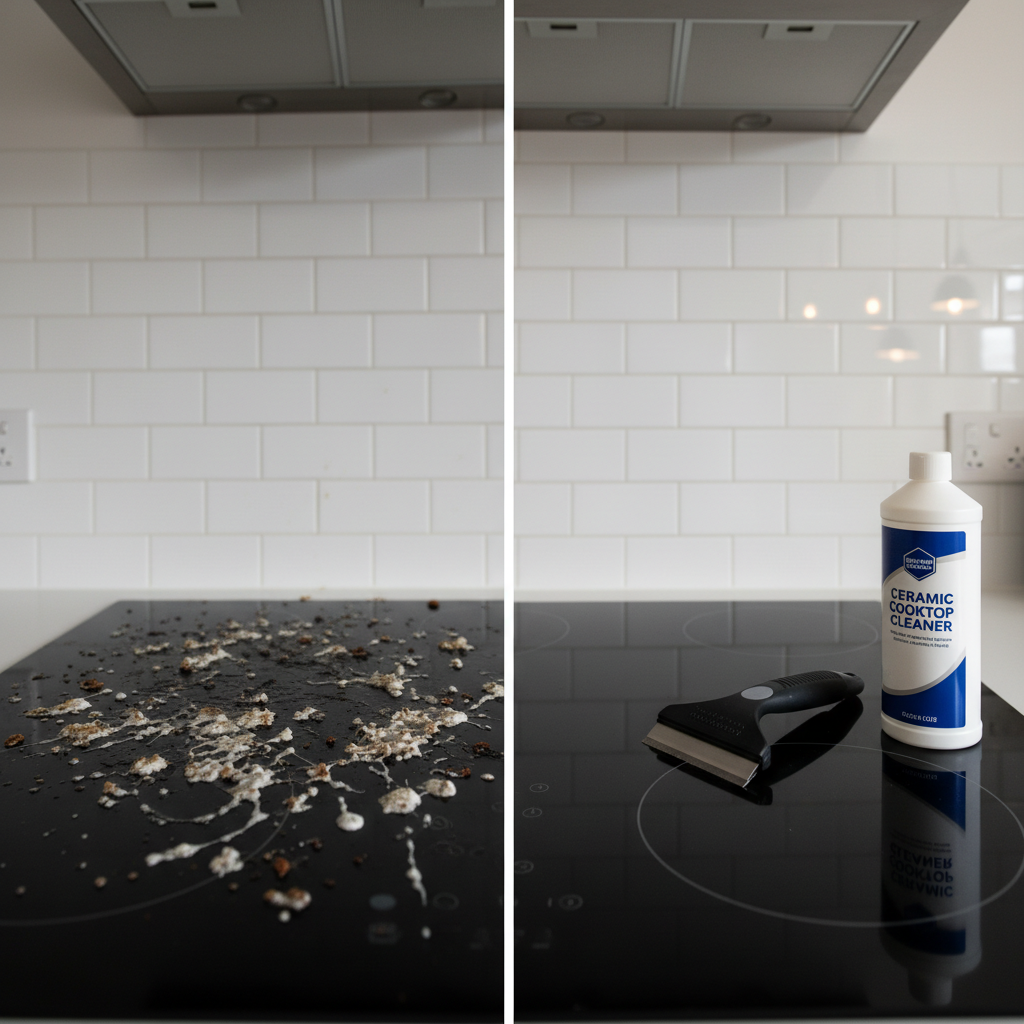
To clean a burnt-on glass stovetop without scratching, create a paste of baking soda and a few drops of Dawn dish soap. Apply the paste to the cooled stovetop, let it sit for 15-30 minutes, then gently scrub with a non-scratch pad. For extreme buildup, carefully use a single-edge razor blade scraper held at a low 30-degree angle to lift the burnt-on debris before cleaning.
Why This Works
Cleaning a glass-ceramic stovetop is a delicate battle against tough chemistry. The surface, often mistaken for simple glass, is a sophisticated material designed to withstand extreme temperature changes. While very hard (around a 5.5 to 7 on the Mohs hardness scale), it is not invincible and can be scratched by materials of similar or greater hardness, like quartz (found in sandy grit) or common kitchen scouring pads.
The mess you're fighting is equally formidable. When sugars or proteins spill and are heated, they undergo carbonization and polymerization, forming intensely durable, plastic-like layers bonded directly to the cooktop surface. Simple wiping won't work because these new polymers are no longer water-soluble.
Our method employs a three-pronged attack based on a precise understanding of the surface and the soil:
-
Mechanical Removal (The Razor Blade): This is the most misunderstood step. A steel razor blade has a Mohs hardness of around 5.5, dangerously close to that of the cooktop. The secret isn't the blade itself, but the angle. By holding the blade at a very low, 30-degree angle, you are not scraping in the traditional sense. Instead, you are shearing, getting underneath the burnt-on polymer and lifting it in a sheet. The force is parallel to the cooktop, not driving into it, which prevents the tip from digging in and causing a scratch.
-
Chemical Reaction (Baking Soda & Dawn Paste): This is where the real magic happens. Baking soda (sodium bicarbonate) is a mild alkali and a very gentle abrasive (Mohs hardness of 2.5), making it physically incapable of scratching the harder glass-ceramic. When mixed with a surfactant like Dawn dish soap, it creates a powerful paste. The Dawn begins to break down and lift any remaining greasy components, while the alkalinity of the baking soda helps dissolve and soften the carbonized mess. Allowing this paste to "dwell" for 20-30 minutes gives these chemical reactions the necessary time to weaken the bonds holding the gunk to your stove.
-
Advanced Abrasion & Finishing (Bar Keepers Friend): For the final, stubborn bits and a perfect shine, we turn to a specialized cleanser. Bar Keepers Friend Soft Cleanser contains feldspar, another gentle abrasive harder than baking soda but still softer than the cooktop. More importantly, its active ingredient is oxalic acid. This mild acid is incredibly effective at breaking down mineral deposits and rust-like stains (often the source of hazy or rainbow-colored films) that the alkaline paste might leave behind. It chemically dissolves the final layer of residue, leaving a streak-free, polished surface.
By layering these techniques—mechanical shearing, alkaline soaking, and acidic polishing—you are working with the chemistry of the problem, not just fighting it with brute force.
What You Need
- Single-Edge Razor Blade Scraper: Absolutely essential for heavy, burnt-on deposits. The long-handled versions provide better leverage and safety.
- Bar Keepers Friend Soft Cleanser: For its gentle abrasive and acidic properties that remove residue and polish the surface. Do not use the powder version for this task as it is easier to create micro-scratches.
- Baking Soda: The primary gentle abrasive and alkaline component of your cleaning paste.
- Dawn Powerwash or Dish Soap: A powerful surfactant that cuts through grease and helps the baking soda form a paste.
- Non-Scratch Scrub Sponges: Specifically labeled as "non-scratch" or "safe for non-stick pans." The blue Scotch-Brite sponges are a common example.
- Microfiber Cloths (at least 3): One for wiping residue, one for rinsing, and one for a final dry buff.
- Paper Towels: For wiping away the initial, heavy gunk lifted by the razor scraper.
- Nitrile or Rubber Gloves: To protect your hands from prolonged exposure to cleaning agents.
Step-by-Step Method
1. Cool It Down Completely — Safety first. Never, ever attempt to clean a warm or hot glass stovetop. Not only is it a burn hazard, but a rapid temperature change from cool cleaning products can cause the glass-ceramic to crack. Wait until the surface is completely cool to the touch.
2. Remove Loose Debris — Use a dry paper towel or a soft brush to wipe away any loose crumbs or debris. This prevents you from grinding abrasive particles into the surface in the later steps.
3. The Razor's Edge — This step is for significant, raised, burnt-on messes. Take your single-edge razor scraper, ensure the blade is fresh and free of nicks, and hold it at a very low 30-degree angle to the cooktop. Apply gentle, steady pressure and push forward to get under the edge of the burnt-on carbon. You should see it lift off in flakes or sheets. Wipe the debris away with a paper towel. Do not use a corner of the blade to "pick" at spots; always use the flat edge.
4. Create the Cleaning Paste — In a small bowl, sprinkle a generous amount of baking soda (about 1/2 cup). Add a few squirts of Dawn dish soap. Mix with a spoon or your gloved finger. Add a few drops of water if needed to create a thick, spreadable paste, similar in consistency to toothpaste.
5. Apply the Paste and Let It Dwell — Using your fingers or a spatula, spread a thick layer of the paste over all the stained and burnt areas of the cooktop. Ensure every bit of residue is covered. Let this paste sit undisturbed for at least 20-30 minutes. For extremely stubborn cases, you can cover the paste with a warm, damp towel to keep it from drying out and enhance the chemical action.
6. Gentle Agitation — After the dwell time, take your non-scratch scrub sponge. Dampen it slightly. Begin scrubbing the paste-covered areas in a circular motion. You should feel the baking soda acting as a fine abrasive, breaking down the softened grime. Apply firm pressure, but let the paste and the pad do the work.
7. Wipe Away the Grime — Use a damp microfiber cloth to wipe away all the paste and loosened gunk. You may need to rinse the cloth several times. This will reveal how much progress you have made. Don't be discouraged if some faint stains remain; that's what the next step is for.
8. The Polishing Cleanse — Squeeze a small amount of Bar Keepers Friend Soft Cleanser onto the remaining stained areas. Using a clean, damp, non-scratch sponge, work the cleanser into the glass with gentle circular motions. The feldspar and oxalic acid will tackle the mineral stains and hazy residue that the alkaline paste couldn't.
9. Final Rinse and Dry — With a new, clean, and thoroughly damp microfiber cloth, wipe the entire cooktop surface to remove all traces of the Bar Keepers Friend. It is critical to remove all cleaning residue. Any leftover chemicals can burn onto the surface the next time you cook, creating new stains.
10. Buff to a Shine — Take your final, completely dry microfiber cloth and buff the entire cooktop surface. This removes any final streaks and polishes the glass to a mirror shine, restoring it to showroom quality.
Common Mistakes
- Using Scratchy Abrasives: Never use steel wool, the green side of a regular Scotch-Brite sponge, or any powdered cleaners like Comet with bleach. These are far too abrasive and will permanently scratch and dull your cooktop.
- Cleaning a Hot Surface: This is a critical safety and maintenance error. It poses a burn risk and can cause thermal shock, cracking the glass-ceramic material.
- Using a Scraper at a High Angle: Holding the razor blade at an angle greater than 45 degrees changes the action from shearing to scraping, making it much more likely to dig in and cause a deep scratch.
- Using Ammonia-Based Glass Cleaner: Standard glass cleaners like Windex contain ammonia, which can be too harsh for cooktop surfaces and may damage the finish or the markings on the stove. Stick to vinegar and water for light cleaning.
- Letting Spills Sit: A sugar spill (from jam, for example) that isn't wiped up can be a disaster. When it cools, it can bond so strongly that it can cause pitting or even break a chunk of the glass off when it contracts. Clean sugary spills immediately (and carefully!).
- Sliding Cast Iron: The rough bottoms of cast iron skillets or enameled cookware can easily scratch the glass surface. Always lift, don't slide.
Cost & Time Breakdown
| Task | DIY Cost | Pro Cost | Time Investment |
|---|---|---|---|
| Initial Deep Clean (This Guide) | $15 - $30 | $100 - $175 | 30-60 Minutes |
| Purchase of Quality Scraper | $8 - $12 | N/A | N/A |
| Routine Weekly Cleaning | <$1 | N/A | 5 Minutes |
| Professional Surface Polishing | N/A | $150 - $250 | 1-2 Hours |
| Cooktop Glass Replacement | $300 - $700+ | $500 - $1,000+ | 2-4 Hours |
Prevention & Maintenance
- Wipe Up Spills Quickly: As soon as the stove is cool enough to touch safely, wipe up spills. For sugary or acidic spills (tomato sauce!), act even faster if you can do so safely.
- Daily Wipe-Down: After the final use of the day, let the cooktop cool and give it a quick spray with a 1:1 solution of white vinegar and water. Wipe with a clean microfiber cloth to remove daily grease and prevent buildup.
- Inspect Your Cookware: Before placing a pot or pan on the stove, check the bottom to ensure it's clean and dry. A piece of grit or a dried-on food lump on the bottom of a pan can cause a scratch.
- Lift, Don't Slide: Always lift heavy cookware, especially cast iron and enameled cast iron, to move it. Do not slide it across the cooktop surface.
- Use the Right Size Cookware: Using a small pot on a large burner can cause excess heat to radiate onto the surrounding surface, sometimes causing discoloration or making spills harder to clean.
- Buy a Cooktop Conditioner: Products like Weiman or Cerama Bryte Cooktop Polish not only clean but also leave a thin, protective silicone layer. This layer helps subsequent spills wipe up more easily.
When to Call a Professional
While this cleaning method is highly effective for burnt-on food and stains, it cannot fix physical damage. You should stop and call a professional appliance technician if you encounter any of the following issues. Trying to "buff out" these problems will only make them worse and could create a serious safety hazard. The main concern with a compromised glass-ceramic surface is that it loses its structural integrity. A crack can expand rapidly with heat, potentially shattering the cooktop during use. Pits and deep scratches create weak points where stress can concentrate.
Contact a professional if you see:
- Deep Scratches: If you can catch your fingernail in a scratch, it's too deep for cosmetic repair.
- Chips, Pits, or Cracks: Any physical breach of the surface is a red flag. Do not use the cooktop until it has been inspected.
- Persistent Rainbow Stains: If deep, oily-looking "rainbow" stains don't come off with Bar Keepers Friend, it could indicate a delamination of the surface coatings, which is not repairable.
- Control Panel Issues: If your cleaning efforts have led to moisture ingress or issues with touch controls, stop immediately and consult an expert.
A technician can assess whether the glass can be repaired (rarely) or if the entire cooktop assembly needs to be replaced, ensuring the appliance remains safe for you and your family to use.
Frequently asked questions
Can I use Mr. Clean Magic Eraser on my glass stovetop?+
It's not recommended. While Magic Erasers can sometimes work, they are a micro-abrasive melamine foam. Over time, they can create micro-scratches that dull the glass surface, removing its reflective shine. Sticking to a dedicated cooktop polish like Cerama Bryte or a baking soda paste is a much safer and more effective option.
What's the best daily cleaner for a glass cooktop?+
For simple daily cleaning and shine, a spray bottle filled with a 1:1 solution of distilled water and white vinegar is perfect. After the cooktop has cooled, spray it down and wipe with a clean microfiber cloth. This cuts through light grease and won't leave streaks. For a commercial option, Weiman or Cerama Bryte daily sprays are excellent.
How do I remove the white, hazy film from my cooktop?+
A white haze is typically caused by mineral deposits from hard water or starch from boiling over pasta or potatoes. The best way to remove this is with a mild acid. A small amount of Bar Keepers Friend Soft Cleanser or a cloth soaked in white vinegar and left on the spot for 10-15 minutes will break down these mineral deposits. Rinse thoroughly afterward.
I have an oily or rainbow-colored stain. What is it and how do I remove it?+
This iridescent, rainbow-like stain is usually caused either by minerals in your food/water being heated to very high temperatures, or by cleaning chemicals that were not fully rinsed off. It's a very thin film that has bonded with the glass. To remove it, use Bar Keepers Friend Soft Cleanser, as its mild acidic properties are specifically designed to break down these types of mineral and chemical films.


Discussion
Loading comments…