Tools & materials you'll need
Affiliate links- AmazonMicrofiber cloths3-5 · Use separate cloths for cleaning, rinsing, and drying.
- AmazonBucket or large bowl1 · For mixing your cleaning solution.
- AmazonSoft-bristled brush1 · Optional, for heavily soiled areas (an old toothbrush works well).
- AmazonRubber gloves1 pair · To protect your hands from hot water and grime.
- AmazonGrease-cutting dish soap1.5 cups · Such as Dawn or a similar brand known for its degreasing properties.
- AmazonHot water1 gallon · As hot as your tap can safely provide.
- AmazonOld towels or plastic sheeting1-2 · To protect countertops and floors.
- AmazonBaking soda1 box · Optional, for creating a paste for stubborn spots.
As an Amazon Associate FixlyGuide earns from qualifying purchases — at no extra cost to you. Prices and availability are accurate as of publication and subject to change.
Quick Answer
To eliminate the stubborn, greasy film on your kitchen cabinets, you need a powerful degreasing solution. The most effective and cabinet-safe formula is a simple mixture of one part dish soap to ten parts hot water, which emulsifies and lifts the polymerized grease without damaging the finish. Apply with a microfiber cloth, let it sit for 3-5 minutes to break down the grime, and wipe clean in the direction of the wood grain for a pristine, non-sticky surface.
The Problem
You run your hand over your kitchen cabinets, especially those above the stove, and it comes away feeling tacky. A yellowish, sticky film coats the surface, resisting casual wipes and attracting dust, pet hair, and other airborne particles. It’s a frustratingly stubborn grime that seems immune to all-purpose cleaners, making your entire kitchen feel unclean no matter how much you scrub. This isn't just everyday dust; it’s a hardened layer of aerosolized cooking grease, moisture, and household dust that has chemically changed over time into a varnish-like coating. It makes cabinet hardware difficult to touch and can even cause long-term damage to the wood or laminate finish by trapping moisture and abrasive particles.
How It Works
The sticky residue on your kitchen cabinets is a result of a process called polymerization. When you cook, microscopic grease particles become airborne. These particles, primarily triglycerides, float up with the steam and heat from your cooktop and settle on the coolest surfaces they encounter—your cabinets. Over time, exposure to air, light, and heat causes these fatty acid molecules to link together, or "polymerize," forming a durable, plastic-like layer. This is the same basic process used to make varnishes and oil-based paints, which is why the film is so resilient.
Simply wiping with a wet cloth does little because water and oil (grease) repel each other. Standard all-purpose cleaners often lack the specific surfactants needed to break down these tough, polymerized grease chains. The solution lies in using a powerful degreaser that can emulsify the film. An emulsifier is a substance that allows oil and water to mix. In our recommended solution, the dish soap acts as the emulsifier. Its molecules have a hydrophilic (water-attracting) head and a lipophilic (oil-attracting) tail. The lipophilic tails grab onto the grease molecules on the cabinet, while the hydrophilic heads are pulled by the water, effectively lifting the grime off the surface so it can be wiped away. The addition of hot water is crucial as it softens the hardened grease layer, making it significantly easier for the soap to penetrate and break it down.
Step-by-Step Fix
1. Prepare Your Workspace — Before you begin, clear off all countertops below the cabinets you intend to clean. Lay down old towels or plastic sheeting to protect your counters and floors from drips. Ensure the area is well-ventilated by opening a window or turning on the kitchen exhaust fan. Safety Note: Good ventilation is crucial when cleaning, even with simple soap and water, to avoid inhaling any aerosolized grime.
2. Mix the Degreasing Solution — In a bucket or large bowl, combine hot water and a quality dish soap known for its grease-cutting power. The ideal ratio is approximately 10 parts hot water to 1 part dish soap. For a standard 1-gallon bucket, this means about 1.5 cups of dish soap. Stir the solution until the soap is fully dissolved, creating a consistent, sudsy mixture.
3. Perform a Spot Test — Always test your cleaning solution on a small, inconspicuous area of the cabinet first, such as the back of a cabinet door or an inside panel. Apply the solution, let it sit for a few minutes, and wipe it off. Check for any discoloration, warping, or damage to the finish before proceeding. This is especially important for painted or older wood cabinets.
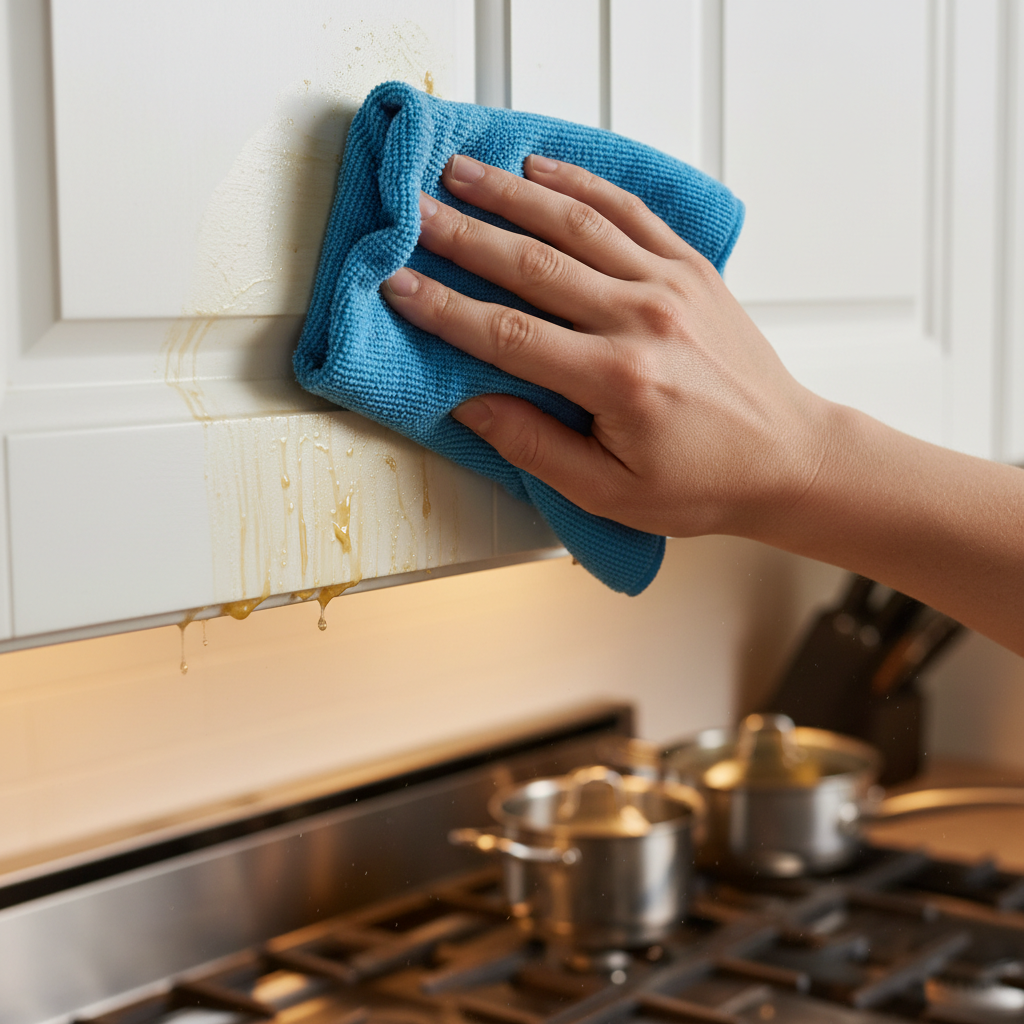
4. Apply the Solution — Dip a microfiber cloth into the hot soap solution and wring it out so it's damp but not dripping. Working on one cabinet door or a small section at a time, wipe the solution onto the sticky surface. Apply generously to fully saturate the grime. For areas with thicker buildup, like a range hood or the cabinets directly above the stove, you can use a soft-bristled brush to gently work the solution in.
5. Let the Solution Dwell — This is the most critical step. Allow the solution to sit on the cabinet surface for at least 3 to 5 minutes. This "dwell time" gives the hot water and soap molecules time to penetrate, soften, and emulsify the polymerized grease. Don’t let the surface dry out; reapply the solution if necessary to keep it wet.
6. Wipe Away the Grime — Take a clean microfiber cloth and soak it in plain hot water. Wring it out well. Following the direction of the wood grain, wipe away the soap and loosened grease. You should see the sticky film lifting off onto your cloth. rinsing the cleaning cloth frequently in the plain water to avoid spreading the grease around.
7. Tackle stubborn Spots — If some sticky spots remain, create a paste of baking soda and water. Apply this mild abrasive with your cloth or a soft brush and scrub gently in a circular motion. The baking soda provides just enough grit to dislodge the residue without scratching most cabinet finishes. Safety Note: Be very gentle and test this paste on your hidden spot first.
8. Rinse a Final Time — Once all the stickiness is gone, go over the entire surface one more time with a fresh cloth dampened with only clean water. This removes any lingering soap residue, which could otherwise attract new dust. Make sure to get into corners and around hardware.
9. Dry the Cabinets — Immediately and thoroughly dry the cabinets with a clean, dry microfiber towel. Do not let water air-dry, as this can leave water spots or cause damage to wood and laminate, especially at the seams and edges. Pay special attention to drying around hinges and handles.
10. Polish and Protect (Optional) — For wood cabinets, after they are completely dry, you can apply a light coat of furniture polish or wax designed for kitchen cabinets. This restores shine and creates a protective barrier that can make future cleaning easier. Follow the product instructions carefully.
Common Causes
- Aerosolized Cooking Grease: The primary culprit. Frying, searing, and even boiling release tiny oil droplets into the air that settle on cabinet surfaces.
- Lack of Ventilation: Not using a range hood or exhaust fan while cooking allows grease-laden steam to circulate and deposit throughout the kitchen.
- High Humidity: Moisture in the air from cooking or boiling water can mix with dust and grease, creating a sticky, hard-to-remove bond.
- Infrequent Cleaning: The longer the grease sits, the more it polymerizes and hardens, making it exponentially more difficult to clean.
- Household Dust: Standard dust, skin cells, and other airborne particles get trapped by the greasy layer, adding to the grime.
Common Mistakes
- Using Abrasive Sponges: Steel wool or harsh scouring pads will permanently scratch and dull cabinet finishes, whether they are wood, laminate, or painted.
- Applying All-Purpose Cleaners: Most are not formulated to break down polymerized grease and will only smear the film or require excessive, damaging scrubbing.
- Scrubbing Against the Grain: Wiping or scrubbing perpendicular to the wood grain can force dirt into the wood's pores and can even cause fine scratches.
- Ignoring a Spot Test: Different finishes react differently. A cleaner that works for one cabinet might strip the paint or varnish off another.
- Soaking the Cabinets: Using a dripping wet cloth can force water into joints, seams, and corners, causing wood to swell, laminate to peel, and finishes to fail.
- Mixing Cleaners: Safety Warning: Never mix cleaning products, especially ammonia and bleach. This can create toxic chloramine gas, which is extremely dangerous to inhale.
Cost & Time Breakdown
| Task | DIY Cost | Pro Cost | Time |
|---|---|---|---|
| Deep Cleaning Cabinets | $5 - $20 | $150 - $300 | 2 - 4 hours |
| Purchasing Supplies | $5 - $20 | (Included in Pro) | 30 minutes |
| Minor Touch-ups | $10 - $30 | $75 - $150 | 1 - 2 hours |
| Professional Cleaning | - | $150 - $300 | (Varies) |
Tips & Prevention
- Use Your Vent Hood: Make it a habit to turn on your range hood fan every time you cook, not just when frying. Let it run for 5-10 minutes after you’ve finished cooking to clear the air.
- Wipe Down After Cooking: After the stove has cooled, give the cabinets directly above it a quick wipe with a damp cloth. This prevents grease from building up and hardening.
- Monthly Deep Clean: Perform a thorough cleaning of all kitchen cabinets once a month using the 10:1 dish soap and hot water solution. This is far easier than an annual deep scrub.
- Check Your Filter: Clean the grease filter in your range hood regularly (check manufacturer instructions). A clogged filter can't effectively trap grease, allowing it to escape into your kitchen.
- Consider a Splatter Guard: When frying, use a splatter screen on your pan to reduce the amount of grease that becomes airborne in the first place.
When to Call a Professional
If your attempts to clean the sticky film are unsuccessful, or if you discover that the finish underneath is damaged, it might be time to call a professional. If the sticky substance seems to have permanently bonded with the varnish or paint, or if the finish comes off along with the grime during your spot test, further DIY attempts could worsen the damage. A professional cleaning service has access to stronger, commercial-grade, finish-safe solvents and equipment that can often remove years of buildup without harming the cabinetry. Furthermore, if you find the cabinet material itself is warping, peeling, or cracking, a handyman or cabinet specialist should be consulted for repairs. They can assess whether the doors and boxes are salvageable or if replacement is the more cost-effective option. The cost for a professional deep clean typically runs from $150 to $300, a worthy investment to save your cabinets from permanent damage.
Frequently asked questions
Can I use vinegar to clean the sticky residue off my kitchen cabinets?+
Vinegar is not the best choice for this task. While it is a good general cleaner, it is not an effective degreaser for the polymerized grease found on kitchen cabinets. It may not be strong enough to cut through the sticky film, and its acidity can potentially dull or damage certain cabinet finishes, especially if left to sit.
How often should I be cleaning my kitchen cabinets to prevent sticky buildup?+
For prevention, a quick wipe-down of the cabinets nearest the stove after each cooking session is ideal. A more thorough cleaning of all kitchen cabinets with a mild degreasing solution should be done at least once a month to prevent the grease from polymerizing and becoming difficult to remove.
Will this dish soap method work on painted cabinets?+
Yes, this method is generally safe for modern, high-quality painted cabinets, but a spot test is absolutely critical. Some paints, especially older or lower-quality ones, may not be as durable. Apply the solution to a hidden area first to ensure it does not cause the paint to soften, bubble, or wipe away.
My cabinets still feel sticky after cleaning. What did I do wrong?+
If stickiness persists, it could be due to a few factors. You may not have allowed the solution to dwell long enough to break down the grease, the water may not have been hot enough, or the grease layer is exceptionally thick. Try a second application, letting it sit for the full 5 minutes. If that fails, the finish itself may have degraded and become permanently tacky, which may require professional refinishing.


Discussion
Loading comments…