
Tools & materials you'll need
Affiliate links- AmazonOutlet Tester1 · Essential for checking for reversed polarity.
- AmazonToothbrush or Soft Brass Brush1 · For gently cleaning igniters and burner heads.
- AmazonMultimeter1 · For advanced diagnostics like testing ignition switches.
- AmazonScrewdriver / Nut Driver Set1 · For removing panels to access components.
- AmazonPliers1 · For adjusting bent igniter brackets.
- AmazonEmery Cloth or Wire Brush1 · For removing corrosion from burner heads.
As an Amazon Associate FixlyGuide earns from qualifying purchases — at no extra cost to you. Prices and availability are accurate as of publication and subject to change.
Quick Answer
If your gas stove still clicks after replacing the spark module, the issue is almost always a problem in the flame-sensing circuit. The module isn't detecting the flame, so it continues to spark. This is typically caused by a dirty or faulty igniter, a misaligned burner cap disrupting the flame, or a poor ground connection through a corroded burner head, preventing the sense signal from completing its circuit.
The Problem
The sound is maddening: a relentless, rhythmic tick-tick-tick from your gas stovetop that refuses to stop. You turn the knob, the burner ignites with a familiar whoosh into a steady blue flame, but the sparking continues. You’ve already gone through the trouble of diagnosing and replacing the spark ignition module—the component most often blamed for this exact issue. You spent the money, navigated the cramped space behind the range, swapped the part, and for a glorious moment, thought you had won. But the clicking persists.
This is a frustratingly common scenario for homeowners. You’ve replaced the brain, but the problem remains. It feels like you're chasing a ghost in the machine. This nonstop clicking, even with a lit flame, means one specific thing: the spark module, new as it may be, does not know a flame is present. It’s operating exactly as designed, continuously trying to light a burner it believes is unlit. Your problem isn’t a failure to spark; it’s a failure to sense. This guide will walk you through the entire sensing circuit, from the igniter tip to the house wiring, to find the real culprit.
How It Works
To solve this, you must understand the elegant electrical conversation happening on your stovetop. When you turn a burner knob, you are performing two actions simultaneously: you open a gas valve, and you close a small electrical switch located on that valve’s stem. This switch signals the spark module.
The spark module is essentially a step-up transformer and a logic board. It takes 120V AC household power and converts it into high-voltage (10,000-20,000V), low-amperage pulses. It sends these pulses down a dedicated wire to the ceramic igniter (the white porcelain post next to your burner). The high voltage creates a spark that jumps the gap from the igniter’s metal tip to the grounded metal of the burner base, igniting the gas-air mixture.
Here is the critical part: Once the flame is established, the system’s job changes from ignition to flame rectification or sensing. The flame itself can conduct a very small amount of electricity. The spark module stops sending the high-voltage pulses and instead sends a tiny AC signal through the igniter. The flame "rectifies" this signal, effectively turning it into a DC micro-current. This current flows from the igniter tip, through the flame, to the grounded burner head, and back to the spark module through the appliance’s main ground wire. The spark module’s logic board is designed to detect this specific DC signal. When it "sees" this signal, it confirms a flame is present and enters a standby state, ceasing all sparking. If that signal is interrupted for any reason—a dirty igniter, a poor ground, or a misshapen flame—the module receives no confirmation, assumes the burner is out, and immediately resumes sparking to relight it.
Therefore, a nonstop clicking with a lit flame is not a module that has "gone crazy"; it is a perfectly functioning module that is being told there is no flame. Your job is to find the break in that communication line.
Step-by-Step Fix
Follow these diagnostic steps in order. This process moves from the most common and easiest-to-fix culprits to the more obscure ones.
SAFETY NOTE: Before beginning any work, unplug your gas range from the electrical outlet and shut off the gas supply line. The shut-off valve is typically located behind the range.
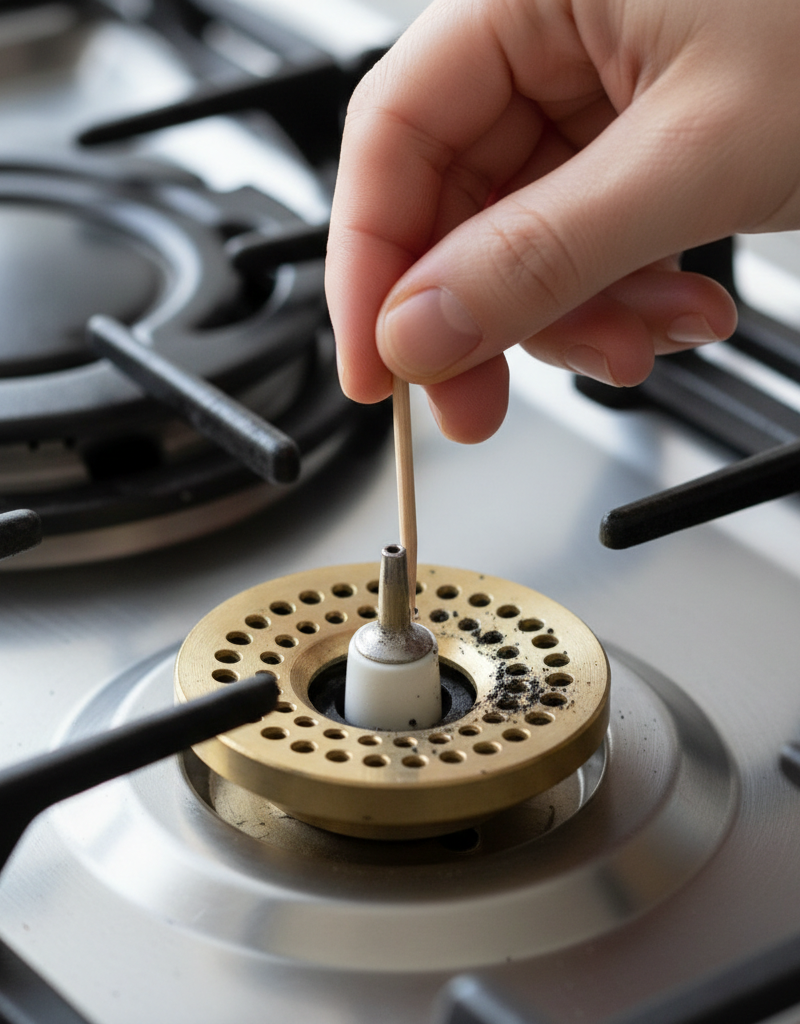
1. Deep Clean the Igniter Electrode: The What: The most common culprit is a contaminated igniter. Food residue, grease, or cleaning product buildup on the ceramic or metal tip can insulate it, preventing it from properly sensing the flame. The How: Use an old toothbrush, a soft brass brush, or a cotton swab dipped in rubbing alcohol. Gently scrub both the white ceramic insulator and the metal tip of the electrode. Be thorough. Even a thin, invisible layer of grease can block the micro-current. Wipe away any loosened debris with a clean, dry cloth. Do not use soap or harsh abrasives, as they can leave a residue or damage the ceramic.
2. Verify Burner Cap & Head Seating: The What: The burner cap must be perfectly level and centered on the burner head. If it’s askew, it will alter the shape and direction of the gas jets, potentially causing the flame to miss the igniter electrode entirely or not engulf it properly. The How: Remove the burner grate and the burner cap. Inspect the cap and the head for any debris that might be preventing a flush fit. Place the cap back on the head and wiggle it slightly. It should sit flat and lock into place via alignment pins or indentations. It should not rock or spin freely.
3. Clean the Burner Head for Grounding: The What: The flame sense circuit requires a solid ground path through the burner body. The spark jumps to the burner head, and the flame current flows through it. Heavy rust, corrosion, or baked-on carbon on the burner head can act as an insulator, breaking this critical ground path. The How: Remove the cap and head. Use a stiff wire brush or emery cloth to scrub the surfaces of the burner head, especially the area where the flame makes contact and where the igniter spark lands. Your goal is to expose clean, bare metal. Clean out the gas ports (the small holes) with a paperclip or port drill, as clogged ports can also affect flame shape.
4. Check Igniter Position & Gap: The What: The igniter must be positioned correctly relative to the burner. The tip should be about 1/8 to 3/16 of an inch (the thickness of two stacked quarters) from the burner head. Critically, it must also be positioned so the flame will completely envelop it. The How: Visually inspect the igniter. If it has been knocked out of position, it can sometimes be gently bent back. Be extremely careful, as the ceramic is brittle. If the metal bracket holding it is bent, use pliers to carefully adjust its position. The tip should be aimed squarely at the burner head, not angled up or down.
5. Inspect the Igniter for Damage: The What: A hairline crack in the white ceramic insulator will cause the spark to ground out to the cooktop base before it ever reaches the burner head. It can also disrupt the path of the flame sense signal. The How: Examine the entire length of the ceramic insulator under a bright light. Look for any fine black lines, which indicate cracking and electrical leakage. If you find a crack, no matter how small, the igniter must be replaced. They are not repairable.
6. Trace and Dry Out Moisture: The What: A recent spill-over is a very common cause. Water can get into the base of the igniter, the ignition switch on the valve stem, or the wiring harness, causing a short or disrupting the signal. The How: If the problem started after a boil-over, this is likely your issue. Prop up or open the cooktop (consult your model’s instructions). Use a hairdryer on a low-heat setting to gently dry the area around the affected burner’s base, the spark module, and the wiring. Allow the appliance to air out for several hours before testing.
7. Inspect the Ignition Switch: The What: The small switch mounted to the gas valve (which you activate with the knob) can get corroded, wet, or stuck in the "on" position. This will continuously tell the module to send a spark, regardless of what the flame sensor says. The How: With the power off and cooktop open, locate the switches on each burner’s valve shaft. They are often small, rectangular plastic components with two wires attached. Check for signs of corrosion, moisture, or physical damage. You can test the switch with a multimeter set to continuity. It should show continuity only when the knob is pushed in and turned to the "Lite" position.
8. Test for Reversed Polarity: The What: This is a less common but critical check. The flame sense circuit relies on the appliance having a proper ground reference to the home’s electrical system. If the hot and neutral wires are reversed at the wall outlet, the grounding for the entire system fails, and the module can never confirm the flame. The How: Purchase a simple three-prong outlet tester from any hardware store for about $5. Plug it into the outlet the stove uses. The pattern of lights will tell you if the polarity is correct, reversed, or if there is an open ground. If the tester indicates reversed polarity or an open ground, this is an issue for a qualified electrician to correct. Do not attempt to fix this yourself.
Common Causes
If you’ve already replaced the spark module, the incessant clicking is almost certainly due to one of these issues:
- Dirty Igniter Electrode: The most frequent cause. A thin layer of grease or grime prevents the flame sense signal from being conducted.
- Poor Ground Connection: Rust or corrosion on the burner head or base prevents the flame sense circuit from being completed.
- Misaligned Burner Components: An improperly seated burner cap alters the flame pattern, causing it to miss the igniter and preventing flame detection.
- Cracked Igniter: A crack in the ceramic insulator shorts the spark and/or the sense signal to the cooktop frame.
- Trapped Moisture: A boil-over can short out the ignition switch or wiring, leading to a continuous spark signal.
- Faulty Ignition Switch: The switch on the gas valve itself is stuck, constantly telling the module to spark.
- Reversed Electrical Polarity: The wall outlet is wired incorrectly, which prevents the flame rectification circuit from ever getting a proper ground reference.
- Defective New Module: While rare, it's possible the new spark module you installed was defective from the factory.
Common Mistakes to Avoid
- Using Abrasive Pads: Never use steel wool or heavy-duty scouring pads on the ceramic igniter; you will damage it. A toothbrush or soft brass brush is sufficient.
- Not Drying Components Fully: After cleaning components with water, ensure they are 100% dry. Even a small amount of residual moisture can cause sparking.
- Bending the Igniter Aggressively: The ceramic insulator will snap with very little force. If you need to reposition the electrode, only bend the metal bracket it’s mounted on.
- Overlooking the Burner Head: Many people focus only on the white igniter post and forget that the metal burner head itself is a critical part of the electrical circuit. Cleaning it to bare metal is essential.
- Ignoring a Recent Spill: Don't dismiss a boil-over from the day before. Moisture can take a surprisingly long time to evaporate from the enclosed space under the cooktop.
- Spraying Cleaners Directly: Never spray all-purpose cleaners directly onto your cooktop around the burners. The liquid will run down into the igniter base and switches, causing these very problems.
Cost & Time Breakdown
| Task | DIY Cost | Pro Cost | Time |
|---|---|---|---|
| Cleaning Burner & Igniter | $0-$5 (alcohol, brush) | $120 - $180 | 30 minutes |
| Replacing a Single Igniter/Electrode | $15 - $40 (part) | $150 - $250 | 45-60 minutes |
| Replacing a Burner Ignition Switch | $20 - $50 (part) | $180 - $300 | 1 - 1.5 hours |
| Correcting Outlet Polarity | $5 (outlet tester) | $100 - $200 (Electrician) | 5 mins (test), 30-60 mins (fix) |
| Full Burner Head Replacement (if corroded) | $40 - $90 (part) | $180 - $280 | 30-45 minutes |
| Diagnostic Service Call | N/A | $90 - $150 | N/A |
Tips & Prevention
- Clean Spills Instantly: The moment a pot boils over, turn off the heat and clean up the liquid as soon as the surface is cool enough to touch. This prevents moisture from seeping below the cooktop.
- Use a Boil-Over Guard: A simple silicone ring placed on top of a pot can prevent messy and damaging boil-overs when cooking pasta or potatoes.
- Perform Regular Light Cleaning: Once a month, remove the grates and burner caps. Wipe down the burner heads and the area around the igniters with a dry cloth to prevent buildup.
- Seat Caps Carefully: After cleaning, always double-check that the burner caps are sitting perfectly flat and are locked in their proper orientation.
- Avoid Soaking Burner Heads: When deep-cleaning burner components, try not to soak them for extended periods if they are cast iron, as this encourages rust. Clean and dry them promptly.
- Listen to Your Stove: Pay attention to the sounds your stove makes. If you hear a "lazy spark" (a slow tick-tick) or see a yellow/orange spark instead of a crisp blue/white one, it’s an early warning sign that the igniter or burner head needs cleaning.
When to Call a Professional
While many causes of a nonstop clicking gas stove are fixable, there are clear times to put down the tools and call a licensed appliance technician. If you have followed all the diagnostic steps in this guide—thorough cleaning, checking alignment, inspecting for damage, and testing outlet polarity—and the problem persists, you are likely dealing with a more complex issue. This could be a faulty wiring harness, a failed ignition switch that is difficult to access, or even a rare second faulty spark module.
Furthermore, if you are at all uncomfortable with the idea of unplugging your stove, opening the cooktop, and handling electrical components, professional service is the safest choice. An experienced technician can use a multimeter to quickly and safely test switches, igniter continuity, and ground paths, pinpointing the exact failure point without unnecessary parts replacement. Finally, if your diagnostics lead you to a problem with the home’s electrical wiring, such as reversed polarity or an open ground, you must call a qualified electrician.
Frequently asked questions
Can a bad ground cause my gas stove to click continuously?+
Absolutely. A bad ground is one of the most common reasons for a gas stove to click even when lit. The system uses a tiny electrical current that runs through the flame to the grounded burner head to sense that a flame is present. If rust, food debris, or corrosion on the burner head interrupts this ground path, the spark module never receives the signal and continues to click as if the burner is unlit.
Why does my stove only start clicking after I clean it?+
This almost always indicates that moisture has gotten into a sensitive area. When you clean, water or cleaning solution can seep down into the base of the igniter or into the ignition switch located on the valve stem under the knob. This moisture can short the circuit, causing the spark module to fire continuously. The other possibility is that you did not place the burner cap back on perfectly, which is disrupting the flame pattern and preventing it from properly engulfing the igniter sensor.
Is a continuously clicking stove dangerous?+
While not an immediate fire hazard if the burner is lit and burning cleanly, it should not be ignored. The nonstop clicking indicates a fault in the ignition and flame-sensing system. More importantly, it causes unnecessary wear and tear on the spark module and igniters, leading to their eventual failure. The constant high-voltage sparking also has the potential, though small, to damage the sensitive electronics in the module over time.
Can I just unplug the stove to make the clicking stop?+
Unplugging the stove will stop the clicking, as it cuts power to the spark module. However, this is not a solution. You will have to light your burners manually with a lighter, which can be dangerous if not done correctly. The underlying fault in the flame-sensing circuit will still exist. It is always better to diagnose and fix the root cause.


Discussion
Loading comments…