Tools & materials you'll need
Affiliate linksAs an Amazon Associate FixlyGuide earns from qualifying purchases — at no extra cost to you. Prices and availability are accurate as of publication and subject to change.
Quick Answer
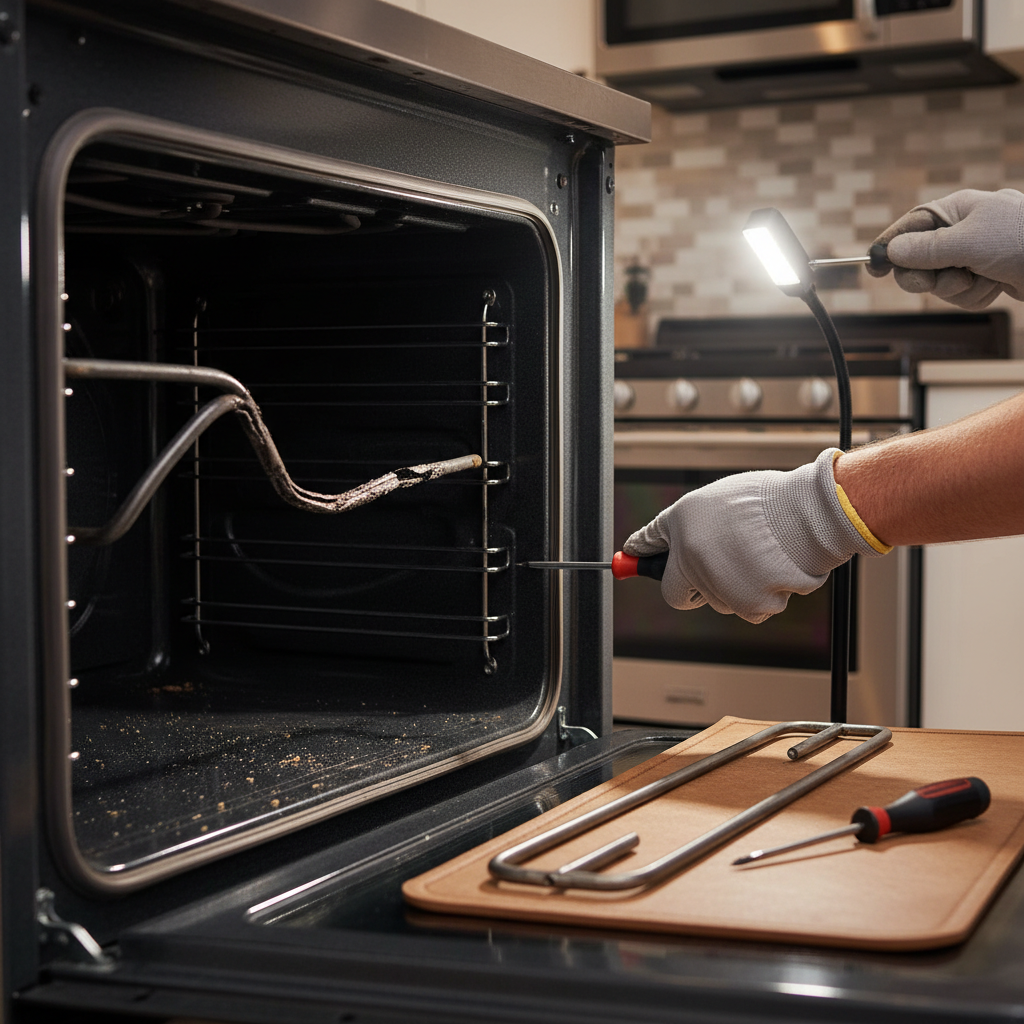
If your electric oven isn't heating, the bottom bake element has likely burned out. You can confirm this by visually inspecting the element for blisters, breaks, or a failure to glow red hot. The fix is a simple DIY job: Power off the oven at the breaker, unscrew the two mounting screws holding the old element, slide it out, disconnect its two wires, connect the new element, and reinstall it. This typically costs $20-$75 for the part and takes about 20 minutes.
The Problem
It's a scenario that plays out in kitchens everywhere. The casserole is in, the timer is set, but half an hour later, the cheese isn't melted and the center is still cold. You preheated the oven, the display says it's at 375°F, but the sad reality is your oven is lying. A quick peek inside reveals the issue: the top broil element might be working, but the bottom bake element—the workhorse of your oven—is cold, dark, and lifeless.
Often, the failure isn't subtle. You might notice a distinct "hot spot" or an angry orange glow concentrated on one section of the element during preheating. In more dramatic cases, you may see a bright flash, hear a "pop," and the element goes dark for good. Upon closer inspection with the oven off and cool, you can see the physical evidence: a blister, a bubble, a crack, or a complete, sagging break in the "U" or "M" shaped metal tube.
This failure doesn't just mean your oven won't heat; it means your cooking will be disastrously uneven. Without the bake element, all the heat comes from the broiler, scorching the tops of your food while leaving the bottoms raw and doughy. It turns your precise baking machine into a glorified, oversized toaster. The problem isn't just an inconvenience; a failing bake element can potentially short circuit, which in a worst-case scenario could damage the oven's electronic control board—a far more expensive and complex repair.
How It Works
Your oven is a remarkably simple appliance. In a basic electric oven, there are two primary heating sources: the bake element on the bottom and the broil element on the top. The bake element is responsible for the majority of the work during baking and roasting cycles. It's essentially a powerful, purpose-built resistor.
The element itself is a hollow metal tube, typically made of an nickel-chromium alloy sheath. Inside this sheath is a coil of resistance wire, surrounded by a magnesium oxide powder. This powder acts as an electrical insulator but an excellent thermal conductor. When you set your oven to "Bake," the control board or a mechanical thermostat sends 240 volts of electricity to the terminals of the bake element. As this current flows through the internal resistance wire, the wire heats up dramatically—just like the tiny filaments in an old incandescent light bulb. This intense heat is conducted through the magnesium oxide to the outer metal sheath, which then glows red hot and radiates infrared heat throughout the oven cavity. This radiant heat cooks your food from the bottom up, while natural convection circulates the air for more even results.
The oven's thermostat constantly monitors the internal temperature, cycling the power to the bake element on and off to maintain the temperature you set. A healthy element heats up evenly across its entire length. A failing element, however, has a compromised internal structure. A break in the resistance wire creates an open circuit, and no electricity can flow. A blister or crack in the outer sheath allows oxygen in, causing the internal wire to quickly oxidize and fail, often creating a short circuit to the sheath—that's the "pop" and flash you might see.
Step-by-Step Fix
This is one of the most straightforward appliance repairs you can tackle. With the right part and about 20 minutes, you can save yourself a service call fee and get your oven working again before your next meal.
SAFETY NOTE: This is the most critical step. You will be working with 240-volt electrical connections. Failure to completely de-energize the oven can result in severe electrical shock and death. Do not proceed unless you are certain the power is off.
-
Kill the Power (Absolutely mandatory): Go to your home's main electrical panel (breaker box). Find the breaker labeled "Oven," "Range," or similar. It is typically a double-pole breaker, meaning it has two switches connected by a bar. Flip it to the full "OFF" position. For an added layer of safety, especially if your breakers are poorly labeled, pull the oven away from the wall and unplug the large 240V cord from its dedicated outlet. If you have a voltmeter, test the wires in Step 7 to be 100% certain no voltage is present.
-
Verify the Correct Part: You cannot guess this. Open the oven door and look for the model number sticker. It's usually on a metal plate along the frame of the oven opening, visible only when the door is open. It might also be on the side of the drawer, or on the back of the unit. Once you have the exact model number, search online appliance part stores (like RepairClinic, PartSelect, or even the manufacturer's site) for "bake element" for your model. The correct part is essential; a similar-looking one may have different wattage or mounting.
-
Gather Your Tools: The beauty of this job is its simplicity. You will likely only need a #2 Phillips head screwdriver or, more commonly, a 1/4-inch nut driver. A pair of needle-nose pliers will be very helpful for pulling the wire connectors. It's also wise to have your phone for taking a quick photo and a small piece of painter's tape.
-
Clear the Oven: Remove all oven racks and any other items from the oven to give yourself a clear workspace. You'll be kneeling, so a pad or towel can make it more comfortable.
-
Locate and Unscrew the Old Element: The bake element sits on the floor of the oven cavity. At the very back, you will see a small metal plate where the element is attached to the rear oven wall. There will be two screws (one on each side of the plate) holding it in place. Using your 1/4" nut driver or screwdriver, remove these two screws. Keep them in a safe place.
-
Gently Pull the Element Forward: With the screws removed, you can now gently pull the entire element toward you. It will slide forward a few inches. Do not yank it out. The electrical wires are connected just behind the back wall. Pull it just far enough to expose the wire connections.
-
Photograph and Disconnect the Wires: You will see two wires, each with a metal "spade" connector pushed onto the element's two prongs. CRITICAL: Before you disconnect anything, take a clear photo with your phone. This is your backup. Now, here's the pro tip: do not let the wires fall back through the holes into the wall cavity. Use a small piece of painter's tape to secure each wire to the back wall, or use a small spring clamp. Using your needle-nose pliers, grip the metal connector (not the wire itself) and firmly wiggle and pull it off the prong. Repeat for the second wire.
-
Remove the Old Element: Once both wires are disconnected and secured, you can fully remove the old, burnt-out element from the oven. Set it aside.
-
Connect the New Element: Take your new bake element. Align it with the wire connections. One at a time, remove a wire from its tape/clamp and, using your pliers to hold the connector, push it firmly onto one of the prongs of the new element. The connection should be snug. If the old connectors are loose or look burnt, they should be replaced, which is a slightly more involved job. Repeat for the second wire. It doesn’t matter which wire goes on which prong, as the circuit is a simple AC resistive load.
-
Position and Secure the New Element: Carefully slide the new element back toward the rear wall, feeding the excess wire back through the holes. Be careful not to pinch or kink the wires. Align the element's mounting plate with the screw holes in the back of the oven. Reinstall the two screws you set aside earlier. Tighten them until they are snug, but do not overtighten, as this can strip the threads or crack the oven's porcelain coating.
-
Final Steps and Power Restoration: Replace the oven racks. If you unplugged the oven, plug the large 240V cord back into its outlet and carefully slide the oven back into place. Go to your breaker panel and flip the oven breaker back to the "ON" position.
-
Test Your Work: Set the oven to "Bake" at 350°F. Within a minute or two, you should see the new element begin to glow a consistent, healthy red-orange across its entire length. Note: It is completely normal for a new element to smoke a little and produce a slight odor for the first 5-15 minutes of use. This is just a factory-applied coating burning off. Open a window to ventilate the kitchen. Let the oven run for 15-20 minutes to complete this burn-off process before you use it for cooking.
Common Causes of Bake Element Failure
- Age and Fatigue: Like a light bulb, a bake element has a finite number of heating and cooling cycles. After thousands of hours of use, the internal resistance wire simply wears out and breaks.
- Food Spills: Highly acidic or sugary spills that drip onto the element are a primary cause of premature failure. The spill carbonizes and eats away at the element's protective metal sheath, creating a weak spot that eventually blisters and fails.
- Physical Impact: Dropping a heavy cast iron pan or a ceramic baking dish directly onto the element can cause a crack or break in the sheath, leading to failure.
- Improper Cleaning: Using harsh oven cleaners or abrasive pads directly on the element can degrade the sheath. Likewise, dousing a hot element with water can cause thermal shock and crack it.
- Self-Clean Cycle Stress: The high-heat self-clean cycle is incredibly demanding on the bake element, running it at maximum output for an extended period. Frequent use of this feature can significantly shorten the element's lifespan.
Common Mistakes to Avoid
- Forgetting to Turn Off the Power: This is the cardinal sin of any appliance repair. It's a 240-volt circuit and is extremely dangerous. Always verify the power is off.
- Buying the Wrong Part: An element that "looks right" can have a different wattage, which will affect oven temperature accuracy, or a different mounting bracket that simply won't fit. Always use your oven's model number to order the exact replacement.
- Letting the Wires Fall: If a wire connector slips back through its hole into the space behind the oven wall, a 20-minute job becomes a 2-hour ordeal. You will have to pull the entire oven out, remove the back access panel, and fish the wire out. Use tape!
- Pulling on the Wires: When disconnecting the old element, pull on the metal connectors with pliers, not the wires themselves. You can easily pull the wire out of the connector, requiring another repair.
- Lining the Oven Bottom with Foil: Never place aluminum foil on the oven floor. It covers the bake element, trapping and reflecting intense heat back onto it. This will cause the element to overheat and burn out very quickly. It also disrupts airflow, leading to poor baking results.
Cost & Time Breakdown
| Item | DIY Cost | Professional Cost | DIY Time | Professional Time |
|---|---|---|---|---|
| Bake Element Part | $20 - $75 | $20 - $75 | - | - |
| Labor | $0 (your time) | $125 - $250 | 20-40 minutes | 30-60 minutes |
| TOTAL | $20 - $75 | $145 - $325 | 20-40 min | 30-60 min |
Tips & Prevention
- Clean Spills Immediately: Once the oven is cool, wipe up any spills, especially sugary ones, before they can be baked on again.
- Avoid Direct Contact: Be careful when placing heavy cookware in the oven to avoid dropping it on the element.
- Use Self-Clean Sparingly: Opt for manual cleaning when possible. If you must use the self-clean feature, do so no more than a few times a year.
- Inspect Periodically: When you are cleaning your oven, take a quick look at the element. If you see any blisters, cracks, or sagging, it's time to order a replacement before it fails mid-dinner.
When to Call a Professional
A bake element replacement is a very manageable DIY project. However, you should call a qualified appliance repair technician if:
- You Replace the Element and It Still Doesn't Heat: This indicates the problem isn't the element itself but another component. The issue could be a faulty thermostat, a blown thermal fuse, a bad wire, or a failed relay on the electronic control board. Diagnosing these requires specialized knowledge and testing equipment.
- You Are Uncomfortable with Electrical Work: Safety is paramount. If you are not 100% confident in your ability to safely de-energize the appliance and perform the repair, it is always worth the cost to hire a pro.
- The Wires Fall Behind the Wall: If you fumble a wire and it disappears behind the oven cavity, a pro can retrieve it much faster than you can.
- You See Burn Marks at the Wire Connections: If the plastic housing of the wire connectors looks melted or the wall of the oven behind the connection is scorched, it could indicate a more serious wiring issue that needs professional diagnosis.
Get the print-ready PDF of this guide
A clean, ad-free, printable version you can keep on your phone or pin to the workshop wall. Free with a FixlyGuide account.
- Print-optimized layout
- Tools, materials & every step included
- Saved to your account
Frequently asked questions
Is a small blister on my oven element a big deal?+
Yes. A blister is a sign that the outer metal sheath has failed. The element will continue to deteriorate and is guaranteed to fail completely, usually at an inconvenient time. You should replace it as soon as you notice a blister or crack.
Why is my new bake element smoking?+
This is perfectly normal. New elements are shipped with a light, oil-based coating to protect them. The smoke and slight odor you notice during the first use is this coating burning off. It should stop within 15 minutes of the initial preheat.
Can I just repair the break in my old bake element?+
No. Bake elements are not repairable. The internal components are sealed, and any break in the sheath or internal wire means the entire unit must be replaced. Thankfully, they are relatively inexpensive parts.
I replaced the bake element, but my oven still won't heat. What's wrong?+
If a new, correct bake element doesn't fix the heating issue, the problem lies elsewhere in the oven's electrical system. The most likely culprits are a faulty temperature sensor, a blown thermal fuse, or a failed relay on the main electronic control board. Diagnosing these issues requires a multimeter and experience, so it may be time to call a professional technician.


Discussion
Loading comments…