
Tools & materials you'll need
Affiliate linksAs an Amazon Associate FixlyGuide earns from qualifying purchases — at no extra cost to you. Prices and availability are accurate as of publication and subject to change.
How it works
The caulk around a bathroom sink serves two critical functions: it acts as a flexible, waterproof seal and as an expansion joint. As a sealant, its primary job is to create an impassable barrier, preventing water that splashes from the basin from seeping into the gap between the sink's edge and the countertop. Without this barrier, water inevitably finds its way into the vanity cabinet below, leading to wood rot, delamination of particleboard or MDF, and creating a dark, damp environment ideal for mold and mildew growth. This moisture can also wick into the adjacent drywall, causing it to soften, swell, and degrade over time.
As an expansion joint, caulk accommodates the minute movements between the sink and the countertop. These materials expand and contract at different rates due to temperature and humidity fluctuations. The building itself also settles and shifts slightly. A flexible sealant like 100% silicone can stretch and compress, maintaining the integrity of the seal despite this movement. Rigid materials like grout would crack under such stress. The caulk begins as a thick paste that adheres to both surfaces—typically ceramic or porcelain and laminate, stone, or solid surface. Through a chemical process called curing, it vulcanizes into a durable, rubbery solid that remains flexible and waterproof for years, protecting the underlying structure of your vanity and walls.
Step-by-Step Fix
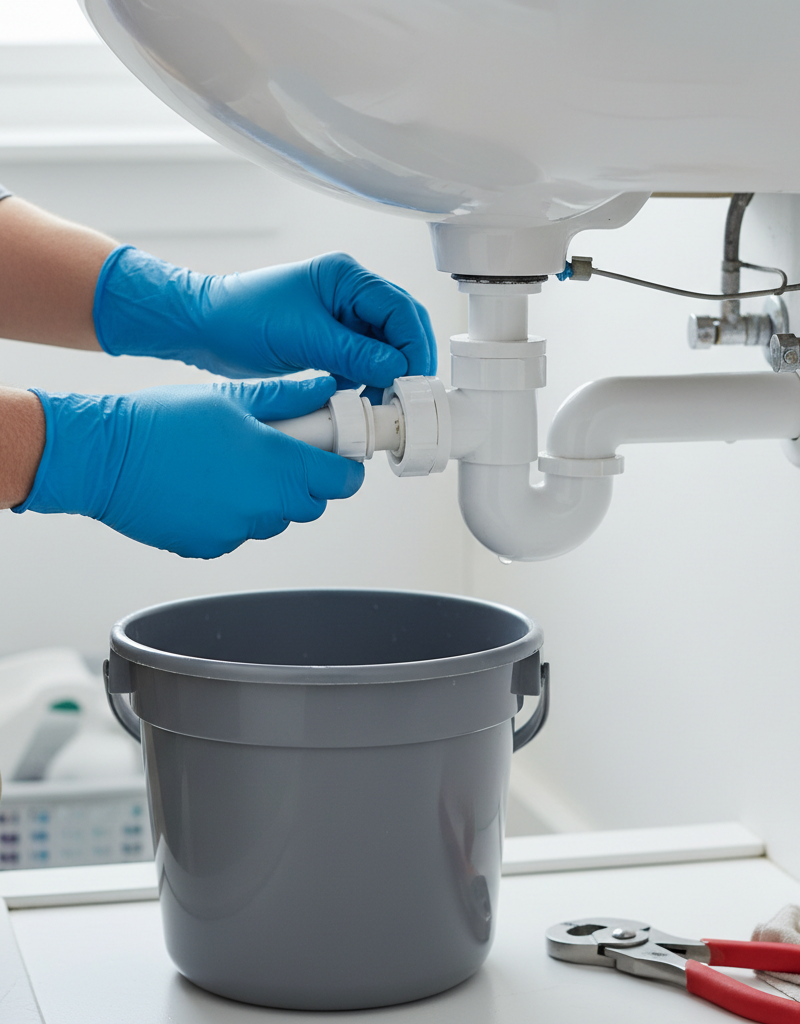
Safety: Wear nitrile gloves to protect your hands from solvents and caulk. Ensure adequate ventilation by opening a window or running the bathroom exhaust fan, especially when using chemical removers or solvents. Wear safety glasses to protect your eyes from debris.
-
Assemble Tools and Materials — Gather everything before you start to ensure a smooth workflow. You will need a cartridge of 100% silicone kitchen and bath caulk, a dripless caulk gun, a dedicated caulk removal tool or plastic razor scraper, a utility knife, painter's tape (1-inch width), denatured or isopropyl alcohol (90% or higher), clean rags or shop towels, a caulk tooling kit or plastic spoons, and a small trash bag for debris.
- Tool Tip: A dripless caulk gun automatically releases pressure when you stop squeezing the trigger, preventing the continuous ooze common with older, cheaper models.
-
Excavate the Old Caulk — The new seal will only be as good as the surface it bonds to, so all old material must be removed. Use a utility knife with a fresh blade to carefully score both the top and bottom edges of the old caulk bead. Make these shallow cuts, using the sink and countertop as guides, to break the seal. Then, use a caulk removal tool or a plastic scraper to get under the bead and pry it up. Pull the old caulk out in long strips whenever possible.
- For Stubborn Caulk: If pieces remain, apply a commercial caulk remover designed for silicone. Follow the product's directions, which usually involve letting it sit for 2-8 hours to soften the material before scraping it away.
-
Detail the Joint and Vacuum Debris — Once the main strips are gone, focus on the residue. Use a plastic razor blade to meticulously scrape away any remaining films or chunks of silicone from the sink and countertop surfaces. Hold the blade at a low angle to avoid scratching. After scraping, use a shop vacuum with a brush or crevice attachment to thoroughly remove all the small, dried particles of caulk from the joint and surrounding area.
-
Deep Clean the Surfaces — This is the most critical step for ensuring proper adhesion. Saturate a clean, lint-free cloth with denatured alcohol or high-percentage isopropyl alcohol and wipe the joint and adjacent surfaces (about one inch onto the sink and counter) aggressively. The alcohol acts as a solvent to remove soap scum, body oils, and any residue from caulk removers, all of which will prevent the new silicone from bonding. The surface should "squeak" when clean.
-
Ensure the Area is Completely Dry — Silicone caulk will not adhere to a damp surface. After cleaning with alcohol, which evaporates quickly, wait at least one hour to allow any residual moisture trapped deep in the joint to evaporate completely. To be certain, you can use a hairdryer on a low-heat or no-heat setting to gently dry the area for a few minutes. Test the joint with a dry corner of a paper towel before proceeding.
-
Mask for a Professional Finish — For crisp, clean caulk lines, apply painter's tape. Place one strip on the countertop and another on the sink, leaving an even, consistent gap for the new caulk. This gap should typically be between 1/8-inch and 3/16-inch wide. Press the edges of the tape down firmly to prevent caulk from bleeding underneath.
-
Prepare the Caulk Cartridge — Use the utility knife to cut the nozzle tip of the caulk tube at a 45-degree angle. The size of the opening should match the width of the gap you taped off. A common mistake is cutting the hole too large. Start small; you can always make it bigger. Puncture the tube's inner foil seal using the stiff wire built into the caulk gun or a long nail. Load the cartridge into the caulk gun and gently squeeze the trigger until you feel the plunger make contact.
-
Apply the New Silicone Caulk — Hold the caulk gun at a 45-degree angle to the joint. Start in a back corner and apply steady, consistent pressure to the trigger. Push the bead of caulk into the joint ahead of the nozzle, moving at a smooth, continuous pace. This "push" technique forces the caulk into the gap for a better seal. Apply a single, uniform bead along one full side of the sink.
-
Tool the Caulk Bead — Immediately after applying a bead along one side, tool it. Use a caulk tooling spatula or the back of a plastic spoon. Press the tool lightly into the bead and pull it smoothly along the joint. This action forces the silicone into the gap for a watertight bond and creates a clean, concave profile that sheds water. Wipe excess caulk from the tool onto a paper towel after each pass. Work quickly, as silicone begins to "skin over" in 3 to 5 minutes.
- Safety Note: Do not use a bare finger to tool the bead. Doing so can introduce bacteria into the caulk and create an uneven surface. If you must use a finger, wear a nitrile glove and do not lick it or dip it in water.
-
Remove the Painter's Tape — As soon as you finish tooling a section, remove the painter's tape. Pull the tape slowly, at a 45-degree angle away from the fresh caulk line. This will shear the edge of the caulk cleanly. If you wait for the caulk to dry, removing the tape will pull the caulk up with it, ruining your work.
-
Final Cleanup and Curing — Inspect your work. If you have any small smudges of wet silicone on the counter or sink, immediately wipe them away with a dry paper towel or a rag dampened with mineral spirits. Be very careful not to touch your new bead. Allow the caulk to cure, undisturbed, for the time specified by the manufacturer. This is typically 24 hours before it can be exposed to water, but a full cure can take 3-7 days. Post a note on the faucet handle to prevent accidental use.
Common mistakes
- Applying New Caulk Over Old Caulk: A frequent but fatal error is to simply apply a new layer of caulk over cracked or mildewed caulk. The new silicone cannot form a proper bond to the old, contaminated surface. This quick fix will fail rapidly, peeling away within weeks and trapping moisture and mold underneath. The only correct method is a complete removal of the old material.
- Inadequate Surface Preparation: Merely wiping the joint with a damp cloth is not enough. Surfaces around a sink are coated in an invisible film of soap, lotions, and oils. Failure to chemically clean the joint with a solvent like denatured or isopropyl alcohol is the number one cause of premature caulk failure, as the silicone cannot adhere to the contaminated surface.
- Using the Wrong Type of Caulk: Not all caulk is created equal. Using acrylic latex caulk (often labeled "painter's caulk") is a critical mistake in a bathroom. It is not designed for areas with high moisture or standing water and will quickly degrade, mildew, and wash away. You must use a product labeled "100% Silicone" and "Kitchen & Bath" to get the necessary water resistance, flexibility, and mold/mildew inhibitors.
- Waiting Too Long to Tool the Bead: Silicone caulk begins curing almost immediately upon contact with air, forming a "skin" in as little as 3-5 minutes depending on humidity. Attempting to tool the bead after this skin has formed will drag and tear it, resulting in a lumpy, unprofessional mess. You must apply and tool in manageable sections, completing all tooling for a given side within that 5-minute window.
- Creating a Poorly Shaped Bead: Smoothing caulk with a wet finger creates a deep concave "U" shape in the bead. While it may look smooth initially, this shape allows water to pool in the caulk line instead of shedding off. A proper tooling spatula creates a slight, 45-degree angle or a very shallow concave shape that promotes drainage away from the joint, extending the life of the seal.
Cost & time breakdown
The cost to recaulk a bathroom sink is minimal for a DIYer, with the primary expense being a one-time purchase of reusable tools if you don't already own them. Professional costs reflect a minimum service charge for a small job.
| Task | DIY Cost | Pro Cost | Time |
|---|---|---|---|
| Materials Purchase | $25 - $50 | (Included) | 30 minutes |
| Old Caulk Removal & Prep | (Included in material cost) | $75 - $150 | 45-75 minutes |
| Taping & Applying New Caulk | (Included in material cost) | $75 - $150 | 30-45 minutes |
| Curing Time (Non-Use) | $0 | $0 | 24 hours |
| Total Project | $25 - $50 | $150 - $300 | ~2 hours active work + curing |
When to call a pro
While recaulking is a straightforward DIY task, certain conditions warrant a professional plumber or handyman. If, after removing the old caulk, you find that the countertop underneath is soft, swollen, or crumbling, this indicates significant water damage that goes beyond a simple seal. Particularly with particleboard or MDF counters, this often requires countertop replacement. Similarly, signs of black or green mold on the wall behind the sink or widespread mold growth inside the vanity cabinet signal a larger moisture problem that needs professional remediation, not just new caulk.
Another key indicator is a loose sink. If the entire sink fixture moves or shifts when you press on it, recaulking is only a temporary cosmetic fix. For an undermount sink, this means the mounting clips or epoxy have failed and the sink needs to be properly re-secured. For a drop-in sink, the clips underneath may need tightening. Both tasks can be difficult in a tight vanity space and are often best left to a pro. Finally, if the sink or countertop itself is cracked or has deep gouges, a professional can assess whether a specialized repair is possible or if a full replacement is necessary.
Prevention & maintenance
- Routine Visual Inspection: Every three to four months, perform a quick check of the caulk line. Look for any discoloration (early signs of mildew), shrinking, or fine cracks forming at the edges where the caulk meets the sink or counter.
- Wipe Down After Use: Make it a habit to wipe the countertop and the caulk joint dry with a hand towel or microfiber cloth after using the sink. Preventing water from sitting on the seal is the single most effective way to prolong its life and prevent mildew.
- Use Gentle Cleaning Methods: Avoid using abrasive powders, stiff brushes, or scouring pads directly on the caulk line. These can scratch and create micro-tears in the silicone's surface, which then trap dirt and encourage mildew growth. Use a soft cloth and a pH-neutral cleaner or a spray bathroom cleaner designed for tubs and showers.
- Maintain Good Bathroom Ventilation: High humidity is a primary cause of mildew. Always run your bathroom's exhaust fan during and for at least 20-30 minutes after a shower or bath to vent moist air outside. This lowers the ambient humidity and gives all surfaces, including the caulk, a chance to dry out.
- Proactive Replacement: Do not wait for a complete failure. High-quality 100% silicone caulk has a typical lifespan of 5 to 10 years in a bathroom environment. If your caulk is nearing this age, appears discolored, or feels stiff and less pliable, schedule a weekend to replace it before it cracks and allows water damage to begin.
Related Articles
Keep troubleshooting with these hand-picked guides from FixlyGuide:
- How to Fix a Leaky Single-Handle Faucet: A DIY Guide — Fixing a leaky single-handle faucet often involves replacing a worn-out O-ring or cartridge, a straightforward DIY task that can save water…
- Clogged AC Drain Line? Clear It Yourself in 30 Minutes — Learn how to quickly and safely clear a clogged AC drain line to restore your air conditioner's efficiency and prevent water damage.
- The $5 Secret to Fixing a Clogged AC Drain Line (and Avoiding a Costly Flood) — A clogged AC drain line can lead to water damage and mold, but a simple, inexpensive DIY fix can prevent costly repairs.
- The Silent Destroyer: 7 Hidden Signs Your Roof Has a Leak (Before You Need a New Ceiling) — Catching roof leaks early can save your home from extensive damage and costly repairs. Learn the subtle indicators that reveal hidden water…
- The Secret Culprit Behind Your Leaky Chimney (It’s Not Always the Obvious Fix) — A leaky chimney during rain can indicate several issues, from simple flashing problems to complex crown damage, requiring homeowners to dia…
- The Tiny Gap That Destroys Your Bathtub's Structure (and How to Seal It) — Recaulking your bathtub correctly is crucial to prevent water damage, mold growth, and structural issues in your bathroom.
Get the print-ready PDF of this guide
A clean, ad-free, printable version you can keep on your phone or pin to the workshop wall. Free with a FixlyGuide account.
- Print-optimized layout
- Tools, materials & every step included
- Saved to your account
Frequently asked questions
What's the best caulk to use for a bathroom sink?+
For bathroom sinks, 100% silicone caulk is highly recommended. It offers excellent waterproofing, flexibility, and resistance to mold and mildew, making it ideal for high-moisture environments.
How long does caulk need to dry before getting wet?+
Most silicone caulks require 12-24 hours to cure completely before being exposed to water. Always check the manufacturer's instructions on your specific caulk tube for precise drying times.
Can I caulk over old caulk?+
No, it's best practice to remove all old caulk before applying new. Applying new caulk over old caulk will not create a lasting, watertight seal and can lead to premature failure and mildew growth.
Why does my bathroom caulk keep molding?+
Caulk can mold due to constant humidity, poor ventilation, or if you're not using a mildew-resistant silicone caulk. Ensure good airflow in your bathroom and use 100% silicone specifically designed for baths and kitchens.
What tools do I need to recaulk a bathroom sink?+
You'll need a utility knife or caulk removal tool, an all-purpose cleaner, rubbing alcohol, a clean cloth, a caulk gun, a tube of 100% silicone caulk, and a caulk tooling tool or gloved finger.
Discussion
Loading comments…