
Tools & materials you'll need
Affiliate linksAs an Amazon Associate FixlyGuide earns from qualifying purchases — at no extra cost to you. Prices and availability are accurate as of publication and subject to change.
Quick Answer
Low water pressure from your kitchen sink sprayer is almost always the result of mineral deposits clogging the spray head or a kink/obstruction in the hose. Less commonly, a failing diverter valve within the faucet body can be the culprit. Fortunately, most of these issues are straightforward for a homeowner to diagnose and fix, usually requiring just basic tools and about 30 minutes of active work.
The Problem
Imagine trying to rinse stubborn food off plates or fill a pot with a kitchen sprayer that barely dribbles water. It's frustrating, inefficient, and can make simple kitchen tasks feel like a chore. A sudden drop in pressure, a spray that's inconsistent, or even no water at all, are all classic signs that something is impeding the flow. While it might seem like a major plumbing issue, the vast majority of low-pressure sprayer problems originate in easily accessible components that can be cleaned or adjusted with minimal effort.
How It Works
To understand how to fix your sprayer, it helps to know how it operates. When you turn on your kitchen faucet, water flows from your household supply lines through hot and cold shut-off valves, then into the faucet body. Inside many older single-handle faucets, a diverter valve (a small plastic or brass cylindrical component) directs water either to the main spout or, when the sprayer is activated, to the sprayer hose. In newer pull-down or pull-out sprayers, the diverter function is often integrated into the cartridge or a simpler check valve system.
The sprayer hose itself is typically a flexible, braided hose that connects the diverter outlet to the spray head. Water travels through this hose and exits through small nozzles on the spray head. Over time, these tiny nozzles are prime real estate for mineral deposits like calcium and lime, especially in hard water areas. These deposits constrict the flow, leading to reduced pressure and a weak spray pattern. Similarly, the hose can become kinked, pinched, or accumulate debris internally at connection points, further restricting water flow. The diverter valve, if present and failing, can also get clogged or stuck, preventing an adequate volume of water from reaching the sprayer.
Step-by-Step Fix
Safety First: Always turn off the hot and cold water supply valves under the sink before performing any work on your faucet or sprayer. This prevents accidental leaks or floods. Have a bucket and towels handy.
-
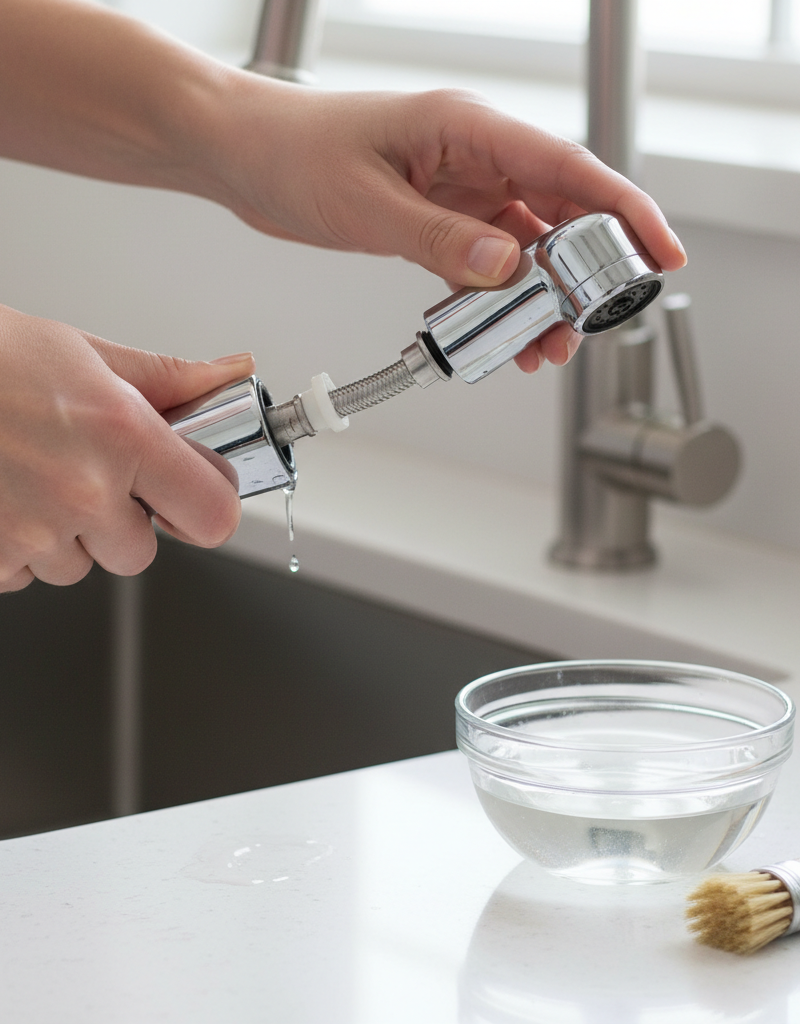
Inspect the Spray Head for Clogs — Begin with the easiest and most common culprit.
- Unscrew the spray head from the hose, turning it counter-clockwise. You might need adjustable pliers if it's tight, but protect chrome finishes with a cloth.
- Inspect the screen or nozzles for visible mineral buildup, food particles, or debris.
- If this doesn't work: Submerge just the head (not the hose connection) in a small bowl of white vinegar for 15-30 minutes to dissolve mineral deposits. Use an old toothbrush or a toothpick to gently scrub away softened debris. Rinse thoroughly.
-
Check the Hose for Kinks or Obstructions — Often overlooked, but a simple fix.
- Pull the sprayer hose out to its full extension. Slowly retract it, feeling for any kinks or pinches under the sink. Clear any obstructions that might be pressing against the hose, like cleaning supplies or garbage disposal pipes.
- If this doesn't work: Disconnect the hose from the underside of the faucet (where it connects to the diverter or main water line). Hold the loose end over a bucket and briefly turn on the water supply just enough to see if water flows freely from the hose. If it does, the problem is likely with the spray head or diverter; if not, the hose itself might be clogged or damaged and require replacement.
-
Clean or Replace the Diverter Valve (if applicable) — A common fix for older faucets.
- For many older single-handle faucets, the diverter valve is located in the faucet body. You'll typically need to remove the faucet handle, then unscrew a retaining nut or collar to access the faucet cartridge. The diverter often looks like a small plastic or brass cylinder near the cartridge or where the sprayer hose connects internally.
- Carefully pull out the diverter. Inspect it for mineral buildup or debris. Clean it using vinegar and a small brush. If it appears cracked, worn, or heavily corroded, replace it with an exact matching part.
- Safety Note: Some diverters are difficult to access. If you're unsure, consult your faucet's manual or consider calling a pro.
-
Check Aerator on Main Faucet (for integral diverters) — Newer faucets might not have a separate diverter.
- For pull-down or pull-out sprayers where the diverter is often integrated, a clogged main aerator can sometimes affect overall pressure, thereby impacting the sprayer.
- Unscrew the aerator from the main faucet spout, clean out any debris or mineral buildup, and reattach. This can sometimes restore overall flow to the faucet, which in turn improves sprayer performance.
-
Look for Leaks Along the Sprayer Hose — Visual inspection for obvious damage.
- While the water supply is off, carefully examine the entire length of the sprayer hose, especially at the connection points under the sink and where it enters the spray head. Look for drips, cracks, bulges, or signs of water damage. Even a small leak can significantly reduce pressure at the spray head.
- If this doesn't work: If you find a leak, the hose itself is compromised and will need to be replaced. Ensure you get an exact match for your faucet model.
Common Causes
- Mineral Buildup: Hard water contains dissolved minerals (calcium, magnesium) that precipitate out and cling to surfaces, especially in small openings like sprayer nozzles. This is by far the most frequent cause.
- Kinked or Pinched Hose: The flexible sprayer hose under the sink can easily become tangled, kinked, or pinched by items stored in the cabinet, restricting water flow.
- Faulty Diverter Valve: In faucets with a dedicated diverter, this small component can become clogged with sediment, wear out, or get stuck, preventing water from being properly directed to the sprayer.
- Debris in Supply Lines: Although less common, sediment or rust particles from aging pipes or water heater tanks can occasionally make their way into the sprayer assembly.
- Weak Water Pressure (House-wide): If all fixtures in your home have low pressure, the issue is not specific to the sprayer but rather a problem with your main water supply or regulator. (This article focuses on sprayer-specific issues).
Common Mistakes
- Ignoring the Supply Valves: Failing to turn off the hot and cold water supply valves under the sink before attempting repairs can lead to an unexpected flood. Always shut them off first!
- Over-tightening Connections: When reattaching the spray head or hose, over-tightening can strip threads, crack plastic components, or damage rubber gaskets, leading to leaks. Hand-tighten, then give a quarter-turn with pliers if needed, but don't force it.
- Using Harsh Chemicals: While vinegar is excellent for mineral buildup, avoid strong chemical cleaners on your sprayer. They can damage plastic parts, rubber seals, and the chrome finish.
- Mismatching Replacement Parts: If you need to replace a diverter or hose, ensure you get an exact match for your specific faucet model. Generic parts often don't fit correctly and can lead to leaks or continued pressure issues.
- Assuming the Worst Immediately: Many homeowners jump to calling a plumber for low pressure when a simple cleaning or hose adjustment would have solved the problem in minutes.
Cost & Time Breakdown
| Task | DIY cost | Pro cost | Time |
|---|---|---|---|
| Clean spray head/hose | $0–$5 | $75–$150 | 15–30 min |
| Replace sprayer hose | $20–$50 | $100–$250 | 30–60 min |
| Replace diverter valve | $10–$40 | $120–$280 | 45–90 min |
| Main faucet aerator clean | $0 | $75–$150 | 10–20 min |
| Diagnose multiple issues | $0 | $150–$300+ | 1–2 hours |
Tips & Prevention
- Regular Cleaning: Periodically unscrew your spray head and soak it in white vinegar, especially if you live in a hard water area. Aim for every 3-6 months.
- Soft Scrubbing: Use an old toothbrush or soft brush to gently clean the spray nozzles during your routine kitchen cleaning.
- Organize Under the Sink: Keep the area under your sink tidy to prevent the sprayer hose from getting tangled or pinched by cleaning supplies, trash bins, or other items.
- Consider a Water Softener: If mineral buildup is a persistent issue throughout your home, a whole-house water softener can significantly reduce maintenance on all your plumbing fixtures.
- Gentle Hose Handling: Avoid yanking or forcefully retracting the sprayer hose, which can cause kinks or internal damage over time.
When to Call a Professional
While many low-pressure sprayer issues are DIY-friendly, there are specific situations where a licensed plumber is your best bet. If you've tried all the troubleshooting steps outlined above – cleaning the spray head, checking the hose, and inspecting the diverter – and the pressure remains stubbornly low, it may indicate a more complex internal faucet problem, a deeper clog in the supply line, or even a water pressure issue affecting your entire home. Furthermore, if you encounter any difficulty accessing faucet components, discover significant leaks beyond a simple hose replacement, or feel uncomfortable disassembling your faucet, it's always safer and more efficient to call a professional. A plumber can quickly diagnose obscure issues, ensure proper installation of new parts, and prevent further damage to your plumbing system.
Related Articles
Keep troubleshooting with these hand-picked guides from FixlyGuide:
- The 5-Minute Trick to Fix a Kitchen Sink Sprayer's Weak Stream — A weak kitchen sink sprayer can be frustrating, but often a simple cleaning or adjustment can restore full pressure in minutes.
- The 5-Minute Trick to Fix Your Kitchen Sprayer's Weak Stream — Restore your kitchen sink sprayer's full power with a simple, quick fix tackling common pressure culprits.
- The 90-Second Trick to Fix a Weak Kitchen Sprayer (No Plumber Needed) — Restore full power to your kitchen sink sprayer with simple DIY steps, addressing common causes like clogs and diverter issues.
- The 5-Minute Fix for Your Kitchen Sprayer's Weak Stream — Restore your kitchen sink sprayer's strong stream with simple troubleshooting steps for common causes like clogs and diverter issues.
- The 5-Minute Fix for Your Kitchen Sink Sprayer's Weak Stream — Restore your kitchen sink sprayer's power with a simple, five-minute fix addressing common causes like mineral buildup and hose kinks.
- The 5-Minute Trick to Fix a Door That Won't Latch (No New Hardware Needed) — Discover the simple, often overlooked reason your door isn't latching and how to fix it in minutes with basic tools, no new hardware requir…
Get the print-ready PDF of this guide
A clean, ad-free, printable version you can keep on your phone or pin to the workshop wall. We'll also send occasional weekly tips matched to your home situation.
- Print-optimized layout
- Tools, materials & every step included
- Unsubscribe anytime
Frequently asked questions
Why is my kitchen sprayer suddenly losing pressure?+
The most common reasons for a sudden loss of kitchen sprayer pressure are mineral buildup clogging the spray head nozzles, a kink or obstruction in the sprayer hose under the sink, or a malfunctioning diverter valve within the faucet body.
Can I clean my kitchen sink sprayer head?+
Yes, absolutely! Cleaning your kitchen sink sprayer head is often the first and most effective DIY fix. Unscrew it, inspect for debris, and soak it in white vinegar for 15-30 minutes to dissolve mineral deposits, then scrub gently with an old toothbrush.
What is a diverter valve and how does it affect sprayer pressure?+
A diverter valve is a small component inside many kitchen faucets that directs water flow to either the main spout or the sprayer. If it becomes clogged with sediment or wears out, it can prevent sufficient water from reaching the sprayer, leading to low pressure.
When should I call a plumber for low sprayer pressure?+
You should call a plumber if you've cleaned the spray head, checked the hose for kinks, and inspected/cleaned the diverter valve, but still have low pressure. Also call if you find significant leaks, are uncomfortable with disassembly, or suspect the issue is related to your home's main water pressure.
How can I prevent low pressure in my kitchen sprayer?+
Prevent low pressure by regularly cleaning your sprayer head with vinegar, keeping the area under your sink clear of obstructions to prevent hose kinks, and considering a whole-house water softener if you have very hard water buildup issues.


Discussion
Loading comments…