
Tools & materials you'll need
Affiliate linksAs an Amazon Associate FixlyGuide earns from qualifying purchases — at no extra cost to you. Prices and availability are accurate as of publication and subject to change.
Quick Answer
When your refrigerator ice maker stops producing ice, the most frequent cause is a blockage in the water supply line, a frozen fill tube, or a tripped feeler arm. You can often diagnose and fix these issues yourself by inspecting the water line for kinks, thawing a frozen fill tube, or ensuring the feeler arm is in the 'down' position. Correcting the freezer temperature can also resolve the problem.
The Problem
You open your freezer, reach for ice, and... nothing. The ice maker is silent, the bucket is empty, and the promise of a cold drink remains unfulfilled. This common household frustration can stem from a variety of sources, from simple user errors like a turned-off water supply to minor mechanical issues such as a clogged filter or a faulty water inlet valve. While it might seem complex, many ice maker problems are surprisingly straightforward to diagnose and repair with a few basic tools and a bit of patience. Understanding the potential culprits and a systematic approach to troubleshooting can save you the cost and inconvenience of a service call, helping you get back to refreshing beverages in no time.
How It Works
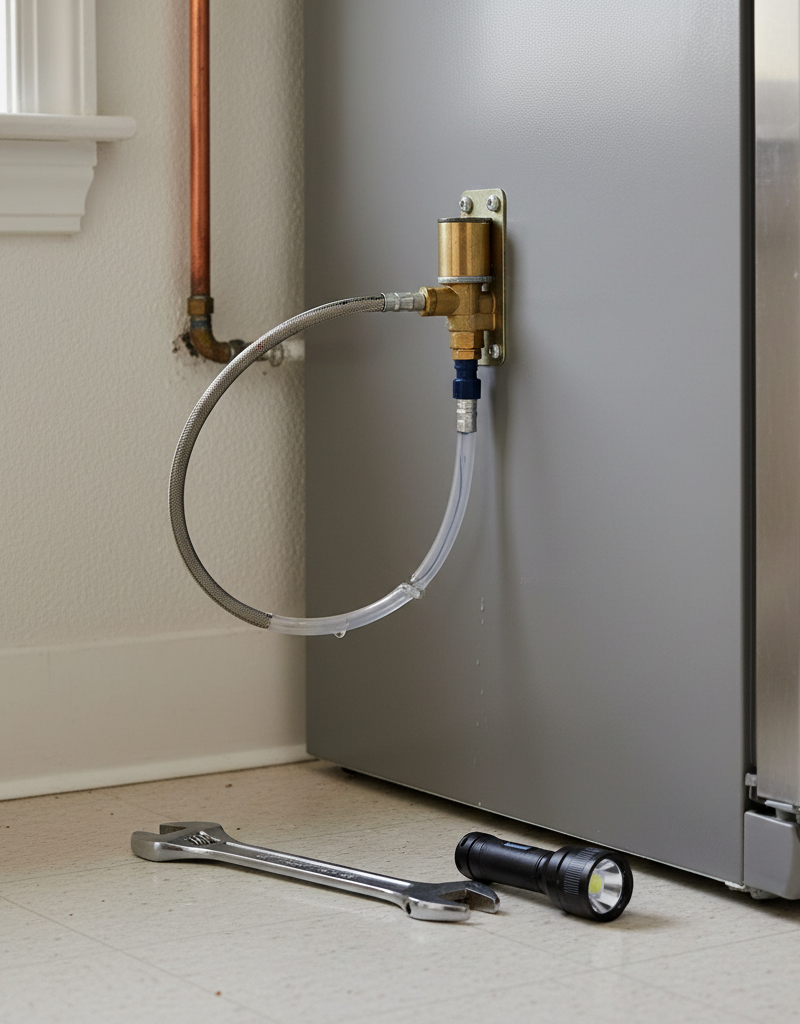
At its core, a refrigerator ice maker is a marvel of simple automation. It begins with a water supply line, typically a thin copper or plastic tube, that connects your refrigerator to your home's main cold water line, often under the kitchen sink. This line feeds into a water inlet valve, an electrically controlled solenoid valve usually located on the back of the refrigerator. When the ice maker calls for water, this valve opens, allowing water to flow through a small fill tube into the ice mold in the freezer.
Inside the ice maker assembly, a small heating element briefly warms the mold to loosen the newly formed ice cubes. A motor then rotates an ejector arm, pushing the ice cubes out of the mold and into the ice bucket below. As the cubes fall, a 'feeler arm' or optical sensor detects the ice level in the bucket. Once the bucket is full, the feeler arm rises or the sensor detects the maximum level, signaling the ice maker to stop producing until the ice level drops again. If the feeler arm is stuck in the 'up' position or the optical sensors are blocked, the ice maker will incorrectly assume the bucket is full and cease production. This entire cycle is governed by a thermostat in the freezer and a timer within the ice maker module itself, ensuring that water only flows when the temperature is right and the previous batch of ice has been ejected.
Step-by-Step Fix
1. Check the Feeler Arm — Ensure it's in the 'down' position.
The most common and easiest fix. Many ice makers have a metal feeler arm that senses the ice level. If this arm is accidentally pushed up or blocked by something in the freezer, the ice maker will think the bin is full and stop making ice. Gently push the arm down. If it snaps back up, there might be ice or an obstruction keeping it from resting correctly.
2. Inspect the Water Supply Line — Look for kinks or damage.
Locate the thin supply line running from your water source (often under the sink) to the back of the refrigerator. Pull the refrigerator away from the wall and check for any bends, kinks, or damage that could restrict water flow. Straighten any kinks. Also, verify that the water shut-off valve for the refrigerator is fully open.
3. Thaw a Frozen Fill Tube — Clear any ice blockages.
Sometimes, the small tube that delivers water to the ice maker mold can freeze. This often happens if the water pressure is too low or the freezer temperature fluctuates. Access the ice maker unit and locate the small plastic tube entering the ice mold. If you see ice, you can often thaw it using a hairdryer on a low setting (keep it moving and don't overheat plastic parts) or by turning off the freezer for a few hours (remove perishables first). Place towels to catch melting water. Safety Note: Unplug the refrigerator before attempting any thawing with a hairdryer.
4. Replace a Clogged Water Filter — Ensure clear water flow.
Most modern refrigerators have an inline water filter, usually located inside the fridge compartment or in the kickplate at the bottom. A clogged filter can significantly reduce water pressure to the ice maker, preventing it from filling the molds. Consult your owner's manual for filter location and replacement instructions. Typically, filters should be replaced every six months.
5. Verify Freezer Temperature — Set it between 0°F and 5°F (-18°C and -15°C).
The ice maker needs consistently cold temperatures to freeze water properly. If your freezer is too warm (above 10°F or -12°C), the ice will take too long to form, or a frozen fill tube might occur. Use a freezer thermometer to check the actual temperature and adjust the thermostat as needed. Give it 24 hours to stabilize after an adjustment.
6. Check the Water Inlet Valve — Listen for a hum or replace if faulty.
The water inlet valve, usually found on the back of the refrigerator where the water line connects, controls water flow. With the refrigerator plugged in and the water supply on, try to manually cycle the ice maker (if your model has a test button/lever – consult your manual). Listen for a distinct hum from the valve as it tries to open. If you hear nothing, or if the valve looks corroded or leaks, it might be faulty and need replacement. This is a more advanced fix; if unsure, call a pro. Safety Note: Unplug the refrigerator before inspecting or working on the water inlet valve.
7. Reset the Ice Maker — Sometimes a simple reset is all it needs.
Some ice maker units have a reset button, typically a small red button on the side or bottom of the ice maker module. Press and hold it for a few seconds. If there's no button, unplug the refrigerator for 5 minutes, then plug it back in. This can often reset the control board and clear minor glitches.
8. Inspect the Ejector Mechanism — Look for stuck ice or broken parts.
If water is getting to the mold but not ejecting, there might be ice stuck in the ejector fingers or a problem with the ejector motor itself. With the refrigerator unplugged and the ice maker powered off, carefully inspect the ejector arms for any obstructions. You can gently clear stuck ice with a plastic utensil. If the arms appear broken or don't move during a test cycle, the ice maker assembly may need replacement.
Common Causes
- Tripped Feeler Arm: The most frequent and easiest to overlook cause. The metal arm that senses the ice level in the bin is stuck in the 'up' position, signaling the ice maker that the bin is full.
- Kinked or Frozen Water Line: The thin plastic or copper line supplying water to the ice maker can bend, crimp, or freeze, preventing water from reaching the ice mold. Low water pressure can exacerbate freezing.
- Clogged Water Filter: A dirty or expired water filter restricts water flow, leading to insufficient water entering the ice maker and often resulting in smaller or no ice cubes.
- Faulty Water Inlet Valve: This electromagnetic valve opens to allow water into the ice maker. If it fails, it won't open, or it might not close completely, leading to leaks or no water flow.
- Incorrect Freezer Temperature: If the freezer isn't cold enough (ideally between 0°F and 5°F), the water won't freeze efficiently, or it might partially freeze in the fill tube, creating a blockage.
- Malfunctioning Ice Maker Module: The internal mechanics of the ice maker, including the motor, gears, and heating element, can wear out over time, preventing cycling or ejection.
Common Mistakes
- Ignoring the Feeler Arm: Many homeowners immediately assume a major problem without checking the most basic component. Always ensure the feeler arm is down and clear before moving to more involved troubleshooting.
- Not Replacing the Water Filter Regularly: Forgetting to change the filter every six months is a common oversight that leads to reduced water pressure and can damage the water inlet valve over time.
- Setting Freezer Temperature Too High: A freezer that's slightly too warm (e.g., above 10°F) won't freeze water quickly enough, leading to small, melted, or no ice. Always aim for 0-5°F (-18 to -15°C).
- Using Metal to Clear Ice: Poking at frozen components with a metal screwdriver or knife can puncture water lines or damage delicate plastic parts. Always use plastic utensils or warm water/hairdryer for thawing.
- Overlooking the Water Shut-Off Valve: Sometimes, the water supply valve has been accidentally turned off during cleaning or other work, leading to a complete lack of water to the ice maker.
- Forgetting to Unplug Before Thawing: When using a hairdryer or working near electrical components, failing to unplug the refrigerator creates a significant electrical shock hazard. Always disconnect power first.
Cost & Time Breakdown
| Task | DIY Cost | Pro Cost | Time |
|---|---|---|---|
| Check Feeler Arm | $0 | $0 | 1 minute |
| Inspect/Thaw Water Line | $0 | $75–$150 | 15–30 minutes |
| Replace Water Filter | $30–$60 | $75–$150 (plus filter) | 5–10 minutes |
| Adjust Freezer Temperature | $0 | $0 | 1 minute |
| Replace Water Inlet Valve | $40–$100 | $150–$300 | 30–60 minutes |
| Replace Ice Maker Assembly | $80–$200 | $200–$400 | 60–90 minutes |
Tips & Prevention
- Regular Filter Changes: Replace your refrigerator's water filter every 6 months, or as recommended by the manufacturer, to maintain good water flow and quality for your ice maker.
- Maintain Optimal Freezer Temp: Keep your freezer consistently between 0°F and 5°F (-18°C and -15°C) to ensure efficient ice production and prevent freezing in the fill tube.
- Clear the Ice Bin: Periodically empty and clean the ice bin. This prevents old ice from sticking together and ensures the feeler arm has a clear path.
- Inspect Water Line: Every few months, pull your refrigerator out and quickly check the water supply line for any kinks or signs of wear, especially if it's an older plastic line susceptible to cracking.
- Don't Overfill Freezer: Overpacking your freezer can block air vents and lead to temperature inconsistencies, potentially affecting ice maker performance.
- Listen for Sounds: Pay attention to unusual noises from your ice maker. A buzzing noise when it should be filling might indicate a faulty water inlet valve, while grinding could signal a problem with the ejector mechanism.
When to Call a Professional
While many ice maker issues are DIY-friendly, certain situations warrant calling a licensed appliance repair technician. If you've systematically worked through all the troubleshooting steps and your ice maker still isn't producing, or if you suspect a more complex electrical or fundamental component failure, it's time to call in the experts. Specifically, if you identify a faulty water inlet valve but aren't comfortable working with water lines and electrical connections, or if you've determined the entire ice maker assembly needs replacing, a professional can ensure the job is done correctly and safely. Furthermore, if you notice any persistent leaks, unusual burning smells, or continuous loud grinding noises that don't resolve with basic troubleshooting, an immediate service call is recommended to prevent further damage or potential safety hazards. Professionals have specialized diagnostic tools and experience to quickly pinpoint and resolve issues that might be beyond the scope of a typical homeowner.
Related Articles
Keep troubleshooting with these hand-picked guides from FixlyGuide:
- The #1 Mistake Homeowners Make When Their Ice Maker Stops (And the Easy Fix) — Before you call for service, learn the most common and easily fixable reason your refrigerator's ice maker isn't producing ice.
- The #1 Reason Your Ice Maker Stopped (It's Not Clogged!) — Discover the most overlooked culprit behind a non-working ice maker and how a simple fix can restore fresh ice to your freezer.
- The #1 Mistake Homeowners Make When Their Dryer Stops Drying (And How to Fix It Free) — If your dryer is taking too long to dry clothes, the most common culprit is a clogged vent, which can be easily fixed with simple tools.
- The #1 Mistake Homeowners Make When Their Dryer Isnt Drying (And How to Fix It Free) — Most homeowners assume a slow dryer means a broken dryer, but the most common culprit is a simple, often overlooked maintenance issue that'…
- The #1 Mistake Homeowners Make When Their Dishwasher Stops Cleaning (And the Simple Fix) — Discover the most common reason your dishwasher isn't cleaning dishes and learn a simple, effective fix you can do yourself in minutes.
- The Surprising Culprit Behind Your Refrigerator's Water Leak (It's Not Always the Ice Maker) — Discover the most common, often overlooked reason your refrigerator is leaking water and how to fix it with simple steps.
Frequently asked questions
Why would my ice maker suddenly stop making ice?+
The most common reasons an ice maker suddenly stops working include a tripped feeler arm (which tells the machine the bin is full), a kinked or frozen water supply line, a clogged water filter, or an incorrect freezer temperature that is too warm for ice production.
How do I reset my refrigerator ice maker?+
Many ice makers have a small red reset button on the side or bottom of the unit; press and hold it for a few seconds. If there's no button, you can often reset it by unplugging the refrigerator from the wall for 5-10 minutes, then plugging it back in.
Can a clogged water filter stop an ice maker from working?+
Yes, absolutely. A clogged or expired water filter significantly restricts the water flow and pressure to the ice maker, often preventing it from filling the ice mold sufficiently or at all. Replacing the filter every six months is crucial for ice maker performance.


Discussion
Loading comments…