
Tools & materials you'll need
Affiliate linksAs an Amazon Associate FixlyGuide earns from qualifying purchases — at no extra cost to you. Prices and availability are accurate as of publication and subject to change.
Quick Answer
A slow kitchen sink drain is almost always the result of a partial blockage within your drain system. The most common offenders are accumulated grease, food debris, and soap scum, which cling to the inside of your pipes, narrowing the passage. Hair can also contribute, especially in shared kitchen/utility sinks. More often than not, a slow drain can be effectively addressed with a few common household tools and a bit of effort, such as using a plunger, applying a baking soda and vinegar solution, or, for more stubborn clogs, physically cleaning out the P-trap.
The Problem
There's nothing quite as frustrating in a kitchen as a sink that refuses to drain properly. That sluggish swirl of water after even a small load of dishes isn't just an annoyance; it's a sign that something is impeding the flow within your drainpipes. Left unaddressed, a slow drain will only worsen, eventually leading to a complete blockage, foul odors, and potentially even water backup. The problem isn't always obvious; sometimes, it's a gradual accumulation that finally reaches a critical mass. Identifying the location and nature of the clog is key to choosing the right solution, from simple DIY fixes to knowing when it's time to call a professional. Before you reach for harsh chemical drain cleaners, which can damage pipes and aren't always effective, understanding the mechanics of your drain and targeting the clog directly is a safer and more reliable approach.
How It Works
Your kitchen sink's drainage system is a cleverly designed network of pipes that relies on gravity and proper ventilation to whisk wastewater away. When you pull the stopper or turn on the faucet, water flows down through the sink's basket strainer, which catches larger food particles. Below the sink, the drain assembly connects to the P-trap, a U-shaped bend designed to hold a small amount of water. This water acts as a barrier, preventing sewer gases from entering your home. From the P-trap, the drainpipe typically runs horizontally for a short distance before connecting to a vertical stack, which then leads to the main sewer line.
Vent pipes, usually extending through the roof, are crucial to this system. They allow air into the drainpipes, preventing a vacuum from forming as water flows, which could otherwise cause gurgling sounds or slow drainage. Clogs most commonly occur where water flow changes direction or velocity: at the basket strainer, inside the P-trap, or in the initial horizontal section of the drainpipe where grease and debris can accumulate easily. These blockages reduce the effective diameter of the pipe, restricting water flow and causing that familiar frustratingly slow drain. Understanding this basic pathway helps in pinpointing where the obstruction is likely located.
Step-by-Step Fix
Safety First! – Before undertaking any plumbing work, always wear appropriate personal protective equipment, including gloves and eye protection. Chemical drain cleaners are caustic and should be avoided due to potential harm to pipes and skin. If you suspect the clog is beyond your capabilities or involves the main stack, call a licensed plumber.
-
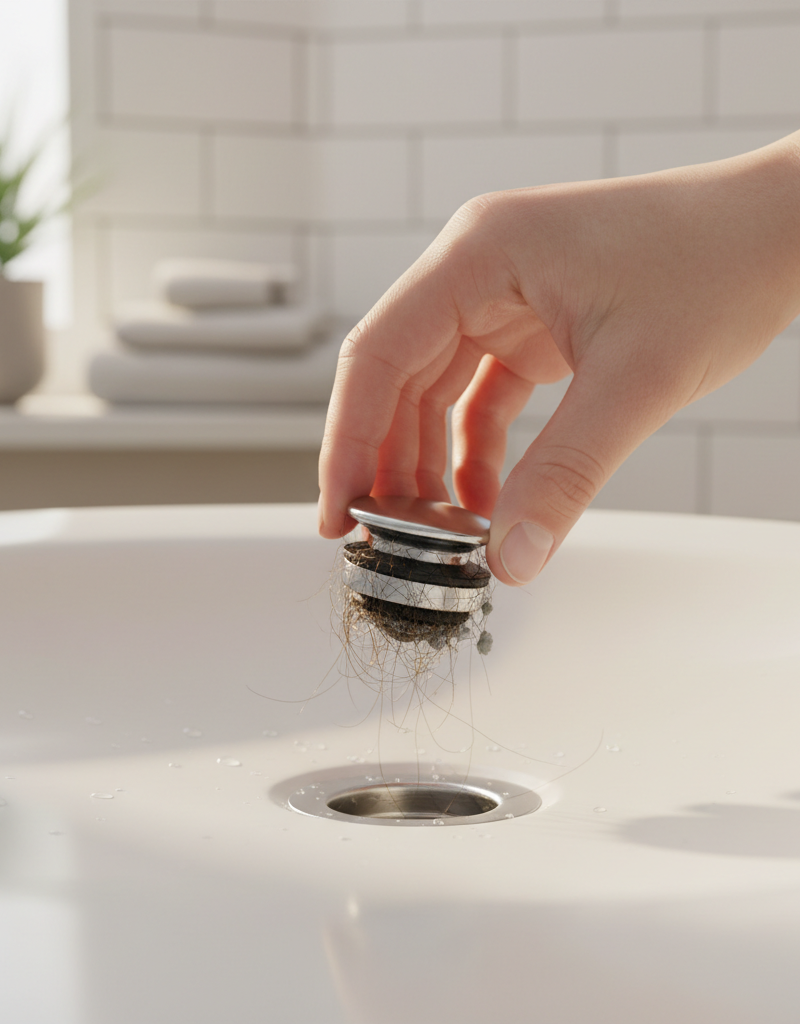
Clear the Basket Strainer – Initial Visual Inspection
- Remove any visible food debris, hair, or other particles caught in the sink's basket strainer. Use a paper towel to wipe it clean. This is often enough for very minor slowdowns.
-
Boiling Water Flush – Grease Dissolution
- If your pipes are metal (not PVC or old, brittle plastic), boil a large pot of water (about 1 gallon). Carefully pour the boiling water directly down the drain. The heat can help melt and dislodge minor grease buildups. Repeat once or twice if you see improvement. If using PVC, use very hot tap water instead of boiling water to avoid damage.
-
The Plunger Technique – Creating Suction
- Fill the sink with enough hot water to cover the bell of your cup-style kitchen sink plunger. Create a tight seal around the drain with the plunger. Plunge vigorously for 20-30 seconds, then quickly break the seal to see if the water drains faster. Repeat this several times. If you have a double sink, plug the second drain securely with a stopper or a wet rag to ensure maximum suction.
- If this doesn't work: The clog might be too dense or too far down the pipe for the plunger to affect it.
- Fill the sink with enough hot water to cover the bell of your cup-style kitchen sink plunger. Create a tight seal around the drain with the plunger. Plunge vigorously for 20-30 seconds, then quickly break the seal to see if the water drains faster. Repeat this several times. If you have a double sink, plug the second drain securely with a stopper or a wet rag to ensure maximum suction.
-
Baking Soda and Vinegar Power – Gentle Chemical Reaction
- Pour 1/2 cup of baking soda down the drain, followed immediately by 1/2 cup of white vinegar. The mixture will fizz. Cover the drain with a stopper or plate and let it sit for 30 minutes to an hour. The effervescent action can help loosen minor clogs. Flush with hot tap water (or boiling water if pipes are metal).
- Safety Note: Never mix vinegar with commercial drain cleaners or bleach, as this can create dangerous gases.
- Pour 1/2 cup of baking soda down the drain, followed immediately by 1/2 cup of white vinegar. The mixture will fizz. Cover the drain with a stopper or plate and let it sit for 30 minutes to an hour. The effervescent action can help loosen minor clogs. Flush with hot tap water (or boiling water if pipes are metal).
-
Disassembling the P-Trap – Direct Clog Removal
- Place a bucket or old towel directly underneath the P-trap to catch any water and debris. Using channel locks or a basin wrench (be gentle on plastic pipes), loosen the slip nuts on both ends of the P-trap. Carefully remove the P-trap. Inspect the inside for clogs and use a bottle brush, old toothbrush, or even a gloved finger to physically remove the accumulated sludge.
- Tools: Adjustable wrench or channel locks, bucket, old towel, gloves.
- Materials: Plumber's tape (for reassembly).
- If bolts are stuck: Apply a penetrating oil and let it sit for 15 minutes before trying again. Be careful not to strip the nuts.
- Place a bucket or old towel directly underneath the P-trap to catch any water and debris. Using channel locks or a basin wrench (be gentle on plastic pipes), loosen the slip nuts on both ends of the P-trap. Carefully remove the P-trap. Inspect the inside for clogs and use a bottle brush, old toothbrush, or even a gloved finger to physically remove the accumulated sludge.
-
Cleaning the Trap Arm – Beyond the P-Trap
- Once the P-trap is removed, inspect the horizontal pipe that leads from the wall (the trap arm). This is a common spot for clogs beyond the P-trap. Use a plumber's snake or a bent wire hanger to carefully fish out any obstructions as far as you can reach. Be gentle to avoid damaging the pipes.
-
Reassemble and Test – Secure and Verify
- Clean the P-trap thoroughly and reassemble it, ensuring all slip nuts are hand-tightened, then given a quarter-turn with channel locks (don't overtighten, especially on plastic). Run water slowly at first to check for leaks, then run a full stream to confirm the drainage speed.
-
Chemical-Free Enzyme Cleaner (Optional, for Maintenance) – Preventative Measure
- If your drain is now clear, consider using an enzyme-based drain cleaner (not a caustic chemical one) once a month as a preventative measure. These cleaners use beneficial bacteria to break down organic matter and are safe for pipes and septic systems. Follow product instructions carefully.
Common Causes
- Grease and Oil Buildup: The most frequent culprit. When hot grease or oil is poured down the drain, it cools and solidifies, coating the inside of pipes and trapping other debris. Though it might appear liquid when hot, it becomes a waxy solid very quickly.
- Food Particles: Small food scraps, coffee grounds, and starchy residues (like pasta water or potato peels) often slip past strainers and contribute to blockages, especially when combined with grease. Over time, these can compact into a formidable clog.
- Soap Scum: Just like in your shower, soap scum (a combination of soap and minerals in hard water) builds up in drains, creating a sticky surface for other debris to adhere to.
- Hair and Lint: Though less common in kitchen sinks than bathroom drains, hair (especially pet hair from washing dishes used by pets) and lint (if a utility sink shares the same drain line as a laundry machine) can intertwine with grease and food, forming dense, complex clogs.
- Mineral Buildup: In areas with hard water, mineral deposits (calcium and magnesium) can accumulate on pipe walls, reducing their diameter and making them more prone to trapping other debris. This is a slower process but can contribute significantly over time.
- Improper Venting: While not a clog, a poorly vented drain or a clogged vent pipe can cause slow drainage and gurgling noises as air struggles to enter the system. This often requires professional diagnosis.
Common Mistakes
- Using Caustic Chemical Drain Cleaners: Many homeowners reach for these first. While they can sometimes clear a clog, they are extremely corrosive, can damage PVC pipes, gaskets, and even older metal pipes over time. They also pose significant safety risks if they splash back, and if they don't work, they leave a pool of toxic water for plumbers to deal with.
- Overtightening P-Trap Nuts: When reassembling the P-trap, tightening the slip nuts too much can crack plastic pipes or strip threads, leading to leaks down the line and requiring more extensive repairs.
- Ignoring the Slower Drain: A slow drain is a warning sign. Ignoring it almost guarantees a complete blockage, which is much more difficult and messy to resolve.
- Pouring Grease Down the Drain: A fundamental error. Even small amounts of grease, bacon fat, or cooking oil will eventually solidify and cause problems. Always dispose of grease in the trash once it cools.
- Not Protecting the Other Side of a Double Sink: When plunging a double kitchen sink, failing to plug the other drain opening prevents proper suction, rendering the plunging ineffective. Always secure both drains (or any nearby overflow holes) before plunging.
- Using the Wrong Type of Plunger: A cup-style plunger, designed for flat surfaces, is best for sinks. A flange plunger (with the extra inner rim) is better suited for toilets but can be awkward and less effective on a sink drain.
Cost & Time Breakdown
| Task | DIY cost | Pro cost | Time |
|---|---|---|---|
| Boiling Water Flush | $0 | N/A | 5-10 minutes |
| Plunging | $0–$15 (plunger) | N/A | 10-20 minutes |
| Baking Soda & Vinegar | $2–$5 | N/A | 30-60 minutes |
| P-Trap Cleaning | $0–$5 (tape) | $100–$250 | 30-60 minutes |
| Snaking Drain Line (DIY) | $20–$50 (snake) | $150–$400 | 1-2 hours |
| Professional Drain Cleaning | N/A | $200–$500+ | 1-3 hours |
Tips & Prevention
- Scrape Plates Thoroughly: Before rinsing dishes, scrape all food scraps into the trash or compost. Even
Related Articles
Keep troubleshooting with these hand-picked guides from FixlyGuide:
- The Secret Culprit Behind Your Slow Sink Drain (It's Not Always Hair) — Uncover the surprising reasons your kitchen sink drains slowly and learn actionable steps to fix common clogs yourself.
- The Secret Culprit Behind Your Slow Sink Drain (It's Not Always Hair) — Uncover the surprising reasons your kitchen sink drains slowly and learn straightforward fixes to restore flow without calling a plumber.
- The #1 Mistake Homeowners Make with a Slow Kitchen Drain (and How to Undo It) — A slow kitchen sink drain is a common and frustrating problem, but often stems from a single preventable mistake that's easily fixed with t…
- The #1 Mistake Homeowners Make with a Slow Kitchen Sink (And Its Dead Simple Fix) — Before you reach for harsh chemicals, learn the most common, easily fixable reason your kitchen sink is draining slowly and how to fix it y…
- The 3 Hidden Reasons Your Bathroom Sink Stinks (And the 20-Minute Fix) — Uncover the surprising causes behind a foul-smelling bathroom sink drain and learn a simple, effective fix in just 20 minutes.
- The #1 Reason Your Interior Door Sticks (It's Not Humidity) — Before you blame humidity, understand the real culprit behind a sticking interior door and learn how to fix it with simple tools.
Get the print-ready PDF of this guide
A clean, ad-free, printable version you can keep on your phone or pin to the workshop wall. We'll also send occasional weekly tips matched to your home situation.
- Print-optimized layout
- Tools, materials & every step included
- Unsubscribe anytime
Frequently asked questions
Why is my kitchen sink draining slowly but not fully clogged?+
A slow drain typically indicates a partial blockage. This means water can still pass through, but the pipe's internal diameter has been reduced by a buildup of grease, food particles, soap scum, or mineral deposits, significantly restricting flow.
Can I use baking soda and vinegar to clear a slow kitchen sink drain?+
Yes, baking soda followed by vinegar can create a fizzing reaction that helps loosen minor clogs caused by grease and food debris. It's a safer, non-toxic alternative to harsh chemical drain cleaners. Simply pour 1/2 cup of baking soda, followed by 1/2 cup of white vinegar, cover, and let it sit for 30-60 minutes before flushing with hot water.
When should I call a plumber for a slow kitchen sink drain?+
You should call a plumber if your DIY attempts (plunging, P-trap cleaning, baking soda/vinegar) don't resolve the issue, if multiple drains in your home are slow (indicating a main line issue), if you hear gurgling from other fixtures, or if water is backing up. These signs suggest a more serious clog deeper in your plumbing system.
How can I prevent my kitchen sink drain from slowing down again?+
Preventative measures include never pouring grease or oil down the drain, always scraping food scraps into the trash before washing dishes, using a sink strainer, and occasionally flushing the drain with very hot (not boiling, if PVC) water or an enzyme-based drain cleaner as a maintenance step. Avoid starchy water and coffee grounds.
Is it safe to pour boiling water down a PVC drain?+
It is generally not recommended to pour boiling water down PVC drains directly. While PVC is durable, extreme heat can soften or warp the plastic, potentially leading to damage or leaks over time. Instead, use very hot tap water for flushing PVC pipes to be safe.


Discussion
Loading comments…