Tools & materials you'll need
Affiliate links- AmazonScrewdriver or nut driver1 · To remove the top panel for better access.
- AmazonFin comb1 · A specialty tool for straightening bent condenser fins.
- AmazonGarden hose with spray nozzle1 · Must have an adjustable spray pattern. DO NOT use a pressure washer.
- AmazonLevel1 · To check if the condenser pad is level.
- AmazonWork gloves1 · To protect hands from sharp fins and debris.
- AmazonSafety glasses1 · Protect eyes from debris and cleaning solutions.
- AmazonWet/dry vacuum1 · Optional, but useful for clearing the condensate drain line.
As an Amazon Associate FixlyGuide earns from qualifying purchases — at no extra cost to you. Prices and availability are accurate as of publication and subject to change.
Quick Answer
The majority of a professional spring AC tune-up, which costs an average of $180, involves cleaning and inspection tasks that a homeowner can perform in under an hour. The key steps include turning off the power, cleaning the outdoor condenser unit and fins, straightening bent fins, ensuring the unit is level, cleaning the indoor condensate drain line, and replacing the air filter. These actions prevent costly summer breakdowns and lower your energy bills by improving system efficiency.
The Problem
Your air conditioner has been sitting dormant for months, accumulating a winter's worth of dirt, leaves, and grime. Like a bear waking from hibernation, it's not in peak condition. Firing it up on the first hot day without preparation is a gamble. The layers of dirt on the outdoor unit's coils act as an insulator, forcing the system to work much harder to release heat. The indoor filter is likely clogged with dust, choking the system's airflow. The condensate drain line might be a budding science experiment for mold and algae, priming it for a clog that can cause water damage inside your home.
This isn't just about cleanliness; it's about mechanical stress and cost. An un-tuned AC unit can see its efficiency plummet by 5-10% or more. For a typical home, that could mean an extra $30-$50 per month on your summer electricity bills. Worse, that added strain on the compressor, fan motor, and capacitors leads to premature failure. What starts as a 45-minute cleaning job you skipped can easily become a $500 emergency capacitor replacement on a sweltering Saturday or, in a worst-case scenario, a $5,000+ full system replacement years before its time.
How It Works
An air conditioner is a heat-moving machine. It uses a fascinating process called the vapor-compression cycle to absorb heat from inside your house and transfer it outside. Think of it in two halves:
-
The Indoor Unit (Evaporator): A coil filled with cold refrigerant absorbs heat from your indoor air, which is blown across it by the furnace or air handler fan. As the refrigerant absorbs heat, it turns from a liquid to a gas.
-
The Outdoor Unit (Condenser): This gas travels to the outdoor unit. Here, the compressor (the heart of the system) pressurizes the gas, making it very hot. A large fan blows ambient outdoor air across the condenser coils. The heat radiates from the hot refrigerant into the outside air, and the refrigerant cools back down into a liquid. This liquid then flows back indoors to repeat the cycle.
This entire process hinges on efficient heat transfer. When the condenser coils outside are caked in dirt, pollen, and grass clippings, the unit can't get rid of heat effectively. The compressor has to run longer and work harder, consuming more electricity and generating more wear. Similarly, if the indoor filter is clogged, not enough air can get to the evaporator coil to have its heat removed. This can cause the coil to freeze into a block of ice, shutting down the whole system. A clean, clear pathway for both heat and air is the secret to a happy, efficient, and long-lasting air conditioner.
SAFETY FIRST: READ BEFORE YOU BEGIN
- Breaker OFF: This is not optional. You will be working with water around an electrical appliance. You must turn off the circuit breaker that controls your outdoor AC unit. You should also turn off the power at the outdoor disconnect switch, which is typically in a metal box mounted on the house near the condenser.
- No Panel Work: This guide does not involve opening the main electrical panel of the condenser unit where the capacitors and high-voltage wiring are housed. Leave this to a professional.
Step-by-Step Fix: Your 45-Minute Tune-Up
1. Safety First: Kill the Power (2 locations!) First, set your thermostat's system mode to "Off". Find your home's main electrical panel (usually in a basement, garage, or utility closet). Locate the circuit breaker labeled "AC," "Condenser," or "HVAC." It's often a double-width breaker. Flip it to the full "Off" position. Next, go outside to the condenser unit. Look for a grey metal box on the wall near the unit. Open it and find the switch or pull-out handle. Pull it out or flip the switch to "Off". This double-protection is non-negotiable.
2. Clear Debris from the Condenser Unit Your outdoor unit is a magnet for yard waste. Put on your work gloves. Remove any large sticks, leaves, or encroaching vines from the top and sides of the unit. Use a shop vacuum or your hands to clear away all the dead leaves, grass clippings, and accumulated mulch from the base of the unit. You need at least 2 feet of clear space around the entire unit for it to breathe properly.
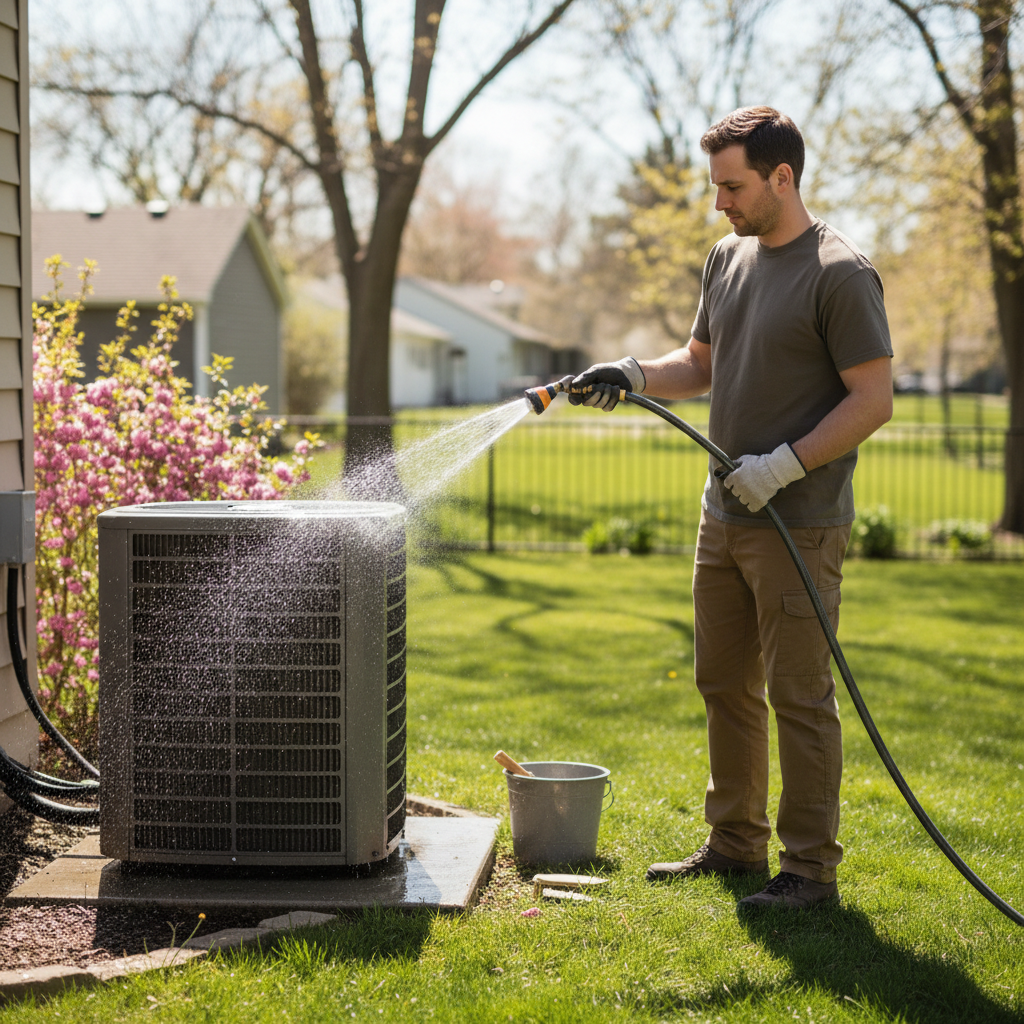
3. Clean the Condenser Fins (Gently!) This is the most important step. DO NOT USE A PRESSURE WASHER. Take your garden hose and attach a spray nozzle. Your goal is a firm, multi-stream spray, not a destructive jet. Most modern units have a protective grille and fan assembly on top. You can often work through the grates, but for a truly thorough cleaning, you may need to remove the top. It's typically held on by a few screws. Be careful: The fan motor is wired to the unit; do not pull on the wires. Gently lift the top and lean it to the side without disconnecting anything.
Now, from the inside of the unit, spray outwards. Start at the top and work your way down, circling the unit. You'll see a disgusting amount of pollen, dust, and grime wash out. Cleaning from the inside-out pushes the debris away from the unit instead of driving it deeper into the fins.
4. Inspect and Straighten Fins You'll notice the condenser is wrapped in thousands of delicate aluminum fins. These can easily get bent by hail, flying debris, or accidental bumps. Bent fins block airflow. Take your fin comb (a cheap, essential tool available online or at home improvement stores). Find the end of the comb that matches the fin spacing on your unit. Gently draw the comb through the bent sections to straighten them. Don't force it; a little patience goes a long way.
5. Check if the Unit is Level Place a level on top of the condenser unit. It should be perfectly level. An unlevel pad can cause the compressor's internal lubricants to shift, leading to excessive wear and premature failure. If it's slightly off-kilter, you can often lift the pad's corner and use pry bar to add or remove gravel to make it level.
6. Replace the Indoor Air Filter This is the single most important maintenance task. Go inside to your furnace or air handler. Locate the filter slot. The old filter will likely have its size printed on the side (e.g., 16x25x1). Slide out the old, dirty filter and slide in a new one, paying close attention to the arrow on the filter's frame, which must point in the direction of airflow (towards the furnace/air handler).
7. Inspect the Condensate Drain Line Find the PVC pipe coming out of your indoor evaporator coil unit (often near the furnace). This line carries away moisture (condensate) that the AC removes from your air. It usually drains outside or into a floor drain. Look for the end of the pipe and ensure it isn't blocked by dirt or debris. To clean it, you can use a wet/dry vac to suction out any gunk from the outdoor end of the pipe. For a more thorough cleaning, find the T-fitting an access port (a capped vertical pipe) near the indoor unit. Pour a solution of one part distilled vinegar to three parts water down the access port to kill any algae or mold growth.
8. Test the System The moment of truth. Go back outside and replace the disconnect handle or flip the switch to "On." Then, go back to the main electrical panel and flip the AC breaker back to the "On" position. Finally, set your thermostat to "Cool" and drop the temperature a few degrees below the current room temperature. The condenser fan outside should spin up, and after a few minutes, you should feel cool (not cold) air coming from your indoor vents. It can take 5-10 minutes for the air to become noticeably cold.
Common Causes
Why does your AC get so dirty in the first place? It's a constant battle with the environment.
- Airborne Pollen and Dust: During spring and summer, the air is thick with particles that the condenser fan happily sucks in.
- Lawn Mowing: Discharging grass clippings towards your AC unit is like force-feeding it debris.
- Cottonwood Trees: The fluffy seeds are notorious for blanketing and clogging condenser fins.
- Overhead Debris: Gutters overflowing with leaves can drop them directly into the top of your unit.
- Lack of Use: Over the winter, moist, protected spaces inside the unit are prime real estate for insects and rodents to build nests.
Cost & Time Breakdown
| Task | Professional Cost | DIY Cost | DIY Time |
|---|---|---|---|
| Spring AC Tune-Up & Inspection | $150 - $220 | $0 | 45-60 minutes |
| Supplies | Included in Pro Fee | $20 - $50 (for tools you keep) | N/A |
| Replacement Air Filter | Often an up-charge | $5 - $25 | 2 minutes |
| TOTAL | ~ $180 | ~ $35 (first time) | ~ 45 Mins |
Common Mistakes
- Using a Pressure Washer: The #1 mistake. It will flatten the fins and destroy your condenser. It's a mistake that can cost you thousands. Use a hose nozzle only.
- Forgetting to Turn Off Power: Extremely dangerous. Always verify the power is off at both the breaker and the disconnect switch.
- Spraying Cleaners and Leaving Them: Some foaming coil cleaners are designed to be "no-rinse," but they work best when rinsed thoroughly. Leaving cleaner residue can sometimes attract more dirt over time.
- Adding Refrigerant: Your AC is a sealed system. If it's low on refrigerant (like Freon or R410a), you have a leak. Adding more without fixing the leak is illegal, bad for the environment, and only a temporary fix. Refrigerant handling requires special certification and equipment and is strictly a job for a professional.
Tips & Prevention
- Landscaping: Keep bushes, trees, and other vegetation trimmed at least 2-3 feet away from your condenser on all sides to ensure good airflow.
- Directional Mowing: When mowing your lawn, direct the clippings away from the AC unit.
- Regular Filter Changes: During peak summer usage, check your indoor filter monthly. A clean filter is the cheapest insurance you can buy for your HVAC system.
- The Cover Debate: Avoid using thick, waterproof plastic covers in the winter. They trap moisture and can lead to rust and corrosion. If you feel the need to cover your unit, use a breathable cover that only protects the top from falling debris.
When to Call a Professional
This DIY guide covers the essential cleaning and maintenance. However, there are times when you absolutely must call a licensed HVAC technician.
- Your AC Won't Turn On: If you've done the cleaning and reset the breakers and it's still dead, you likely have an electrical problem (like a failed capacitor) or a seized motor.
- The System Blows Warm Air: After cleaning the coils and changing the filter, if the air coming from your vents isn't getting cold, you could be low on refrigerant, which indicates a leak. Poking around refrigerant lines is dangerous and requires a pro.
- Loud or Strange Noises: Grinding, squealing, or loud buzzing/clanking that you didn't hear before are signs of imminent mechanical failure. Shut the system down and call for service.
- Ice on the Coils: If you see ice forming on the refrigerant lines or on the indoor evaporator coil, it's a sign of either a critical airflow problem or a low refrigerant charge. Turn it off to thaw and call a pro.
Frequently asked questions
Can I use a pressure washer on my AC unit?+
Absolutely not. The high pressure will bend the delicate aluminum fins and obstruct airflow, which can restrict airflow and ruin the unit. Always use a gentle spray from a standard garden hose.
Do I really need to turn the power off at the breaker?+
Yes, always. The outdoor disconnect switch only turns off power to the unit, but the main breaker ensures no electricity is flowing to the disconnect box itself. This two-step process is crucial for preventing electrical shock.
My AC still isn't cooling after cleaning it. What's next?+
If you've performed all the cleaning steps, replaced the filter, and your AC still isn't blowing cold air, it likely indicates a more serious problem like a refrigerant leak, a bad capacitor, or a compressor issue. This is the time to call a professional HVAC technician.
How often should I perform this tune-up?+
This full checklist should be performed every spring before you start using your AC for the season. The indoor air filter, however, should be checked monthly and replaced every 1-3 months, depending on your home's air quality and pets.


Discussion
Loading comments…