Tools & materials you'll need
Affiliate links- AmazonInfrared Thermometer1 · Crucial for getting accurate air temperature readings from vents.
- AmazonPermanent Marker1 · For marking 'Summer' and 'Winter' positions on the ducts.
- AmazonFlashlight or Headlamp1 · Essential for working in dark basements, attics, or crawlspaces.
- AmazonWork Gloves1 · To protect your hands from sharp metal edges on the ducts.
- AmazonSafety Glasses1 · To protect your eyes from dust and debris.
- AmazonStep Ladder1 · May be needed to reach dampers on high ceilings.
No materials required.
As an Amazon Associate FixlyGuide earns from qualifying purchases — at no extra cost to you. Prices and availability are accurate as of publication and subject to change.
Quick Answer
Your upstairs rooms are hotter because heat rises and your HVAC system is likely not balanced correctly. Air, like water, follows the path of least resistance, meaning the ducts leading to the downstairs get more cool air. To fix this, you need to adjust your HVAC duct dampers. Partially close the dampers for the downstairs zones in your basement or crawlspace, which will force more conditioned air to the underserved second floor. This process is called balancing your HVAC system.
The Problem
You feel it every summer. The thermostat downstairs reads a comfortable 72°F, but your upstairs bedroom feels like a sauna, easily hitting 80°F or higher. This temperature difference isn't just uncomfortable; it's a sign of an inefficient HVAC system. Your air conditioner is running constantly, trying to cool a second floor that never seems to get enough relief, while your first floor becomes an icebox. This wastes energy, drives up your electricity bills, and puts extra strain on your expensive HVAC equipment.
The core of the issue is uneven airflow. Your HVAC's blower motor pushes conditioned air through a network of ducts to every room in your house. However, factors like duct length, bends, and the simple physics of heat rising create a situation where the downstairs gets more than its fair share of the cool air, leaving the upstairs starved.
How It Works
Think of your ductwork as a system of highways for air. Without any traffic control, the majority of the air will take the shortest and straightest path. Ducts leading to your first-floor registers are often shorter and have fewer bends than those running all the way to the second floor. This creates a low-pressure path, and the bulk of the cool air naturally flows there.
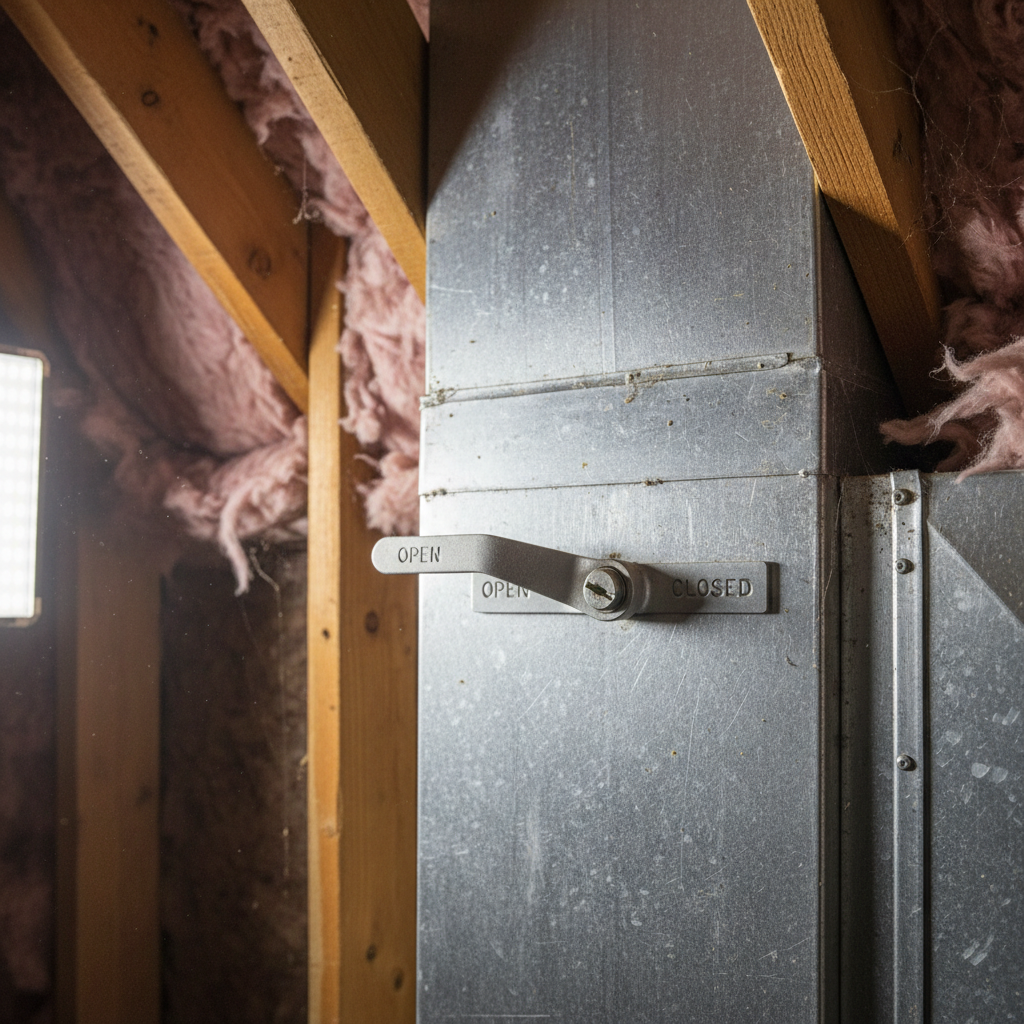
This is where duct dampers come in. A damper is essentially a valve inside your ductwork. It's a metal plate that can be swiveled to either allow full airflow or restrict it. By slightly closing the dampers on the ducts that feed the first floor, you create more resistance. This doesn't block the air entirely but instead redirects a larger volume of that precious, cooled air to the paths of higher resistance—the long duct runs that lead to your hot upstairs rooms.
This process, known as 'balancing,' is crucial for a comfortable home. An HVAC system isn't just about producing cold air; it's about distributing it where it's needed most. Proper balancing ensures every room gets the right amount of airflow, leading to consistent temperatures throughout the house.
Step-by-Step Fix
SAFETY FIRST: This job doesn't require shutting off the main power to your HVAC system, as you are only accessing the ducts. However, you will be in a basement, crawlspace, or attic, so wear appropriate personal protective equipment (PPE). This includes safety glasses to protect from dust and debris, work gloves, and a dust mask. Have a reliable flashlight or headlamp.
Step 1: Gather Your Tools (5 minutes) Assemble your supplies. You'll need a way to measure temperature, a way to mark the dampers, and a tool to adjust them. A non-contact infrared thermometer is ideal for getting quick and accurate room and vent temperatures.
Step 2: Turn on Your HVAC System (2 minutes) Set your thermostat to 'Cool' and turn the fan to 'On' instead of 'Auto'. This ensures the blower is running continuously, giving you a constant stream of air to test as you make adjustments. Set the temperature low enough that the AC will run for the entire duration of this process.
Step 3: Baseline Temperature Readings (15 minutes) Go through your house and measure the current air temperature in each room. Note these down. Then, use your infrared thermometer to measure the temperature of the air coming directly out of each supply vent. You will likely see a significant difference between the upstairs and downstairs readings.
Step 4: Locate Your Dampers (15-30 minutes) Head to your basement, crawlspace, or attic where your main HVAC trunk lines are visible. Look for the large metal ducts that branch off from the main plenum (the big box your furnace/air handler connects to). Right where these smaller, round (or sometimes rectangular) ducts begin, you should see a small metal lever or handle on the outside of the duct. This is the damper handle. If you don't see one, it might be a sign your system doesn't have manual dampers, or they could be automated (a more complex system).
Step 5: Identify the Ducts (15 minutes) This is the trickiest part. You need to figure out which duct leads to which room. You can try to follow the ducts visually, but a more reliable method is to have a partner stand in a specific room while you tap on a duct near the furnace. They can tell you if they hear the tapping in their location. Do this for all the first-floor vents you plan to adjust.
Step 6: Mark the Damper Positions (10 minutes) Before you make any adjustments, use your permanent marker to draw a line on the duct indicating the current position of the damper handle. This is your baseline. The handle's orientation usually tells you the position of the plate inside: parallel to the duct means fully open, and perpendicular means fully closed. Mark the 'Open' and 'Closed' positions for reference.
Step 7: Adjust the First-Floor Dampers (15 minutes) Start with the ducts that you've identified as feeding the first floor. Do NOT close them completely. A fully closed damper can create too much back-pressure, which can be noisy and strain your blower motor. Turn the damper handle about 25-30% of the way towards the 'Closed' position. Think of it as moving from the 12 o'clock (fully open) position to the 2 or 3 o'clock position.
Step 8: Adjust the Second-Floor Dampers (5 minutes) Go to the dampers for the ducts leading to the second floor. Ensure these are all in the fully open position. You want maximum airflow going to the upstairs rooms.
Step 9: Wait and Re-Measure (30-60 minutes) Air balancing is not instantaneous. Your system needs time to stabilize with the new settings. Let the AC run for at least 30 minutes, then go back and take new temperature readings in all the rooms and at the vents. Your goal is to see the temperature gap between the first and second floors narrowing.
Step 10: Fine-Tune the Adjustments (30+ minutes) Did the temperature change enough? If your upstairs is still too warm, you may need to go back and close the downstairs dampers a little more—perhaps to 40% or 50% closed. If the downstairs is now getting too warm, you've gone too far and need to open its dampers slightly. This is a process of trial and error. Make small adjustments and wait 30 minutes between each one. It might take a few hours or even a day to get it just right.
Step 11: Mark the Final 'Summer' Position (5 minutes) Once you've found the sweet spot, use your permanent marker to label the new handle position as 'Summer'. This will save you from having to repeat the entire process next year.
Step 12: Remember to Change it Back in Winter! (5 minutes) In the winter, the problem reverses—heat rises, so your upstairs will be toasty while your downstairs is chilly. You'll want to reverse the damper settings. Open all the dampers fully again, and then slightly close the dampers to the second-floor ducts to force more warm air downstairs. Mark this new position as 'Winter'.
Common Causes
- The Stack Effect: This is the natural tendency of warm air to rise and cool air to sink. In summer, all the heat from sunlight on the roof and ambient heat in the house naturally collects on the second floor.
- Long, Complex Duct Runs: The ducts leading to the second floor are longer and often have more bends to navigate around the house's structure. Each bend adds resistance, reducing the airflow that reaches the registers.
- Poor Insulation: An under-insulated attic is a massive source of heat gain in the summer. The sun beats down on your roof, and that heat radiates directly into your second-floor rooms.
- Leaky Ducts: If the duct runs in your attic or walls have gaps or leaks, a significant portion of the expensive, cool air is lost before it ever reaches the intended room.
- Undersized or Oversized HVAC System: An improperly sized AC unit will struggle to cool the entire house effectively, leading to major temperature imbalances.
Common Mistakes
- Closing Dampers Completely: Never fully close a damper. This can create excessive air pressure in the duct, leading to whistling noises, potential damage to the duct seals, and added strain on your HVAC blower motor.
- Forgetting to Mark Positions: You will forget the perfect setting by next season. Mark the 'Summer' and 'Winter' positions clearly to save yourself a headache.
- Adjusting the Wrong Dampers: Make sure you've correctly identified which ducts go where before you start making adjustments. Closing off the upstairs dampers in the summer will only make the problem worse.
- Expecting Instant Results: Be patient. It takes time for the house's temperature to stabilize after you adjust the airflow.
- Ignoring Other Issues: Dampers are a great fix, but they can't solve everything. If your attic insulation is poor or your ducts are very leaky, balancing will only be a partial solution.
Cost & Time Breakdown
This is primarily a DIY project with minimal cost. The main investment is your time.
| Item / Task | Quantity | Estimated Cost (DIY) | Estimated Cost (Pro) | Notes |
|---|---|---|---|---|
| Materials | ||||
| Permanent Marker | 1 | $1 | N/A | For marking damper positions. |
| Duct Tape (optional) | 1 roll | $10 | N/A | For labeling or temporarily holding a loose handle. |
| Tools | ||||
| Infrared Thermometer | 1 | $20 - $40 | N/A | Highly recommended for accurate temperature readings. |
| Flashlight/Headlamp | 1 | $10 - $30 | N/A | Essential for dark basements or crawlspaces. |
| Labor | ||||
| Professional HVAC Balancing | N/A | $0 | $300 - $700 | A pro will use specialized hoods to measure exact airflow (CFM). |
| Time | ||||
| DIY Balancing | 2-4 hours | N/A | N/A | Includes locating, adjusting, and fine-tuning. |
| TOTAL | $31 - $81 | $300 - $700 |
Tips & Prevention
- Seasonal Adjustment: Make damper adjustment a part of your bi-annual home maintenance routine. Switch them in the spring when you turn on the AC and in the fall when you turn on the heat.
- Check Insulation: Go into your attic. If you can see the tops of your ceiling joists, you almost certainly need more insulation. The Department of Energy recommends 12-15 inches of fiberglass or cellulose insulation in most climates.
- Seal Air Leaks: Use canned spray foam or caulk to seal any air leaks around windows, doors, and penetrations for wires and pipes, especially on the top floor.
- Use Your Fans: A ceiling fan set to rotate counter-clockwise in the summer can make a room feel 4-6 degrees cooler by creating a wind-chill effect. This helps circulate the cool air that is making it upstairs.
- Check Return Air Vents: The return vents are what pull stale, warm air out of the room to be re-conditioned. Make sure they are not blocked by furniture or rugs. An undersized or blocked return air system on the second floor is a common culprit.
When to Call a Professional
While damper adjustment is a great DIY fix, there are times when you need an expert.
PRO CALLOUT: If you've tried balancing your dampers and still have a significant temperature difference (more than 4-5 degrees), or if your system exhibits any of the following symptoms, it's time to call a certified HVAC technician:
- You cannot find any damper handles on your ductwork.
- You suspect your ducts are severely leaky (e.g., you notice dust streaks near duct joints or some rooms have almost no airflow at all).
- Your AC unit is short-cycling (turning on and off frequently) or running constantly without ever reaching the set temperature.
- The airflow from your vents feels weak everywhere in the house, even with all dampers fully open.
An HVAC professional can perform a full system diagnostic. They use tools like an airflow hood to measure the exact cubic feet per minute (CFM) from each vent and can perform a duct blaster test to pinpoint and quantify any leaks. They can determine if your problem is simple balancing or a more serious issue like an improperly sized system or a failing blower motor.
Frequently asked questions
What if a damper handle is stuck or won't move?+
Sometimes, older dampers can get stuck due to dust or corrosion. First, try gently wiggling it back and forth. If it still won't budge, spray a small amount of a penetrating lubricant like WD-40 where the handle enters the duct. Let it sit for 10-15 minutes and then try again. Be gentle to avoid breaking the handle mechanism. If it's completely seized, you may need a professional to replace the damper section.
I don't have any handles on my ducts. What does that mean?+
If you don't see any manual damper levers, you might have one of a few situations. 1) Your system was installed without them, which was common in older or budget installations. 2) You have an automated zoning system, which uses motorized dampers controlled by your thermostat or a separate control panel. 3) The dampers are inside the boot of the register, accessible only by removing the vent cover. If you can't find any, you won't be able to perform this specific fix, and getting even airflow may require a professional to install dampers or explore other solutions.
Is it okay to close a register vent instead of a damper?+
While it might seem like the same thing, it's not ideal. Closing a register creates high pressure right at the end of the line, which can result in a high-pitched whistling sound. It's also less efficient. A damper adjustment controls the flow further back in the system, redirecting the air more effectively to other branches. If you don't have dampers, partially closing registers can be a temporary solution, but it's not the correct way to balance a system.
Will balancing my dampers fix my high energy bills?+
It can certainly help. When your upstairs is too hot, your AC unit runs longer to try and satisfy the thermostat, even if the downstairs is already cold. By balancing the airflow, the entire house cools more evenly, allowing the system to reach the set temperature more quickly and shut off. This reduces overall runtime, which directly translates to lower energy consumption. However, for major savings, you should also look into insulation, air sealing, and regular HVAC maintenance.


Discussion
Loading comments…