
Tools & materials you'll need
Affiliate links- AmazonDrop cloths/plastic sheeting1–2 rolls
- AmazonPainter's tape1 roll
- AmazonTSP (trisodium phosphate) substitute cleaner1 bottle
- AmazonSponge/rags2–3
- AmazonSpackling compound/joint compound1 quart
- AmazonSanding sponge/fine-grit sandpaper (180-220 grit)1-2 sheets or sponges
- AmazonPrimer (appropriate for your walls)1 Gallon
As an Amazon Associate FixlyGuide earns from qualifying purchases — at no extra cost to you. Prices and availability are accurate as of publication and subject to change.
How it works
A durable, professional-quality paint job is not a product of the paint alone—it's the result of a physical and chemical bond between the paint, the primer, and the wall surface (substrate). Understanding this relationship is key to avoiding failure. Paint adheres in two primary ways: mechanically and chemically.
Mechanical adhesion is the process of paint physically gripping a surface. Imagine a microscopic landscape of peaks and valleys; the liquid paint flows into these low points and, as it cures, locks itself into place. A glossy, non-porous surface is like a sheet of glass, offering no texture for the paint to grab. This is why sanding is not optional—it creates the necessary microscopic texture, or "tooth," for the paint film to anchor itself securely.
Chemical adhesion involves molecular bonding between the paint's polymer binders (like acrylics or alkyds) and the substrate. This process is easily disrupted. Contaminants such as dust, oils from hands, cooking grease, or soap scum form an invisible barrier on the wall. The paint sticks to this contaminant layer, not the wall itself. When that layer shifts, degrades, or loses its own weak adhesion, it takes the new paint with it, causing peeling and flaking. Primer acts as a dedicated intermediary, formulated to maximize both mechanical and chemical adhesion to the wall while presenting an ideal, uniform surface for the topcoat.
Step-by-Step Fix
Follow these steps methodically to create a wall surface that guarantees a flawless, long-lasting paint finish. Rushing or skipping any step is the primary cause of disappointing results.
-
Clear the Room and Protect Surfaces — Remove all furniture from the room if possible. Group remaining large items in the center of the room and cover them completely with plastic sheeting. Use canvas or rosin paper drop cloths to cover the entire floor, as plastic can be slippery. Apply painter's tape along the top edge of baseboards, window trim, and door casings.
- Tools: Drop cloths (canvas preferred), plastic sheeting, painter's tape (like FrogTape or 3M Blue).
- Pro Tip: Press the edge of the painter's tape down with a flexible putty knife to create a tight seal and prevent paint from bleeding underneath.
-
Inspect the Walls Thoroughly — With the walls bare, perform a detailed inspection. Hold a bright work light at a low angle to the wall surface; this grazing light will reveal every imperfection, divot, crack, and subtle texture issue that is invisible under normal ambient light. Mark any problem areas lightly with a pencil.
- Look For: Nail pops, stress cracks (especially near corners of doors and windows), holes from picture hangers, peeling paint, and any signs of water stains or mildew.
-
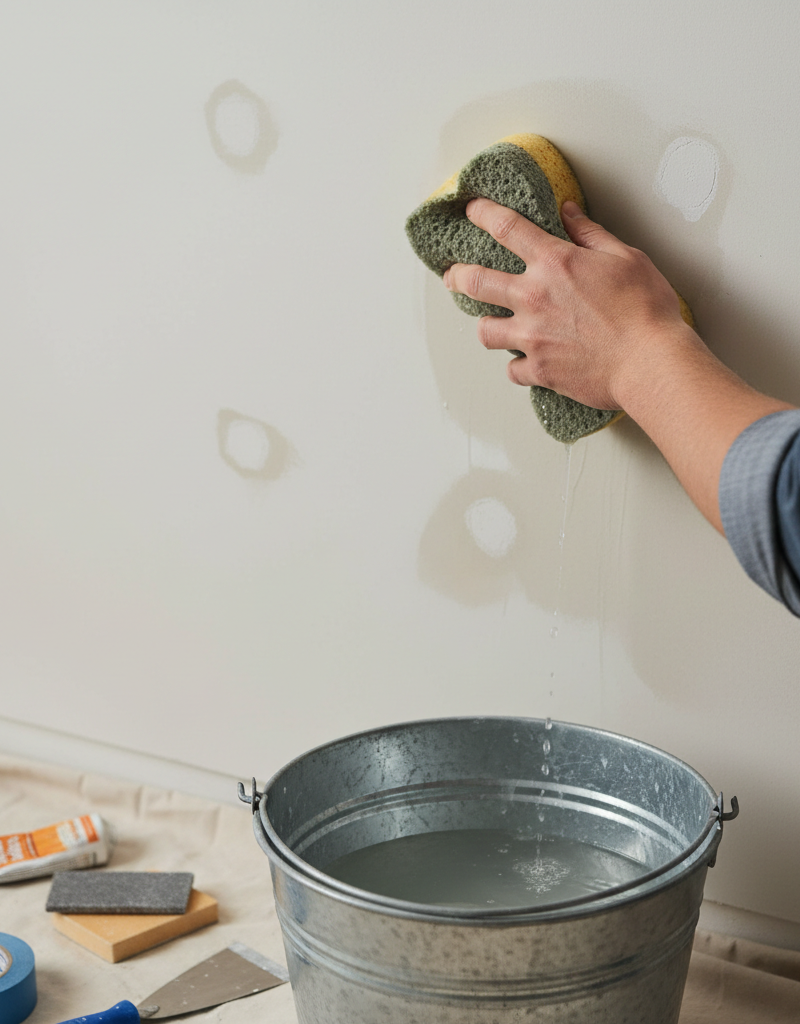
Clean the Walls from Bottom to Top — Contaminants are the number one cause of paint adhesion failure. For kitchens, bathrooms, or walls with visible grime, use a solution of Trisodium Phosphate (TSP) or a TSP substitute, following the package directions. For general dust and light dirt, a bucket of warm water with a few drops of dish soap is sufficient.
- Technique: Use two buckets: one for the cleaning solution and one with clean rinse water. With a large sponge, wash the wall starting from the bottom and working your way up. This prevents clean areas from being streaked by dirty runoff. Rinse with the clean water and a separate sponge, then allow the walls to dry completely, typically for 2 to 4 hours.
-
Scrape All Loose and Peeling Paint — Use a 5-in-1 tool or a flexible 2-inch putty knife to carefully scrape off any paint that is flaking, chipping, or bubbling. The goal is to remove anything not firmly attached to the wall. Be gentle but firm, working until you reach a solid edge.
- Safety: If your home was built before 1978, the old paint may contain lead. Do not scrape or sand without testing for lead first. If lead is present, hire an EPA-certified professional.
- Technique: After scraping, use the edge of your tool to "feather" the transition between the remaining paint and the bare wall, creating a smoother slope rather than a hard edge.
-
Fill Nail Holes and Minor Dings — For small imperfections like nail holes or dents smaller than 1/8 inch deep, use a lightweight spackling compound. Apply it with a flexible putty knife, pressing the compound into the hole and then swiping smooth. Overfill the hole slightly, as spackle can shrink as it dries.
- Tools: Flexible 1.5-inch putty knife, lightweight spackling compound (e.g., DAP Fast 'N Final or 3M High Strength Small Hole Repair).
-
Repair Larger Holes and Cracks — For holes up to 4-6 inches, a self-adhesive mesh patch is the most reliable solution. For hairline stress cracks, use a 5-in-1 tool to gently gouge the crack into a V-shape, then fill it with a flexible, paintable elastomeric patching compound or caulk, which can move with the wall and prevent the crack from returning.
- For Mesh Patches: Center the patch over the hole. Using a 6-inch drywall knife, apply a thin, tight coat of all-purpose joint compound over the mesh, pressing firmly to push the compound through the holes. Let it dry completely. Apply a second, wider coat, feathering the edges. A third, even wider coat may be needed for a perfectly flat repair.
-
Sand All Patches Until Smooth — Once the joint compound or spackle is completely cured (allow at least 24 hours for joint compound), sand the repairs. Use a sanding block or sanding sponge with 150-grit sandpaper. Sand with a light, circular motion until the patch is perfectly flush with the surrounding wall.
- The Feel Test: Close your eyes and run your hand over the repair. You should not be able to feel any ridge, edge, or change in texture between the patch and the original wall. If you can, it will be visible after painting. Apply another thin coat of compound and repeat the process.
-
Scuff-Sand All Wall Surfaces — Do not skip this step, especially if the existing finish has any sheen (satin, semi-gloss, or gloss). Using a pole sander with 120-grit sandpaper, lightly sand every square foot of the walls you plan to paint. The goal is not to remove the old paint, but to "de-gloss" the surface and create that microscopic profile for mechanical adhesion.
- Time Saver: A pole sander allows you to sand an entire wall from floor to ceiling in minutes. It is a worthwhile investment for any painting project.
-
Remove All Sanding Dust — Sanding creates a fine layer of dust that acts as a bond-breaker. First, use a shop vacuum with a soft brush attachment to remove the bulk of the dust. Follow up by wiping down the entire wall surface with a tack cloth or a damp microfiber cloth. The wall must be completely clean and dust-free before priming.
-
Apply a Problem-Specific Primer — Primer is not generic; choose one that solves a specific problem. Apply one even coat with a roller and brush, and allow it to dry completely according to the manufacturer's specified recoat time (usually 2-4 hours).
- New Drywall/Patches: Use a PVA (polyvinyl acetate) drywall primer to seal the porous surface and prevent the topcoat from looking blotchy ("flashing").
- Stains: For water stains, ink, or smoke damage, use a shellac-based primer like Zinsser B-I-N. It is the only type that will permanently block severe bleed-through. For minor stains, an oil-based primer like Kilz Original will work.
- Glossy Surfaces/Color Change: For painting over glossy surfaces or making a drastic color change (e.g., dark red to off-white), use a high-adhesion stain-blocking latex primer like Zinsser Bulls Eye 1-2-3.
Common mistakes
-
Believing "Clean-Looking" Is Clean: Walls, especially in kitchens and bathrooms, accumulate a thin, invisible film of grease, hairspray, or soap scum. Painting over this film means the paint is adhering to grime, not the wall, guaranteeing peeling. Instead: Always wash walls with a TSP substitute and rinse thoroughly as a non-negotiable first step.
-
Skipping the Scuff-Sand on Sheen Finishes: Many DIYers assume that "paint-and-primer-in-one" products eliminate the need for sanding. These products have higher-quality binders but cannot defy physics; they will not reliably bond to a glossy, slick surface without a mechanical profile to grip. Instead: Always perform a quick scuff-sand with 120-grit paper on any surface with an eggshell, satin, or semi-gloss finish to ensure proper adhesion.
-
Using the Wrong Filler for the Job: Applying lightweight spackle to a deep hole or a flexing crack is a common error. Spackle is brittle, shrinks excessively in deep applications, and has no flexibility, so the crack or depression will reappear. Instead: Use mesh-reinforced joint compound for holes larger than a half-inch, and a flexible elastomeric patch or paintable caulk for stress cracks.
-
Painting Over Sanding Dust: After diligently sanding patches, it's tempting to immediately prime and paint. This encapsulates a layer of fine dust between the primer and the wall, creating a gritty texture and a weak bond that can be scraped off with a fingernail. Instead: After sanding, vacuum the walls with a brush attachment and then wipe them down with a tack cloth or a damp microfiber rag to remove every trace of dust.
-
Ignoring Primer's Specific Purpose: Using a standard latex primer over a persistent water stain or skipping it entirely on new drywall patches. The stain will bleed through the latex primer within weeks, and new drywall will absorb paint unevenly, causing blotchy, inconsistent sheen (flashing). Instead: Match the primer to the problem. Use a shellac-based primer for tough stains and a PVA primer/sealer for new drywall.
Cost & time breakdown
This estimate is for a standard 12 ft. x 12 ft. room with 8 ft. ceilings, requiring minor to moderate patching. Prices for professional services can vary significantly based on region and the complexity of the job.
| Task | DIY cost | Pro cost | Time |
|---|---|---|---|
| Wall Cleaning & Surface Protection | $25 - $45 (TSP, sponges, tape, drop cloths) | $150 - $300 | 2 - 4 hours |
| Patching & Repair | $30 - $60 (compound, knives, mesh, sandpaper) | $200 - $450 | 3 - 6 hours (active), 24h dry time |
| Priming (1 Coat) | $30 - $55 (1 gallon primer, roller, brush) | $150 - $250 | 2 - 3 hours (active), 4h dry time |
| Complete Prep (All Steps Above) | $85 - $160 | $500 - $1,000+ | 2 - 3 days (including drying) |
When to call a pro
While most wall preparation is within a dedicated DIYer's reach, certain situations warrant calling a professional painting or drywall contractor to avoid safety risks and subpar results.
Contact a professional if you encounter:
- Pre-1978 Construction: If your home was built before 1978, the existing paint layers may contain lead. The dust from sanding or scraping lead paint is highly toxic. Professionals are required to be EPA Lead-Safe Certified (RRP) to handle this material safely. Do not risk contaminating your home and exposing your family.
- Significant Drywall Damage: This includes large holes (greater than 6 inches in diameter), extensive water damage that has caused the drywall to become soft or crumble, or numerous, widespread stress cracks that may indicate underlying structural movement. A drywall professional can replace sections, re-tape seams, and achieve a Level 5 finish that is nearly impossible for a novice.
- Widespread Mold or Mildew: If cleaning reveals dark, splotchy mold covering a significant area (more than a few square feet), you need a mold remediation specialist. A painter will only paint over the problem. A specialist will identify and fix the moisture source and safely remove all contaminated material.
- Need for a Full Skim Coat: If walls are covered in heavy texture or have countless imperfections, a full skim coat (a thin layer of joint compound applied over the entire surface) is needed for a smooth finish. This is a difficult skill that takes professionals years to master.
Prevention & maintenance
A perfectly prepped paint job deserves to be protected. Follow these habits to extend the life and beauty of your walls.
- Install and Use Exhaust Fans: In bathrooms and kitchens, always run the ventilation fan during and for 15-20 minutes after showers or heavy cooking. This removes damaging moisture and grease from the air before it has a chance to settle on and degrade the paint film.
- Choose the Right Sheen for the Room: Use durable, washable finishes like satin or eggshell in high-traffic areas, hallways, and kids' rooms. Reserve flat or matte finishes for low-impact areas like formal living rooms and master bedrooms, as they are less resistant to scuffs and cleaning.
- Clean Spills and Scuffs Promptly: Address marks as soon as you see them. Use a soft sponge or microfiber cloth with a simple solution of water and mild dish soap. Avoid abrasive cleaners or scrub pads, which can burnish the paint and create a shiny spot.
- Perform Annual Inspections and Touch-Ups: Once a year, walk through your home and look for any new dings, scratches, or chips. Use a small artist's brush to apply touch-up paint (saved from the original job) to these spots to prevent them from growing larger.
- Address Moisture Intrusion Immediately: If a stain appears on a ceiling or wall, it's a sign of a leak. Do not simply prime and paint over it. Find and repair the source of the water—whether a roof leak, plumbing issue, or window sealing failure—before making any cosmetic repairs.
Related Articles
Keep troubleshooting with these hand-picked guides from FixlyGuide:
- The Chemical Reason Your Peel-and-Stick Tile Is an Epic Fail — Discover the surprising scientific reason—poor surface preparation and adhesive chemistry—why your peel-and-stick backsplash is peeling awa…
- The 4-Inch Drywall Hole Fix: Why Spackle Alone Always Fails — Learn the right way to patch a small drywall hole (up to 4 inches) to ensure a strong, invisible repair that spackle alone can't achieve.
- Your Floating Shelves Failed? 3 Hidden Drywall Mistakes. — Learn how to safely and securely install floating shelves into drywall using the right anchors and tools, avoiding common mistakes.
- Your Floating Shelves Sag? The 3 Drywall Mistakes You're Making — Learn how to install floating shelves into drywall securely and prevent common issues like wobbling or damage with the right tools and tech…
- That New Grout Is Already Cracking? Here’s the Hidden Cause — Cracked grout weeks after a renovation is often a sign of a deeper issue with your subfloor or tile installation, not just a problem with t…
- That Peeling Paint? Your Bathroom Has a Moisture Secret — Discover the hidden causes behind your peeling bathroom ceiling paint. We reveal why moisture is the main culprit and provide a permanent f…
Get the print-ready PDF of this guide
A clean, ad-free, printable version you can keep on your phone or pin to the workshop wall. Free with a FixlyGuide account.
- Print-optimized layout
- Tools, materials & every step included
- Saved to your account
Recommended for DIYers & woodworkers
Sponsored
The Top 20 Tools for Workshops of Any Budget
No stationary machines or power tools required — plus 3 fundamental tools that can't be bought at any price.
Get the free guide
Ted's Woodworking — The #1 Woodworking Resource
Detailed instructions, dimensioned drawings, materials & cutting lists, and 3D schematics for every skill level.
See the plansSponsored: links above are affiliate links. FixlyGuide may earn a commission on qualifying purchases — at no extra cost to you.
Frequently asked questions
How long should joint compound or spackle dry before sanding?+
Most joint compounds or spackles require at least 24 hours to dry completely, depending on humidity and thickness. Always check the manufacturer's recommendations, but waiting a full day ensures the material is hard enough for proper sanding without crumbling.
Do I really need to wash walls before painting?+
Yes, absolutely. Walls accumulate dust, grime, grease, and other contaminants that are invisible to the naked eye. Painting over these will prevent proper adhesion, leading to peeling or an uneven finish. A simple wash with a degreasing cleaner is essential.
What kind of primer should I use?+
The type of primer depends on your wall's condition and the paint you're using. Use a stain-blocking primer for water stains or crayon marks. For new drywall or patching, a drywall primer/sealer is ideal. If you're switching from a dark color to a light one, a tinted primer can help. Always match your primer to your topcoat (e.g., latex primer for latex paint).


Discussion
Loading comments…