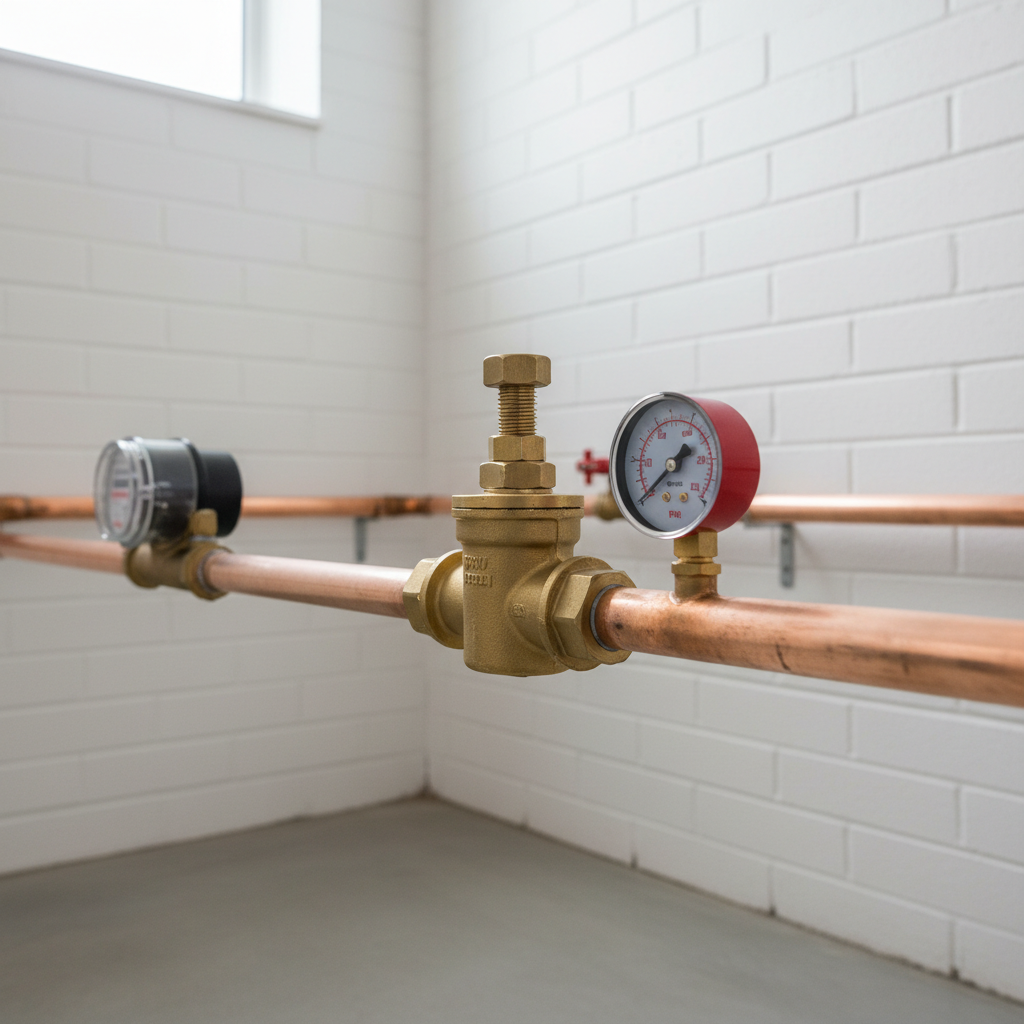
- Periodic Pressure Checks: Invest in a water pressure gauge and periodically (every 6-12 months) check your home's static water pressure. This can help you catch a failing PRV before it becomes a major inconvenience.
- Know Your Main Shut-Off: Ensure everyone in your household knows the location of the main water shut-off valve and how to operate it. This is crucial in emergencies or when performing any plumbing work.
- Inspect Your PRV Annually: Briefly visually inspect your PRV for any signs of leaks, corrosion, or unusual noises. While most PRVs are low-maintenance, a quick check can sometimes identify early issues.
- Consider Whole-House Water Filter Maintenance: If you have a whole-house water filter, ensure you change the filter cartridge regularly according to the manufacturer's recommendations. A clogged filter can severely restrict water flow.
- Look for Slow Leaks: Periodically check your water meter when no water is being used in the house. If the meter is still spinning, you likely have a hidden leak which can affect pressure and waste water.
Plumbing · Low water pressure
| Project category | Plumbing |
|---|---|
| Problem type | Low water pressure |
| Trade required | Plumbing |
| Urgency | Soon — within weeks |
| Safety risk | Low safety risk |
| DIY suitability | DIY friendly |
| Cost category | Low cost |
| Typical timeline | DIY checks in under an hour; PRV replacement a half day |
| Contractor type | Licensed plumber |
Repair option
Clean aerators, then test static pressure before replacing the PRV.
Replacement option
Repipe when scaling in galvanized lines is the cause.
Common causes
- Clogged aerators or fixture screens
- Failing pressure-reducing valve
- Partially closed main shutoff
- Galvanized pipe scaling in older homes
Relevant tools:diy difficulty
Published July 20, 2026Last updated August 17, 2026
Tools & materials you'll need
Affiliate linksAs an Amazon Associate FixlyGuide earns from qualifying purchases — at no extra cost to you. Prices and availability are accurate as of publication and subject to change.
Quick Answer
The most common cause of sudden, whole-house low water pressure is a failing pressure-reducing valve (PRV). This valve, typically located near your main water shut-off, regulates the incoming municipal water pressure to a safe level for your home's plumbing. Over time, its internal components can degrade, restricting water flow and causing a noticeable drop in pressure at all fixtures.
The Problem
Imagine stepping into the shower, expecting a revitalizing rush, only to be met with a disappointing trickle. Or trying to run the dishwasher while someone takes a bath, and both appliances barely function. Low water pressure throughout the entire house isn't just an inconvenience; it can impact everything from basic hygiene to the efficiency and lifespan of your appliances. When the problem affects every tap, toilet, and showerhead, it points to an issue with the main water supply entering your home, rather than an isolated fixture problem. While a burst pipe or a city-wide issue can be culprits, a more insidious and common problem lurks in many homes: a malfunctioning pressure-reducing valve, or PRV.
Often, homeowners immediately suspect the municipal water supply, a major leak, or clogged aerators. While these can certainly contribute to localized pressure drops, if the problem is consistent across all fixtures simultaneously, the PRV is a prime suspect. This article will guide you through diagnosing a faulty PRV and, if it's the culprit, precisely how to either adjust or replace it, restoring your home's water pressure to its former glory. We'll also cover other less common but significant causes of pervasive low water pressure, ensuring you have a comprehensive understanding of the issue.
How It Works
To understand why your water pressure might be low, it's crucial to grasp how water enters and is distributed throughout your home. Municipal water supplies often deliver water at very high pressures, sometimes between 80 to 100 pounds per square inch (psi) or even higher. While this high pressure is effective for main distribution lines, it's far too intense for residential plumbing systems. Most home plumbing, including pipes, fixtures, and appliances, is designed to operate safely and efficiently within a pressure range of 40 to 60 psi. Pressures above 80 psi can cause significant damage, leading to burst pipes, dripping faucets, continuously running toilets, and premature failure of water heaters and other water-using appliances.
The unsung hero preventing this damage is the pressure-reducing valve (PRV). Invented in the early 20th century, the PRV is a spring-loaded diaphragm valve installed on the main water line, typically after the water meter and main shut-off valve, where the municipal water supply enters your house. Its job is to sense the incoming high pressure and automatically throttle it down to a predetermined, safe level for your home. Inside the valve, a diaphragm responds to pressure changes. When the incoming pressure is too high, the diaphragm pushes against a spring, which in turn closes a gate or restricts an opening, reducing the flow and thus the pressure downstream. Conversely, if the downstream pressure drops, the diaphragm allows more water to pass through, maintaining the desired pressure. Over time, the internal components of the PRV – the diaphragm, spring, and O-rings – can wear out, corrode, or get fouled by sediment. This wear and tear can cause the valve to stick, either partially open or partially closed, resulting in inconsistent or significantly reduced water pressure throughout your entire home.
Step-by-Step Fix
1. Test Static Water Pressure – Determine if your PRV is the problem.
- Tools: Water pressure gauge (available at hardware stores for $10-$20).
- Action: Screw the gauge onto an exterior hose spigot or laundry room utility sink faucet (after removing any aerator). Open the spigot fully, ensuring no other water is running in the house. A healthy static pressure should read between 40-60 psi. If it's consistently below 40 psi throughout the house, and your neighbors don’t have a similar issue, your PRV is the most likely culprit.
- If this doesn't work: If your pressure is normal but drops significantly when water is running, you may have a flow issue, not a static pressure problem. This could be due to partially closed shut-off valves or sediment buildup.
2. Check the Main Water Shut-Off Valve – Ensure it's fully open.
- Tools: Pliers or wrench (if valve is stiff).
- Safety: Always know where your main water shut-off is located before starting any plumbing work.
- Action: Locate your main water shut-off valve, typically near the water meter where the main line enters your home. For ball valves (lever handle), ensure it's turned fully parallel to the pipe. For gate valves (round handle), turn it clockwise until it stops, then back counter-clockwise a quarter turn to ensure it's not seized in a slightly closed position.
3. Inspect and Attempt to Adjust the PRV – A temporary fix or diagnostic step.
- Tools: Adjustable wrench, flathead screwdriver, water pressure gauge.
- Action: Locate your PRV, usually a bell-shaped or cylindrical valve with an adjustment screw on top, near your main water meter and shut-off. Loosen the locknut on the adjustment screw (if present). Turn the adjustment screw clockwise using a flathead screwdriver to increase pressure, or counter-clockwise to decrease it. Make small adjustments (quarter turns) and recheck the pressure with your gauge. Note that a failing PRV might not respond to adjustments, or the adjustment might be temporary.
- If this doesn't work: If the PRV doesn't respond to adjustments or the pressure doesn't stabilize, replacement is likely necessary.
4. Gather Replacement Materials and Prepare Your Work Area – What you'll need for a PRV swap.
- Tools: New PRV (match size and connection type, e.g., 3/4-inch NPT threaded), two adjustable wrenches, pipe dope or PTFE thread seal tape, possibly pipe cutter and copper fittings if converting.
- Safety: Ensure you have enough light, a clear workspace, and towels for inevitable drips.
- Action: Purchase a new PRV that matches the size (common residential sizes are 3/4-inch or 1-inch) and connection type (threaded, sweat, or press-fit) of your existing valve. Measure the current valve or take a photo to show the hardware store. Have all tools and materials within reach.
5. Shut Off Main Water Supply and Drain Lines – Prepare for valve removal.
- Safety: This is critical. Failure to shut off the main water supply will result in significant flooding.
- Action: Turn off the main water shut-off valve for your house completely. Then, open the lowest faucet in your home (e.g., a basement sink or outdoor spigot) and the highest faucet (e.g., an upstairs bathroom sink) to drain the water from the pipes. This relieves pressure and minimizes water spillage when you remove the PRV.
6. Remove the Old PRV – Carefully disconnect the failing valve.
- Tools: Two adjustable wrenches.
- Action: Use two adjustable wrenches. Place one wrench on the body of the existing PRV to hold it steady and prevent twisting the pipe. Use the second wrench to turn the union nut or threaded connection on one side of the PRV counter-clockwise. Once one side is loose, repeat for the other side. Be prepared for some residual water to spill out. Carefully remove the old valve.
7. Install the New PRV – Connect the replacement valve.
- Tools: Adjustable wrenches, pipe dope or PTFE thread seal tape.
- Action: Apply pipe dope or wrap PTFE thread seal tape (3-5 wraps clockwise) around the male threads of the new PRV and the connecting pipe sections. Ensure the flow arrow on the new PRV is pointing in the direction of water flow into your house. Hand-tighten the connections, then use two adjustable wrenches to tighten firmly, but do not overtighten, which can crack fittings. Secure the valve body with one wrench while tightening the connections with the other.
8. Restore Water Supply and Check for Leaks – Bring the system back online.
- Action: Slowly open the main water shut-off valve, listening for water filling the pipes. Once fully open, check all connections around the new PRV for any signs of leaks. Tighten slightly if needed. Turn off any opened faucets in the house. Re-test your water pressure with the gauge if you have one on an outside spigot or laundry tub.
9. Purge Air from the System – Eliminate sputtering faucets.
- Action: With the water fully restored, go to the highest faucet in your house and open both hot and cold water. Let them run until the water flows smoothly, indicating all air has been purged from that line. Repeat this process for all other faucets throughout your house, starting from the highest floors and working your way down. You might hear gurgling or sputtering as air is expelled.
Common Causes
Beyond a failing PRV, several other issues can lead to low water pressure throughout your entire home:
- Main Water Shut-Off Valve (Partially Closed): The most straightforward problem. If the main valve located near your water meter or where the main line enters your house is not fully open, it will restrict the flow of water to your entire home. This can happen accidentally or if someone partially closed it for maintenance and forgot to reopen it fully. Even a slight restriction can significantly impact pressure.
- Water Meter Shut-Off Valve (Utility Side): Similar to your home's main shut-off, the utility company's shut-off valve at the water meter can sometimes be partially closed. This isn't common for homeowners to adjust, but if city workers performed work in the area, it's possible it wasn't fully reopened. If you suspect this, you'll need to contact your water utility.
- Corroded or Sediment-Clogged Pipes: Especially in older homes with galvanized steel pipes, internal corrosion and mineral buildup (scale) can significantly reduce the effective diameter of the pipes. This restricts water flow to all fixtures, leading to pervasive low pressure. This is a gradual process and usually doesn't appear suddenly.
- Shared Water Supply Issues: If you live in an area with a shared well system or a very old, undersized municipal main, the overall supply might simply be inadequate to meet peak demand in the neighborhood. This typically results in low pressure at certain times of the day when many people are using water simultaneously.
- Hot Water Heater Issues (for hot water only): If only your hot water pressure is low, the problem likely lies with the hot water heater or its associated plumbing. This could be sediment buildup inside the tank restricting flow, a clogged shut-off valve on the hot water heater's inlet, or a failing dip tube.
- Major Water Leak: A significant leak in your main water line (underground, in a crawl space, or behind a wall) can divert a substantial amount of water away from your fixtures, causing a pressure drop throughout the house. Signs include unusually high water bills, damp spots in the yard, or the sound of running water when no fixtures are in use.
Common Mistakes
- Ignoring the PRV: Many homeowners immediately jump to individual faucet aerators or showerheads. While these can cause localized low pressure, if the problem is everywhere, the PRV should be your first suspect after confirming the main shut-off is open. Overlooking it can lead to unnecessary fixes.
- Over-tightening Plumbing Connections: When replacing a PRV or adjusting connections, overtightening threaded fittings can strip threads, crack pipes or fittings, and create new leaks. Always use two wrenches (one to hold, one to turn) and tighten until snug, then give an additional quarter to half turn.
- Not Draining the System: Attempting to work on main water lines or valves without first shutting off the main supply and draining the lines will lead to significant flooding and a messy situation. Always relieve pressure by opening the highest and lowest faucets.
- Using the Wrong Tools/Materials: Employing standard wrenches on stubborn plumbing fittings can round off nuts and bolts, making removal much harder. Using the wrong size PRV or not applying pipe dope/thread tape correctly can lead to leaks and further issues. Ensure you have the correct PRV size and proper sealing materials.
- Assuming a City Problem: While city main breaks can cause low pressure, they are often widely publicized. Don't assume the city is at fault without first checking your home's internal system. Running around to neighbors and asking if they have low pressure will help you assess if it is local to your home or affects a larger area.
- Trying to DIY Gas or Main Sewer Lines: While this article focuses on potable water supply, some homeowners may confuse their issues. Never attempt to work on gas lines, high-voltage electrical, or your home's main sewer stack yourself. These require licensed professionals for safety and code compliance.
Cost & Time Breakdown
| Task | DIY Cost | Pro Cost | Time |
|---|---|---|---|
| Diagnose Low Pressure (Gauge) | $15–$25 | $75–$150 (service call) | 5–15 minutes |
| Adjust PRV (if possible) | $0 | $75–$150 | 10–20 minutes |
| Replace PRV (parts only) | $70–$250 | N/A | 1–2 hours |
| Replace PRV (DIY Labor) | $0 | N/A | 1–2 hours |
| Replace PRV (Pro Labor) | N/A | $200–$500 | 1–3 hours |
| Address Pipe Corrosion | N/A | $2,000–$15,000+ | Days to Weeks |
Tips & Prevention
- Periodic Pressure Checks: Invest in a water pressure gauge and periodically (every 6-12 months) check your home's static water pressure. This can help you catch a failing PRV before it becomes a major inconvenience.
- Know Your Main Shut-Off: Ensure everyone in your household knows the location of the main water shut-off valve and how to operate it. This is crucial in emergencies or when performing any plumbing work.
- Inspect Your PRV Annually: Briefly visually inspect your PRV for any signs of leaks, corrosion, or unusual noises. While most PRVs are low-maintenance, a quick check can sometimes identify early issues.
- Consider Whole-House Water Filter Maintenance: If you have a whole-house water filter, ensure you change the filter cartridge regularly according to the manufacturer's recommendations. A clogged filter can severely restrict water flow.
- Look for Slow Leaks: Periodically check your water meter when no water is being used in the house. If the meter is still spinning, you likely have a hidden leak which can affect pressure and waste water.
- Upgrade Old Pipes: If your home has galvanized steel pipes and is experiencing consistent low pressure without a clear PRV issue, consider consulting a plumber about repiping. This is a significant investment but can drastically improve water flow and prevent future issues.
When to Call a Professional
While diagnosing and replacing a PRV is often a manageable DIY task for most homeowners, there are specific situations where calling a licensed plumbing professional is critical. If your initial pressure tests indicate an extremely low or erratic pressure that doesn't respond to PRV adjustments, or if you suspect a major underground leak, a professional has specialized tools to pinpoint and address these complex problems. Furthermore, if you encounter difficulties during the PRV replacement, such as seized pipes, unusual pipe configurations (like old lead or polybutylene piping), or if you are uncomfortable working with main water lines, it's always safer to defer to an expert. A plumber can ensure proper installation, adhere to local codes, and guarantee the safety and integrity of your home's water supply system. If a general lack of pressure persists after checking your PRV and main shut-off, it may indicate a larger issue like major pipe corrosion or problems with the municipal supply line, which definitely warrant professional investigation and repair. Never attempt to repair or adjust components on the street side of your water meter, as this is typically property of the water utility.
Related Articles
Keep troubleshooting with these hand-picked guides from FixlyGuide:
- The #1 Hidden Culprit Behind Your Whole-House Low Water Pressure (It's Not Your City!) — Discover the most common, often overlooked cause of low water pressure throughout your entire home and how to fix it yourself.
- The #1 Mistake Homeowners Make When Diagnosing Low Water Pressure (It's Not Your Pipes!) — Discover the most common, often overlooked culprit behind low water pressure impacting your entire home and how to easily fix it.
- The #1 Hidden Culprit Behind Your Whole-House Low Water Pressure (It's Not Your City!) — Discover the most common, overlooked cause of low water pressure throughout your entire home and how to easily diagnose and fix it yourself.
- The 4 Hidden Reasons Your Entire Home Has Low Water Pressure (And the Easy Fixes) — Low water pressure throughout your entire home can be a frustrating and often misunderstood problem, with several common culprits. Learn to…
- The #1 Mistake Homeowners Make When Diagnosing Low Water Pressure (It's Not Your Pipes) — Discover the most common, overlooked culprit behind low water pressure impacting your entire home and learn how to fix it yourself with bas…
- The $5 Secret to Silencing That Annoying Dripping Faucet (Single-Handle Fix) — Stop a dripping single-handle faucet with a simple and inexpensive DIY fix by replacing a worn-out o-ring or washer.
What should this project cost?
Enter your project details for a realistic cost range before you call anyone.
Cost depends heavily on which system turns out to be the source.
- Regional adjustment
- National average
- Labor share (typical)
- ~$1,620
- Quotes to collect
- 3 written estimates
Educational estimate based on national averages — not a binding quote. Always confirm with written local estimates.
Fixly Project Decision Box
- DIY difficulty
- Moderate
- Estimated time
- 30 minutes – half a day
- Cost level
- Moderate
Main tools / materials
- Adjustable wrench
- Plunger or drain auger
- Bucket and towels
- Thread tape
When to stop and call a pro
- Water you cannot shut off at the fixture or main
- Sewage backing up into more than one fixture
- Water near electrical panels or outlets
- Gas water heater work beyond relighting a pilot
Need professional help?
Get a Licensed PlumberRecommended for DIYers & woodworkers
Sponsored
The Top 20 Tools for Workshops of Any Budget
No stationary machines or power tools required — plus 3 fundamental tools that can't be bought at any price.
Get the free guide
Ted's Woodworking — The #1 Woodworking Resource
Detailed instructions, dimensioned drawings, materials & cutting lists, and 3D schematics for every skill level.
See the plansSponsored: links above are affiliate links. FixlyGuide may earn a commission on qualifying purchases — at no extra cost to you.
Frequently asked questions
What is a pressure-reducing valve (PRV) and why is it important?+
A pressure-reducing valve (PRV) is a crucial plumbing component installed on your main water line that reduces high incoming municipal water pressure to a safe, consistent level for your home's plumbing system (typically 40-60 psi). Without it, high pressure could damage pipes, fixtures, and appliances, leading to leaks and premature wear.
How do I know if my PRV is failing?+
The most common sign of a failing PRV is a sudden or gradual drop in water pressure throughout your entire house, affecting all fixtures equally. You can confirm this by attaching a water pressure gauge to an outdoor spigot; a reading consistently below 40 psi when no water is running strongly suggests a PRV issue.
Can I adjust my PRV myself?+
Yes, many PRVs have an adjustment screw (usually on top under a locknut) that allows for minor pressure adjustments. Turn it clockwise to increase pressure and counter-clockwise to decrease. However, if the valve is old or significantly degraded, adjustment might not work or only provide a temporary fix, indicating it needs replacement.
What tools do I need to replace a PRV?+
To replace a PRV, you'll typically need a new PRV of the correct size and connection type, two adjustable wrenches (or pipe wrenches), PTFE thread seal tape or pipe dope, and potentially a pipe cutter if your existing connections are sweat fit. A water pressure gauge is essential for verifying the new valve's setting.
When should I call a plumber for low water pressure?+
Call a plumber if your pressure issues are complex, if you suspect underground leaks, if you're uncomfortable working with major plumbing components, or if replacing the PRV doesn't resolve the issue. Also, if your home has unusual or very old piping materials, a professional can ensure safe and compliant repairs.
What if only hot water pressure is low?+
If only your hot water pressure is low, the problem is likely isolated to your water heater or its associated plumbing. This could be sediment buildup in the tank, a clogged shut-off valve on the hot water heater's inlet, or a failing dip tube inside the tank. It's usually not a main PRV issue.

Discussion
Loading comments…