
Tools & materials you'll need
Affiliate links- AmazonTwo Mop BucketsOne for the stripping/cleaning solution and one for clean rinse water.
- AmazonFlat-Weave Microfiber Mop
- AmazonMicrofiber Mop Pads3 · Use separate pads for stripping, rinsing, and final cleaning.
- AmazonSoft-Bristled BrushA long-handled version is best for saving your back.
- AmazonMicrofiber ClothsFor drying and spot cleaning.
- AmazonNitrile Gloves
- AmazonZep Neutral pH Floor CleanerOr another LVP-safe, pH-neutral cleaner like Bona Hard-Surface Floor Cleaner.
- AmazonDistilled White Vinegar1 cup
- AmazonDawn Dish SoapJust a single drop is needed for the stripping solution.
- AmazonDistilled Water1-2 gallons · Recommended for mixing and rinsing to avoid mineral deposits.
As an Amazon Associate FixlyGuide earns from qualifying purchases — at no extra cost to you. Prices and availability are accurate as of publication and subject to change.
Quick Answer
The cloudy haze on your matte LVP floors is likely residue from using the wrong type of cleaner (like a floor polish or high-pH degreaser). To fix this, you need to strip the residue using a specialized floor stripper or a DIY solution of vinegar and water, followed by a thorough rinse with clean water and a flat-weave microfiber mop. Always use a pH-neutral cleaner for regular maintenance to prevent future buildup.
Why This Works
That frustrating, milky film that makes your beautiful matte LVP floors look perpetually dirty isn't a flaw in the flooring itself; it's a chemistry problem. Understanding the science behind the haze is the key to removing it and preventing its return.
First, let's consider the surface. Luxury Vinyl Plank is a multi-layered product. The top layer, known as the "wear layer," is a tough, clear coating of urethane, often enhanced with additives like aluminum oxide or ceramic beads for durability. This layer is engineered to be non-porous and resilient, protecting the printed vinyl design layer beneath it. A matte finish is achieved through micro-texturing on this surface that diffuses light rather than reflecting it directly. This same texture, however, can be excellent at grabbing and holding onto residues.
The "soil" you're seeing is not typical dirt or grime. It’s a chemical film. The most common culprits are:
- Improper Cleaners: Many popular household floor cleaners contain acrylic polymers, waxes, or "shine enhancers." Products like Mop & Glo, acrylic-based waxes, or even some multi-surface cleaners are designed to leave a thin layer behind to create a glossy finish. On a matte floor, this layer builds up, scatters light, and creates a cloudy, uneven appearance.
- High-pH or Soap-Based Cleaners: Soaps and high-alkaline degreasers (like ammonia or some all-purpose cleaners) can react with minerals in your tap water (calcium and magnesium) to form insoluble soap scum. This leaves a dull, sticky film that attracts more dirt.
- Hard Water Minerals: If you mop with untreated hard water, the water can evaporate and leave behind calcium and carbonate deposits, creating a "scale" that looks like a white haze.
The solution lies in choosing a cleaning agent that can dissolve this film without harming the LVP's urethane wear layer. This is a two-part process: stripping the old residue and implementing a correct maintenance routine.
For stripping, a mild acidic solution is highly effective. A heavily diluted mixture of white vinegar (acetic acid) works by dissolving alkaline mineral deposits and breaking down some soap films. The key is the dilution; too much acid can be detrimental over time. We also add a single drop of a pure surfactant, like Dawn dish soap. The surfactant molecules have a water-loving (hydrophilic) head and an oil/residue-loving (hydrophobic) tail. The tails attach to the dissolved residue particles, and the heads allow them to be suspended in the water and mopped away. This prevents the residue from simply redepositing elsewhere on the floor.
The most critical step, however, is the rinse. Rinsing with fresh, clean water physically removes the suspended residue from the floor entirely. Skipping this step is like washing your hands and not rinsing off the soap.
For long-term maintenance, a pH-neutral cleaner (around 7 on the pH scale) like Zep Neutral pH Floor Cleaner or Bona Hard-Surface Floor Cleaner is essential. These cleaners are formulated with surfactants to lift dirt but contain no waxes, polymers, or harsh alkalis/acids. They clean effectively without leaving a film, preventing the cloudy buildup from ever starting again.
What You Need
For Stripping Residue:
- Distilled White Vinegar
- Dawn Dish Soap (original blue formula)
- Distilled Water (highly recommended to prevent mineral spots)
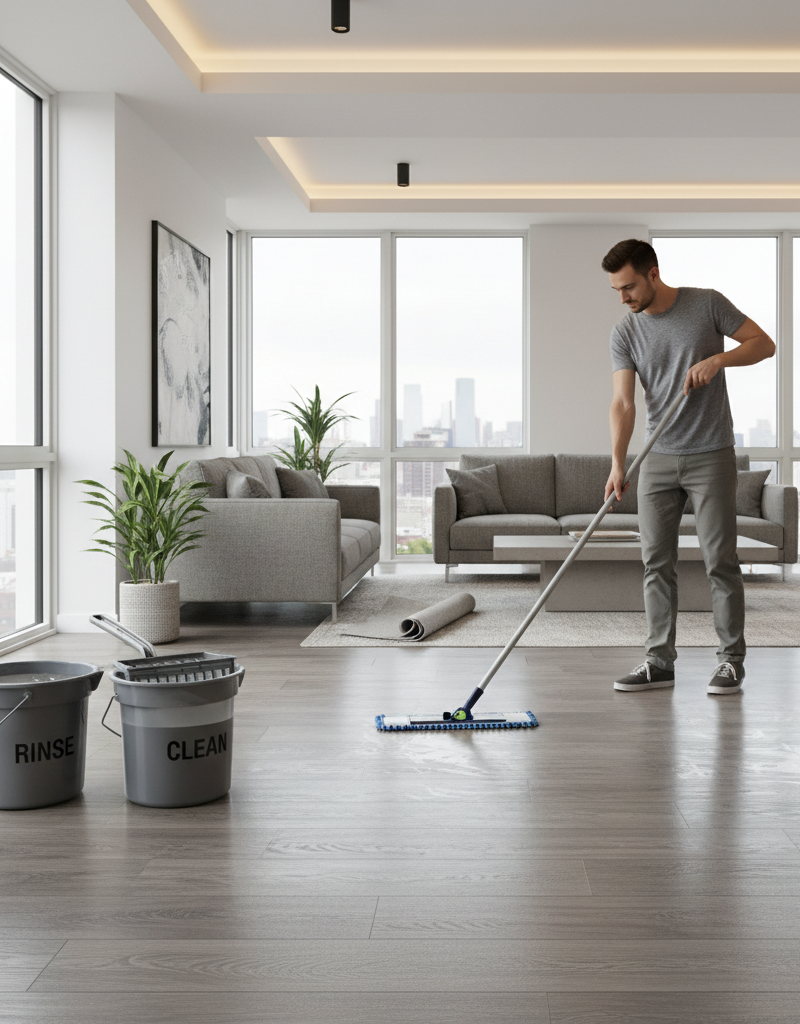
- Two mop buckets with wringers
- Flat-weave microfiber mop with at least three separate mop pads
- Soft-bristled scrub brush on a long handle
- Old towels or clean microfiber cloths
For Regular Maintenance:
- A dedicated pH-neutral floor cleaner, such as Zep Neutral pH Floor Cleaner or Bona Hard-Surface Floor Cleaner.
Safety Gear:
- Nitrile or latex gloves
- Optional: Knee pads for comfort
Step-by-Step Method
-
Clear and Prep the Area — Begin by removing all furniture, rugs, floor mats, and any other items from the room. This ensures you have unobstructed access to the entire floor surface for a uniform result.
-
Thoroughly Vacuum the Floor — Use a vacuum cleaner with a soft-bristle, brushless hard floor attachment. Go over the entire floor meticulously to remove all loose dust, pet hair, and debris. This prevents you from turning dirt into mud during the wet cleaning process.
-
Perform a Spot Test — Before tackling the whole floor, test your stripping solution in a hidden, inconspicuous area, such as inside a closet or under where a large piece of furniture normally sits. This ensures the solution doesn't react negatively with your specific flooring.
-
Mix the Stripping Solution — In one of your buckets, mix a solution of 1 cup of distilled white vinegar and one single drop of Dawn dish soap into 1 gallon of warm (not hot) water. Using more than a tiny drop of soap will create excess suds and leave a new film behind. Fill the second bucket with clean, cool water—preferably distilled water—for rinsing.
-
Apply the Solution in Sections — Working in a manageable 5-foot by 5-foot section, dip your first microfiber mop pad into the vinegar solution and wring it out so it is damp, not dripping. Apply the solution evenly across this first section.
-
Allow for Dwell Time — Let the solution sit on the floor for 5 to 7 minutes. Do not let it dry. This "dwell time" is crucial, as it allows the acetic acid and surfactants to break down and dissolve the built-up residue film.
-
Gently Agitate the Surface — After the dwell time, take your long-handled, soft-bristled brush and gently scrub the section. The goal is to agitate and loosen the residue, not to aggressively scour the floor. The brush bristles will help release the film from the micro-textures of the matte finish.
-
Mop Up the Stripping Solution — Using a second, clean microfiber mop pad, dampen it in the RINSING bucket, wring it out thoroughly, and mop up the dirty stripping solution. You should see the grime and haze lifting onto the mop pad. Rinse this mop pad frequently in the rinse bucket.
-
Rinse Thoroughly with Clean Water — This is the most important step for a clear finish. Attach your third (and final) clean microfiber mop pad, dampen it with the clean rinse water only, and go over the section one more time. This removes any last traces of the stripping solution and dissolved residue. Your rinse water bucket should remain as clean as possible.
-
Towel Dry and Inspect — Immediately dry the completed section with a clean towel or dry microfiber cloth. Kneel down and inspect the surface from a low angle against the light. It should have its original matte luster back. If a stubborn haze remains, repeat the process on that section before moving on.
-
Continue Across the Floor — Repeat steps 5 through 10, section by section, until the entire floor is stripped, rinsed, and dried. Be sure to change your rinse water in the second bucket as soon as it starts to look cloudy.
-
Perform a Final pH-Neutral Clean — Once the entire floor is stripped and completely dry, perform one final cleaning pass. Properly dilute your pH-neutral cleaner (like Zep or Bona) according to the manufacturer's instructions and mop the entire floor. This neutralizes any remaining traces of the acidic vinegar solution and sets you up for a proper maintenance routine.
Common Mistakes
- Using the Wrong Cleaner in the First Place: The haze is a direct result of using products with waxes, acrylics, or oils (like Mop & Glo, Rejuvenate, Pine-Sol, Murphy Oil Soap). These are not formulated for LVP and will always cause buildup. Stick to pH-neutral cleaners only.
- Skipping the Final Rinse: The most common failure point. If you don't thoroughly rinse with clean water, the dissolved residue and stripping solution will simply dry back onto the floor, trading one haze for another.
- Using Too Much Water: LVP is water-resistant, but not waterproof. A mop that is dripping wet can force water into the seams between planks, potentially damaging the subfloor and weakening the plank adhesive over time. Your mop should always be just damp.
- Scrubbing with Abrasive Tools: Never use a Magic Eraser, steel wool, or hard-bristled brushes on LVP. These are micro-abrasives that will create fine scratches in the urethane wear layer, causing permanent dulling that cannot be cleaned away.
- Letting the Stripping Solution Dry: If the vinegar solution dries on the surface, it becomes much harder to remove and can redeposit the film. Always work in small sections and keep the surface wet.
- Confusing Residue with Damage: If stripping doesn't work, your "haze" may actually be widespread micro-scratches (abrasion) from heavy foot traffic, furniture dragging, or improper cleaning tools. This is physical damage and requires professional buffing or plank replacement.
Cost & Time Breakdown
| Task | DIY Cost Estimate (1,000 sq ft) | Professional Cost Estimate | Time Estimate |
|---|---|---|---|
| Residue Stripping & Restoration | $50 - $80 (for mops, buckets, vinegar, cleaner) | $300 - $500 | 4-6 hours |
| Weekly pH-Neutral Cleaning | $2 monthly (cost of cleaner) | $100 - $150 per visit | 30 minutes |
| Deep Scratches or Wear Layer Damage | N/A | $500+ (for professional buffing or plank replacement) | 1-2 days |
| Professional Deep Cleaning Service | N/A | $200 - $400 | 2-3 hours |
Prevention & Maintenance
- Commit to a pH-Neutral Cleaner: Immediately discard any wax-based or "shine-enhancing" floor cleaners. Use only a cleaner with a pH level between 6 and 8, specifically formulated for LVP, like Zep Neutral pH Floor Cleaner or Bona Hard-Surface Floor Cleaner.
- Vacuum or Sweep Frequently: The best way to clean your floor is to remove abrasive grit and dirt before it gets ground in. Use a vacuum with a brushless hard floor head or a microfiber dust mop daily in high-traffic areas.
- Use the Two-Bucket Mop Method: For routine mopping, continue using two buckets. One holds your diluted cleaning solution, and the other holds clean rinse water. Rinse your dirty mop head in the rinse bucket before putting it back into the cleaning solution bucket. This keeps your cleaning solution clean and effective.
- Tackle Spills Immediately: Clean up spills as soon as they happen with a damp cloth and, if needed, a small spray of your pH-neutral cleaner. This prevents sticky spots that attract dirt.
- Consider Distilled Water: If your home has very hard water, the minerals can contribute to a hazy buildup over time even with the right cleaner. Using distilled water for your cleaning solution eliminates this problem.
- Use High-Quality Doormats: Place robust doormats both outside and inside every entrance to your home. This will trap the vast majority of dirt, grit, and moisture before it ever reaches your floors.
When to Call a Professional
While this DIY stripping method is highly effective for residue buildup, there are times when a professional touch is necessary. If you have spent a significant amount of time and effort on the stripping process, completing multiple passes, and the cloudy haze persists, it’s time to call a flooring professional. In this case, the issue may not be a film but rather physical abrasion to the wear layer itself—essentially, thousands of micro-scratches that are scattering light. A professional has access to specialized rotary machines and low-speed buffers with non-abrasive pads that can sometimes burnish the wear layer and restore its clarity.
Furthermore, if your floor has deep scratches, gouges, or peeling corners, these are physical repairs that are beyond the scope of cleaning. If you suspect you or a previous owner used a harsh chemical solvent (like acetone or paint thinner) that may have melted the urethane finish, a pro is needed to assess the damage. Lastly, if the cloudiness appears perfectly uniform and seems to be under the wear layer, this could be a rare manufacturing defect or an issue caused by moisture trapped under the planks, both of which require professional diagnosis. A reputable flooring company can assess the problem accurately and prevent you from causing further accidental damage.
Get the print-ready PDF of this guide
A clean, ad-free, printable version you can keep on your phone or pin to the workshop wall. Free with a FixlyGuide account.
- Print-optimized layout
- Tools, materials & every step included
- Saved to your account
Frequently asked questions
Can I use a steam mop on my cloudy LVP floors?+
No, most LVP manufacturers advise against steam mops as the high heat and moisture can damage the adhesive, cause planks to warp, and potentially void your warranty.
Is it safe to use bleach or ammonia to clean my LVP?+
Absolutely not. Bleach is an oxidizer and ammonia is highly alkaline; both can permanently damage the urethane wear layer of LVP. Never mix them with each other or other cleaners.
How often should I strip my LVP floors?+
You should only need to strip your floors if a residue has built up. If you are using the correct pH-neutral cleaner from the start, you may never need to strip them.
Will vinegar damage my LVP flooring?+
A highly diluted solution of vinegar (1 part vinegar to 16 parts water) is generally safe for a one-time stripping process on modern LVP. However, never use concentrated vinegar or let it sit for extended periods, and always do a spot test first.

Discussion
Loading comments…