
Tools & materials you'll need
Affiliate links- AmazonNitrile Gloves1 pair · Essential for hand protection.
- AmazonSafety Glasses1 · Protect eyes from chemical splashes.
- AmazonStiff-Bristled Grout Brush1 · Specifically designed for scrubbing grout lines.
- AmazonSpray Bottle1
- AmazonBucket1
- AmazonMicrofiber Cloths3-5 · For cleaning, rinsing, and drying.
- AmazonOxiClean Versatile Stain Remover1 · Primary alkaline cleaner for organic stains and mildew.
- AmazonZep Grout Cleaner & Whitener1 · Optional acidic cleaner for mineral deposits. Do NOT use on natural stone.
- AmazonDawn Dish Soap1 · For the initial pH-neutral surface cleaning.
- AmazonPenetrating Grout Sealer1 · Crucial final step to prevent future stains. e.g., Aqua Mix Sealer's Choice Gold.
As an Amazon Associate FixlyGuide earns from qualifying purchases — at no extra cost to you. Prices and availability are accurate as of publication and subject to change.
Quick Answer
Black grout is usually caused by a thriving colony of mildew, bacteria, and soap scum buildup. To clean it, use a pH-neutral cleaner first to remove surface dirt, then apply an alkaline cleaner like OxiClean or a specialized grout cleaner with a stiff brush to kill the mildew and lift the deep stains. For stubborn mineral-based stains like hard water buildup, a targeted acidic cleaner can be used cautiously. The final, most crucial step is to apply a penetrating grout sealer to prevent future staining.
Why This Works
To defeat the enemy, you must know the enemy. That black gunk in your grout lines isn’t just dirt; it’s a complex ecosystem of grime, and understanding its composition is the key to obliterating it. Grout, especially traditional cement-based grout, is inherently porous. Microscopically, it resembles a sponge, full of tiny voids and capillaries ready to absorb water, dirt, and anything else that lands on your floor or shower wall.
This porosity is ground zero for the three main culprits of black grout:
-
Biological Growth (The Living Gunk): This is primarily mold and mildew. These fungi thrive in damp, humid environments with a food source. In your bathroom, that food source is soap scum, body oils, and skin cells. The grout acts as the perfect apartment complex, providing moisture and a place to anchor. An alkaline cleaner, particularly an oxygenated one like OxiClean (its active ingredient is sodium percarbonate), is exceptionally effective against this. When mixed with hot water, it releases oxygen in a bubbling reaction. These bubbles physically lift the organic matter from the grout's pores while the high pH (around 11) breaks down the cellular structure of the mold and mildew, killing it.
-
Soap Scum (The Chemical Gunk): That whitish-then-grayish film that builds up on shower doors and tiles also clogs your grout. Soap scum is a chemical precipitate formed when the fatty acids in soap react with the mineral ions (calcium and magnesium) in hard water. The result is a sticky, water-insoluble mess called calcium stearate or magnesium stearate. While alkaline cleaners can break down the oily part of this, a low-pH acidic cleaner is the true champion here. Products like Zep Grout Cleaner & Whitener or CLR Brilliant Bath use acids to dissolve these mineral-based deposits, breaking their bond with the grout and allowing them to be rinsed away.
-
Embedded Dirt & Grime (The Physical Gunk): This is your everyday soil, dust, and debris. Over time, foot traffic and mopping (which often just pushes dirty water into grout lines) physically work this grit deep into the grout's pores. Effective cleaning starts by removing the loose surface layer of this dirt. This is where surfactants come in. A simple pH-neutral solution like water with a few drops of Dawn dish soap does this initial job perfectly. The surfactant molecules have a water-loving (hydrophilic) head and an oil-loving (hydrophobic) tail. The tail attaches to the dirt and grime, and the head pulls it into the water, allowing it to be wiped away and exposing the deeper stains for the heavy-duty cleaners to attack.
Finally, the concept of dwell time is not a suggestion; it’s a chemical necessity. Whether you’re using an alkaline or acidic cleaner, the product needs several minutes to perform its chemical reaction. Without adequate dwell time, you’re just relying on physical scrubbing, which is exhausting and far less effective. Letting the cleaner sit allows it to penetrate the pores and either oxidize the mildew or dissolve the minerals, doing most of the hard work for you.
What You Need
Materials
- Alkaline Cleaner: OxiClean Versatile Stain Remover or a similar oxygenated bleach powder. This will be your primary cleaner.
- Acidic Cleaner (Optional): Zep Grout Cleaner & Whitener or CLR Brilliant Bath. Only needed for stubborn mineral stains.
- pH-Neutral Cleaner: Dawn Dish Soap or Dr. Bronner's Sal Suds.
- Grout Sealer: A high-quality, water-based penetrating sealer like Aqua Mix Sealer's Choice Gold.
- Warm Water
Tools
- Nitrile Gloves: Essential for protecting your hands from the chemicals.
- Safety Glasses: Protect your eyes from splashes.
- Stiff-Bristled Grout Brush: A brush specifically designed for grout is a must-have. An old toothbrush is too soft.
- Spray Bottle: For applying the pH-neutral cleaner.
- Bucket: For mixing your OxiClean solution.
- Microfiber Cloths (Multiple): For wiping, rinsing, and drying.
- Squeegee: For shower walls and floors.
- (Optional) Wet/Dry Vacuum: The most effective tool for rinsing grout lines thoroughly.
- (Optional) Oscillating Tool with Brush Head: To save your arms and achieve a deeper clean with less effort.
Step-by-Step Method
-
Safety First: Ventilate the Area — Before you open a single cleaning product, open windows and doors. Place a box fan pointing out a window to create cross-ventilation. Put on your nitrile gloves and safety glasses. Chemical fumes in an enclosed space like a bathroom can be hazardous.
-
Initial Surface Clean: Remove Loose Grime — Sweep or vacuum the entire tile surface to remove hair, dust, and loose debris. Then, mix a few drops of Dawn dish soap into a spray bottle with warm water. Spray the tile and grout, let it sit for a minute, and wipe down the entire surface with a microfiber cloth. This removes the surface-level oils and dirt, allowing your deep cleaner to penetrate more effectively.
-
Choose Your Weapon: Alkaline vs. Acidic — For 90% of black grout cases, especially those caused by mildew and common grime, the alkaline OxiClean method is the correct and safer first choice. Only if you have significant hard water buildup (visible chalky, white deposits) or the alkaline method fails should you proceed to an acidic cleaner. We will start with the alkaline method.
-
Mix the Alkaline Solution: Activate the Oxygen — Fill a bucket with one gallon of hot water (hot water is crucial for activating the cleaner). Add one full scoop of OxiClean Versatile Stain Remover to the water and stir until it’s fully dissolved. The solution will fizz as the sodium percarbonate reacts with the water to release oxygen. For vertical surfaces like shower walls, create a thick paste by mixing OxiClean with just enough hot water to form the consistency of toothpaste.
-
Apply the Cleaner: Saturate the Grout Lines — Carefully pour the OxiClean solution directly onto the grout lines on the floor. Be generous; you want the grout to be fully saturated. For the paste on vertical surfaces, use your gloved finger or a small brush to apply it directly to the grout, ensuring full coverage.
-
Let It Dwell: The Power of Patience — Do not touch it for at least 15-20 minutes. This dwell time is critical. The oxygen bubbles are actively working, pushing the dirt, mold, and grime out of the grout’s pores while the alkaline solution kills the mildew. You might even see the grime starting to lift and float in the solution.
-
Agitate and Scrub: The Hard Work Begins — Now, it’s time for elbow grease. Take your stiff-bristled grout brush and scrub back and forth along each grout line. Apply firm pressure. For a significant upgrade, attach a brush head to an oscillating multi-tool; it will scrub thousands of times per minute, providing a dramatically better clean with less effort.
-
Rinse Thoroughly: Remove All Residue — This is the most frequently botched step. You must remove all of the dirty, cleaner-filled water. Any residue left behind will become a magnet for new dirt. The best method is to use a wet/dry vacuum to suck all the liquid directly out of the grout lines. If you don’t have one, use a squeegee to pull the water into one area and soak it up with clean microfiber towels, frequently rinsing the towels in a separate bucket of clean water.
-
Assess and Escalate (If Needed): The Acidic Approach — Inspect the grout. If some stains from mineral deposits or soap scum remain, it’s time to escalate. CRITICAL WARNING: Never use acidic cleaners on natural stone like marble, travertine, or limestone, as it will etch and permanently damage the surface. If you have ceramic or porcelain tile, proceed by applying a product like Zep Grout Cleaner & Whitener. Follow the product's instructions, which typically involve a shorter dwell time (2-5 minutes), a quick scrub, and another thorough rinse.
-
Final Rinse and Dry: The Finishing Touch — Whether you stopped after the alkaline step or proceeded to acid, perform one final rinse with clean water. Use a squeegee and then a dry microfiber towel to dry the tile and grout as completely as possible. Good airflow from your fan will help speed this up.
-
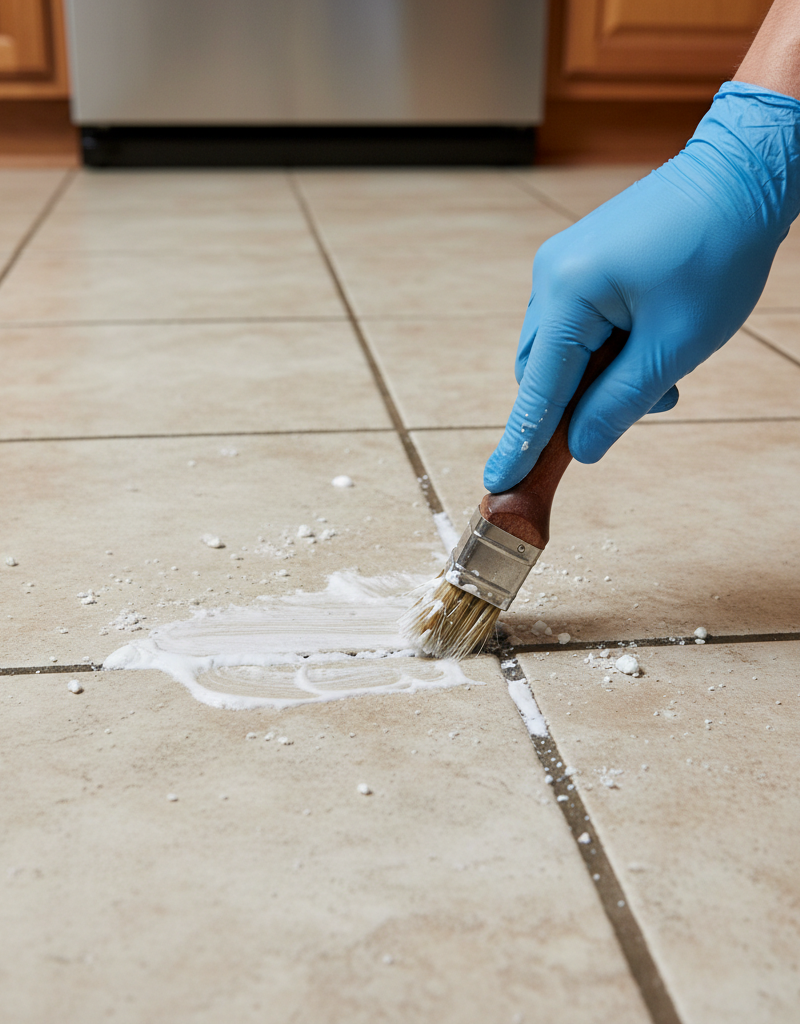
Seal the Deal: Prevent Future Stains — Wait at least 24 hours for the grout to dry completely. Grout must be bone dry before sealing. Apply a high-quality, water-based penetrating grout sealer like Aqua Mix Sealer's Choice Gold using a small brush or applicator bottle. Follow the product directions, applying a thin, even coat to the grout lines. Let the first coat penetrate for 10-15 minutes, wipe away any excess from the tile face, and then apply a second coat. This invisible shield is the single most important step to prevent your grout from turning black again.
Common Mistakes
- Using a Wire Brush: Never use a metal wire brush on grout. It is too abrasive and will gouge and erode the grout, creating more surface area for dirt and mildew to grow.
- Not Rinsing Thoroughly: Leaving behind dirty water and cleaning solution residue is counterproductive. The sticky residue will attract fresh dirt, and your grout will look dirty again in weeks.
- Mixing Cleaning Chemicals: NEVER mix different cleaning chemicals, especially bleach and ammonia (creates toxic chloramine gas) or bleach and acid (creates toxic chlorine gas). Use one type of cleaner, rinse completely, then use another if necessary.
- Defaulting to Chlorine Bleach: While household bleach can kill mildew, it’s harsh on grout’s cement and can weaken it over time. It can also yellow white grout and offers no protection against future stains. Oxygenated bleach (OxiClean) is a superior and safer choice.
- Not Sealing the Grout: Cleaning grout without sealing it is like washing your car and not waxing it. You've done the hard work but left the surface completely unprotected. All your effort will be wasted as the porous grout immediately begins absorbing new moisture and grime.
- Using Acidic Cleaners on Stone: Using vinegar, or strong acidic cleaners like CLR or Zep, on natural stone tiles (marble, travertine, limestone) is a disaster. It will chemically burn, or "etch," the surface of the stone, leaving dull, permanent marks.
Cost & Time Breakdown
The cost and time can vary based on the room size and level of soil. The following is an estimate for a typical 100 sq. ft. bathroom floor.
| Task | DIY Cost | Pro Cost | Time (per 100 sq. ft.) |
|---|---|---|---|
| Initial Cleaning & Prepping | $5 - $10 | (Included) | 30-45 minutes |
| Deep Cleaning & Agitation | $20 - $40 | $150 - $250 | 1.5 - 2.5 hours |
| Rinsing and Drying | $0 | (Included) | 30 minutes |
| Grout Sealing (2 coats) | $15 - $25 | $100 - $200 | 1 - 1.5 hours |
| Total | $40 - $75 | $250 - $450 | 3.5 - 5 hours |
Prevention & Maintenance
Whitening your grout is a marathon, not a sprint. Keeping it clean is all about proactive maintenance.
- Squeegee Shower Walls: After every single shower, use a squeegee to remove excess water from the tile and glass. This gives mildew no water to feed on.
- Run Your Ventilation Fan: Leave the bathroom fan running for at least 30 minutes after a shower to exhaust the humid air.
- Use a Daily Shower Spray: Products like Method Daily Shower Cleaner or a homemade mix of water, a little vinegar, and a drop of dish soap can be misted on walls after a squeegee to prevent soap scum buildup.
- Switch to Liquid Soap: Bar soaps are high in stearates that cause soap scum. Switching to a liquid body wash can significantly reduce soap scum formation.
- Weekly pH-Neutral Cleaning: For regular cleaning, avoid harsh chemicals. A simple mop or spray with a pH-neutral cleaner like diluted Dawn or Sal Suds is sufficient to keep surface grime at bay.
- Reseal Your Grout: The sealer is a sacrificial layer that wears down. In high-use, high-moisture areas like a primary shower, you should reseal the grout annually. For less-trafficked floors, every 2-3 years is adequate.
When to Call a Professional
While this DIY method is highly effective, there are scenarios where a professional is the better, or only, option.
If your grout is cracked, crumbling, or missing in sections, you have a structural problem, not a cleaning problem. The grout is failing and needs to be removed and replaced (a process called re-grouting). Cleaning will not fix this and can make it worse. A tile and grout specialist can assess the damage and provide a quote for repair.
If you have delicate and expensive natural stone tiles, such as marble, slate, or travertine, and you’re anxious about using any chemicals, a professional will have the experience and specialized pH-neutral, stone-safe cleaners to do the job without risk of etching. The cost of a professional clean is far less than the cost of replacing a ruined stone tile floor.
Finally, if the stains are from something other than mold or minerals—such as rust stains from a leaky pipe or deeply-set oil stains—they may require specialized poultices or solvents that are best left to a pro. If you’ve followed the steps above and seen no improvement, it’s time to make the call.
Get the print-ready PDF of this guide
A clean, ad-free, printable version you can keep on your phone or pin to the workshop wall. Free with a FixlyGuide account.
- Print-optimized layout
- Tools, materials & every step included
- Saved to your account
Frequently asked questions
Can I use household bleach to clean my grout?+
You can, but it's not recommended as a first choice. Chlorine bleach is harsh and can degrade the cement in grout over time, potentially leading to yellowing and increased porosity. An oxygenated bleach like OxiClean is a safer and more effective alternative that lifts stains from within the grout's pores without damaging it.
How often should I seal my grout?+
This depends on the location. For high-moisture and high-traffic areas like shower walls and bathroom floors, sealing your grout once every year is the best practice. For lower-traffic areas like a kitchen backsplash or a guest bathroom floor, sealing every 2-3 years is generally sufficient.
Why did my grout turn black again so quickly?+
There are two likely reasons. First, you may not have rinsed all the cleaning solution and dirty water away. Leftover residue is sticky and attracts new dirt like a magnet. The second, and more probable reason, is that you skipped the final, crucial step of applying a penetrating grout sealer. Unsealed grout is like a sponge, and it will immediately start absorbing moisture and grime again.
Is it safe to use a steam cleaner on grout?+
Steam cleaners can be very effective for cleaning grout as the high heat kills mold and mildew without chemicals. However, use caution. If your grout is old, cracked, or not sealed properly, the high-pressure steam can blast away the weak grout. Always start with the lowest pressure setting and test in an inconspicuous area.


Discussion
Loading comments…