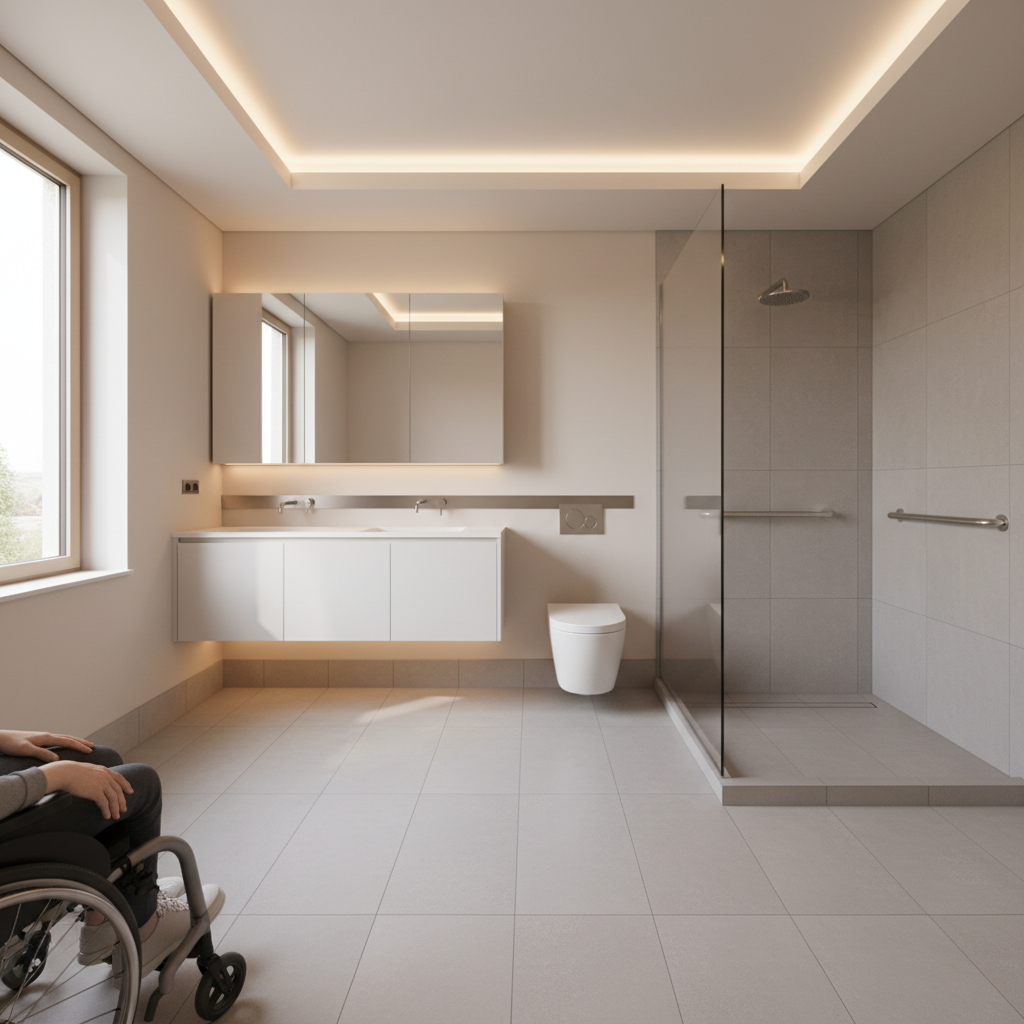
- Assess Your Current Needs & Future Projections — Take an honest look at your family's current and anticipated mobility. Are there elderly relatives who visit? Do you plan to age in place? This assessment will guide your design choices.
- Pro Tip: Even if you're young and healthy, life happens. Building in flexibility now is always a smart move.
- Consider: Think about temporary setbacks like a broken leg, not just long-term aging.
Bathroom · Bathroom remodel
| Project category | Bathroom |
|---|---|
| Problem type | Bathroom remodel |
| Trade required | General contracting |
| Urgency | Planned project |
| Safety risk | Low safety risk |
| DIY suitability | Pro recommended |
| Cost category | High cost |
| Typical timeline | Typically 2–4 weeks on site |
| Contractor type | Bathroom remodeler or licensed plumber |
Repair option
Refresh fixtures, grout, and vanity without moving plumbing.
Replacement option
Gut remodel when the pan leaks or the layout changes.
Common causes
- Dated finishes
- Failing tile or pan
- Accessibility needs
Relevant tools:project cost estimatorcompare quotes
Published July 7, 2026Last updated August 17, 2026
Tools & materials you'll need
Affiliate linksAs an Amazon Associate FixlyGuide earns from qualifying purchases — at no extra cost to you. Prices and availability are accurate as of publication and subject to change.
Quick Answer
Many homeowners prioritize aesthetics over long-term functionality and accessibility during bathroom remodels, leading to design choices that become problematic as mobility changes. The most impactful way to future-proof your bathroom is to integrate universal design principles from the start, such as blocking for grab bars, ensuring adequate maneuvering space, and planning for curbless showers, which can save tens of thousands of dollars in future modifications.
The Problem
You're planning a bathroom remodel, excitedly picking out tiles, fixtures, and paint colors. But are you thinking about five, ten, or even twenty years down the road? Most homeowners aren't. They focus on current trends and immediate needs, inadvertently creating a space that will be difficult or impossible to use if they, a family member, or a future guest experiences a change in mobility. This oversight can lead to two main problems: either a prohibitively expensive second renovation to adapt the space, or the heartbreaking necessity of moving out of a beloved home.
Imagine needing a walker or wheelchair and suddenly realizing your beautiful vanity is too high to use while seated, your shower has a treacherous curb, or the doorway is too narrow. These aren't minor inconveniences; they're barriers that profoundly impact independence and quality of life. The problem isn't just about aging; accidents, injuries, and temporary disabilities can strike at any age. Designing for universal accessibility isn't just for 'them'; it's for 'us,' now and in the future.
How It Works
Universal design, at its core, is about creating environments that are usable by all people, to the greatest extent possible, without the need for adaptation or specialized design. In a bathroom, this translates to specific architectural and fixture choices that accommodate a wide range of physical abilities.
Consider the concept of blocking for grab bars. These aren't just an add-on; they require solid wood blocking installed between the wall studs during the framing stage. This provides a secure anchor point for grab bars in the future, preventing them from ripping out of drywall. Without this foresight, installing grab bars later means opening up finished walls, adding blocking, and then patching and repainting – a messy, costly, and time-consuming endeavor.
Another critical element is maneuvering space. A person using a wheelchair needs a minimum clear floor space of 30 x 48 inches for a forward approach to a fixture and a 60-inch diameter clear turning radius within the bathroom. This dictates the placement of toilets, sinks, and showers, often requiring a slightly larger bathroom footprint or a more thoughtful layout. Standard bathrooms often lack this crucial space, making them inaccessible.
Curbless showers are another prime example. Rather than a step-over curb, the shower floor transitions seamlessly with the main bathroom floor, with a slight slope built into the subfloor to direct water to the drain. This requires careful planning of the drain location and a specific subfloor modification. Retrofitting a curbless shower into an existing conventional bathroom typically involves substantial demolition, re-framing of the floor joists to create the necessary slope, modifying plumbing, and extensive waterproofing. Doing it right during the initial build is dramatically simpler and cheaper.
Finally, think about door widths. Standard interior doors are often 28 or 30 inches wide. For wheelchair users, a minimum clear opening of 32 inches is required, which typically means a 34-inch wide door slab. Swapping out a door frame after construction means demoing the existing frame, widening the rough opening, installing a new, wider frame, and patching the surrounding drywall – again, far more complex than planning for it from day one.
Step-by-Step Fix
While retrofitting a fully accessible bathroom can be extensive, here are steps you can take during a remodel to integrate key accessibility features and prepare your bathroom for the future:
-
Assess Your Current Needs & Future Projections — Take an honest look at your family's current and anticipated mobility. Are there elderly relatives who visit? Do you plan to age in place? This assessment will guide your design choices.
- Pro Tip: Even if you're young and healthy, life happens. Building in flexibility now is always a smart move.
- Consider: Think about temporary setbacks like a broken leg, not just long-term aging.
-
Plan for Wider Doorways — Aim for a minimum clear opening of 32 inches into the bathroom. This usually means installing a 34-inch wide door slab.
- Solution: Specify a 34-inch door and frame during the demolition and framing stage. If space is tight, consider a pocket door or barn door for maximum clear opening.
- Measurements: Measure the actual clear opening, not just the door width.
-
Install Blocking for Grab Bars — This is non-negotiable for future safety. Before drywall, install horizontal 2x8 or 2x10 wooden blocking between studs wherever grab bars might be needed.
- Locations: Focus on inside the shower/tub (especially around the valve and shower head walls), next to the toilet, and potentially near the sink.
- Placement: Standard grab bar heights are 33-36 inches from the floor for vertical bars and often a diagonal bar in the shower. Place blocking strategically to accommodate these.
-
Design a Curbless Shower — This requires precise planning for drainage and subfloor modifications.
- Process: Consult with your contractor or tile setter early. They'll need to create a sloped subfloor (often involving depressing the shower pan area by an inch or two) and ensure proper waterproofing before tiling.
- Drainage: A linear drain at the far end or along one wall often simplifies tiling and sloping for curbless designs.
-
Choose an Accessible Toilet Height — Opt for
Related Articles
Keep troubleshooting with these hand-picked guides from FixlyGuide:
- The Hidden Reason Your AC Isn't Cooling (And Why Most Homeowners Get It Wrong) — Is your central AC blowing warm air or struggling to cool your home? The culprit is often a silent but serious issue many homeowners overlo…
- 7 Inspection Red Flags That Secretly Signal a $20,000 Bill — Don't let your dream home become a money pit. Many buyers and even some inspectors overlook subtle home inspection red flags that lead to f…
- The One Pruning Mistake That Could Be Killing Your Shrubs (and How to Fix It) — Discover the crucial pruning mistake many homeowners make that can significantly damage or even kill their shrubs, and learn the simple fix.
- The #1 Mistake Homeowners Make with Pellet Grills (and How to Fix It) — Unpredictable temperature swings are the most common and frustrating issue for pellet grill owners, often caused by maintenance oversights.
- The 4 Critical Power Tools Every New Homeowner FORGETS to Buy (Don't Be One of Them) — New homeowners often overlook essential power tools that make common home repairs and maintenance tasks significantly easier. Learning whic…
- The #1 Deck Sealing Mistake Most Homeowners Make (And How to Fix It) — Many homeowners make a critical error when sealing their decks, leading to premature wear and damage. Learn how to properly reseal your woo…
Should you do this yourself?
Answer five quick questions before you start. Safety outranks savings every time.
Your experience with work like this
How high do you have to work?
Does the job involve any of these?
Will it need a permit?
Specialty tools
Free and instant. Educational guidance only — not a quote, inspection, or professional diagnosis.
What should this project cost?
Enter your project details for a realistic cost range before you call anyone.
Mid-range remodels commonly $12,000–$22,000; small repairs often under $600.
- Regional adjustment
- National average
- Labor share (typical)
- ~$5,603
- Quotes to collect
- 3 written estimates
Educational estimate based on national averages — not a binding quote. Always confirm with written local estimates.
Fixly Project Decision Box
- DIY difficulty
- Professional Recommended
- Estimated time
- Inspection 1–2 hours · repairs 1–3 days
- Cost level
- High
Main tools / materials
- Binoculars for a ground-level look
- Flashlight for attic checks
- Moisture meter
- Roofing cement (temporary patch only)
When to stop and call a pro
- Active leak near lights, fans, or any wiring
- Sagging, bulging, or water-filled ceiling
- Steep, wet, or two-story roof — do not climb it
- Storm or hail damage you plan to claim on insurance
Need professional help?
Free roof assessment first — no phone calls until you ask for them.
Get Local Roofing HelpBefore you start
Check the difficulty, permits, and safety risk — then decide whether to call a pro.
- Estimate this projectGet a cost range for your scope and ZIP before you call anyone.Open
- Get local estimatesSend one request and compare written estimates from vetted pros.Open
Free, no signup required. Estimates are educational guidance, not a quote or an inspection.
Get the print-ready PDF of this guide
A clean, ad-free, printable version you can keep on your phone or pin to the workshop wall. Free with a FixlyGuide account.
- Print-optimized layout
- Tools, materials & every step included
- Saved to your account
This article was independently written by FixlyGuide based on the source topic.
Frequently asked questions
How much does it cost to add accessibility features to a bathroom later?+
Retrofitting a bathroom for accessibility after a renovation can easily cost $10,000 to $25,000 or more, depending on the extent of modifications. This includes opening walls for grab bar blocking, modifying subfloors for curbless showers, and widening doorways.
What is the ideal clear space for a universally designed bathroom?+
A universally designed bathroom should ideally have a 60-inch diameter clear turning radius to accommodate wheelchairs. Additionally, a clear floor space of at least 30x48 inches is needed for clear approach to fixtures.
Can I install grab bars without opening my walls?+
While some surface-mounted grab bars exist, they are generally not as secure as those anchored to solid blocking within the wall. For true safety and stability, especially for critical support, installing proper blocking behind the drywall is recommended.

Discussion
Loading comments…