Tools & materials you'll need
Affiliate linksAs an Amazon Associate FixlyGuide earns from qualifying purchases — at no extra cost to you. Prices and availability are accurate as of publication and subject to change.
Quick Answer
Caulking a bathroom sink might seem like a straightforward task, but many homeowners inadvertently make a critical mistake: neglecting proper surface preparation and consistent application. This often results in a short-lived seal prone to peeling, cracking, and unsightly mold growth. The key to a durable, watertight caulk job lies in meticulous cleaning of the old caulk and residue, ensuring a bone-dry surface, and then applying a continuous, even bead of high-quality silicone caulk, finishing with a smooth, concave profile. Addressing these common pitfalls will prevent leaks, improve aesthetics, and extend the life of your caulk.
The Problem
Water is the enemy of any unsealed gap in a bathroom. Around your bathroom sink, a compromised caulk line isn't just an aesthetic issue; it's a direct pathway for water to seep beneath the sink, into cabinets, or even behind walls. This can lead to a cascade of problems: stained countertops, warped cabinet bases, mildew and black mold growth, and eventually, structural damage. Many homeowners apply new caulk over old, dirty surfaces, use the wrong type of caulk, or apply it inconsistently, creating weak points that fail quickly. The result is a cycle of re-caulking every few months, frustration, and the constant threat of water damage.
How It Works
Caulk, when properly applied, acts as a flexible, waterproof barrier that seals the small gap between your bathroom sink and countertop, or between the countertop and the wall. Most commonly, a silicone sealant is used for its superior flexibility, water resistance, and adhesion to non-porous surfaces like porcelain, ceramic, and laminate. Unlike latex or acrylic caulks, 100% silicone caulk doesn't shrink significantly, resists mold and mildew more effectively, and maintains its elasticity over a wide range of temperatures and humidity levels—critical in a bathroom environment.
When a bead of caulk is properly laid, it adheres strongly to both surfaces, creating a bond that water cannot penetrate. The slight flexibility allows for the minute expansion and contraction of materials due to temperature changes without cracking the seal. However, if the surface is not clean, the caulk cannot properly bond. If the bead is too thin, it lacks the material to form a robust seal. If it's too thick, it cures unevenly and is more prone to tearing. And if it's not smoothed immediately, it creates channels where water can sit, encouraging mildew. Understanding that caulk is not just a gap-filler but a dynamic, active barrier is key to a successful application. Its effectiveness hinges on its ability to bond tightly, remain flexible, and repel water and mold, all of which are significantly impacted by the application process.
Step-by-Step Fix
1. Clear the Deck – Prepare your workspace for clean removal and application.
Remove everything from around your sink: toothbrushes, soap dispensers, decorative items. You need a completely clear area to work effectively and avoid accidental messes. A clear space allows you to move freely and apply caulk with an even, continuous motion. This step is often overlooked but crucial for a professional finish.
2. Excise the Old Sealant – Carefully remove all existing caulk with the right tools.
Use a utility knife or a specialized caulk removal tool to carefully cut along both edges of the old caulk bead. Angle the blade slightly to get under the caulk. Once scored, peel or scrape away the bulk of the old material. For stubborn bits, a plastic scraper or even a stiff nylon brush can help. Take your time; any old caulk left behind will prevent the new caulk from adhering properly.
- Safety Note: Always cut away from yourself when using a utility knife. Wear cut-resistant gloves.
- Tools Tip: A dedicated caulk removal tool often makes this process much easier and safer than a utility knife alone.
3. Cleanse the Gunk – Ensure surfaces are pristine and free of residue.
After removing the visible caulk, thoroughly clean the surfaces. Use mineral spirits or denatured alcohol on a rag to remove any remaining caulk residue, soap scum, mildew, or oil. Rub vigorously. Finish by wiping with a clean cloth dampened with rubbing alcohol to remove any solvent residue and ensure the surface is sterilized and perfectly clean. Let it dry completely for at least an hour, or longer if the area was particularly wet.
- If you see mold: For moldy areas, treat with a bleach solution (1 part bleach to 3 parts water) or a commercial mold killer. Allow it to sit for 15 minutes, then rinse thoroughly and dry completely.
4. Mask for Precision – Use painter's tape to create straight, clean lines.
Apply painter's tape along both sides of the gap where the new caulk will go. Position the tape to create a narrow, consistent gap, typically 1/8 to 1/4 inch wide. The tape acts as a guide, ensuring a straight, professional-looking caulk line and preventing excess caulk from spreading onto your sink or countertop. Press the tape down firmly to prevent caulk from bleeding underneath.
- Tape Tip: FrogTape or similar painter's tape with PaintBlock technology works exceptionally well for clean edges.
5. Ready the Caulk Gun – Prepare your silicone caulk for smooth application.
Cut the tip of the caulk tube at a 45-degree angle, making an opening just slightly smaller than the desired bead width (usually 1/8 to 1/4 inch). Puncture the inner seal with a long nail or the built-in poker on your caulk gun. Load the tube into the caulk gun. Squeeze the trigger a few times on a piece of scrap paper to get the caulk flowing smoothly and to ensure there are no air bubbles.
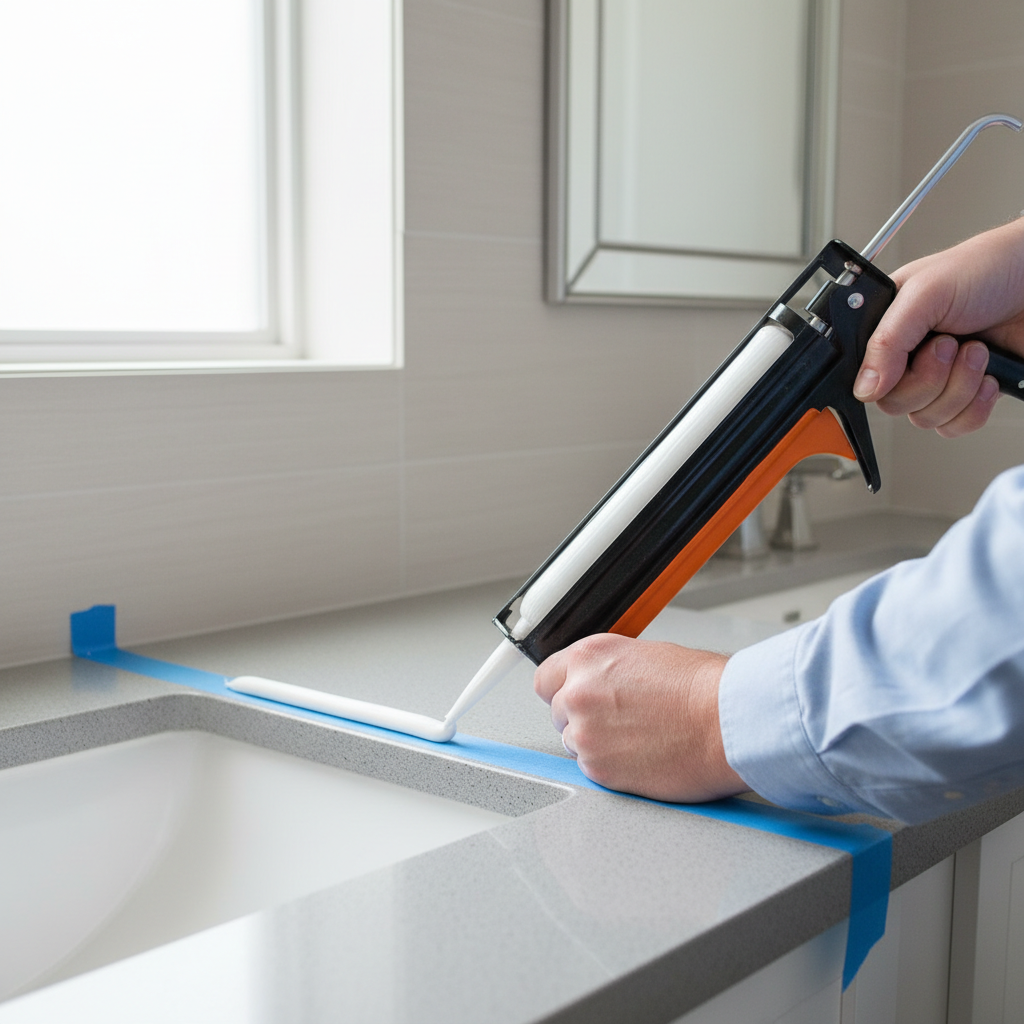
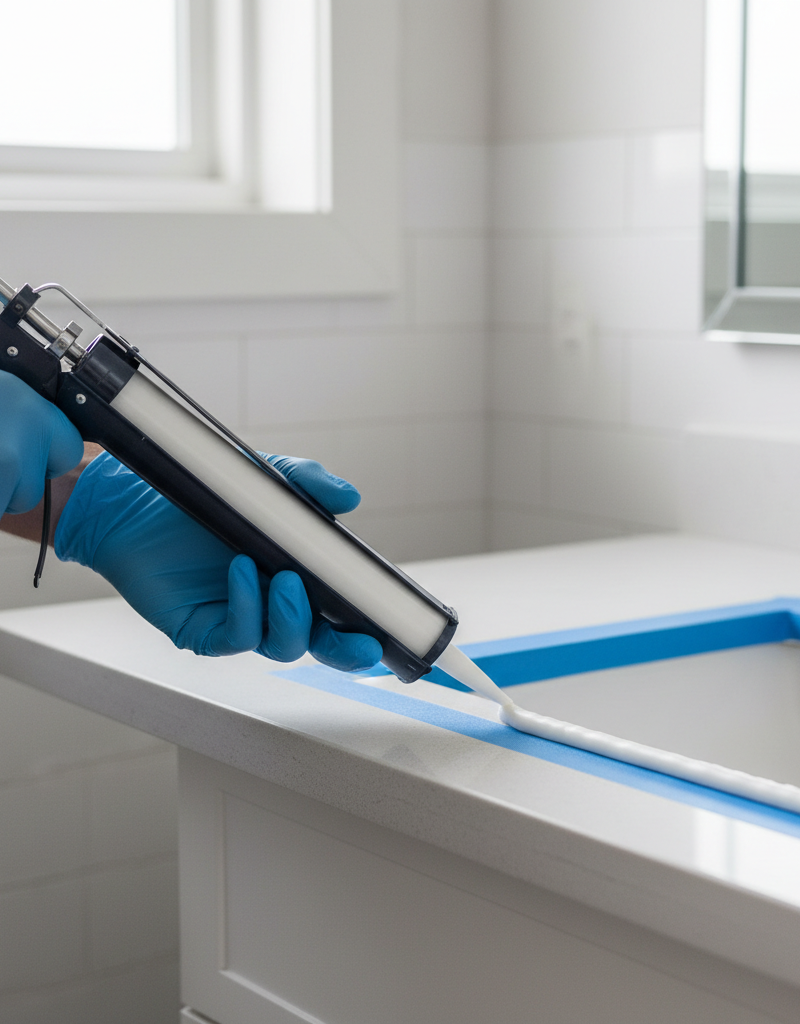
6. Lay the Perfect Bead – Apply caulk in a continuous, even motion.
Start at one end of the gap. Hold the caulk gun at a 45-degree angle to the surface. Apply steady, even pressure to the trigger while moving the gun slowly and consistently along the taped line. Maintain a continuous flow, pushing the caulk into the seam, rather than just laying it on top. Aim for a uniform bead that fills the entire gap without excess bulging. Avoid stopping and starting if possible.
- Pro Tip: If you need to stop, release the trigger pressure immediately to prevent caulk from oozing out. Restart slightly before your previous stop and blend smoothly.
7. Smooth Criminal – Finish the caulk line for a professional, watertight seal.
Immediately after applying the caulk (within 5-10 minutes, depending on the caulk's set time), smooth the bead. You can use a moistened finger (wear a latex glove for easier cleanup and protection), a specialized caulk tool, or even an old plastic spoon. Draw the chosen tool along the caulk line, applying gentle, consistent pressure to create a smooth, concave finish. This forces the caulk deeper into the joint and ensures good adhesion.
8. Peel and Reveal – Remove painter's tape before the caulk fully cures.
Crucially, remove the painter's tape immediately after smoothing the caulk, while the caulk is still wet. Pull the tape slowly at a 45-degree angle away from the freshly caulked line. Waiting until the caulk cures will result in the caulk peeling off with the tape, ruining your clean line. If any small imperfections remain, gently smooth them with your gloved finger.
9. Cure and Protect – Allow ample time for the caulk to fully set.
Check your caulk tube for the recommended curing time. Most silicone caulks require 24 hours before exposure to water, but some may take longer. Avoid using the sink or getting the caulk wet during this period. Full curing can take several days, after which the caulk will reach its maximum hardness and water resistance.
- If you absolutely must use the sink: Try to keep water exposure to a minimum and dry the area immediately after use during the initial 24-hour curing period.
Common Causes
- Improper Surface Preparation: The most frequent culprit. New caulk won't adhere to dirty, greasy, or still-wet surfaces, or to old, degraded caulk. This leads to premature peeling and cracking.
- Using the Wrong Caulk: Latex or acrylic caulks are often chosen for ease of cleanup but lack the flexibility and mold resistance of 100% silicone, especially in high-moisture bathroom environments.
- Inconsistent Bead Application: Applying caulk too thin or too thick, or with uneven pressure, creates weak points that are prone to cracking or provide insufficient material for a lasting seal.
- Skipping the Smoothing Step: Failing to smooth the caulk bead forces it into the joint and compresses it, which is essential for proper adhesion and a watertight seal.
- Insufficient Curing Time: Exposing caulk to water before it has fully cured significantly weakens its bond and longevity, making it susceptible to failure.
- Lack of Expansion Space: While less common around sinks, if materials are butted too tightly together with no gap, the caulk has no space to flex, leading to compression failure.
- Poorly Maintained Ventilation: High humidity over extended periods can overwhelm even good caulk, encouraging mildew growth and eventually degrading the sealant.
Common Mistakes
- Caulking Over Old Caulk: Never do this. The new caulk will only stick to the old, failing caulk, and the seal will be compromised from day one. Always remove every trace of the previous sealant.
- Choosing Acrylic Late Caulk for Bathrooms: While easier to clean up, acrylic latex caulk (even
Related Articles
Keep troubleshooting with these hand-picked guides from FixlyGuide:
- The #1 Mistake Homeowners Make When Caulking a Bathroom Sink (And How to Fix It) — Discover the most common caulk mistake homeowners make around bathroom sinks and follow simple steps to achieve a lasting, watertight seal.
- The Nasty Truth: Is Your Bathroom Sink's Stink Coming From a Hidden Biofilm? — A persistent, foul odor from your bathroom sink drain often signals a hidden biofilm buildup, not just a simple clog, demanding specific cl…
- The 5-Minute Trick to Stop a Dripping Single-Handle Faucet (No Plumber Needed) — A persistent drip from your single-handle faucet is usually caused by a worn-out cartridge, a repair you can typically complete yourself in…
- The 5-Minute Trick to Restore Your Kitchen Sink Sprayer's Lost Pressure — Restore your kitchen sink sprayer's low pressure with a quick, simple trick that often takes less than five minutes and requires no special…
- The #1 Mistake Homeowners Make Caulking a Bathroom Sink (And How to Fix It) — Discover the most common caulking mistake homeowners make around bathroom sinks and how to achieve a waterproof, professional-looking seal…
- The #1 Caulk Mistake That Leads to Mold (And How to Fix It Right) — Discover the most common caulk mistake that causes frustrating mold growth around your bathtub and learn the simple, effective way to recau…
Frequently asked questions
How often should you recaulk a bathroom sink?+
You should typically recaulk a bathroom sink every 3-5 years, or immediately if you notice signs of cracking, peeling, discoloration, or mold growth. High-quality silicone caulk, properly applied, can last even longer.
What is the best caulk for a bathroom sink?+
For bathroom sinks, 100% silicone caulk is highly recommended. It offers superior water resistance, flexibility, and mold/mildew resistance compared to acrylic latex or other types of caulk, ensuring a long-lasting, watertight seal.
Can I caulk over existing caulk?+
No, you should never caulk over existing caulk. This is a common mistake that prevents the new caulk from adhering properly and creates a weak, short-lived seal. Always remove all old caulk completely before applying new.
How long does silicone caulk take to dry before getting wet?+
Most 100% silicone caulks require 24 hours to cure sufficiently before being exposed to water. Some may specify longer or shorter times; always check the manufacturer's instructions on the caulk tube for specific drying and curing times.


Discussion
Loading comments…