
Tools & materials you'll need
Affiliate links- AmazonReplacement foil tape or metal hose clampsOnly if original connectors are damaged
As an Amazon Associate FixlyGuide earns from qualifying purchases — at no extra cost to you. Prices and availability are accurate as of publication and subject to change.
How it works
Your clothes dryer generates heat using either an electric element or a gas burner. A blower motor pulls ambient air into the machine, forces it across the heat source, and tumbles it through the drum with your wet clothes. This hot, moving air absorbs moisture and carries with it fine lint particles shed from the fabric.
This now-hot, moist, lint-laden air is expelled from the drum. It first passes through the lint screen (trap), which is designed to catch the majority of fibers. From there, the air is forced by the blower into the exhaust system. This system consists of three primary components:
- The transition duct: A short, flexible hose connecting the dryer's exhaust port to the wall duct opening.
- The rigid duct: Metal pipe (typically 4-inch diameter aluminum or galvanized steel) that runs inside your walls, floor joists, or attic space.
- The termination hood: The vent on the exterior of your house where the air is finally expelled.
Over time, fine lint particles bypass the screen and accumulate throughout this entire system. The buildup reduces the duct's diameter, increasing back pressure and restricting airflow. This trapped air causes heat to build up inside the dryer drum and chassis, forcing safety thermostats to cycle on and off. Eventually, these components can fail, allowing temperatures to rise until the highly flammable lint itself reaches its ignition point, starting a fire.
Step-by-Step Fix
This procedure details cleaning a standard ground-level dryer vent. If your vent terminates on a roof or a high wall, consider professional service due to safety risks.
1. Gather Your Tools and Disconnect Power — Safety and preparation are non-negotiable.
Before beginning, unplug your electric dryer from its 240V outlet. For a gas dryer, shut off the gassupply using the valve on the pipe behind the appliance, then unplug the standard 120V power cord. Assemble your tools.
- Tools Required:
- Dryer vent cleaning kit (includes a flexible lint brush with multiple connecting rods)
- Cordless drill
- Shop vacuum with hose and crevice tool attachments
- Screwdriver or nut driver for vent clamps
- Sturdy foil tape (UL 181B-FX listed) or new metal worm-drive clamps
- Work gloves and a dust mask
2. Access the Rear of the Dryer — Create a safe and effective workspace.
Carefully slide the dryer straight out from the wall. Avoid twisting or dragging it, as this can damage the flooring or the appliance's feet. You will need at least 2-3 feet of clearance to work comfortably and safely behind the unit. If the machine is heavy, ask for assistance.
3. Disconnect the Transition Duct — Separate the dryer from the wall vent system.
Identify the flexible transition duct connecting the back of the dryer to the pipe in the wall. It is typically secured with circular metal clamps or foil tape. Use a screwdriver or nut driver to loosen the clamps at both the dryer-side and wall-side connections. Gently pull the duct free from both ports. Be prepared for a significant amount of lint to fall out.
4. Clean or Replace the Transition Duct — Eliminate the most common point of failure.
Inspect the transition duct. If it is a white vinyl or flimsy foil-type duct, it does not meet most modern building codes and should be replaced. These materials are more flammable and can easily be crushed, restricting airflow. If you have a semi-rigid or rigid metal transition duct, you can clean it thoroughly with the brush from your kit and the shop vacuum. For optimal safety and performance, replacing it with a new 4-inch diameter semi-rigid metal duct is the recommended course of action.
5. Clean the Dryer Chassis and Exhaust Port — Remove lint from the appliance itself.
With the transition duct removed, use the shop vacuum's crevice tool to clean the exhaust port on the back of the dryer. Next, remove the lint screen from the top or front of the dryer. Vacuum deeply into the lint screen cavity, as a large amount of lint accumulates below the screen's reach. This is a critical and often overlooked area for lint buildup.
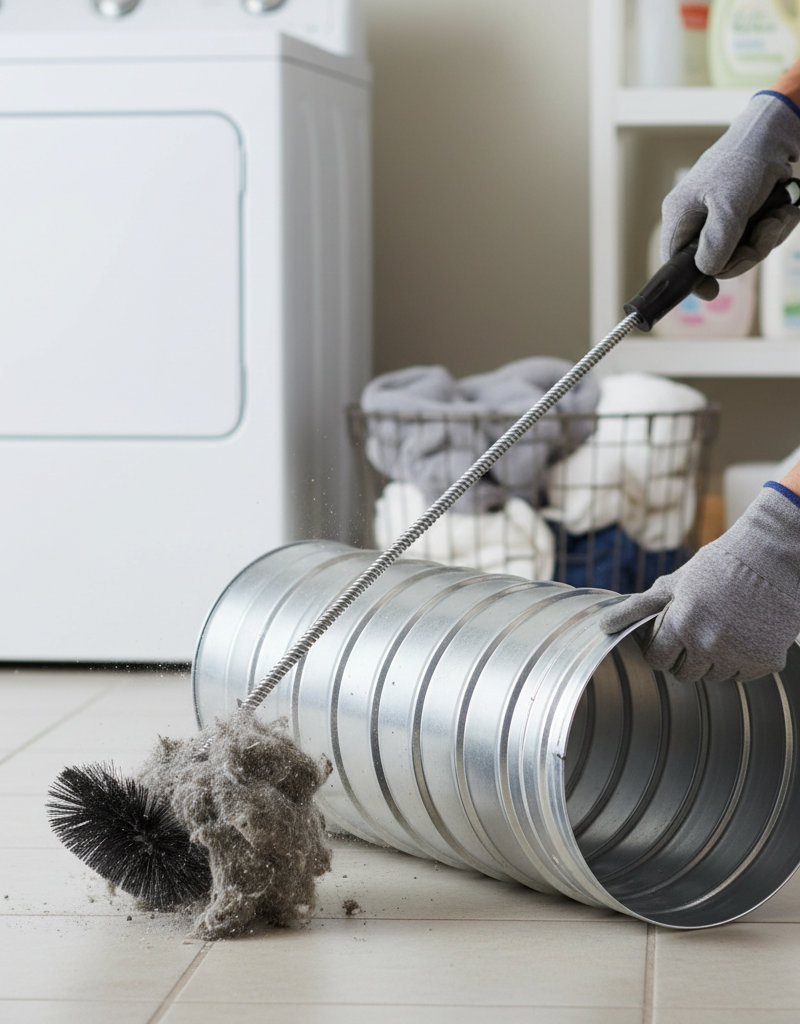
6. Assemble the Brush and Clean from Inside — Clear the primary duct run.
Attach the lint brush head to one of the flexible rods from your cleaning kit. Insert the brush into the duct opening in the wall. Connect your cordless drill to the other end of the rod. Set the drill to rotate in a clockwise direction only (running it counter-clockwise can unscrew the rod sections inside the duct). Start the drill on a low speed and slowly push the rod into the duct.
7. Systematically Advance and Retract the Brush — Work in sections to extract, not compact, the lint.
Push the brush in 2-3 feet at a time. Then, while the brush is still spinning clockwise, pull it back about halfway. This action breaks the lint free and draws it back toward the opening for removal. Repeat this process, adding new rod sections as you go, until you feel the brush reach the exterior vent hood. You may feel resistance at elbow joints; slow down and gently work the brush around the bend. Have a partner use the shop vacuum to capture the dislodged lint as you pull the brush back.
8. Clean the Exterior Vent Hood — Ensure the exit path is completely clear.
Locate the vent termination hood on the outside of your house. Open or remove the flap or louvers. Many hoods have a screen or guard to prevent pests from entering; these are often a major point of clogging and should be thoroughly cleaned of caked-on lint. If possible, insert your cleaning brush from the outside and run it a few feet into the duct to clear the final section. Remove any visible lint, leaves, or nesting material by hand.
9. Final Vacuuming and Inspection — Clear all remaining debris from the system.
Back inside, run the shop vacuum hose as far into the wall duct as it will reach to capture any remaining loose lint. Inspect the interior of the duct with a flashlight to ensure it is clear. Check the ductwork for any signs of damage, disconnection within the wall (indicated by a loose fit), or corrosion.
10. Reassemble with Proper Materials — Create a secure, code-compliant connection.
If you are installing a new semi-rigid metal transition duct, stretch it to the required length before installing, taking care not to over-extend it. Connect one end to the wall duct opening and the other to the dryer's exhaust port. Secure both connections with metal worm-drive clamps or spring clamps. Do not use sheet metal screws, as the tips protrude into the duct and will snag lint. Do not use duct tape; use UL 181B-FX listed foil tape if clamps are not an option.
11. Carefully Position the Dryer — Avoid crushing the new duct.
Gently slide the dryer back into its position. As you push it back, be extremely careful not to kink or crush the transition duct behind it. A compressed duct is the most common cause of airflow restriction. Leave a few inches of space between the dryer and the wall to allow for a gentle, sweeping bend in the duct.
12. Test Airflow and Operation — Verify the cleaning was successful.
Plug the dryer back in and restore the gas supply if applicable. Run the dryer on an "Air Fluff" or "No Heat" setting for 5-10 minutes. Go outside and check the exterior vent hood. You should feel a strong, continuous flow of air. If the airflow is weak, there may still be a blockage, a crushed transition duct, or a problem with the dryer's blower motor.
Common mistakes
- Forgetting to clean the entire system. Many people only clean the flexible hose behind the dryer, ignoring the long run of rigid duct in the wall and the exterior vent hood. The entire pathway, from the dryer's lint trap cavity to the outside air, must be clear.
- Using the wrong materials for the transition duct. White vinyl or flimsy accordion-style foil ducts are a significant fire hazard. They are not permitted by most modern building codes for dryer venting. Always use a UL 2158A listed semi-rigid or rigid metal duct for the transition.
- Crushing the duct when pushing the dryer back. Pushing the dryer flush against the wall will kink and flatten the transition duct, severely restricting airflow and creating an immediate fire hazard, even with a clean vent. Always leave several inches of space.
- Using screws to connect duct sections. The points of screws protrude into the airstream and act as collection points for lint, creating a clog much faster than smooth-walled connections. Use metal foil tape or clamps instead.
- Running the brush drill in reverse. A drill-powered brush kit must always be spun in the clockwise direction specified by the manufacturer. Spinning it counter-clockwise will cause the flexible rod sections to unscrew and separate inside the duct, requiring a much more difficult retrieval process.
- Relying solely on the lint screen. While the screen catches most lint, it is not 100% effective. Fine particles always get through. Thinking that cleaning the screen is sufficient protection is the primary reason vents become clogged over time.
Cost & time breakdown
This table reflects typical costs and time for a standard, accessible dryer vent system. Vents that are exceptionally long, routed through complex spaces, or terminate on a roof may incur higher professional costs.
| Task | DIY Cost | Pro Cost | Time Required |
|---|---|---|---|
| Complete DIY Vent Cleaning | $30 - $60 | N/A | 45 - 90 minutes |
| Professional Vent Cleaning | N/A | $125 - $250 | 30 - 60 minutes |
| Dryer Vent Brush & Rod Kit | $20 - $40 | N/A | N/A |
| Replacement Semi-Rigid Metal Duct | $15 - $30 | Included in Pro | 10 minutes |
| Exterior Vent Hood Replacement | $10 - $25 | $75 - $150 | 20 minutes |
When to call a pro
While cleaning a dryer vent is a manageable DIY task for many, certain situations warrant calling a certified dryer vent technician. Contact a professional if you encounter any of the following:
- Excessively long duct runs: If your total duct length exceeds 35 feet (the maximum typically recommended by dryer manufacturers), a professional's high-powered vacuum and specialized tools are necessary to ensure the entire run is cleared effectively. Note that each 90-degree elbow in the duct is equivalent to adding 5 feet of length, and each 45-degree elbow adds 2.5 feet.
- Rooftop termination: If your dryer vent exits through the roof, attempting to clean it yourself presents a significant fall hazard. Professionals have the required safety equipment and experience to work on roofs.
- Signs of a disconnected or damaged duct: If you suspect the duct has separated or been crushed inside a wall or ceiling (e.g., you find excessive lint in the wall cavity or the brush meets no resistance), a pro will be needed to access, repair, or replace the hidden ductwork.
- Persistent warning lights: If your dryer continues to display a "Check Vent" or "Flow Sense" error after you have thoroughly cleaned the vent, it could indicate a more complex blockage or an issue with the dryer's sensors or blower, requiring professional diagnosis.
- Evidence of pests: If you find a bird's nest or signs of rodents in the vent line, a professional can not only remove the blockage but also install a more effective pest-proof exterior vent hood.
Prevention & maintenance
Proactive maintenance is the key to preventing dryer fires and ensuring your appliance runs efficiently.
- Clean the lint screen after every single load. This is the single most important habit. A full screen restricts airflow, increases drying time, and forces more lint into the vent system.
- Perform a full vent cleaning annually. For households with high laundry volume (4+ people), cleaning every six months is recommended. Mark the date on your calendar to make it a routine task.
- Visually inspect the exterior vent hood quarterly. Check that the damper flap opens and closes freely when the dryer is running. Clear away any lint, leaves, or snow that might be obstructing it.
- Upgrade your transition duct. If you have a flexible vinyl or foil duct, replace it immediately with a semi-rigid or rigid metal duct. This is an inexpensive upgrade that dramatically improves safety and airflow.
- Watch for warning signs. Be alert to longer drying times, clothes that are unusually hot at the end of a cycle, a hot exterior on the dryer itself, or a burning smell. These are clear indicators that your vent is clogged and requires immediate attention.
- Avoid overloading the dryer. Large, heavy loads produce more lint and put extra strain on the dryer's motor and heating elements. Follow the manufacturer's recommendations for load size.
Related Articles
Keep troubleshooting with these hand-picked guides from FixlyGuide:
- Your dryer vent is a 1,800-fire secret weapon (clean it!) — Cleaning your dryer vent regularly is crucial for preventing fires, improving dryer efficiency, and extending the life of your appliance. T…
- The Dryer Vent Fire Trap: 3 Hidden Signs Your Home Is at Risk — Learn the critical signs your dryer vent is clogged and how to safely clean it to prevent a dangerous house fire.
- The $5 Part That Stops Your Dryer From Heating (And How to Replace It in 30 Minutes) — A dryer that tumbles but doesn't heat often points to a blown thermal fuse, a simple and inexpensive fix most homeowners can do themselves.
- The Secret Culprit Behind Your Dead AC (And How to Revive It in 10 Minutes) — Discover how a common, easily replaceable part might be preventing your air conditioner from turning on, and learn to fix it yourself in un…
- The Hidden Culprit Behind That Burning Smell From Your Vents (And How to Fix It) — That strange burning smell from your vents when the heat kicks on usually points to a natural accumulation of dust on your furnace's heat e…
- The Silent Fire Hazard Lurking In Your Laundry Room — Don't let a clogged dryer vent become a silent fire starter. Learn why this common oversight is so dangerous, the clear warning signs to lo…
Frequently asked questions
How often should I clean my dryer vent?+
For most households, cleaning your dryer vent annually is sufficient. However, if you have a large family, frequently dry heavy items like towels or pet bedding, or notice your dryer taking longer than usual to dry clothes, you may need to clean it every six months.
What are the signs of a clogged dryer vent?+
Key signs include clothes taking excessively long to dry, clothes feeling hotter than usual at the end of a cycle, the dryer itself feeling very hot to the touch, a burning smell, or lint accumulating around the dryer vent opening outside your home. Increased energy bills are also a strong indicator.
Can I use a leaf blower to clean my dryer vent?+
While a leaf blower can move some loose lint, it's not recommended as a primary cleaning method. It often pushes lint further into the ductwork or compacts it, rather than fully removing it. A specialized dryer vent brush kit is designed to scrape and pull out clinging lint effectively.
Is it dangerous to clean my own dryer vent?+
Cleaning your dryer vent is a safe and straightforward DIY task for most homeowners, provided you disconnect power (and gas, if applicable) before starting. The main risk is not fully clearing the vent, which can leave a fire hazard. If you're uncomfortable or your vent run is unusually long or complex, hiring a professional is a good option.


Discussion
Loading comments…