Tools & materials you'll need
Affiliate links- AmazonAdjustable wrenchOnly if replacing fill valve
As an Amazon Associate FixlyGuide earns from qualifying purchases — at no extra cost to you. Prices and availability are accurate as of publication and subject to change.
Quick Answer
A running toilet is incredibly annoying and a massive water waste, but the good news is that the vast majority of cases stem from one of three simple issues: a flapper that isn't seating properly, a refill tube that's too far down the overflow pipe, or a float that's set too high. Often, a quick jiggle of the handle or a peek inside the tank reveals the culprit, and the fix can be as fast as 30 seconds to a few minutes. Don't let the thought of plumbing intimidate you; this common problem is often a simple DIY repair.
The Problem
You hear it, even faintly – that persistent hiss or gurgle from your toilet tank, long after you've flushed. This isn't just an annoying sound; it's money literally going down the drain, costing you hundreds of dollars annually in wasted water. A running toilet means that water is continuously flowing from the tank into the toilet bowl, preventing the tank from refilling completely and signaling the fill valve to keep working. This constant cycle leads to higher water bills, unnecessary wear on your toilet's internal components, and the frustrating sound of a toilet that just won't quit.
How It Works
To understand why your toilet is running, it helps to know how a toilet works in its basic cycle. When you flush, you lift a handle connected by a chain to the flapper, a rubber or plastic seal at the bottom of the tank. This flapper opens, allowing accumulated water in the tank to rush into the bowl, creating the siphon effect that removes waste. As the tank empties, the flapper falls back into place, sealing the tank's drain hole. Simultaneously, the float (often a cup or ball) drops with the water level. This drop triggers the fill valve to open, allowing fresh water to flow into the tank and a smaller amount through the refill tube into the overflow pipe, which replenishes the bowl's trap seal. As the water level rises, the float rises with it. Once the water reaches a predetermined level, the float mechanism signals the fill valve to shut off, stopping the flow of water. If any part of this system — the flapper, the chain, the float, or the refill tube — is out of sync or damaged, the tank might never fully seal or fill, leading to that continuous leak and incessant running noise. The fill valve will just keep trying to top off a tank that's slowly, or quickly, losing water.
Step-by-Step Fix
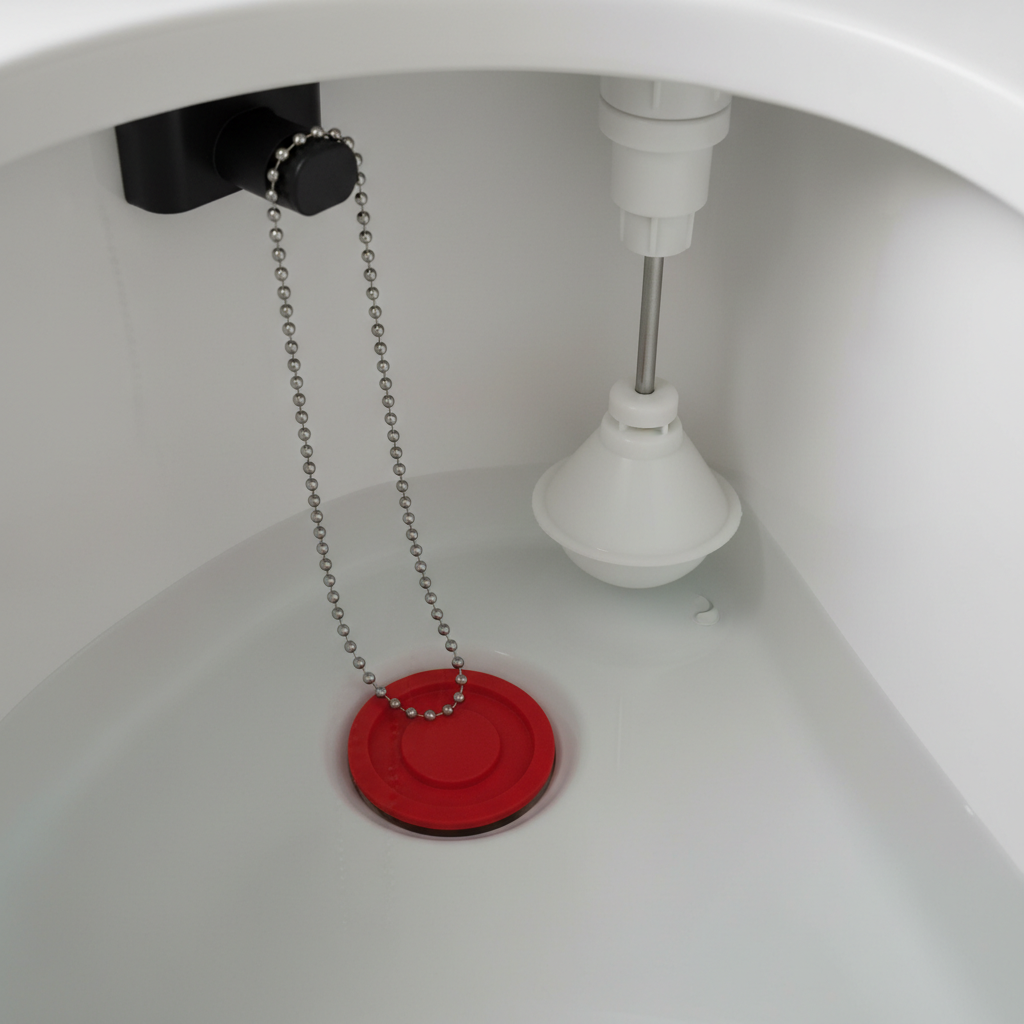
1. Check the Flapper Chain — A common and easily overlooked issue.
- Inspect: Open the toilet tank lid. Observe the chain connecting the flush handle lever to the flapper. Is it too tight, preventing the flapper from fully closing? Is it tangled around the fill valve or overflow tube? Sometimes, the chain is simply caught under the flapper itself.
- Adjust: There should be a small amount of slack in the chain, about 1/2 to 1 inch, when the flapper is fully closed. If the chain is too short, rehook it to a different hole on the flapper or the flusher arm to add more slack. If it's tangled, carefully untangle it. Ensure the chain isn't so long that it can get caught underneath the flapper when it closes.
- Test: Flush the toilet and watch the flapper. Does it fall cleanly into place and create a seal? If so, the running should stop.
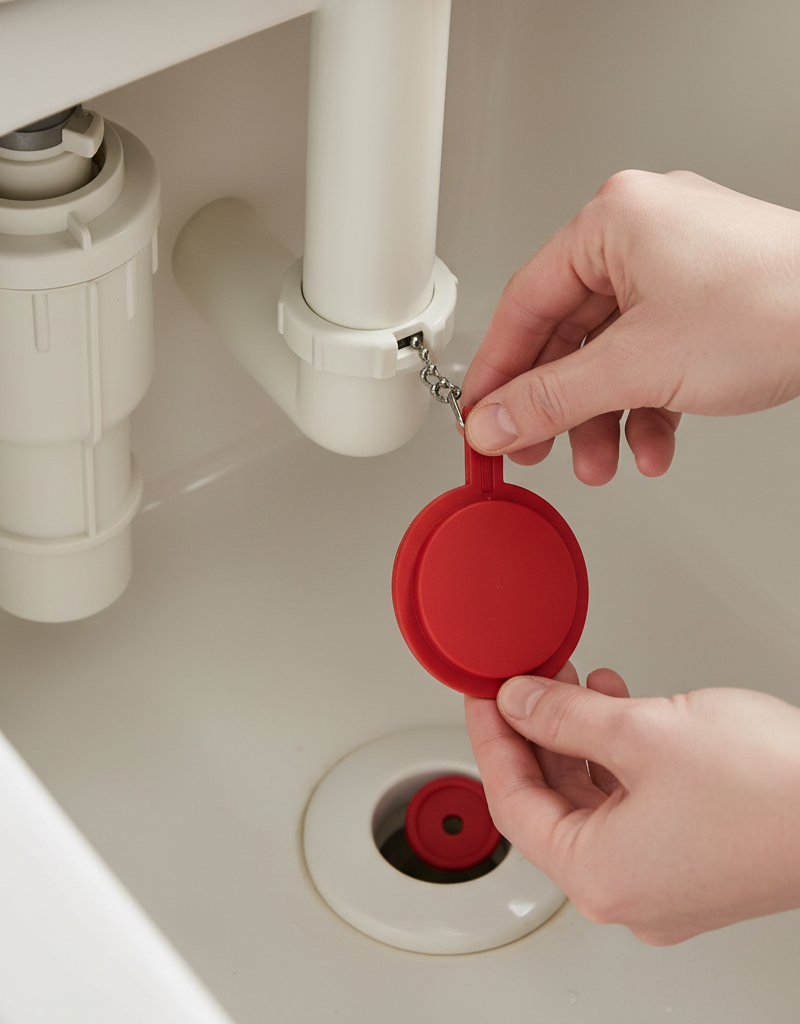
2. Inspect the Flapper Itself — The most frequent culprit for leaks.
- Visual Check: With the tank lid off, flush the toilet and observe the flapper as it closes. Is it warped, cracked, or stiff? Does it look like it's sealing evenly around the drain opening? Older rubber flappers can degrade over time, losing their flexibility and ability to create a watertight seal.
- The Dye Test: For an invisible leak, add a few drops of food coloring to the toilet tank (don't flush). Wait 15-20 minutes. If color appears in the toilet bowl, your flapper isn't sealing.
- Clean or Replace: If the flapper is dirty, gently wipe down its edges and the drain seat with a clean cloth. Mineral deposits can build up and prevent a good seal. If it's worn or damaged, it needs replacement. Replacement is typically simple: unhook the old flapper from the flush arm and the two posts at the base of the overflow tube, then attach the new one, ensuring it's the correct type for your toilet (universal flappers are widely available but checking your toilet's make/model provides the best fit).
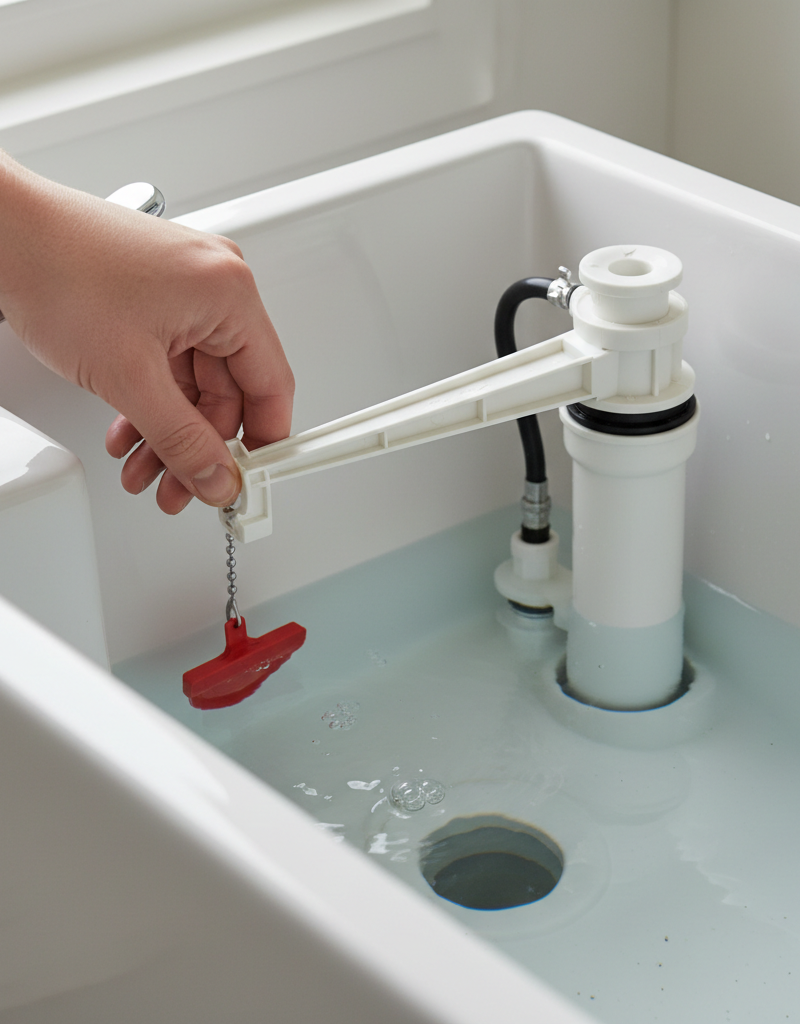
3. Adjust the Float Height — Ensuring the tank fills to the correct level.
- Identify the Float: Modern toilets usually have a 'cup-style' float that slides up and down the fill valve shaft. Older toilets might have a large ball float attached to a rod.
- Too High: If the water level in the tank is too high, it will continuously spill into the overflow tube, causing the fill valve to run without shutting off. The water level should typically be about 1 inch below the top of the overflow tube.
- Adjust Cup-Style Float: There's usually a small adjustment screw or clip on the fill valve shaft. Turn the screw counter-clockwise or slide the clip down to lower the float. Flush and test.
- Adjust Ball-Style Float: Gently bend the metal rod connecting the ball float to the fill valve assembly downwards. Bend it slightly, then test. Repeat until the water level is correct.
4. Position the Refill Tube — Small detail, big impact.
- Location: The refill tube is a small, flexible plastic hose that connects the main fill valve to the overflow tube. Its purpose is to refill the toilet bowl with a small amount of water after flushing to ensure the trap seal is full, preventing sewer gases from entering your home.
- Too Low: The end of the refill tube should be positioned just above the overflow tube opening, pointing slightly downwards into it. If it's pushed too far down into the overflow tube, it can siphon water out of the tank even when the fill valve is shut off, leading to a constant, subtle running.
- Adjust: Pull the refill tube up slightly so its end is about 1/2 inch above the top of the overflow tube, secured by a clip if present. Ensure water flows into the overflow tube and not outside it.
5. Check the Fill Valve for Leaks — Less common, but possible.
- Listen Closely: If none of the above fixes work, the fill valve itself might be faulty or leaking internally. Listen for a faint hiss coming directly from the fill valve assembly, even when the tank is full and the float has risen.
- Inspect for Cracks: While rare, check the plastic body of the fill valve for any visible cracks or signs of water weeping. This usually indicates a compromised component.
- Professional Help: A faulty fill valve often requires replacement. While it's a DIY job for some, it involves shutting off water and careful reassembly. If you're uncomfortable, this is a good point to call a plumber.
Common Causes
- Worn Flapper Seal: The most common culprit. Rubber flappers degrade over time due to chlorine in water, minerals, and general wear and tear, losing their ability to create a watertight seal against the tank's drain opening.
- Improper Flapper Chain Length: A chain that is too short keeps the flapper slightly open, allowing water to escape. A chain that is too long can tangle or get caught under the flapper, preventing a full seal.
- High Water Level (Float Adjustment): If the fill valve's float is set too high, the water level will continuously spill into the overflow tube, keeping the fill valve running indefinitely.
- Misaligned Refill Tube: The small tube that refills the bowl can siphon water out of the tank if it's pushed too far down into the overflow pipe, causing the toilet to run intermittently or continuously.
- Faulty Fill Valve: While less common, the fill valve itself can fail internally, either by not shutting off completely or by slow internal leaks, leading to a constant trickle of water.
- Sediment Buildup: Mineral deposits or sediment can accumulate on the flapper seat or within the fill valve, preventing a proper seal.
Common Mistakes
- Ignoring the Sound: Many homeowners brush off a running toilet as a minor annoyance. This is a mistake that leads to significantly higher water bills and premature wear on toilet components.
- Assuming Major Repair: Often, people think a running toilet signifies a complex, expensive repair, when most issues are simple, quick adjustments or cheap part replacements.
- Buying the Wrong Flapper: Not all flappers are universal. Buying a flapper that doesn't fit your toilet's make and model can lead to continued leaks or improper flushing. Take your old flapper to the store or check your toilet model number.
- Over-tightening Components: When replacing parts, especially the bolts holding the tank to the bowl, over-tightening can crack the porcelain, leading to a much more expensive repair.
- Not Checking the Refill Tube: Homeowners often focus on the flapper and float but overlook the small refill tube's critical role and proper positioning.
- Bending the Float Arm Too Much: If you have a ball-style float, bending the arm excessively can damage the fill valve mechanism. Make small, incremental adjustments.
Cost & Time Breakdown
| Task | DIY Cost | Pro Cost | Time |
|---|---|---|---|
| Adjust Flapper Chain | $0 | $75–$150 | <1 minute |
| Adjust Float Height | $0 | $75–$150 | <2 minutes |
| Reposition Refill Tube | $0 | $75–$150 | <1 minute |
| Replace Flapper | $8–$20 | $100–$180 | 10–20 minutes |
| Replace Fill Valve | $15–$30 | $150–$250 | 30–60 minutes |
| Plumber Diagnostic Visit | N/A | $75–$120 (min) | N/A |
Tips & Prevention
- Regular Visual Inspection: Every few months, lift your toilet tank lid and visually inspect the flapper, chain, and water level. Look for signs of wear or misalignment.
- The Dye Test Annually: Perform the food coloring dye test once a year to catch silent flapper leaks before they escalate into high water bills.
- Clean Flapper & Seat: Periodically clean any mineral buildup on the flapper and the drain seat at the bottom of the tank to ensure a good seal.
- Avoid Harsh Cleaners: Don't use in-tank drop-in toilet bowl cleaners that contain harsh chemicals, as these can prematurely degrade rubber flappers and other plastic components.
- Set Water Level Correctly: Ensure the water level in the tank is always about 1 inch below the overflow tube. This prevents constant spilling and wasted water.
- Consider a Specialty Flapper: If you live in an area with highly chlorinated water, consider installing a chlorine-resistant flapper designed for longevity.
When to Call a Professional
While many running toilet issues are straightforward DIY fixes, there are times when it's best to call a licensed plumber. If you've tried all the common troubleshooting steps—adjusting the chain, inspecting and replacing the flapper, setting the float, and positioning the refill tube—and the toilet continues to run, the problem might be more complex. This could indicate a deeper issue with the fill valve that isn't easily accessible, or potential cracks in the fill valve housing. Additionally, if you notice water leaking from the base of the toilet or around the tank itself, or if the toilet is old and the components are seized or rusted, attempting further DIY repairs could lead to damage. A professional can quickly diagnose the underlying cause, safely replace any faulty components, and ensure your toilet is functioning efficiently and leak-free, saving you frustration and potential water damage.
Related Articles
Keep troubleshooting with these hand-picked guides from FixlyGuide:
- The 30-Second Toilet Fix Plumbers Don't Want You to Know — A running toilet can waste hundreds of gallons of water per day, but often the fix is incredibly simple and takes under a minute.
- The $2 Trick to Stop a Running Toilet (Plumbers Don't Want You to Know) — Discover the simple, two-dollar fix that can stop your running toilet in minutes, saving water and preventing costly repairs.
- The $5 Flapper Trick Plumbers Hope You Don't Know About Your Running Toilet — Discover the secret $5 flapper trick that often fixes a running toilet, saving you money on parts and plumber call-outs.
- The $5 Secret to Silencing a Running Toilet (Plumbers Hope You Don't Know) — A running toilet is usually caused by a simple issue with the flapper or its chain, leading to constant water waste and higher utility bill…
- The 5-Minute Trick to Fix a Weak Kitchen Sink Sprayer (No Plumber Needed) — Restore full power to your kitchen sink sprayer with simple, DIY steps that tackle common culprits like clogs and diverter issues.
- Why Your Extension Cord Keeps Tripping the Breaker (And the Simple Test to Find the Hidden Cause) — Discover why your extension cord keeps tripping the circuit breaker and learn how to safely diagnose and fix the real problem with a simple…
Frequently asked questions
Why is my toilet running constantly?+
The most common reasons for a constantly running toilet are a worn-out flapper seal, a flapper chain that's too short or tangled, an improperly adjusted float (causing the water level to be too high), or a refill tube that's positioned incorrectly.
How do I know if my flapper is the problem?+
You can perform a dye test. Add a few drops of food coloring to your toilet tank and wait 15-20 minutes without flushing. If color appears in the toilet bowl, your flapper isn't sealing properly and is likely the culprit.
How much water does a running toilet waste?+
A continuously running toilet can waste hundreds, even thousands, of gallons of water per day, leading to significantly higher water bills. Even a small, silent leak can add up to thousands of gallons over a year.
Can I fix a running toilet myself?+
Yes, most running toilet issues are simple DIY fixes that only require basic tools and inexpensive parts like a new flapper. By following a few troubleshooting steps, you can often resolve the problem in minutes without needing a professional.
When should I call a plumber for a running toilet?+
If you've tried all the common troubleshooting steps (flapper, chain, float, refill tube) and the toilet still runs, or if you see water leaking from the base of the toilet or the tank itself, it's time to call a licensed plumber.

Discussion
Loading comments…