Tools & materials you'll need
Affiliate linksAs an Amazon Associate FixlyGuide earns from qualifying purchases — at no extra cost to you. Prices and availability are accurate as of publication and subject to change.
Quick Answer
A slow-filling toilet tank is typically not a sign of a deep plumbing blockage in your drain system, but rather an issue with the fresh water supply entering the tank. The most common culprits are a partially closed water supply stopcock, sediment buildup or a failing diaphragm within the toilet's fill valve assembly, or a kinked supply line. Addressing these issues often involves simple adjustments or part replacements that most homeowners can handle.
The Problem
There's nothing quite as annoying as flushing a toilet only to wait an eternity for the tank to refill. This common household plumbing issue, a slow-filling toilet tank, can drastically reduce water efficiency, disrupt daily routines, and occasionally hint at underlying problems that, if left unaddressed, could lead to more significant headaches down the line. While it doesn't usually signal an emergency, it's a persistent annoyance that homeowners want to resolve quickly.
The core of the problem lies in the volume and pressure of water making its way into the toilet tank. Instead of a swift, strong gush, you get a trickle or a weak stream. This can range from a slightly extended refill time to several minutes of waiting, making subsequent flushes inconvenient or impossible. Most often, the issue originates within the toilet itself, specifically around the water supply line and the fill valve mechanism, rather than a problem with your home's main water pressure or drainage.
How It Works
To understand why your toilet tank might be filling slowly, it's essential to grasp the basic mechanics of how a toilet operates. A typical gravity-fed toilet consists of two main components: the bowl and the tank, which sits above it. When you flush, a flapper or flush valve at the bottom of the tank opens, allowing water to rush into the bowl, creating the siphon action that evacuates waste. Once the tank is empty, the flapper closes, and the refill cycle begins.
This refill cycle is governed by the fill valve, often called the ballcock. The fill valve is a sophisticated mechanism that controls the entry of fresh water into the tank and then shuts off precisely when the water reaches a predetermined level. Modern fill valves are typically float-cup or float-arm designs. As the tank empties, the float drops, opening a diaphragm valve inside the fill valve assembly. This allows pressurized water from your home's main supply, via a small supply line connected to the bottom of the tank, to flow into the tank. Simultaneously, a small refill tube channels some of this water into the overflow tube, refilling the bowl trap after the flush to maintain the water seal that blocks sewer gases.
As the tank fills, the float rises with the water level. Once the water reaches the set fill line, the float has risen high enough to actuate a lever or plunger that closes the diaphragm valve, stopping the water flow. The speed at which the tank fills is dependent on several factors: the water pressure from your main supply, the openness of the toilet's integral stopcock (the small valve on the wall or floor near the toilet), the condition of the flexible supply line, and most critically, the unhindered operation of the fill valve itself. Any restriction in this pathway – from the stopcock to the fill valve's internal components – can lead to a slow fill.
Step-by-Step Fix
1. Check the Water Supply Stopcock — Ensure the water supply valve is fully open to allow maximum flow.
- Tools: None (hand-turn valve)
- Action: Locate the small shut-off valve on the wall or floor beneath the toilet tank. It often has a small handle or a lever. Turn it counter-clockwise as far as it will go to ensure it's completely open. Sometimes, these valves get partially closed accidentally during cleaning or minor adjustments. A partially closed valve is the most common and easiest fix for a slow-filling tank. After opening, flush the toilet and observe the fill speed.
- If this doesn't work: Proceed to check the supply line and fill valve components.
2. Inspect the Supply Line — Look for kinks or damage in the flexible hose connecting the wall to the toilet tank.
- Tools: None
- Action: Visually inspect the flexible braided or solid supply line. Ensure there are no sharp bends, kinks, or signs of damage that might restrict water flow. Sometimes, the line can get twisted during installation or if the toilet is moved slightly. Straighten any kinks you find. If the line appears visibly damaged, corroded, or very old, consider replacing it.
- Safety: Turn off the water at the stopcock before disconnecting any lines. Have a small bucket or towel ready to catch residual water.
3. Clean or Replace the Fill Valve Filter Screen — Sediment can accumulate at the base of the fill valve, restricting water entry.
- Tools: Adjustable wrench, small bucket, old toothbrush or awl, small pliers (optional)
- Action: First, turn off the water supply to the toilet at the stopcock. Flush the toilet to empty the tank as much as possible, holding the handle down to remove most of the water. You may need to sponge out the remaining water. Disconnect the toilet supply line from the bottom of the fill valve's shank, typically a plastic nut. Place a bucket underneath to catch any drips. Inside the shank, you might see a small rubber washer and a filter screen. Carefully remove the screen (you might need small pliers or an awl to gently pry it out). Clean any visible sediment or rust particles from the screen using an old toothbrush and water. Rinse thoroughly. Reinsert the screen, reconnect the supply line, and turn the water back on to test.
- If this doesn't work: The restriction might be further inside the fill valve assembly.
4. Adjust the Fill Valve Float Level — Incorrect float settings can sometimes affect fill speed, though usually, they impact fill level.
- Tools: Screwdriver (for some models), hands
- Action: Most modern fill valves have an adjustable float cup or arm. Ensure the float mechanism moves freely and isn't snagging on anything inside the tank. While less common for slow filling, an improperly set float could theoretically affect the valve's opening mechanism. Generally, the float level is adjusted to set the water level in the tank, not the fill speed directly. However, if the float is impeding the fill valve's full opening, it could contribute to slowness. Consult your fill valve's manual if available, or look for a screw adjustment or a clip to slide the float cup up or down. Ensure it's not set too low, which would prematurely close the valve.
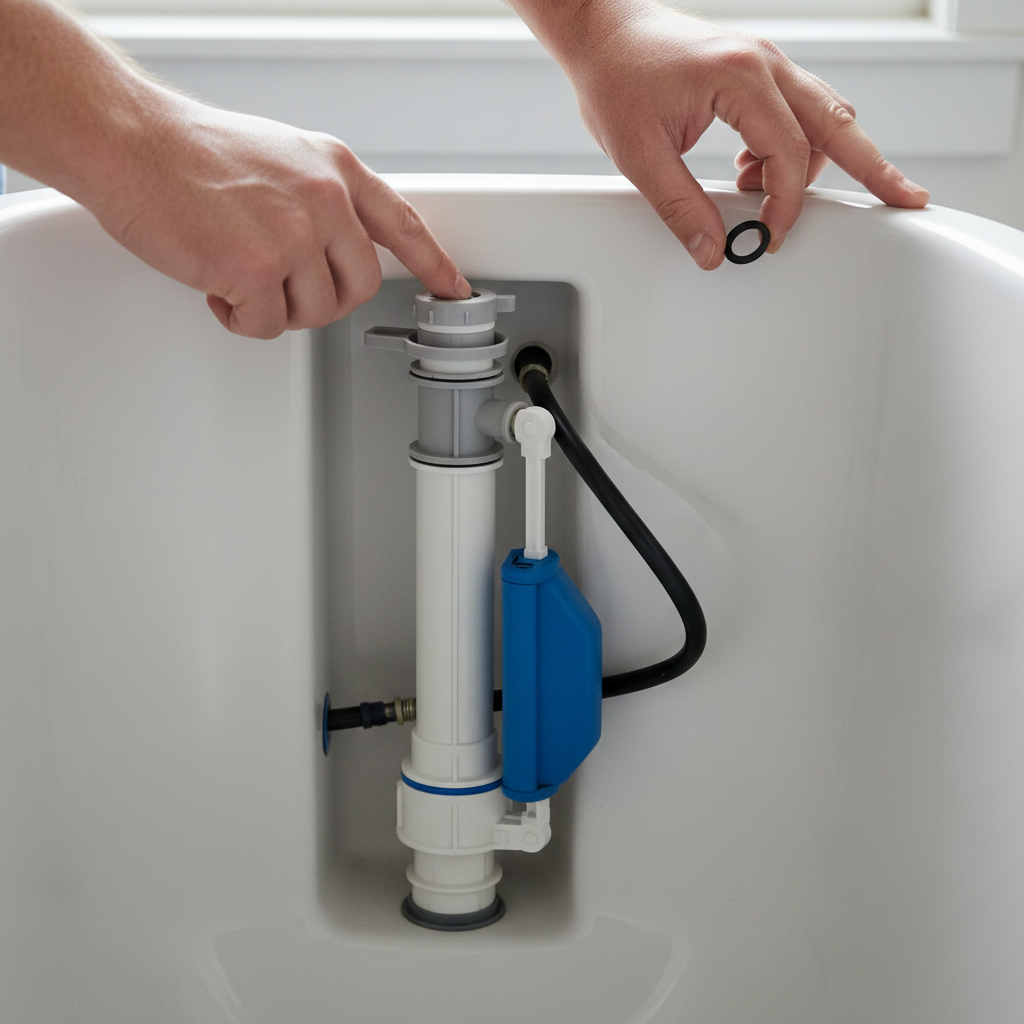
5. Clean the Fill Valve Diaphragm or Replace the Seal — The diaphragm is crucial for water flow control and is often prone to sediment buildup.
- Tools: Small flathead screwdriver, old toothbrush or awl, new fill valve seal/gasket kit (if replacing parts)
- Action: This step requires disassembling the top portion of the fill valve. First, turn off the water supply and flush the toilet. Remove the cap of the fill valve. This usually involves twisting it counter-clockwise (for older models) or gently prying it open with a small flathead screwdriver. Be careful not to break any plastic tabs. Once the cap is off, you'll expose the diaphragm (a rubber seal) and possibly a small brass or plastic metering pin. Carefully lift out the diaphragm. Inspect it for any tears, hardening, or holes. Also, check the small opening and the seating area for sediment or debris. Clean all components with an old toothbrush. If the diaphragm is stiff, cracked, or has visible damage, it's best to replace it. Many hardware stores sell universal fill valve repair kits that include a new diaphragm and other seals. Reassemble carefully, ensuring the diaphragm is seated correctly. Turn the water back on and test.
- Safety: Always handle plastic components gently to avoid snapping them. Ensure the water is OFF before disassembling the fill valve.
- If this doesn't work: If cleaning doesn't help or the diaphragm is damaged, full fill valve replacement is the next step.
6. Replace the Entire Fill Valve Assembly — If internal components are worn or cleaning doesn't help, a new fill valve is the most reliable solution.
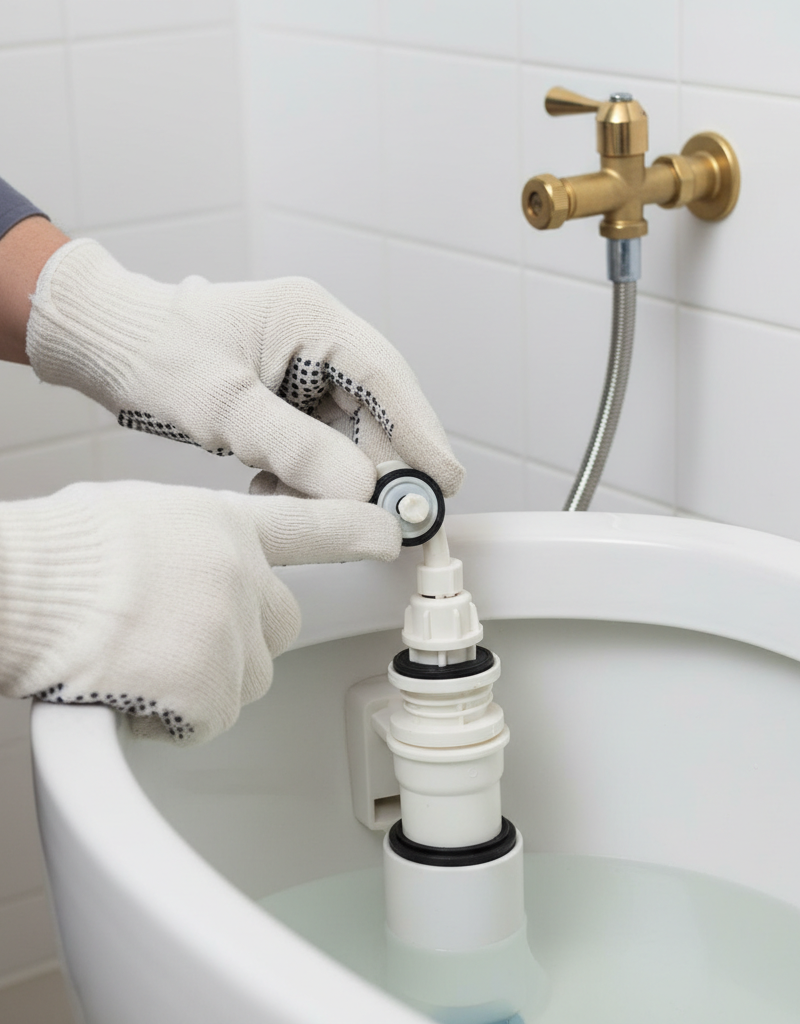
- Tools: Adjustable wrench, large sponge, old towels, bucket, new universal fill valve kit, pliers (optional)
- Action: This is the most comprehensive fix for a slow-filling fill valve. Turn off the water supply and flush the tank dry. Use a sponge to remove any remaining water. Disconnect the supply line from the bottom of the tank/fill valve. Use an adjustable wrench to loosen the large retaining nut on the underside of the tank that secures the fill valve. Once the nut is removed, lift the old fill valve out of the tank. Clean any sediment from the hole. Install the new fill valve by inserting it into the hole, ensuring the new rubber gasket is properly seated on the tank's interior. Tighten the retaining nut from below – hand-tighten plus a quarter turn with a wrench, being careful not to overtighten plastic nuts. Connect the refill tube to the overflow pipe and trim if necessary. Reconnect the supply line, ensuring the washer is in place and it's hand-tightened before a final quarter turn with a wrench. Turn the water supply back on and check for leaks. Adjust the new fill valve's float height for the desired water level.
- Safety: Do not overtighten plastic nuts, as they can crack. Ensure the water is off and the tank is empty before removing the old valve.
Common Causes
- Partially Closed Stopcock: The shut-off valve beneath the toilet is not fully open, restricting water flow.
- Clogged Fill Valve Filter: Sediment, rust, or mineral deposits accumulate in the small filter screen at the base of the fill valve, blocking water entry.
- Degraded Fill Valve Diaphragm/Seals: The rubber diaphragm or seals inside the fill valve harden, crack, or become stiff with age and mineral buildup, preventing the valve from opening fully.
- Kinked or Obstructed Supply Line: The flexible hose connecting the stopcock to the toilet tank is bent, kinked, or has internal debris restricting flow.
- Low Home Water Pressure (less common for individual toilet issues): While less likely to affect only one toilet, overall low home water pressure could manifest as a slow fill. However, if other fixtures are fine, the issue is almost certainly localized to the toilet.
- Wrong Type of Fill Valve (rare): An old or improperly installed fill valve might not be designed for optimal flow rates, though this is rare in modern installations.
Common Mistakes
- Ignoring the Obvious (Stopcock): Many homeowners immediately assume a complex problem and overlook the simplest fix: ensuring the water supply valve is fully open. Always check this first.
- Overtightening Plastic Connections: When replacing a supply line or fill valve, overtightening the plastic nuts can crack them, leading to leaks and requiring further repair or replacement.
- Not Turning Off Water Completely: Forgetting to shut off the toilet's water supply before attempting internal repairs can lead to messy leaks and potential water damage.
- Improperly Seating the Fill Valve Diaphragm: When cleaning or replacing the diaphragm, if it's not seated perfectly flat and aligned, the fill valve will either leak or not shut off properly.
- Using Harsh Chemicals: Attempting to clear blockages or clean internal fill valve components with harsh chemicals can damage rubber seals and plastic parts, leading to more problems than they solve.
- Ignoring a Worn Supply Line: Overlooking a kinked, corroded, or aged flexible supply line can lead to future leaks or continued slow filling, even if the fill valve is fine.
Cost & Time Breakdown
| Task | DIY Cost | Pro Cost | Time |
|---|---|---|---|
| Check/Adjust Stopcock | $0 | $75–$150 (trip fee) | 5–10 min |
| Inspect/Straighten Supply Line | $0 | $75–$150 (trip fee) | 5–10 min |
| Clean Fill Valve Filter | $0 | $75–$150 (trip fee) | 15–30 min |
| Replace Fill Valve Diaphragm | $5–$15 | $100–$200 | 20–40 min |
| Replace Fill Valve Assembly | $15–$30 | $150–$250 | 30–60 min |
Tips & Prevention
- Annual Stopcock Check: Once a year, fully close and then reopen the toilet's stopcock valve. This helps prevent it from seizing up due to mineral buildup and ensures it's always fully open for optimal flow.
- Water Quality Awareness: If you live in an area with hard water or well water, mineral and sediment buildup is more likely. Consider installing a whole-home water filter to reduce these issues in all your plumbing fixtures.
- Regular Fill Valve Inspection: Every 1-2 years, remove the top of your fill valve (after turning off the water) and quickly inspect the diaphragm and internal components for debris or signs of wear. A quick rinse can prevent future issues.
- Proper Water Level: Ensure your toilet's water level is set correctly – typically about an inch below the top of the overflow tube. An improperly set float can sometimes stress the fill valve components.
- Listen for Changes: Pay attention to the sounds your toilet makes. A gurgling sound during refilling or a weak, sputtering refill could be early warning signs of an issue developing in the fill valve.
- Consider Quality Replacement Parts: When replacing a fill valve, opt for a reputable brand. Quality components tend to last longer and resist sediment buildup better than cheaper alternatives.
When to Call a Professional
While most slow-filling toilet problems are DIY-friendly, there are specific situations where calling a licensed plumber is the wisest course of action. If you've attempted all the described troubleshooting steps, including replacing the entire fill valve assembly, and the tank still fills slowly, the issue might stem from lower water pressure within your home's main plumbing system, or a more complex blockage in the supply line that's beyond the toilet itself. Additionally, if you notice leaks around the toilet's base after performing repairs, or if you're uncomfortable working with plumbing and connections, a professional can ensure the job is done correctly and without damage. Anytime you suspect an issue with your home's main water pressure rather than just an isolated toilet problem, or if the stopcock itself is seized or leaking, a plumber has the tools and expertise to diagnose and safely resolve these more advanced issues.
Related Articles
Keep troubleshooting with these hand-picked guides from FixlyGuide:
- The 4 Hidden Reasons Your Toilet Tank Fills Slowly (And How to Fix Them in Under an Hour) — A toilet tank that fills slowly is a common, annoying plumbing problem, often caused by easily fixable issues within the fill valve or wate…
- The Secret Culprit Behind Your Slow Toilet Tank (And the $7 Fix) — A slow-filling toilet tank is a common, annoying problem, usually caused by a simple issue within the fill valve that homeowners can fix th…
- The 4 Hidden Reasons Your Toilet Tank Fills Slowly (And How to Fix Them in 30 Minutes) — A slow-filling toilet tank is a common, annoying problem that usually points to issues with the fill valve or water supply and can often be…
- The 3 Hidden Reasons Your Toilet Tank Fills Slowly (And How to Fix Each) — Discover the common culprits behind a slow-filling toilet tank, from crucial valve issues to subtle obstructions, and learn how to restore…
- The Secret Culprit Behind Your Slow Toilet Fill (It's Not Clogs!) — A slow-filling toilet tank is usually caused by issues with the fill valve, not clogs, affecting both water pressure and flush efficiency.…
- Is One Drip Emitter Starving? The Secret Culprit (It's Not Clogging) — A single drip emitter refusing to hydrate your plants can be frustrating, but the fix is often simpler than you think and rarely a clog.
Frequently asked questions
Why is my toilet tank filling up so slowly?+
The most common reasons for a slow-filling toilet tank are a partially closed water supply stopcock, a clogged filter screen or diaphragm within the fill valve, or a kinked supply line. Sediment and mineral buildup often restrict water flow through the fill valve over time.
Can I increase my toilet's water fill speed?+
You can increase your toilet's fill speed by ensuring the water supply stopcock is fully open, cleaning any sediment from the fill valve's filter screen, or replacing a worn-out fill valve diaphragm or the entire fill valve assembly. These steps restore optimal water flow.
How do I know if my fill valve is bad?+
Signs of a bad fill valve include a slow-filling tank, the toilet constantly running or cycling on and off, or the fill valve making loud noises (hissing, squealing) during the refill cycle. If cleaning the filter and diaphragm doesn't help, replacement is often necessary.
Is it easy to replace a toilet fill valve?+
Replacing a toilet fill valve is a moderate DIY task for most homeowners. It involves shutting off the water, emptying the tank, disconnecting and reconnecting a few nuts, and adjusting the float. Kits are widely available, and the process typically takes 30-60 minutes.


Discussion
Loading comments…