
Tools & materials you'll need
Affiliate links- AmazonHeavy-duty drywall anchors (e.g., toggle bolts)if not provided with shelf hardware and unable to hit studs
As an Amazon Associate FixlyGuide earns from qualifying purchases — at no extra cost to you. Prices and availability are accurate as of publication and subject to change.
Quick Answer
Many homeowners attempt to install elegant floating shelves directly into drywall using only various types of drywall anchors, leading to shelves that sag, pull away from the wall, or even collapse. The quick answer is that for truly strong and lasting floating shelf installations, especially for shelves that will hold more than just light decorative items, you absolutely must anchor at least one, and ideally both, sides or mounting points of the shelf directly into a wall stud. Drywall anchors are acceptable for very light loads or to supplement stud mounting, but they are rarely sufficient on their own for significant weight or cantilevered forces.
The Problem
Floating shelves offer a sleek, minimalist aesthetic, creating an illusion of space and lightness. However, that illusion often leads DIYers astray when it comes to installation. Unlike traditional shelves with visible brackets, floating shelves rely on an internal mounting system—a hidden beam, rod, or metal plate—that slides into the back of the shelf itself. This internal support is then attached to the wall. The problem arises when this support is merely screwed into drywall alone, even with seemingly robust drywall anchors. Drywall, essentially gypsum plaster pressed between sheets of paper, has very little structural integrity on its own. While a toggle bolt or molly bolt can theoretically hold a decent amount of pull-out weight in ideal conditions, it's not designed for the shear forces and constant leverage that a loaded floating shelf exerts. Over time, these anchors can loosen, tear through the drywall, or simply sag, making your beautiful shelves look shoddy or even dangerous.
How It Works
Understanding a bit about wall construction demystifies why stud mounting is so critical. Standard interior walls in most homes are constructed with vertical lumber framing, typically 2x4s or 2x6s, known as studs, spaced either 16 or 24 inches on center. These studs run from the floor to the ceiling and are the primary structural components to which drywall sheets are attached. When you screw into a stud, you're engaging with solid wood, providing a robust anchor point that can bear significant weight. In contrast, when you screw into drywall, even with an anchor, you're relying on the anchor to expand or toggle behind a thin sheet of material.
Floating shelf hardware usually consists of either a concealed metal bracket with protruding rods that slide into corresponding holes in the shelf, or a sturdy cleat that attaches to the wall and the shelf then locks onto it. In both scenarios, the strength of the installation is entirely dependent on how securely that wall-mounted bracket or cleat is fastened. When the shelf is loaded with books, dishes, or decor, it creates leverage. The further out the weight is from the wall, the more downward force is applied to the top fasteners and upward force on the bottom fasteners of the bracket. Without the solid backing of a stud, drywall alone simply can't withstand these long-term forces without eventually failing. This leverage effect is precisely why light picture frames are fine with simple drywall anchors, but a loaded floating shelf is not.
Step-by-Step Fix
1. Gather Your Arsenal – Get the right tools before you begin.
Make sure you have all the necessary tools and materials. This includes a reliable stud finder, a level, a drill, appropriate drill bits, a pencil, and the mounting hardware that came with your floating shelves. Having everything at hand will make the process smoother and prevent interruptions.
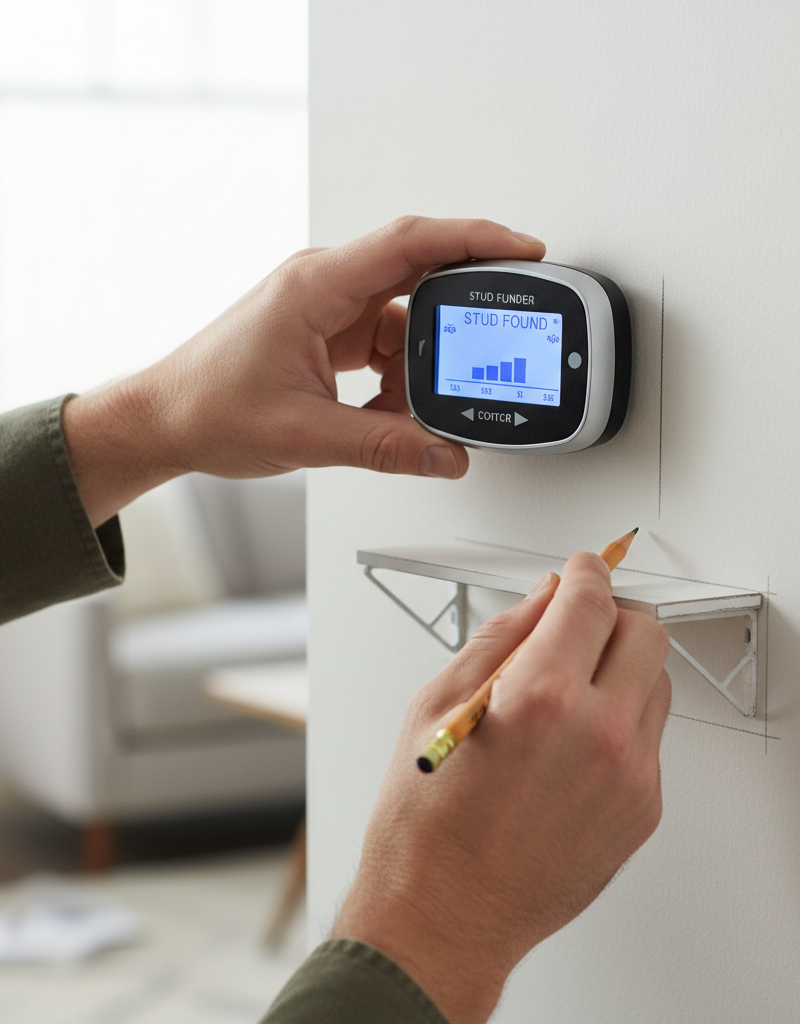
2. Locate Those Studs – Don't guess, scan for structure.
Use a stud finder to locate the vertical studs in the wall where you plan to install your shelf. Move the stud finder horizontally along the wall, marking the edges of each stud with a pencil. Typically, studs are 1.5 inches wide. Mark the center of the stud for the most secure attachment. Scan above and below your intended shelf height to confirm the stud's vertical path. Repeat this process for the entire length of your planned shelf. Don't skip this step; it's the most critical for a strong installation. Mark the stud centers clearly.
3. Map Out Your Shelf Placement – Precision prevents slanted shelves.
Hold the shelf or its mounting bracket (if it's a separate piece) against the wall at your desired height. Use a level to ensure it's perfectly horizontal. With your pencil, mark the exact locations where the mounting screws will go, making sure at least one, and preferably two, of these marks align with the center of a stud you previously identified. If your shelf is long and hits multiple studs, that's ideal. If it only hits one, plan to use heavy-duty drywall anchors for the other mounting points closest to the stud, or for any mounting points that fall between studs.
4. Pre-Drill Pilot Holes – Create a path for screws, not a struggle.
Using your drill, create pilot holes at each marked screw location. If you are drilling into a stud, use a drill bit slightly smaller than the diameter of your mounting screws. This allows the screws to bite firmly into the wood without splitting it. If you are drilling for drywall anchors, use the drill bit size recommended by the anchor manufacturer. Safety Note: Always ensure there are no electrical wires or plumbing lines behind the wall before drilling. A non-contact voltage tester can help identify live wires, but scanning for studs and understanding your home's layout is also important.
5. Install Drywall Anchors (If Needed) – Supplement stud strength.
For any mounting points that do not align with a stud, install your chosen heavy-duty drywall anchors according to the manufacturer's instructions. Common types include toggle bolts, molly bolts, or self-drilling anchors. Toggle bolts and molly bolts require larger pilot holes and expand or engage behind the drywall for a strong hold. Self-drilling anchors simply screw into the drywall. Ensure they are flush and secure before proceeding.
6. Mount the Bracket or Support – Fasten securely to the wall.
Position the shelf's mounting bracket or internal support mechanism over your pre-drilled holes. Use a level one last time to confirm it's still perfectly horizontal. Drive the appropriate screws through the bracket and into the pilot holes. For stud connections, drive the screws firmly into the studs until the bracket is tight against the wall. For drywall anchors, screw into them until they are secure, but do not overtighten, as this can strip the anchor or damage the drywall. Ensure the bracket doesn't wobble or shift.
7. Install the Shelf Body – The final, satisfying step.
Carefully slide the actual shelf body onto the mounted bracket or support rods. Most floating shelves are designed to fit snugly. Some may have small set screws underneath to secure the shelf to the bracket; if so, tighten these gently to prevent the shelf from lifting off the bracket. Step back and ensure the shelf is level and flush against the wall. Test its stability by gently pressing down before adding items.
8. Load and Monitor – Use common sense and observe.
Begin placing items on your new shelf, starting with lighter items. Distribute weight evenly across the shelf, avoiding placing all heavy items on one end if only one side is stud-mounted. Periodically check the shelf for any signs of sag, loosening, or pulling away from the wall. If you notice any issues, empty the shelf and reassess the mounting.
Common Causes
- Over-reliance on Drywall Anchors: Assuming all drywall anchors are equal, or that any anchor can support significant cantilevered weight. Many anchors are only rated for static, pull-out weight, not the dynamic, shear, and leverage forces of a loaded shelf.
- Missing Wall Studs: Failing to use a stud finder, or not confirming the full width and depth of a stud, leading to screws partially engaging a stud or missing it entirely.
- Incorrect Anchor Type for Load: Using anchors designed for light picture frames (e.g., plastic expansion anchors) for heavy floating shelves.
- Improper Installation of Anchors: Not installing drywall anchors exactly according to manufacturer instructions, such as using the wrong drill bit size or not fully expanding toggle bolts.
- Overtightening Screws into Drywall: Stripping out drywall anchors by over-driving screws, especially with power tools, which compromises their holding strength.
- Ignoring the Lever Arm Effect: Forgetting that weight placed further out on a floating shelf creates significantly more stress on the fasteners closest to the wall.
Common Mistakes
- Guessing Stud Locations: Never assume studs are exactly 16 or 24 inches on center or that they will be where you expect. Always use a reliable stud finder and mark precisely. Guessing often leads to drilling into empty drywall.
- Using Plastic Expansion Anchors for Heavy Shelves: The small, flimsy plastic anchors included with many light decorative items are completely inadequate for floating shelves that will hold anything more than a feather. Invest in robust metal toggle or molly bolts.
- Not Using a Level: Eyeballing the shelf's straightness inevitably leads to a crooked installation. A level is non-negotiable for a professional-looking result.
- Overloading the Shelf: Even perfectly installed shelves have weight limits. Know the weight of your shelf, its contents, and the capacity of your mounting hardware. When in doubt, err on the side of caution.
- Forgetting Pre-drilling: Screwing directly into drywall for anchors or into studs without pilot holes can cause the drywall to crumble or the wood to split, weakening the hold.
- Ignoring Electrical and Plumbing: Drilling blindly can hit electrical wires or water pipes, leading to dangerous and costly repairs. Always use caution, check for hazards, and consider the typical locations of these systems (e.g., outlets often have wiring running vertically).
Cost & Time Breakdown
| Task | DIY cost | Pro cost | Time |
|---|---|---|---|
| Stud Finder (if needed) | $20–$50 | Included | 5–10 min |
| Heavy-Duty Drywall Anchors | $10–$25 | Included | 10–20 min |
| Floating Shelf Hardware | $0 (comes with shelf) | No direct cost | 5–15 min |
| Drill & Bits (if needed) | $0–$50 (borrow/own) | Included | 5 min |
| Installation of 1-2 shelves | $0–$50 (materials only) | $150–$300 (per shelf) | 1–2 hours |
Tips & Prevention
- Embrace the Stud: Always prioritize anchoring into at least one stud for every floating shelf. The more fasteners you can get into solid wood, the better.
- Check Shelf Weight Limits: Before purchasing, ensure the floating shelf itself is rated for the weight you intend to place on it, and that its mounting hardware is robust enough.
- Consider Shelf Material: Heavy solid wood shelves inherently weigh more and require stronger mounting than hollow core or lighter materials. Account for this in your installation.
- Test Drills: If unsure about hitting a stud, use a small, thin drill bit to carefully drill a test hole. If you feel resistance and pull out wood shavings, you've found a stud. Patch small holes easily.
- Use Toggle Bolts for Between-Stud Support: If you absolutely cannot hit two studs, then metal toggle bolts offer the strongest solution for drywall-only attachment points, far superior to plastic anchors or self-drilling designs.
- Distribute Weight Evenly: When loading your newly installed shelves, spread the weight out. Avoid stacking heavy objects in one concentrated area, especially near the end of a shelf not supported by a stud.
When to Call a Professional
While installing floating shelves can be a satisfying DIY project, there are specific situations where calling a licensed professional is the smartest and safest choice. If you are struggling to locate studs reliably, or if your stud finder indicates unusual stud spacing or no studs where you expect them, a professional can use more advanced tools like borescopes or inspect the wall framing in an attic or basement (if accessible) to determine the best mounting points. Furthermore, if you are planning to install very large, heavy, or custom-built floating shelves that will hold substantial weight (e.g., a full library of books, heavy dishware collections), the stakes are higher. A professional carpenter or handyman specializing in installations will have the expertise to ensure these structures are securely fastened, potentially reinforcing the wall if necessary. They can also address any concerns about hidden electrical wiring or plumbing that might be in the way, preventing accidental damage and costly repairs. Don't risk damaging your walls or, worse, having shelves collapse; a professional installation ensures peace of mind and safety for your home and belongings.
Related Articles
Keep troubleshooting with these hand-picked guides from FixlyGuide:
- The #1 Mistake Homeowners Make Installing Floating Shelves (and How to Fix It) — Discover the crucial error many DIYers make when mounting floating shelves into drywall and learn the simple steps to ensure a secure, sag-…
- Your Floating Shelves Sag? The 3 Drywall Mistakes You're Making — Learn how to install floating shelves into drywall securely and prevent common issues like wobbling or damage with the right tools and tech…
- Your Floating Shelves Failed? 3 Hidden Drywall Mistakes. — Learn how to safely and securely install floating shelves into drywall using the right anchors and tools, avoiding common mistakes.
- The 4-Inch Drywall Hole Fix: Why Most DIY Patches Fail (And How to Do It Right) — Don't let a small drywall hole become a recurring nightmare – discover the secret to a seamless, lasting repair that disappears into your w…
- The Giant Drywall Hole: 3 Hidden Causes (And The Best Permanent Fix) — Don’t just slap a patch on a large drywall hole—understand the common causes and learn the most durable repair method homeowners can tackle.
- The #1 Mowing Mistake That Invites Weeds (And How to Fix It in 15 Minutes) — Discover the secret to a thriving lawn and banish weeds by avoiding the most common mowing error homeowners make, improving grass health dr…
Recommended for DIYers & woodworkers
Sponsored
The Top 20 Tools for Workshops of Any Budget
No stationary machines or power tools required — plus 3 fundamental tools that can't be bought at any price.
Get the free guide
Ted's Woodworking — The #1 Woodworking Resource
Detailed instructions, dimensioned drawings, materials & cutting lists, and 3D schematics for every skill level.
See the plansSponsored: links above are affiliate links. FixlyGuide may earn a commission on qualifying purchases — at no extra cost to you.
Frequently asked questions
Can I install floating shelves without hitting a stud?+
While it's technically possible with heavy-duty toggle bolts or other high-strength drywall anchors, it is strongly discouraged for anything beyond very light decorative items. For reliable strength and to prevent sagging or collapse, always aim to anchor at least one, ideally two, mounting points into a wall stud.
What's the best type of drywall anchor for floating shelves?+
For any mounting points that cannot hit a stud, metal toggle bolts (e.g., Snaptoggle, Toggle Lock) are generally considered the strongest option for hollow walls like drywall. Molly bolts (expansion anchors) are also a good choice for moderate loads. Avoid basic plastic expansion anchors for floating shelves.
How much weight can a floating shelf hold?+
The weight capacity depends on several factors: the shelf's construction, the quality of its mounting hardware, and critically, how it's anchored to the wall. Shelves anchored securely into multiple studs can hold significantly more weight than those relying solely on drywall anchors. Always check the manufacturer's rating and err on the side of caution.
How do I find studs in my wall?+
The most effective method is to use an electronic stud finder. Slide it horizontally along the wall until it indicates the presence of a stud. Mark both edges and the center. You can also sometimes tap on the wall and listen for a solid sound, or look for electrical outlets, which are typically attached to a stud.
My floating shelf is sagging, what should I do?+
A sagging shelf almost always indicates insufficient support. Remove items from the shelf immediately. Reassess the mounting points: were they all in studs? If not, you may need to reposition the shelf to hit a stud or replace inadequate drywall anchors with stronger toggle bolts. You might need to patch old holes before remounting.


Discussion
Loading comments…