- Impact Damage: Moving furniture, playful children, or objects hitting the wall are primary culprits. This includes doorknobs lacking wall protectors.
- Picture Hanging Mishaps: Nails pulled out, or pictures falling can leave behind various sized holes.
- Anchor Failures: Wall anchors that pull out prematurely or were installed incorrectly can leave larger, jagged holes.
- Pest Infestation: Rodents can chew small holes through drywall, particularly in less-frequented areas like basements or utility rooms. Always address the underlying pest issue before patching.
- Plumbing or Electrical Access: Sometimes holes are cut for repairs (e.g., accessing a leaky pipe or electrical box) and not properly patched afterward.
General remodeling · Renovation planning
| Project category | General remodeling |
|---|---|
| Problem type | Renovation planning |
| Trade required | General contracting |
| Urgency | Planned project |
| Safety risk | Low safety risk |
| DIY suitability | Pro recommended |
| Cost category | Major investment |
| Typical timeline | Design and permitting often 2–4 months before work starts |
| Contractor type | General contractor |
Repair option
Phase the work and fix the building envelope first.
Replacement option
Full renovation with permits, design, and a general contractor.
Common causes
- Space no longer fits how the household lives
- Resale preparation
- Deferred maintenance stacking up
Relevant tools:project cost estimatorcompare quoteshome improvement material prices
Published July 18, 2026Last updated August 17, 2026
Tools & materials you'll need
Affiliate linksAs an Amazon Associate FixlyGuide earns from qualifying purchases — at no extra cost to you. Prices and availability are accurate as of publication and subject to change.
Quick Answer
Patching a small hole in drywall is a straightforward DIY task that prevents minor damage from escalating. The most effective method for holes up to about 4-6 inches involves using a self-adhesive mesh patch or cutting a 'California patch' from a new piece of drywall. The key to an invisible repair lies in the meticulous application of joint compound, feathering its edges into the existing wall, and applying thin, even coats, rather than one thick layer. Proper sanding and priming are crucial final steps to ensure the patch disappears completely once painted.
The Problem
You've moved a picture, bumped furniture, or perhaps a doorknob slammed against the wall one too many times. Now, there's an unsightly hole in your drywall, anywhere from a tiny nail pop to a fist-sized punch. While small, these imperfections are glaring, detract from your home's appearance, and can even attract pests or allow moisture intrusion in humid environments. Leaving them unaddressed is an open invitation for future headaches, making a simple, timely repair essential.
How It Works
Drywall, also known as plasterboard or gypsum board, is a panel made of gypsum plaster pressed between two sheets of thick paper. It's the standard material for interior walls and ceilings due to its ease of installation, fire resistance, and smooth finish. When drywall is damaged, the gypsum core can crumble, and the paper facing can tear.
Patching a hole works by introducing new material (usually joint compound and sometimes a small piece of drywall or a mesh patch) to fill the void and restore the wall's integrity and smooth surface. The success of a patch depends on creating a strong bond between the new material and the old, and then skillfully blending the repair so it's indistinguishable from the surrounding wall. This 'blending' is achieved through a multi-stage process of applying thin layers of joint compound, allowing each to dry, and then sanding smooth. The joint compound (often called 'mud') adheres to the drywall paper and hardens, creating a durable, paintable surface. When applied correctly, thicker in the center of the patch and gradually thinning out towards the edges, it creates a subtle ramp that eliminates any visible seam or bump, making the repair disappear under paint.
Step-by-Step Fix
1. Prepare the Area — Clean, trim, and ready the hole for patching.
- Clear Debris: Use a utility knife to carefully trim away any loose paper or crumbling gypsum around the edge of the hole. The goal is to create a clean, stable perimeter. Pull out any stray nails or screws if present. For smaller holes (up to 2 inches), ensure the edges are flat and flush with the wall surface. For larger holes (2-6 inches), you might need to slightly bevel the edges inward to provide a better surface for the mud to adhere.
- Clean Surrounding Wall: Wipe the area around the hole with a damp cloth to remove any dust, dirt, or grease. A clean surface ensures proper adhesion of the joint compound and patch.
2. Choose Your Patch Method — Select the right material based on hole size.
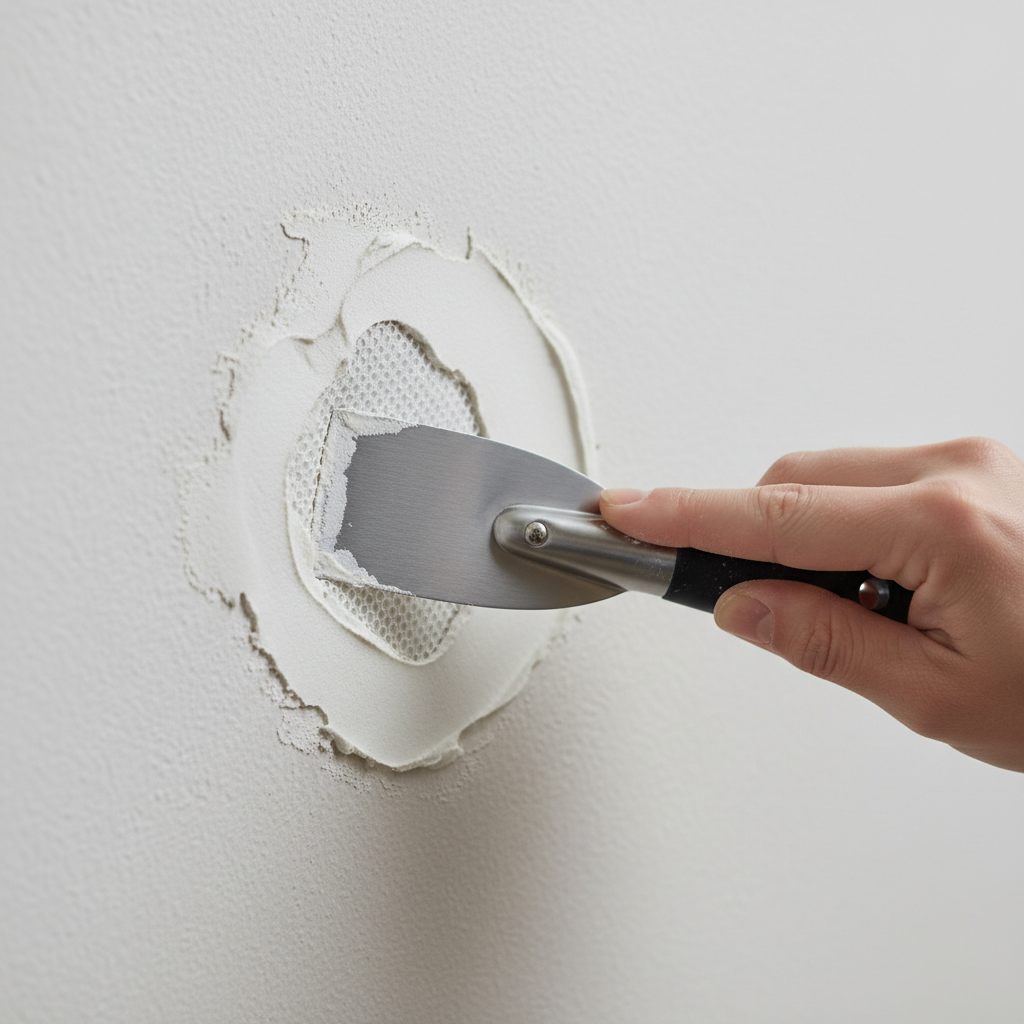
- For Holes 0.5 to 4 Inches (Small): Use a self-adhesive fiberglass mesh drywall patch. These patches often have a metal plate in the center for added rigidity. Peel off the backing and firmly press the patch over the hole, ensuring it covers the entire damaged area and adheres flat to the wall.
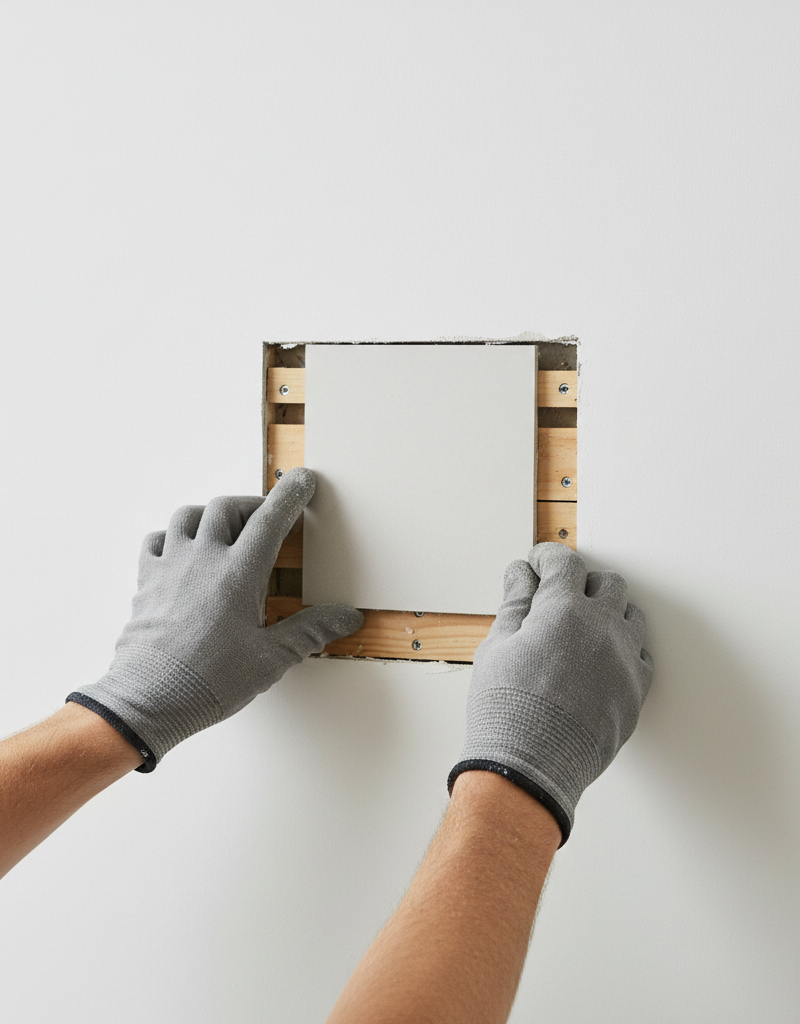
- For Holes 4 to 6 Inches (Medium): Consider a California patch for a more robust repair. Cut a square or rectangle around the hole with a utility knife. Then, cut a new piece of drywall roughly 2 inches larger than the hole on all sides. Score the back paper of the new drywall piece 1 inch in from each edge. Carefully snap the gypsum away from the paper, leaving the front paper intact and creating a 'paper flange'. Apply joint compound to the back of these paper flanges and around the hole's edges on the wall. Insert the patch into the hole, pressing the paper flanges firmly against the existing drywall. Hold it in place until the compound begins to set. Alternatively, for medium holes, a small piece of drywall with furring strips or scrap wood bracing behind the existing wall can be screwed in for support, then the new patch piece screwed to this bracing.
3. First Coat of Joint Compound — Apply the base layer over the patch.
- Safety First: Wear gloves and a dust mask when working with drywall compound and sanding.
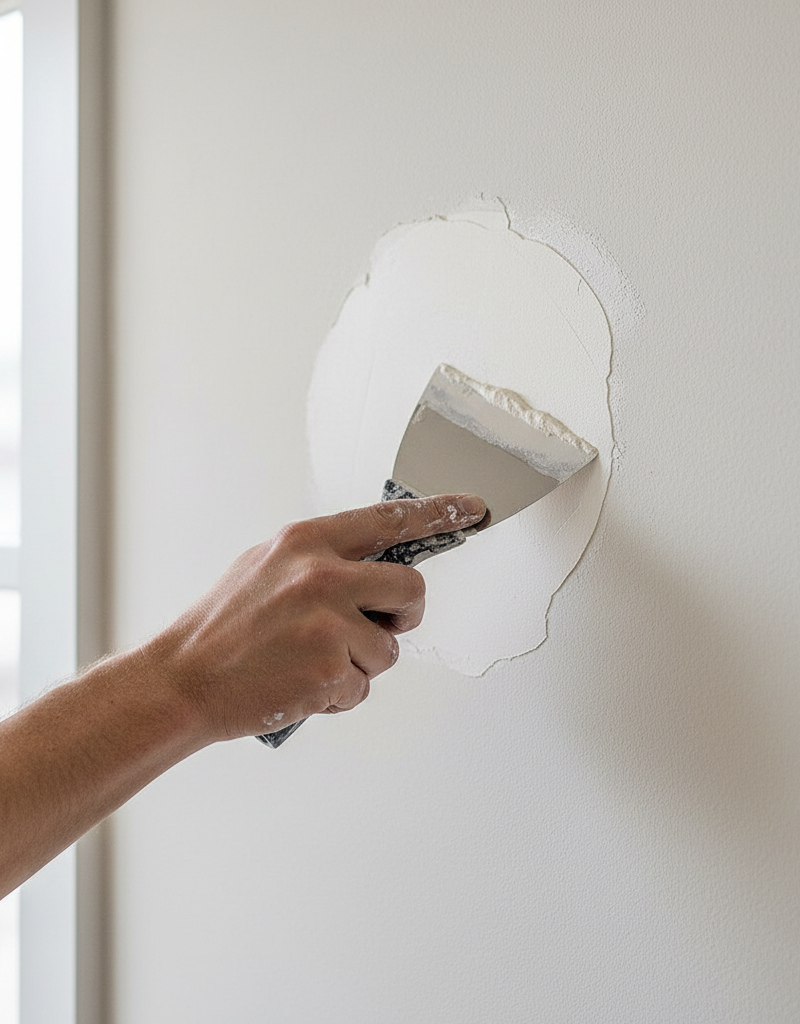
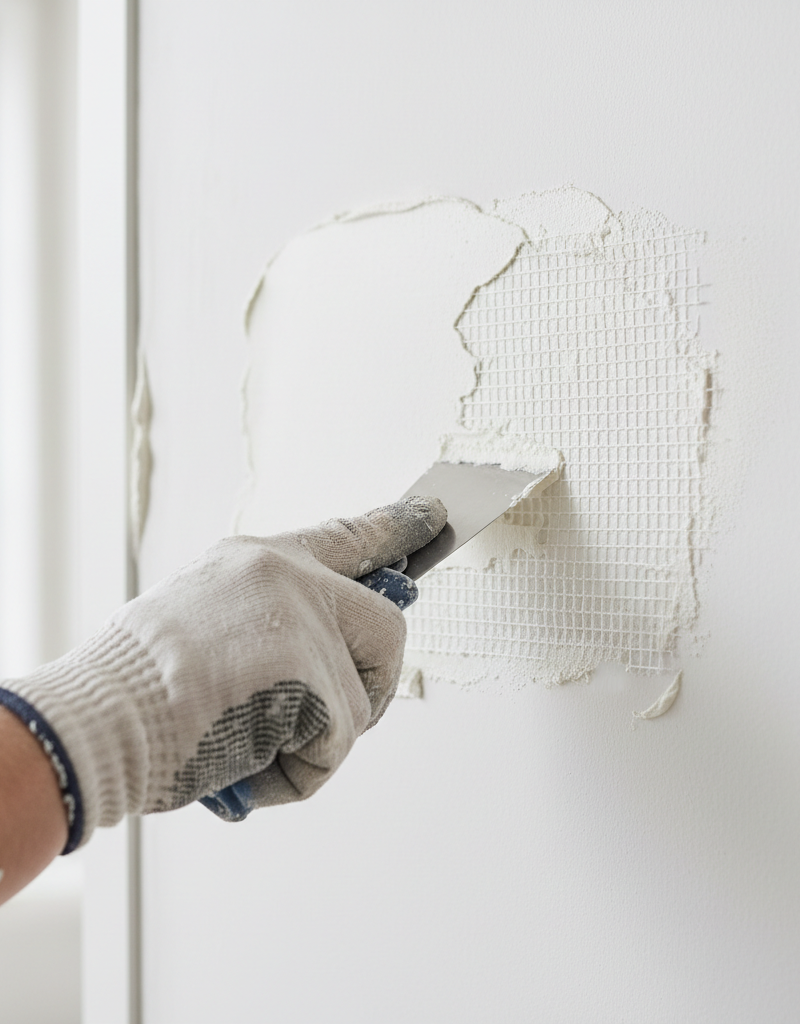
- Apply a Thin Layer: Using a 6-inch drywall knife, scoop a small amount of all-purpose or lightweight joint compound. Apply a thin, even layer over the entire mesh patch (if used) or over the California patch and its paper flanges. Extend the compound about 2-3 inches beyond the edges of the patch. The goal of this first coat is to embed the patch and fill the initial void. Too much compound at once will lead to cracking and make sanding much harder down the line.
- Smooth and Feather: Hold the knife at a slight angle (around 30 degrees) and apply gentle, even pressure to smooth the compound. Feather the edges of the compound into the existing wall by reducing pressure as you reach the outer perimeter, making it thinner and blending it seamlessly.
- Dry Time: Allow the first coat to dry completely. This can take anywhere from 4 to 24 hours, depending on humidity, temperature, and compound thickness. Consult the product's instructions. Do not rush this step.
4. Second Coat and Wider Feathering — Build up the compound and blend further.
- Light Sanding (Optional): Once dry, if there are any significant ridges or bumps from the first coat, very lightly sand them down with 150-grit sandpaper or a sanding sponge. The goal is just to knock down high spots, not to remove the entire coat.
- Apply Second Coat: Use a 10-inch drywall knife (or a 12-inch for even better feathering) and apply another thin layer of joint compound. This coat should extend another 2-3 inches beyond the first coat. This wider application helps to further feather the edges and create a smooth, imperceptible transition.
- Smooth Carefully: Use smooth, arcing strokes, keeping the knife clean. Minimize ridges as you go. Again, feather the edges thinly into the existing wall.
- Dry Time: Allow to dry completely (4–24 hours).
5. Final Skim Coat (If Needed) — Achieve perfect smoothness.
- Inspect Thoroughly: After the second coat is dry, critically examine the patch under good lighting. Look for any depressions, ridges, or imperfections. If the patch isn't perfectly flush or smooth, a third, very thin skim coat might be necessary.
- Apply Thin Skim: Using your widest drywall knife (10-12 inches), apply an extremely thin skim coat of joint compound over the entire area, focusing on filling any remaining inconsistencies. This coat should be almost transparent in places, just filling the microscopic pores and slight imperfections.
- Feather Widely: Feather this final coat out even further, ensuring absolutely no discernible edge where the compound meets the existing wall.
- Dry Time: Allow to dry completely.
6. Sanding and Finishing — The critical step for an invisible repair.
- Ventilation: Ensure good ventilation when sanding to minimize dust. Wear a dust mask and eye protection.
- Start with Finer Grit: Once all coats are completely dry, begin sanding with 180-grit to 220-grit sandpaper or a fine-grit sanding sponge. Start gently, using a circular motion, or long, even strokes. The goal is to make the patched area perfectly smooth and flush with the surrounding wall, eliminating all ridges, knife marks, and subtle bumps.
- Check for Smoothness: Periodically run your hand over the patch (with eyes closed is often best for feeling subtle imperfections) to feel for any high or low spots. Use a bright work light held at an angle to highlight shadows from imperfections. Continue sanding until perfectly smooth. Do not over-sand, as this can create depressions.
- Clean Dust: Wipe down the sanded area thoroughly with a damp (not wet) cloth to remove all sanding dust.
7. Prime the Patch — Essential for consistent paint finish.
- Primer Choice: Use a high-quality, stain-blocking, water-based drywall primer/sealer (PVA primer is excellent for this). Do not skip this step! Joint compound is porous and will absorb paint differently than the surrounding drywall, leading to flashing or dull spots if not primed.
- Apply Evenly: Apply a thin, even coat of primer over the entire patched area, extending slightly beyond where the joint compound ends. Allow it to dry completely according to the manufacturer's instructions.
- Second Prime Coat (Optional): For best results, especially with darker paint colors, a second coat of primer can be beneficial after the first has dried.
8. Paint the Wall — The final step to an invisible repair.
- Match Paint: Use existing wall paint if you have it. If not, color match precisely. Paint the primed area, extending slightly beyond the patch. For best results and to avoid a 'halo' effect, it's often advisable to paint the entire wall from corner to corner, or at least from the patch to the nearest architectural break (like a door frame or corner).
- Apply Multiple Thin Coats: Apply two thin coats of paint rather than one thick one. Allow each coat to dry completely between applications.
Common Causes
- Impact Damage: Moving furniture, playful children, or objects hitting the wall are primary culprits. This includes doorknobs lacking wall protectors.
- Picture Hanging Mishaps: Nails pulled out, or pictures falling can leave behind various sized holes.
- Anchor Failures: Wall anchors that pull out prematurely or were installed incorrectly can leave larger, jagged holes.
- Pest Infestation: Rodents can chew small holes through drywall, particularly in less-frequented areas like basements or utility rooms. Always address the underlying pest issue before patching.
- Plumbing or Electrical Access: Sometimes holes are cut for repairs (e.g., accessing a leaky pipe or electrical box) and not properly patched afterward.
- Drywall Degradation: In rare cases, water damage or long-term moisture can cause drywall to soften and crumble, leading to holes, though this usually manifests as larger areas of damage.
Common Mistakes
- Applying Too Much Compound: The single biggest mistake. Thick layers of joint compound don't dry properly, crack, and are extremely difficult to sand smooth, resulting in a noticeable bulge on the wall. Always aim for thin, buildable layers.
- Inadequate Drying Time: Rushing between coats of mud leads to cracking, poor adhesion, and an uneven finish. Each coat must be completely dry before sanding or applying the next.
- Skipping the Primer: Joint compound is very porous. Without priming, the patched area will absorb paint differently, creating a dull, flattened, or 'flashing' appearance even after multiple coats of paint. This is why many DIY patches are obvious.
- Poor Feathering: Not extending the joint compound far enough beyond the patch and not thinning the edges creates a visible ridge or 'shoulder' where the patch meets the existing wall. Wider knives and light pressure are key here.
- Insufficient Sanding/Over-Sanding: Not sanding enough leaves bumps and knife marks. Over-sanding can create a depression or remove too much compound, exposing the patch again. Feel the surface, don't just look at it.
- Ignoring Loose Debris: Patching over loose paper or crumbling gypsum will result in a weak bond and a patch that quickly fails or cracks.
Cost & Time Breakdown
| Task | DIY Cost | Pro Cost | Time |
|---|---|---|---|
| Materials (patch, mud, tools) | $15–$50 | N/A | N/A |
| Small Hole Patch (DIY) | $0 (material cost) | $75–$150 per patch | 1–2 hours active, 24–48 hours total dry time |
| Medium Hole Patch (DIY) | $0 (material cost) | $100–$250 per patch | 2–4 hours active, 48–72 hours total dry time |
| Primer & Paint | $10–$30 | Inc. in pro patch | 30 min active, 2–4 hours dry time |
Tips & Prevention
- Doorknob Protectors: Install wall-mounted or floor-mounted door stops to prevent doorknobs from damaging walls. These are inexpensive and save a lot of headaches.
- Picture Hanging Best Practices: Use appropriate drywall anchors for heavier items. For lighter pictures, use small picture hooks designed for drywall. Always ensure hooks are properly seated.
- Furniture Pads: Apply felt pads to furniture that frequently moves or is placed against walls to prevent scuffs and dents.
- Patch Immediately: Don't let small holes linger. Patching them promptly prevents them from getting larger or attracting moisture/pests.
- Keep Spare Drywall: If you have had new construction or renovations, save small scraps of drywall (especially if they are textured) for future patches. This can be invaluable for California patches or larger repairs.
- Quality Materials: Invest in decent joint compound and a good set of drywall knives. Good tools make the job much easier and the results much better.
When to Call a Professional
While patching small holes is a manageable DIY project, there are specific situations where calling a professional drywall repair specialist or a general handyman is the wiser choice. If the hole is larger than 6 inches in diameter, especially if it extends through to the stud cavity, it often requires cutting out a larger section, adding backing support, and installing a new piece of drywall. This level of repair demands more advanced skills, precise cutting, and structural considerations that can be challenging for a novice. Furthermore, if the damage is widespread (multiple large holes, water-damaged sections, or significant cracks), a professional will ensure a cohesive and durable repair that blends seamlessly with the surrounding walls, often taking less time and achieving superior results than a DIY attempt. If you're unsure about the extent of the damage, particularly after water leaks or structural shifts, always consult a professional to rule out more serious underlying issues.
Related Articles
Keep troubleshooting with these hand-picked guides from FixlyGuide:
- The 4-Inch Drywall Hole Fix: Why Spackle Alone Always Fails — Fix a small drywall hole (up to 4 inches) properly with a simple patch kit and avoid common mistakes that lead to visible repairs.
- The 15-Minute Drywall Patch Secret (No Mudding Skills Required) — Discover how to quickly and easily patch a small hole in drywall using a simple method that doesn't require advanced mudding skills.
- The 1 Common Mistake That Makes Drywall Patches Obvious (And How to Fix It) — Learn the common pitfall in drywall repair that leaves unsightly patches and how to achieve a seamless, invisible fix every time.
- The 15-Minute Drywall Hole Fix Plumbers Don't Want You to Know — Discover the surprisingly simple, super-fast method for patching small drywall holes that avoids messy muds and sanding.
- The 1 Common Drywall Patching Mistake (and The Right Way to Fix a Hole) — Discover the biggest mistake homeowners make when patching drywall holes and learn the correct, long-lasting method for seamless repairs.
- The Secret Reason Your Baseboards Pull Away (And the Easy Fix) — Discover why your baseboards are separating from the wall and learn surprisingly simple fixes that restore a polished look to your home.
Should you do this yourself?
Answer five quick questions before you start. Safety outranks savings every time.
Your experience with work like this
How high do you have to work?
Does the job involve any of these?
Will it need a permit?
Specialty tools
Free and instant. Educational guidance only — not a quote, inspection, or professional diagnosis.
What should this project cost?
Enter your project details for a realistic cost range before you call anyone.
Cost depends heavily on which system turns out to be the source.
- Regional adjustment
- National average
- Labor share (typical)
- ~$1,620
- Quotes to collect
- 3 written estimates
Educational estimate based on national averages — not a binding quote. Always confirm with written local estimates.
Before you start
Check the difficulty, permits, and safety risk — then decide whether to call a pro.
- Estimate this projectGet a cost range for your scope and ZIP before you call anyone.Open
- Get local estimatesSend one request and compare written estimates from vetted pros.Open
Free, no signup required. Estimates are educational guidance, not a quote or an inspection.
Recommended for DIYers & woodworkers
Sponsored
The Top 20 Tools for Workshops of Any Budget
No stationary machines or power tools required — plus 3 fundamental tools that can't be bought at any price.
Get the free guide
Ted's Woodworking — The #1 Woodworking Resource
Detailed instructions, dimensioned drawings, materials & cutting lists, and 3D schematics for every skill level.
See the plansSponsored: links above are affiliate links. FixlyGuide may earn a commission on qualifying purchases — at no extra cost to you.
Frequently asked questions
How do you fix a small hole in drywall without it showing?+
To fix a small hole in drywall without it showing, properly clean and trim the hole, use a self-adhesive mesh patch, apply multiple thin coats of joint compound, feathering the edges widely. Sand meticulously until perfectly smooth, then prime the area with a quality drywall primer before painting to achieve an invisible repair.
What is the best way to patch a small hole in drywall?+
For holes up to 4-6 inches, the best way is to use a self-adhesive fiberglass mesh patch or a California patch. Both methods require applying several thin layers of joint compound, feathering each layer beyond the previous one, and thorough sanding, followed by priming and painting.
Why does my drywall patch look bumpy?+
A bumpy drywall patch is usually caused by applying too much joint compound in one thick layer, not allowing adequate drying time between coats, or insufficient sanding. Always apply thin, even layers and sand diligently after each coat to ensure a smooth finish.
Should I prime drywall patch before painting?+
Yes, absolutely! Priming a drywall patch before painting is crucial. Joint compound is very porous and will absorb paint differently than the surrounding finished drywall, leading to flashing, dull spots, or an uneven sheen in your final paint job if not properly primed.
Discussion
Loading comments…