
How it works
A residential asphalt shingle roof is a multi-layered system designed to shed water and protect the structure below. The system begins with the roof deck, a sheathing of plywood or oriented strand board (OSB) that forms the structural surface. Over this deck lies the underlayment, a water-resistant barrier (traditionally asphalt-saturated felt, now often a synthetic fabric) that provides a secondary layer of protection against water intrusion.
The primary defense is the shingles themselves. They are installed in overlapping courses starting from the bottom edge (eave) of the roof. Each shingle course overlaps the one below it, creating a cascading effect where water flows down and off the roof without penetrating the seams. A critical component is the sealant strip on each shingle, which is thermally activated by the sun after installation to bond the shingle to the one below it. This bond is the roof's main defense against wind uplift. When high winds blow across a roof, they create negative pressure that can lift the leading edge of a shingle. If the seal is weak or broken, wind can get underneath, bend the shingle back, and eventually tear it off. Granules on the shingle's surface protect the asphalt from UV degradation and provide some impact resistance, but a direct hit from hail or debris can still fracture the shingle mat, creating a point of failure.
Step-by-Step Fix
This guide covers the emergency tarping and permanent replacement of a few missing architectural shingles. It assumes you have safe access and are comfortable working on a ladder at the roof's edge.
-
Conduct a Post-Storm Safety Sweep — Before addressing the roof, ensure the immediate area is safe. Cautiously walk the property perimeter, looking for downed power lines, unstable tree limbs, broken glass, or other hazards created by the storm. Do not proceed if any overhead electrical lines are compromised; contact your utility company immediately.
-
Perform a Ground-Level Inspection — Use binoculars to systematically scan your entire roof from the ground. Look for obviously missing shingles, but also for ones that are lifted, curled, cracked, or have significant granule loss (which may look like dark patches). Note the location and number of damaged areas. Check gutters and the ground around your foundation for shingle fragments or an accumulation of granules, which indicates widespread wear or hail damage.
-
Document All Damage Thoroughly — This step is critical for any insurance claim. Using a high-resolution camera or smartphone, take numerous photos from the ground. Capture wide shots to show the overall context of the damage on the roof plane, as well as zoomed-in shots of each specific problem area. If you find shingle pieces on the ground, photograph them as well. Create a simple written log that corresponds to your photos.
-
Assemble Tools and Materials — For a temporary tarp and a permanent shingle replacement, you will need a specific set of supplies.
- Tools: Sturdy extension ladder, hammer, pry bar or flat bar, utility knife with a hook blade, tape measure, chalk line, caulking gun.
- Safety Gear: Work gloves, non-slip footwear, safety glasses, and a fall protection harness if you will be stepping onto the roof.
- Materials: A bundle of matching shingles (bring a sample to the store if unsure), 1.25-inch galvanized roofing nails, asphalt roofing cement rated for wet/dry application, and for temporary patching, a heavy-duty waterproof tarp and several 8-foot 1x3 or 2x4 wood furring strips.
-
Set Up and Ascend the Ladder Safely — Place the extension ladder on firm, level ground. For every four feet of height to the roof's edge, the base of the ladder should be one foot away from the wall (a 4:1 ratio). Extend the ladder so at least three feet of it projects above the roofline. Ensure the locks are fully engaged before climbing. Always maintain three points of contact (two feet and one hand, or two hands and one foot) when ascending or descending.
-
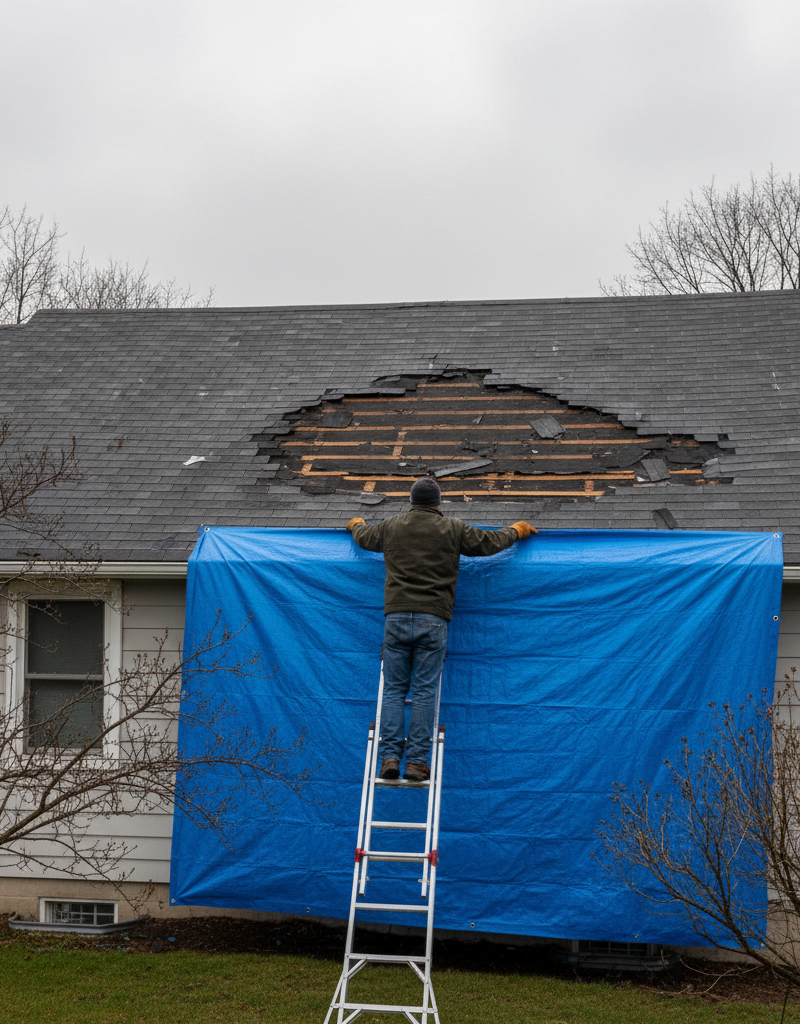
Apply a Temporary Tarp (If Needed) — If more rain is imminent and you cannot perform an immediate repair, a tarp is your best defense against water damage. From the ladder or a secure position on the roof, unroll the tarp to cover the damaged area, extending it at least 3-4 feet past the damage in all directions. The top edge of the tarp must go over the roof's ridge or as high as possible. Secure the tarp by rolling its edges around 1x3 or 2x4 furring strips and nailing through the wood and tarp into the roof decking. This distributes the force and prevents nails from tearing the tarp. Place fasteners every 18-24 inches. Do not leave the tarp unsecured; wind can turn it into a destructive sail.
-
Remove the Damaged Shingle Remnants — To replace a shingle, you must first access the nails holding it in place. These nails are hidden by the shingle in the course directly above it. Gently slide a pry bar under the shingle above the one you're replacing, working it back and forth to break the sealant bond. You may need to do this in 2-3 spots. Once the shingle is lifted, you will see the nail heads of the damaged shingle below. Use the pry bar to carefully pry up these one or two nails, then slide the damaged shingle out. Inspect the surrounding shingles for any collateral damage.
-
Prepare and Position the New Shingle — Check the newly exposed underlayment for any tears or holes. If you find any, patch them with a small piece of self-adhering waterproofing membrane or roofing cement. Take the new shingle and slide it up into the empty space, ensuring its top edge is flush against the nails from the course above it. Align the side edges of the new shingle with the existing shingles in its course, maintaining the proper offset pattern.
-
Fasten the New Shingle Correctly — Proper nailing is non-negotiable for a durable repair. For a standard architectural shingle, use four 1.25-inch galvanized roofing nails. Position the nails along the shingle’s designated nailing line, which is typically just below the sealant strip. The nails should be driven straight and flush with the shingle surface—not under-driven (sticking up) or over-driven (breaking the shingle mat).
-
Seal the Repair — Because you manually broke the thermal seal on the shingle above, you must create a new one. Lift the tab of the overlying shingle again and apply three to four quarter-sized dabs of asphalt roofing cement along its underside, directly over the new shingle you just installed. Press the overlying shingle down firmly onto the cement. Apply another small dab of cement under the corners of the new shingle to help it bond to the course below. This manual seal will protect the repair from wind until the sun can reactivate the factory sealant strip.
Common mistakes
- Using Mismatched Shingles. Grabbing any bundle of shingles that looks "close enough" is a mistake. Different brands and product lines have different dimensions, exposure lines, and sealant strip locations. A mismatch can create gaps, disrupt the water-shedding pattern, and will be an obvious aesthetic flaw. Take a sample of a damaged shingle to the supplier for an exact match.
- Improper Nailing. This is the most common failure point of DIY repairs. Placing nails too high (above the nailing line) will fail to secure the shingle below it. Placing them too low will leave them exposed to weather, leading to rust and leaks. Over-driving nails fractures the shingle mat, while under-driving them allows wind to lift the shingle and prevents the one above from sealing properly.
- Using the Wrong Sealant. Never use generic silicone caulk or other non-asphalt-based sealants for roofing. They are not compatible with the asphalt in shingles, will not bond correctly, and will break down under UV exposure and temperature fluctuations. Only use products specifically labeled as "asphalt roofing cement" or "roofing sealant."
- Ignoring Underlayment Damage. Simply slapping a new shingle over a visible hole in the roof deck or a torn piece of underlayment is an incomplete repair. Water will find its way through the shingle joints and directly into your attic. Any compromised underlayment or decking must be repaired before the new shingle is installed.
- Walking on the Roof Improperly. On hot days, asphalt shingles become soft, and walking on them can scuff granules off and cause damage. On cold days, they become brittle and can crack underfoot. Always step lightly on the lower, thicker portions of the shingles where they are supported by the shingle underneath, not on the unsupported middle sections.
- Making a "Face-Nail" Repair. It can be tempting to just slide a shingle in and drive a nail through the exposed surface. This is a guaranteed leak. Nail heads should never be exposed to the elements. All fasteners must be covered by the next course of shingles, following the proper lapping procedure.
Cost & time breakdown
Costs are national averages and will vary by location and the complexity of the job. DIY costs assume you already own basic tools like a hammer and ladder.
| Task | DIY Cost | Pro Cost | Time |
|---|---|---|---|
| Inspection & Documentation | $0 | $250 - $500 (for full report) | 1 hour |
| Temporary Tarping (10x10 ft) | $30 - $60 (tarp, wood, nails) | $200 - $600 (emergency call-out) | 1-2 hours |
| Replace 1-5 Scattered Shingles | $40 - $70 (bundle of shingles, cement, nails) | $200 - $450 (minimum service charge) | 2-4 hours |
| Replace One Section (10x10 ft) | $100 - $200 (shingles, underlayment, nails) | $400 - $900 | 4-8 hours (1 day) |
| Professional Assessment & Quote | N/A | $0 - $150 (often free for a quote) | 1 hour |
When to call a pro
While replacing a few shingles is a manageable DIY task for many, certain conditions demand professional expertise. Immediately call a licensed roofing contractor if you encounter any of the following:
- Excessive Damage: If the storm has removed more than 20-30 shingles or created damage across multiple sections of the roof, the problem is likely systemic and requires a professional assessment.
- Steep Roof Pitch: Do not attempt repairs on a roof with a pitch of 8/12 (a rise of 8 inches for every 12 inches of run) or steeper. These roofs require specialized safety equipment and techniques.
- Structural or Decking Damage: If you see large holes, feel soft or spongy spots when pressing on the roof, or see daylight through the roof boards from your attic, the decking is compromised. This is a structural repair beyond the scope of replacing shingles.
- Multiple Roof Layers: If your home has two or more layers of old shingles, repairs are more complex and often signal the need for a full tear-off and replacement.
- Specialty Roofing Materials: This guide is for asphalt shingles. If you have a slate, tile, metal, or wood shake roof, do not attempt a DIY repair. These materials are fragile, expensive, and require special tools and knowledge to fix without causing further damage.
Prevention & maintenance
- Schedule Biennial Inspections. Have a professional roofer inspect your roof every two years, and annually after it reaches 10 years of age. They can spot and fix minor issues like loose sealant strips or cracked flashing before a storm turns them into major leaks.
- Keep Gutters and Downspouts Clear. Clogged gutters cause water to back up under the edge of your shingles, saturating the underlayment and roof deck. This rots the wood, loosens fasteners, and makes the area highly susceptible to wind damage.
- Trim Overhanging Tree Limbs. Remove any branches that are touching or hanging directly over your roof. In a storm, these can rub against shingles, wearing away granules, or break off and cause severe impact damage.
- Monitor Attic Ventilation and Insulation. An overheated attic in the summer can bake your shingles from below, accelerating the aging process and making them brittle. Ensure your soffit, ridge, and gable vents are clear and functioning to maintain proper airflow.
- Look for Early Warning Signs. Periodically scan your roof for signs of aging, such as shingles that are curling at the edges, cracking, or developing dark patches from granule loss. Addressing these issues with targeted repairs can significantly extend the life of your roof.
Related Articles
Keep troubleshooting with these hand-picked guides from FixlyGuide:
- The Urgent Truth About Missing Roof Shingles (And Your 3-Step Fix) — High winds can rip shingles off your roof, exposing your home to immediate water damage – here’s how to assess, temporary patch, and plan p…
- The One Overlooked Mistake After Storm Damage: Finding Missing Roof Shingles Fast — Storms can rip off roof shingles, exposing your home to further damage. Learning how to safely assess and temporarily patch your roof is cr…
- Your Roof is Leaking. Now What? — A leaking roof after a storm is a homeowner's nightmare. Learn how to safely install a temporary roof tarp to prevent further water damage…
- Wind Tore Off Your Shingles? The 7 Critical Steps Most Homeowners Miss — Discover the essential steps to take when roof shingles go missing after a storm, from immediate safety checks to temporary repairs and ins…
- The One Mistake Homeowners Make When Shingles Blow Off (And How to Fix It Fast) — When shingles blow off your roof after a storm, the biggest mistake is waiting; quick, decisive action can prevent far more expensive damag…
- The $30 Secret to Banishing Ice Dams Without Damaging Your Roof — Discover how a simple, inexpensive trick can safely eliminate dangerous ice dams from your roof and prevent costly damage to your home.
Frequently asked questions
How do I know if my roof has storm damage?+
Look for missing, cracked, or curled shingles from the ground. Check your gutters and yard for shingle granules or pieces. Inside, look for water stains on ceilings or walls.
Can I temporarily fix missing shingles myself?+
For small, accessible areas, you might be able to temporarily cover exposed decking with a tarp, secured carefully. However, for safety and proper repair, it's best to call a professional.
Will my homeowner's insurance cover missing shingles from a storm?+
Most homeowner's insurance policies cover sudden and accidental damage from storms, including missing shingles due to wind or hail. It's important to file a claim promptly and document the damage.
How long can I wait to fix missing roof shingles?+
You should address missing shingles as soon as possible after a storm. Delaying repairs can lead to water intrusion, mold, rot, and more extensive and costly damage to your home.
What should I do before the roofer arrives?+
Document the damage with photos, file a claim with your insurance company, and if safe, clear any debris from around your home that might impede the roofer's access.


Discussion
Loading comments…