
Tools & materials you'll need
Affiliate linksAs an Amazon Associate FixlyGuide earns from qualifying purchases — at no extra cost to you. Prices and availability are accurate as of publication and subject to change.
Quick Answer
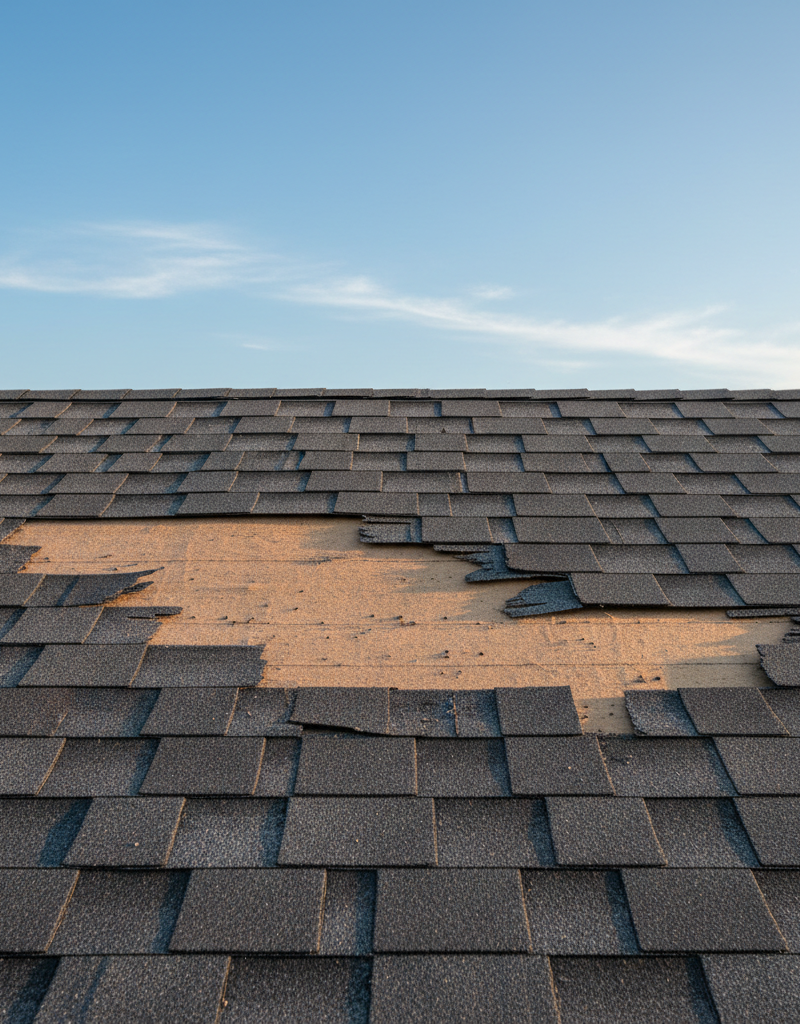
After a storm, missing roof shingles create an urgent water intrusion risk. Safely inspect your roof for damage, then immediately install a temporary tarp to prevent leaks. Once the weather clears, you can often replace a few missing shingles yourself using basic tools and materials, saving hundreds on professional repair.
The Problem
You wake up after a powerful windstorm, and as you survey your property, something looks amiss on your roof – patches of missing shingles. This isn't just an aesthetic issue; it's an open invitation for water to penetrate your roof's protective layers, leading to damaged decking, ruined insulation, mold growth, and costly interior leaks. The clock starts ticking the moment those shingles disappear. Understanding why your roof failed and how to address it quickly and safely is paramount to protecting your home's structural integrity and preventing widespread damage.
Ignoring missing shingles, even just a few, can escalate a minor repair into a major headache, potentially costing thousands in water remediation and structural repairs. The good news is that for isolated incidents, homeowners with a basic comfort level on ladders can often perform the necessary temporary waterproofing and even permanent shingle replacement themselves, provided they prioritize safety.
How It Works
Your roof is a complex system designed to shed water, and shingles are the first line of defense. Standard asphalt shingles are composite materials made from a fiberglass mat saturated with asphalt and topped with ceramic granules. The granules protect the asphalt from UV degradation and add color, while the asphalt provides waterproofing. Shingles are installed in an overlapping pattern, typically with a 5-inch exposure (the part of the shingle visible to the weather). Each shingle is secured with roofing nails, usually four, placed just above the self-sealing adhesive strip.
The adhesive strip, activated by the sun's heat, bonds the shingles together, creating a wind-resistant barrier. When high winds (often exceeding 60 mph for standard 3-tab shingles, or higher for architectural shingles) blow across the roof, they create uplift pressure. If the adhesive hasn't sealed properly, if the nails are improperly placed, or if the shingles are old and brittle, this uplift can overcome the shingle's resistance, peeling it back and eventually tearing it free. Once one shingle is gone, the exposed edges of surrounding shingles become more vulnerable, potentially leading to a cascading failure.
Beneath the shingles lies the underlayment, typically a felt paper or synthetic material, which provides a secondary layer of protection against moisture. Below that is the roof decking, usually plywood or OSB, which forms the structural base. If shingles and underlayment are compromised, water can reach the decking, leading to rot, softening, and eventually structural failure. Attic ventilation also plays a role; proper airflow helps prevent heat buildup that can prematurely age shingles and degrade their adhesive properties over time.
Step-by-Step Fix
**Safety First: Always use extreme caution when working on a roof. Ensure your ladder is stable on firm, level ground. Wear non-slip shoes and consider using a safety harness, especially on steep or wet roofs. Never work on a roof during active strong winds, rain, or if it's wet from dew. Have a spotter if possible.
-
Assess the Damage Safely – Identify compromised areas from the ground.
- Before getting on the roof, walk around your house and use binoculars or a drone to get a clear view of the damaged areas. Note the number of missing shingles and their general location. Look for widespread damage or just isolated spots.
- Check your gutters and the ground around your house for shingle debris. This can indicate the extent of the loss.
- If this doesn't work: If you can't get a clear view, or suspect extensive hidden damage, it's best to call a professional for a detailed inspection.
-
Gather Your Tools and Materials – Prepare for temporary and permanent repair.
- Make sure you have all necessary items laid out and ready before climbing the ladder. This minimizes trips up and down.
- Tools/Materials: Ladder, sturdy work gloves, non-slip shoes, utility knife, flat pry bar, hammer, roofing nails (1 ¼ inch galvanized), a few new shingles (match color and style), roofing cement/sealant, optional: caulk gun, temporary tarp, 1x2 furring strips, screws/washers, drill.
-
Install a Temporary Tarp (If Raining or Imminent Rain) – Prevent water intrusion immediately.
- Safety Note: Only tarp a roof if it's safe to do so (not windy, not actively raining). If you can't safely tarp, focus on interior containment and call a pro immediately.
- Position the tarp to cover the entire damaged area, extending at least 2–3 feet beyond the perimeter in all directions. Use heavier-gauge tarps, ideally 10 mil or thicker.
- Secure the tarp using 1x2 furring strips (or similar wood battens) screwed through the tarp into solid roof decking, with washers under the screw heads to prevent tearing. Do NOT nail through the tarp directly into shingles if possible, as this creates new holes.
- Ensure the upper edge of the tarp is tucked under existing shingles to allow water to flow over it, not under. Overlap the tarp sections like shingles if using multiple pieces.
-
Carefully Remove Damaged Shingle Nails – Prepare the area for new shingles.
- Once the weather is clear and you're ready for permanent repair, gently lift the edges of the shingles directly above the missing shingle area. Be careful not to crease or break them, especially if they are cold.
- Locate the nails holding down the tab of the shingle directly above where the new shingle will go. Use a flat pry bar to carefully pry up these nails. If the shingle above is intact, you'll need to remove its bottom two nails to slide the new shingle underneath.
- Use a utility knife to cut away any remaining fragments of the old, damaged shingle that are still nailed down.
-
Slide in the New Shingle – Position the replacement correctly.
- Take your new shingle and slide it upwards into place, underneath the shingle above it, aligning its bottom edge and side edges perfectly with the surrounding shingles.
- Ensure the new shingle is fully seated and lays flat, precisely where the old one was. The self-sealing strip on the new shingle should align with the strips on adjacent shingles.
-
Secure the New Shingle – Nail it down properly.
- Using galvanized roofing nails (1 ¼ inch) and a hammer, nail the new shingle into the roof decking. Place four nails across the shingle, roughly 1 inch above the top of the shingle's cutouts (the 'keyways'), and about 1 inch in from each side. These nails should pass through the shingle and into the decking.
- Crucial: These nails also need to penetrate the upper part of the shingle or shingles below it, providing extra security and maintaining the weather-tight seal.
- Apply a small dab (about a quarter-sized amount) of roofing cement underneath the bottom edge of the newly installed shingle, and press it down firmly to create an immediate seal, especially important in colder weather where the self-sealing strip might take longer to activate.
-
Re-nail and Seal Overlapping Shingles – Ensure surrounding shingles are secure.
- If you had to lift or remove nails from the shingles directly above or beside the replacement, re-nail those shingles securely back into the decking. Place the new nails through the existing nail holes if possible, or very close to them.
- Apply a small amount of roofing cement under the tabs of any previously lifted or disturbed shingles to help them reseal, especially in cooler temperatures.
- Smooth down all areas to ensure everything lies flat and creates a continuous, water-shedding surface.
-
Final Inspection – Check your work thoroughly.
- Carefully climb down and perform another ground-level inspection of the repaired area. Ensure the new shingle blends in and lies flat. Check for any lifted edges or exposed nail heads.
- Look for loose granules on the ground, indicating potential further shingle degradation. Clean up any debris from the repair.
Common Causes
- High Winds: This is the most common culprit. Strong winds, especially those with upward gusts, can lift shingles and break their adhesive seal, eventually tearing them off. Corner sections or roof edges are often most vulnerable.
- Aging Shingles: As shingles age (typically beyond 15-20 years for asphalt), the asphalt dries out, the granules erode, and the self-sealing strip loses its effectiveness. This makes them brittle and much more susceptible to wind damage.
- Improper Installation: Shingles nailed too high (nailing into the 'headlap' instead of the 'common bond' area), too few nails, or nails that miss the decking entirely can lead to premature shingle loss during even moderate winds.
- Inadequate Sealing: If shingles are installed in cold weather, or if there isn't enough direct sunlight for an extended period after installation, the self-sealing strip may not fully activate, leaving shingles vulnerable to wind uplift.
- Hail Damage: While not directly 'missing' shingles, severe hail can weaken the shingle's mat and compromise the granular surface, making them more likely to blow off in subsequent wind events.
- Trees/Debris: Falling branches or other wind-blown debris can physically strike and dislodge shingles.
- Foot Traffic: Unnecessary walking on the roof, especially in cold weather when shingles are brittle, can crack or loosen them, weakening their attachment.
Common Mistakes
- Ignoring the Problem: Delaying even a small repair dramatically increases the risk of water damage, mold, and rot in the attic and interior. Address missing shingles immediately.
- Working Unsafely: Neglecting ladder safety, working on wet or icy roofs, or during high winds is incredibly dangerous. Falls from roofs are a leading cause of home repair injuries. Prioritize safety over speed.
- Not Matching Shingles: Using a different color or style of shingle will create an eyesore and can make future insurance claims more difficult. Try to match as closely as possible, often by finding spare shingles in the attic or garage.
- Improper Nailing: Nailing too high, too low, or using too few nails will compromise the new shingle's wind resistance. Nails must penetrate the shingle and underlying decking correctly.
- Over-Cementing: Applying excessive roofing cement can make future repairs extremely difficult and can even contribute to shingle blistering if too much is applied in hot weather.
- Walking on Damaged Areas: Avoid stepping directly on unsupported or damaged areas of the roof decking, as it could be weakened and lead to a fall.
Cost & Time Breakdown
| Task | DIY cost | Pro cost | Time |
|---|---|---|---|
| Temporary tarp installation | $20–$50 | $200–$500 | 30–60 min |
| Replace 1–5 shingles | $10–$50 | $250–$600 | 1–2 hours |
| Replace 6–15 shingles | $50–$150 | $500–$1,200 | 2–4 hours |
| Roof inspection (pro only) | $0 | $0–$150 (often waived with repair) | 30–60 min |
| Interior water damage repair | $100–$1,000+ | $500–$5,000+ | Varies |
Tips & Prevention
- Annual Roof Inspection: Perform a ground-level inspection of your roof every spring and fall, and after any major storm. Look for lifted, cracked, or missing shingles, and excessive granule loss.
- Keep Gutters Clean: Clogged gutters can cause water to back up under shingles, leading to accelerated deterioration. Clean them regularly.
- Trim Overhanging Branches: Remove any tree branches that are close enough to scrape or fall onto your roof during strong winds or ice storms.
- Ensure Proper Attic Ventilation: Good attic airflow prevents heat and moisture buildup that can degrade shingles from below. Check that soffit and ridge vents are clear.
- Understand Your Warranty: Know what your shingle warranty covers regarding wind damage. Some manufacturers offer enhanced wind warranties for higher wind speeds.
- Consider Impact-Resistant Shingles: If you live in an area prone to severe storms, consider installing impact-resistant shingles designed to withstand higher winds and hail.
When to Call a Professional
While replacing a few missing shingles is a manageable DIY task for many homeowners, there are clear instances where calling a licensed roofing professional is not just advisable, but necessary. If you observe widespread damage across multiple sections of your roof, or if more than a dozen shingles are missing, a professional inspection is crucial. They can assess structural damage, underlying weakness, and ensure the entire roof system is still sound. Any indications of water actively entering your home, visible from the attic (e.g., wet insulation, stained decking), require immediate professional attention to prevent further deterioration and mold growth. If the roof pitch is very steep (greater than 6:12) or the weather conditions make ladder work inherently risky (e.g., strong winds, rain, ice), do not attempt DIY repairs. Furthermore, if you suspect your roof is nearing the end of its lifespan (over 20 years old), professional assessment can determine if spot repairs are still viable or if a full replacement is a more cost-effective long-term solution. A professional will also be equipped to handle insurance claims and necessary permitting for larger repairs.
Related Articles
Keep troubleshooting with these hand-picked guides from FixlyGuide:
- The One Spot You MUST Check After a Storm — And How to Fix Missing Shingles FAST — High winds can easily rip shingles from your roof, exposing your home to water damage. Learn how to safely inspect and temporarily repair m…
- The Urgent Truth About Missing Roof Shingles (And Your 3-Step Fix) — High winds can rip shingles off your roof, exposing your home to immediate water damage – here’s how to assess, temporary patch, and plan p…
- The #1 Mistake Homeowners Make After Finding Missing Shingles (And How to Fix It Right) — Discover the crucial steps to take after a storm rips shingles from your roof, ensuring a proper, lasting repair and preventing costly futu…
- The One Mistake Homeowners Make When Shingles Blow Off (And How to Fix It Right) — After a storm, finding missing roof shingles can be alarming. Learn the critical mistake homeowners often make and how to properly assess a…
- Wind Lifted Your Shingles? The 7 Immediate Steps to Prevent Roof Leaks — Discover the crucial steps to take immediately after a storm rips shingles from your roof to prevent costly water damage and temporary repa…
- Why Your Microwave Sparks and How to Prevent a Fire — A sparking microwave is alarming, but often an easy fix. Discover the common causes of microwave arcing, from forgotten forks to hidden dam…
Get the print-ready PDF of this guide
A clean, ad-free, printable version you can keep on your phone or pin to the workshop wall. Free with a FixlyGuide account.
- Print-optimized layout
- Tools, materials & every step included
- Saved to your account
Frequently asked questions
How many missing shingles is too many to DIY?+
As a general rule, if you have 10–15 or fewer missing shingles in an isolated area, and you are comfortable with ladder safety, a DIY repair is often feasible. If damage is widespread, covers multiple areas, or involves more than 15 shingles, it's best to call a professional to assess the full extent and ensure structural integrity.
Can I just glue a shingle back on?+
No, simply gluing a shingle back on is not sufficient. Shingles need to be properly nailed into the roof decking for long-term security and wind resistance. Roofing cement can be used to help seal disturbed shingle tabs, but it's not a substitute for proper nailing.
How soon do I need to fix missing shingles?+
You should address missing shingles immediately. Even a small exposed area can lead to significant water damage, mold, and rot during the next rain event. A temporary tarp should be installed as soon as safely possible, followed by permanent repair when weather permits.
What kind of nails should I use for replacing shingles?+
Always use 1 ¼-inch galvanized roofing nails for replacing asphalt shingles. Galvanization prevents rust, and the wide head provides good holding power. Ensure the nails penetrate through the shingle and into the roof decking.
Can my homeowner's insurance cover missing shingles?+
Most homeowner's insurance policies cover sudden and accidental damage, including wind or hail damage that causes missing shingles. It's crucial to document the damage with photos, safely tarp the area to prevent further damage, and contact your insurance provider as soon as possible to file a claim.
What if I can't find matching shingles?+
If you can't find an exact match, check your attic or garage for leftover bundles from the original installation. Failing that, you might be able to 'borrow' a shingle from an inconspicuous area of your roof, like under a vent stack or from a shed, and use a new, slightly mismatched shingle in that less visible spot. Otherwise, buy the closest match available and understand there will be a slight aesthetic difference.


Discussion
Loading comments…