Tools & materials you'll need
Affiliate linksAs an Amazon Associate FixlyGuide earns from qualifying purchases — at no extra cost to you. Prices and availability are accurate as of publication and subject to change.
Quick Answer
After a storm, the discovery of missing roof shingles can be alarming, but acting quickly can prevent more significant water damage to your home's interior. The most critical step is a controlled, safe assessment of the damage, identifying not just missing shingles but also creased, curled, or split ones. For minor, easily accessible damage, a temporary repair using roofing cement or a tarp can offer immediate protection. However, for widespread damage, multiple missing shingles, or if you're uncomfortable on a ladder, calling a professional roofer is the safest and most effective course of action.
The Problem
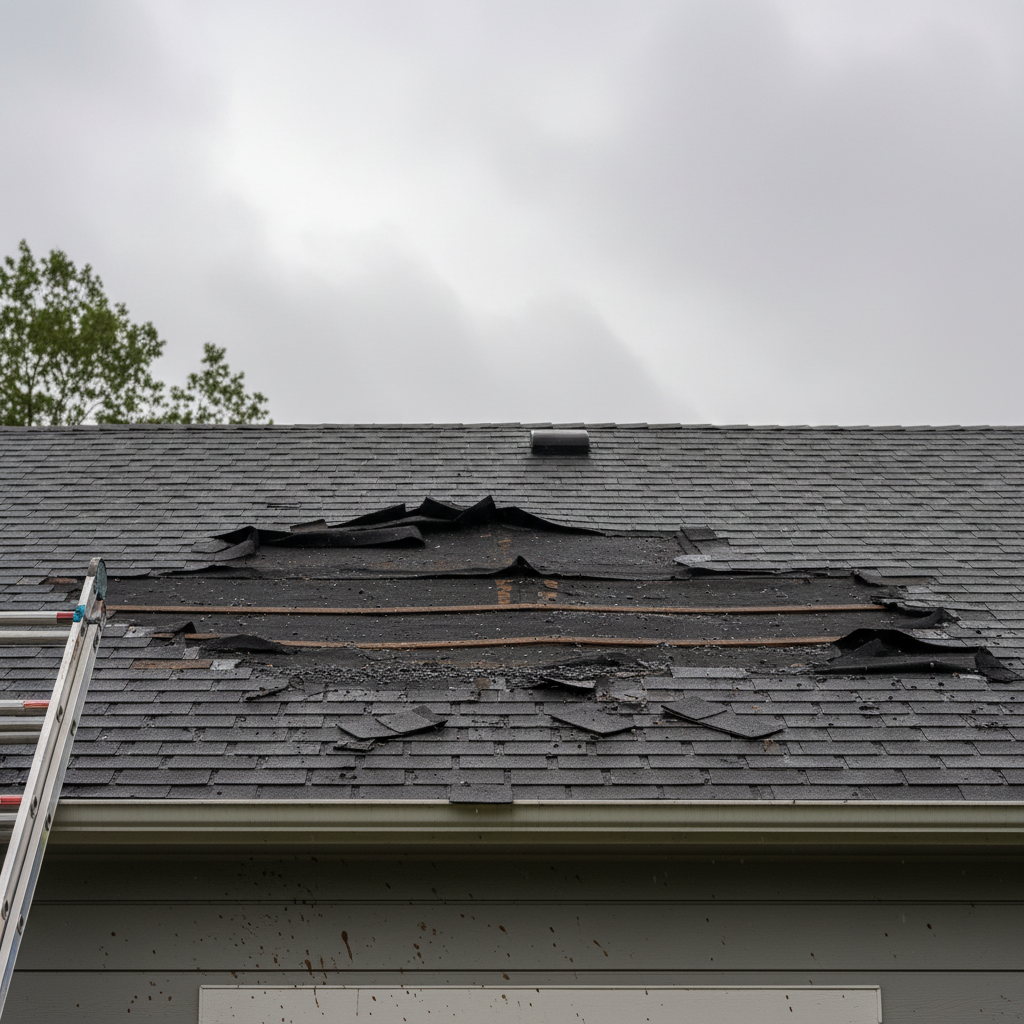
High winds and heavy rain during a storm can exert immense force on your roof, leading to shingles being lifted, torn off, or otherwise damaged. Missing shingles expose the underlying roofing felt and, eventually, the roof decking to the elements. This exposure creates direct pathways for water intrusion, which can lead to leaks in your attic, ceilings, and walls. Left unaddressed, even a small area of missing shingles can result in thousands of dollars in interior water damage, mold growth, compromised structural integrity, and significantly reduced roof lifespan. The problem isn't just aesthetic; it's a direct threat to your home's weatherproofing envelope.
How It Works
Your roof is a system designed to shed water, and shingles are the primary line of defense. Standard asphalt shingles are multilayered, typically consisting of a fiberglass mat base, asphalt, and ceramic granules. They are installed in overlapping courses, with each shingle "locking" into the ones below and beside it, secured by roofing nails. Below the shingles is an underlayment, usually a synthetic or felt material, providing a secondary barrier against moisture. The entire system relies on proper overlap and sealing to guide water down and off the roof. When wind lifts a shingle, it breaks the seal and can pull out the roofing nails, leaving the underlayment vulnerable. If a shingle is completely torn off, the underlayment is directly exposed. If the underlayment is also compromised, water can then reach the plywood or OSB roof decking, initiating the cycle of rot and interior damage. Strong wind, especially gusts, can create uplift forces that literally peel shingles off the roof, starting at edges and areas of weakness.
Step-by-Step Fix
1. Stay Safe, First and Foremost — Assess the situation from the ground before considering ladder work.
- Safety Note: Never attempt to climb onto a wet, icy, or excessively steep roof. If winds are still gusting, wait until conditions are calm. Always have someone spot you when using a ladder. Wear appropriate non-slip footwear and work gloves. If the damage is extensive, near power lines, or you feel unsafe, call a professional.
- Look for visible damage from the ground using binoculars. Note the location and extent of missing shingles.
- Check your yard for fallen debris, which might indicate shingles have come off.
2. Prepare Your Workspace and Tools — Gather everything you need before climbing.
- Tools & Materials: Have your ladder, safety glasses, work gloves, roofing cement/caulk gun, trowel, hammer, roofing nails, and (if applicable) replacement shingles or tarp readily accessible. Ensure your ladder is stable on a firm, level surface.
3. Safely Access the Roof — Proper ladder use is crucial for preventing falls.
- Extend your ladder at least 3 feet above the roof edge. Ensure it's angled correctly (approximately a 75-degree angle, or a 1:4 ratio of distance from the wall to height). Secure the base to prevent slipping.
- Always face the ladder when climbing up and down. Maintain three points of contact (two hands, one foot, or one hand, two feet) at all times.
4. Clear Debris and Inspect Thoroughly — Remove loose items and look beyond just missing shingles.
- Gently remove any loose branches or debris from the damaged area. Be careful not to cause further damage.
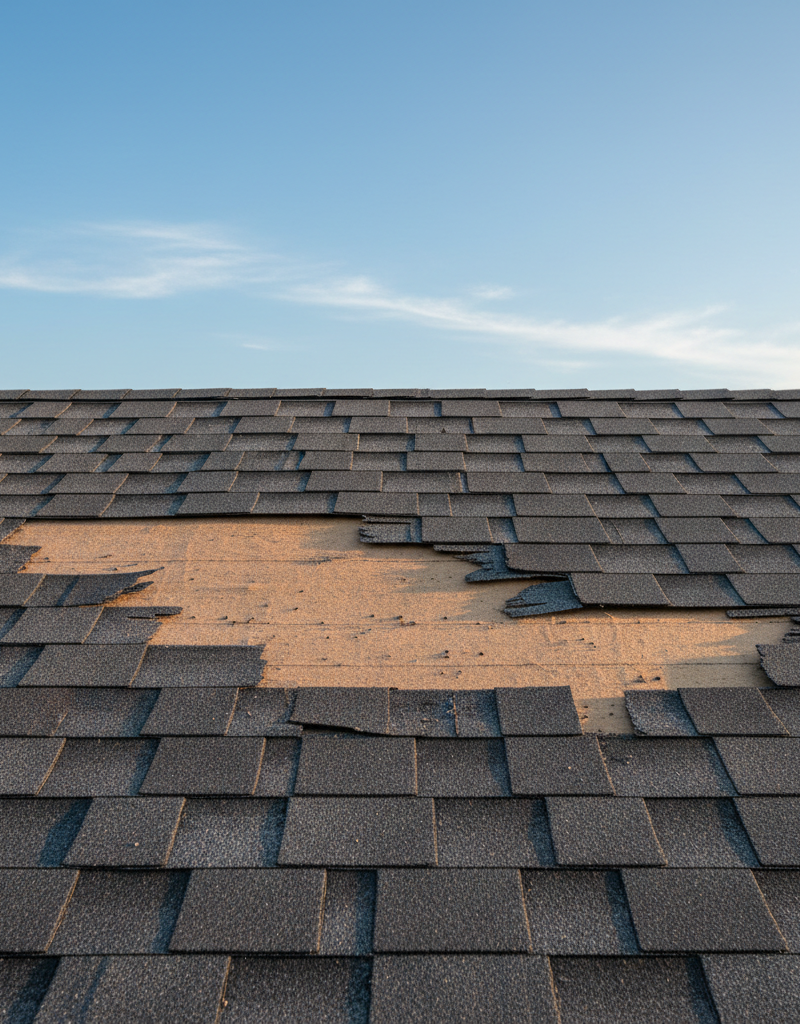
- Inspect adjacent shingles for signs of stress, such as creasing, cracking, curling, or loosened granules. These could be precursors to future blow-offs.
- Check for exposed nail heads, which can allow water to penetrate.
5. Address Minor Lifted/Creased Shingles — Early intervention can save bigger headaches.
- For shingles that are merely lifted or creased but still intact, apply a generous bead of roofing cement underneath the lifted edge using a caulk gun. Press the shingle down firmly.
- If exposed nail heads are visible but the shingle is still otherwise good, apply a dab of roofing cement over the nail head.
6. Replace Missing Shingles (Temporary or Permanent) — Fill the gap to restore protection.
- If you have matching replacement shingles: Carefully lift the shingle directly above the gap. Remove any old nails. Slide the new shingle into place, ensuring it aligns with the existing course. Secure it with 4 roofing nails, placed just below the tar strip, so they are covered by the overlapping shingle above. Apply a dab of roofing cement over the nail heads.
- If you don't have matching shingles or for a quick temporary fix: Cut a piece of roofing felt or even a sturdy plastic tarp to overlap the exposed area by several inches on all sides. Secure it with roofing cement around the edges and a few dabs in the center. Avoid excessive nailing that creates new holes.
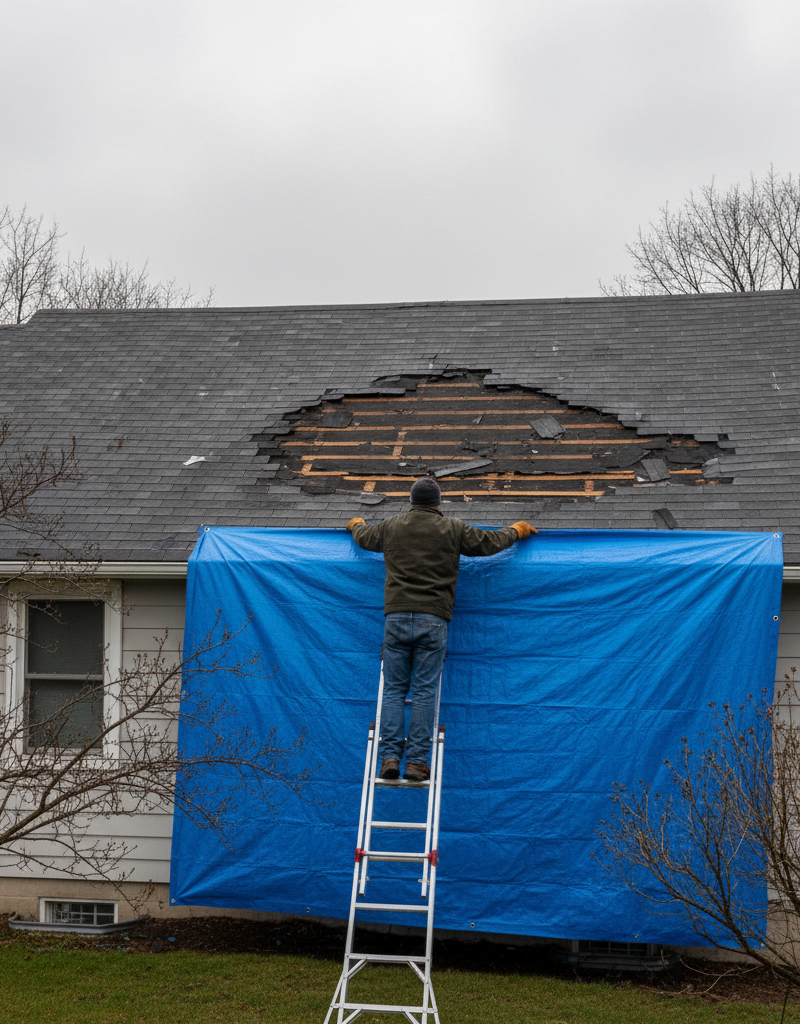
7. Apply a Temporary Tarp for Larger Damage — A stopgap for significant shingle loss.
- For larger areas of missing shingles or exposed decking, spread a heavy-duty tarp over the damaged section, extending at least 2-3 feet beyond the edges of the damage.
- Secure the tarp using 2x4s nailed or screwed into the fascia or roof edges (if safe and practical), or by using sandbags at the edges. Avoid nailing through the tarp into the damaged roof unless absolutely necessary, and then seal those points with roofing cement. The goal is to avoid creating more holes than you fix.
8. Seal and Clean Up — Final steps to protect and tidy.
- Ensure all temporary repairs are securely fastened and sealed. If using roofing cement, it typically takes several hours to cure, so avoid disturbing it.
- Remove any tools and debris from the roof and surrounding area. Dispose of old shingles or material appropriately.
Common Causes
- High Winds: The primary culprit. Gusts can get underneath shingles, especially those with weakened seals or at edges and corners, lifting and tearing them off. Wind speeds as low as 40-50 mph can cause damage to older or poorly installed roofs, while hurricane-force winds can devastate any roof.
- Age and Wear: As shingles age, the asphalt dries out, making them brittle and less flexible. The granular surface erodes, and the adhesive strip (tar line) designed to seal courses together weakens. These older shingles are far more susceptible to wind uplift and impact damage.
- Improper Installation: Shingles installed with too few nails, nails placed incorrectly (too high or too low on the shingle), or without adequate sealant can easily blow off in a storm. Using the wrong type of nails or insufficient overlap are also factors.
- Defective Materials: In rare cases, manufacturing defects can lead to premature shingle failure, making them more prone to storm damage.
- Impact Damage: While less common for missing shingles, hail or falling tree branches can directly damage or loosen shingles, making them easier for subsequent winds to rip away.
- Lack of Maintenance: Moss or algae growth can trap moisture, further deteriorating shingles and loosening their grip. Uncleaned gutters can cause water to back up under shingle edges.
Common Mistakes
- Ignoring Ground-Level Inspection: Many homeowners immediately grab a ladder without fully assessing the situation from below. This can lead to overlooking widespread damage or, worse, attempting a repair in unsafe conditions.
- Walking on Damaged or Wet Roofs: Walking on acompromised roof can cause further damage to weakened shingles or the underlayment. Wet roofs are extremely slippery and dangerous, significantly increasing the risk of falls.
- Using the Wrong Fasteners/Sealants: Using standard nails instead of roofing nails, or general caulk instead of roofing cement (which is designed to withstand UV and extreme temperatures), will result in ineffective and short-lived repairs.
- Underestimating the Extent of Damage: A few missing shingles might hide more extensive underlying damage, like a compromised underlayment or warped decking, which a temporary patch won't solve fully.
- Not Documenting Damage: For insurance claims, thorough documentation (clear photos from multiple angles, before and after if possible) is crucial. Skipping this step can complicate the claims process.
- Waiting Too Long: Delaying even temporary repairs allows water to penetrate further, leading to exponentially higher repair costs and potential mold growth.
Cost & Time Breakdown
| Task | DIY Cost | Pro Cost | Time |
|---|---|---|---|
| Ground-level inspection | $0 | N/A | 10–15 min |
| Gather tools & safety setup | $0 | N/A | 15–30 min |
| Minor shingle re-sealing | $5–$20 | $100–$250 | 30–60 min |
| Missing shingle replacement | $20–$50 (per bundle) | $150–$400 (minimum service call) | 1–2 hours |
| Temporary tarping (materials) | $30–$80 | $200–$600+ | 1–3 hours |
| Professional damage assessment | N/A | $0–$150 (often waived if hired) | 30–60 min |
Tips & Prevention
- Regular Roof Inspections: Twice a year (spring and fall) and after every major storm, perform a ground-level visual inspection of your roof. Look for curled, cracked, broken, or missing shingles, and excessive granule loss.
- Keep Gutters Clean: Clogged gutters cause water to back up, potentially seeping under shingles and fascia, leading to rot and shingle damage.
- Trim Overhanging Branches: Trees too close to your roof can scratch, abrade, or drop branches onto shingles during storms, causing direct damage.
- Ensure Proper Ventilation: Good attic ventilation helps regulate roof deck temperature, extending shingle life by preventing premature aging and making them less brittle.
- Professional Check-ups: Consider having a licensed roofer conduct a professional inspection every 3-5 years, especially if your roof is older than 10 years or has experienced several severe storms.
- Understand Your Warranty: Familiarize yourself with your shingle manufacturer's warranty and your installer's workmanship warranty. Many warranties have specific requirements for maintenance and repair.
When to Call a Professional
While repairing a few missing shingles might seem manageable, there are critical situations where calling a licensed roofing professional is not just advisable, but necessary. You should immediately contact a pro if you observe widespread damage across large sections of your roof, or if you suspect damage to the underlying decking or structural components. If you find multiple consecutive shingles missing, or if the exposed area is larger than a few square feet, attempting a DIY repair could be a temporary fix for a much larger, unseen problem. Moreover, if your roof has a steep pitch, multiple stories, or is difficult to access safely, the risk of injury far outweighs any potential DIY savings. Professionals have the right safety equipment, experience to spot subtle damage, and knowledge of local building codes. They can also provide a comprehensive estimate for insurance claims and ensure proper, long-lasting repairs that maintain your roof's integrity and warranty.
Related Articles
Keep troubleshooting with these hand-picked guides from FixlyGuide:
- The #1 Mistake Homeowners Make After Finding Missing Shingles (And How to Fix It Right) — Discover the crucial steps to take after a storm rips shingles from your roof, ensuring a proper, lasting repair and preventing costly futu…
- The One Spot You MUST Check After a Storm — And How to Fix Missing Shingles FAST — High winds can easily rip shingles from your roof, exposing your home to water damage. Learn how to safely inspect and temporarily repair m…
- The 3 Missing Shingles: Why Ignoring Them Costs You $10,000 — Ignoring even a few missing roof shingles after a storm can lead to thousands in water damage and rot – here’s how to safely fix them yours…
- The #1 Reason Your Gutters Overflow (It's Not Clogging) — Discover the surprising true cause of overflowing gutters during heavy rain and how a simple fix can prevent costly water damage to your ho…
- Is Your Gutter Sagging After Every Storm? The Hidden Flaw Most Homeowners Miss — Discover the overlooked reason your gutters sag after every storm and learn the lasting fix that most homeowners miss.
- The One Hidden Sign of a Roof Leak Most Homeowners Miss (And the $10 Fix) — Catching a roof leak early can save thousands in repairs. Learn the elusive signs and a simple, effective fix before minor issues become ma…
Frequently asked questions
How soon after a storm should I check my roof for missing shingles?+
You should check your roof as soon as it's safe to do so after a storm, ideally within 24-48 hours. Quick inspection and temporary repairs can prevent minor damage from escalating into major leaks and more costly interior damage.

Discussion
Loading comments…