
Tools & materials you'll need
Affiliate links- AmazonLawnmowerSet to lowest acceptable height.
- AmazonPower dethatcher or dethatching rakeRentable item or manual tool.
- AmazonCore aeratorRentable, if soil compaction is an issue.
- AmazonBroadcast or drop spreaderFor even seed distribution.
- AmazonGarden hose with sprinkler
- AmazonLeaf rakeFor light raking of seeds.
As an Amazon Associate FixlyGuide earns from qualifying purchases — at no extra cost to you. Prices and availability are accurate as of publication and subject to change.
Quick Answer
Many homeowners struggle with thin lawns, often making the crucial mistake of simply scattering seed without proper ground preparation. The secret to a lush, thick lawn lies in understanding the 'why' behind the thinness and then performing a methodical overseeding process that includes soil preparation, selecting the right grass seed for your climate and sun exposure, and consistent post-seeding care. Ignoring these fundamentals leads to wasted effort and continued frustration, but with the right approach, you can transform your tired turf into a vibrant green carpet.
The Problem
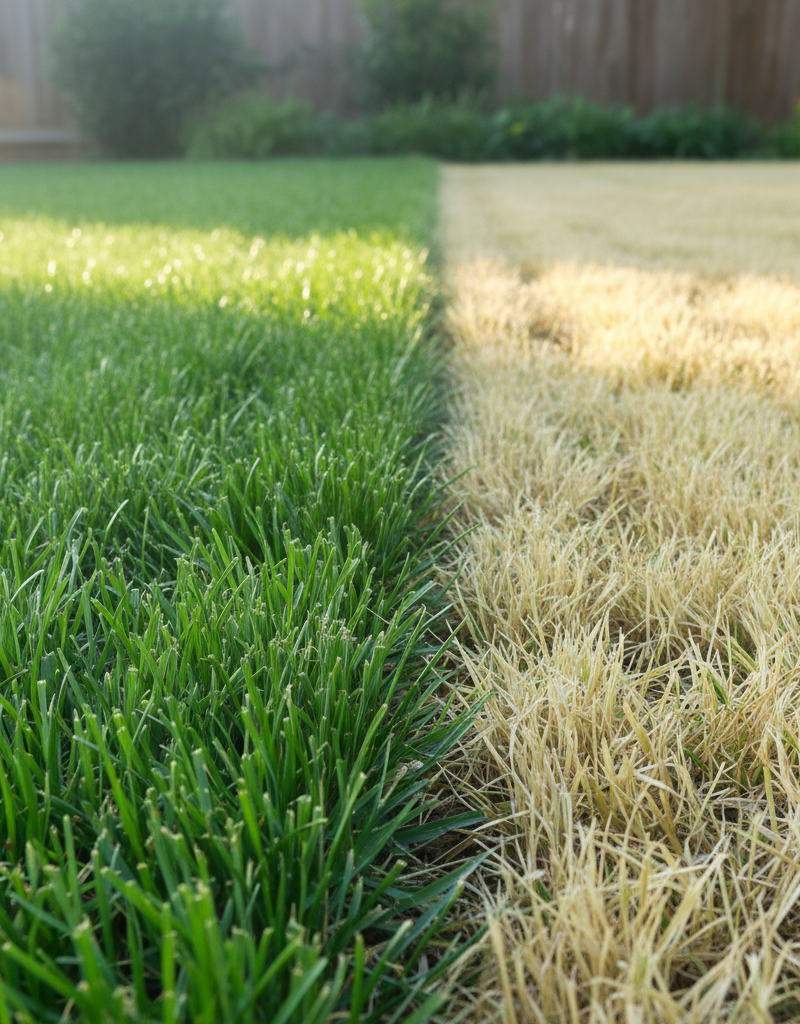
That sparse, patchy, and generally lackluster lawn isn't just an eyesore; it's a symptom of deeper issues and an open invitation for weeds to take over. Foot traffic, pet activity, harsh weather cycles, nutrient deficiencies, insect damage, or fungal diseases can all contribute to a thinning lawn over time. Even healthy turf naturally declines as individual grass plants age and die, reducing the overall density. Ignoring these signs leads to a downward spiral: less grass means more bare soil, which encourages weed germination, increases water evaporation, and makes your lawn more susceptible to disease and pest infestations. Simply put, a thin lawn is a vulnerable lawn, and it won't fix itself.
How It Works
Overseeding is the process of spreading new grass seed over an existing lawn to improve its density and appearance without tearing up the entire turf. Think of it as rejuvenating your lawn's population. Grass plants, like all living things, have a lifespan. As they age, their vigor decreases, and they become less efficient at absorbing nutrients and fighting off stressors. Overseeding introduces new, often improved, grass varieties that can fill in bare spots, increase overall turf density, and enhance the lawn's resistance to diseases, pests, and environmental stresses like drought or heat.
The success of overseeding hinges on several biological and environmental factors. For grass seed to germinate, it needs three things: warmth, moisture, and good seed-to-soil contact. Each tiny seed contains an embryo that, when conditions are right, breaks dormancy. Water softens the seed coat and activates enzymes that begin the growth process. The root, or radicle, emerges first, anchoring the seedling and seeking water and nutrients. Next, the shoot emerges, reaching for sunlight to begin photosynthesis.
Soil preparation plays a critical role because new seedlings are delicate. They need a soft, nutrient-rich environment where their tiny roots can easily penetrate. Compacted soil, a common culprit in thin lawns, prevents roots from establishing and restricts the flow of water and oxygen. Aeration helps alleviate this by creating small holes, allowing seed, water, and air to reach deeper. Dethatching removes the layer of dead organic matter (thatch) that can prevent seeds from reaching the soil surface. Providing a thin layer of compost or topdressing after seeding offers a protective and nutrient-rich bed for the new seeds, improving germination rates and early seedling health. The choice of grass seed is also vital; cool-season grasses (like fescue, rye, bluegrass) thrive in spring and fall, while warm-season grasses (like Bermuda, zoysia, St. Augustine) prefer the heat of summer. Matching the grass type to your local climate and specific lawn conditions (sun exposure, traffic) ensures the best chance of survival and long-term success.
Step-by-Step Fix
Safety First! Always wear appropriate eye protection and gloves when handling lawn equipment. Be mindful of tripping hazards from hoses or power cords. If using a dethatcher or aerator, read the manufacturer's safety instructions carefully.
-
Mow Your Lawn Shorter Than Usual — Prepare the groundwork. Set your mower to its lowest acceptable setting, typically around 1.5 to 2 inches, and mow the entire lawn. This reduces competition for sunlight and moisture for the new seedlings and allows them to reach the soil more easily. Collect all grass clippings; you want the soil surface exposed.
- Pro Tip: If your lawn is very tall, do a two-stage mow: cut it to 3-4 inches first, then lower the deck for the final cut a day or two later.
-
Dethatch Your Lawn — Remove barriers to growth. Excessive thatch (a layer of dead and living organic matter between the grass blades and the soil surface) can prevent new seeds from reaching the soil. Use a power dethatcher, a rake attachment for your mower, or a sturdy dethatching rake to remove this layer. Aim to get down to the soil. Collect and dispose of all removed thatch.
- If you don't have a dethatcher: A robust spring-tine rake can work, but it's more labor-intensive, especially for large lawns. Focus on areas with noticeable thatch buildup.
-
Aerate if Necessary — Improve soil health. If your soil is compacted (e.g., foot traffic areas, heavy clay soil, or if a screwdriver is hard to push into the ground), aeration is crucial. Use a core aerator (rentable from equipment stores) to pull out small plugs of soil, creating channels for air, water, and nutrients. Distribute the plugs back over the lawn.
- When to aerate: Best done during the growing season for your grass type – early fall for cool-season grasses, late spring/early summer for warm-season grasses.
- Soil Moisture: Aerate when the soil is moist but not soggy. Water the lawn thoroughly a day or two before if it's dry.
-
Amend the Soil (Optional but Recommended) — Boost nutrient uptake. Perform a soil test to identify any nutrient deficiencies or pH imbalances. Based on the results, apply a starter fertilizer rich in phosphorus (for root development) and/or a thin layer (1/4 to 1/2 inch) of compost or nutrient-rich topdressing. Rake it gently into the areas where you'll be seeding.
- Soil pH: Most grasses prefer a pH between 6.0 and 7.0. Adjust with lime (to raise pH) or sulfur (to lower pH) as needed, following product instructions.
-
Select the Right Grass Seed — Match your conditions. Choose a high-quality grass seed blend appropriate for your climate zone, sun exposure (full sun, partial shade), and intended use (e.g., high traffic). Look for drought-tolerant or disease-resistant varieties if those are concerns. Avoid cheap, generic seed mixes.
- Cool-season grasses: Kentucky bluegrass, perennial ryegrass, tall fescue. Best seeded in early fall or early spring.
- Warm-season grasses: Bermuda, Zoysia, St. Augustine (often sodded). Best seeded in late spring/early summer.
-
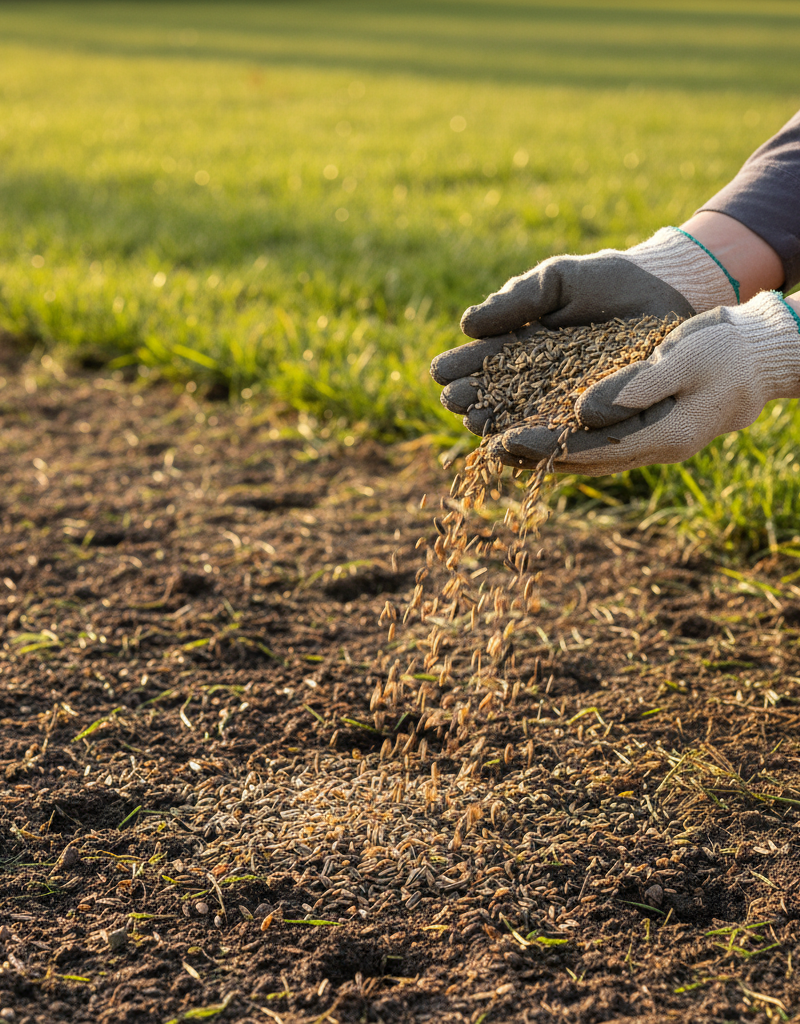
Spread the Grass Seed Evenly — Achieve uniform coverage. Use a broadcast spreader for larger areas or a drop spreader for more precise control. Set the spreader to the recommended rate for overseeding (typically half the new lawn rate). For best coverage, spread half the seed in one direction (e.g., north-south) and the other half in a perpendicular direction (e.g., east-west). For bare patches, hand-spread a slightly heavier amount.
- Coverage Check: If you mix the seed with some sand or fine compost, it can be easier to see where you've spread.
-
Lightly Rake and Roll (Optional but Helpful) — Ensure seed-to-soil contact. After spreading, gently rake the seeded areas with a leaf rake to barely cover the seeds with about 1/8 inch of soil or topdressing. This improves seed-to-soil contact and protects seeds from birds and wind. If you have a lawn roller (empty or lightly filled with water), gently roll over the seeded areas to press seeds firmly into the soil.
-
Water Frequently and Lightly — Crucial for germination. This is the most critical step. Immediately after seeding, water the lawn lightly but thoroughly to moisten the top inch of soil. For the next 2-3 weeks, or until seedlings are established (about 2 inches tall), water 2-3 times a day for 5-10 minutes each time. The goal is to keep the top inch of soil consistently moist, not soggy. Reduce watering frequency and increase duration as seedlings mature.
- Avoid run-off: If water starts to pool, stop and let it absorb before continuing.
- Consider a timer: An automatic sprinkler timer can be invaluable for consistent light watering.
-
First Mow and Fertilization — Encourage strong growth. Wait until the new grass seedlings are at least 2-3 inches tall before mowing. Set your mower to a higher setting than usual (e.g., 3 inches) to avoid stressing the young plants. Only remove the top third of the grass blade. Around 4-6 weeks after germination, you can apply a balanced, slow-release lawn fertilizer, specifically formulated for new lawns or mature lawns, to further support establishment.
Common Causes
- Soil Compaction: Heavy foot traffic, equipment, and even rainfall can compact soil, reducing air and water circulation, making it difficult for grass roots to grow and thrive. This often leads to thin areas, especially in high-traffic zones.
- Inadequate Sunlight: Most grass varieties require several hours of direct sunlight. Trees and structures can create excessive shade, causing grass to thin and become weak, eventually dying off if light levels are too low.
- Nutrient Deficiency: A lack of essential nutrients (nitrogen, phosphorus, potassium) in the soil weakens grass, making it less dense, more susceptible to disease, and slow to recover from stress. Over-fertilization or incorrect fertilization can also cause problems.
- Pest and Disease Damage: Grubs, chinch bugs, fungal diseases (like brown patch or dollar spot), and other invaders can rapidly damage and thin out large sections of a lawn, creating bare spots.
- Improper Watering: Either too little water (leading to drought stress) or too much water (leading to root rot and fungal infections) can severely impact grass health and density. Inconsistent watering is also detrimental.
- Wrong Grass Type: Using a grass variety not suited for your specific climate zone, soil type, or sun exposure will inevitably lead to a struggling, thin lawn that never reaches its full potential.
- Excessive Thatch: A thick layer of thatch (over 1/2 inch) can prevent water, air, and nutrients from reaching the soil, hindering root growth and creating an environment ripe for pests and diseases.
Common Mistakes
- Skipping Soil Preparation: Simply throwing seed on hard, compacted, or thatch-laden soil is the most common mistake. The seeds won't make good contact with the soil and will likely dry out or be washed away, leading to very poor germination rates. Always dethatch and consider aerating.
- Incorrect Timing: Overseeding at the wrong time of year (e.g., mid-summer for cool-season grasses) exposes delicate seedlings to extreme heat, cold, or strong competition from established weeds, drastically reducing success.
- Inconsistent Watering: New grass seeds require constant moisture for the first few weeks. Letting the soil dry out, even once, can kill germinating seeds. On the flip side, overwatering can wash away seeds or lead to fungal diseases.
- Wrong Seed Choice: Using cheap, generic seed or a variety not suited for your sun exposure (shade seed in full sun, or vice-versa) or climate will result in a continued struggle for a dense lawn.
- Applying too Much Seed: More seed doesn't equal a thicker lawn. Over-seeding leads to overcrowding, where seedlings compete intensely for resources, resulting in weaker, thinner grass or widespread disease. Stick to recommended rates.
- Mowing Too Soon or Too Short: Mowing newly germinated grass prematurely or cutting it too short puts immense stress on the fragile seedlings, potentially killing them or hindering their establishment. Wait until they are established and mow at a higher setting.
- Forgetting Starter Fertilizer: Young seedlings benefit greatly from a starter fertilizer with phosphorus, which aids root development. Skipping this step can lead to weaker, slower-growing young grass.
Cost & Time Breakdown
| Task | DIY cost | Pro cost | Time |
|---|---|---|---|
| Mower rental (if needed) | $0–$40 | N/A | 15–30 mins |
| Dethatcher/Aerator rental | $40–$100 | Included in service | 1–3 hours |
| Grass Seed (per 5,000 sq ft) | $40–$120 | Included in service | N/A |
| Starter Fertilizer/Topdressing | $20–$50 | Included in service | N/A |
| Spreader | $0–$50 | N/A | N/A |
| Post-seeding watering | $5–$20 (water bill) | Included in service | 2–3 weeks daily |
| Total (DIY) | $100–$280 | $300–$700+ | 2-4 hours active + 3 weeks watering |
Tips & Prevention
- Regular Soil Tests: Conduct a soil test every 2-3 years to monitor nutrient levels and pH. This allows you to proactively address imbalances before they severely impact your lawn's health.
- Proper Mowing Height: Avoid scalping your lawn. Most grass types prefer to be mowed at a height of 2.5 to 3.5 inches. Taller grass shades the soil, conserves moisture, and develops deeper roots, leading to a denser, healthier turf.
- Smart Watering: Water deeply and infrequently (1 inch of water per week, delivered in one or two sessions) rather than lightly and frequently. This encourages deeper root growth, making your lawn more drought-tolerant and resilient.
- Fertilize Strategically: Apply fertilizer based on your grass type and soil test results. Avoid over-fertilizing, which can burn your lawn or lead to excessive growth that depletes the plant's resources. Split applications are often best.
- Address Shade Issues: If trees are casting too much shade, consider judicious pruning to allow more sunlight to reach the grass. For very shady areas, consider planting shade-tolerant ground cover or installing hardscaping instead of struggling with grass.
- Manage Thatch Annually: Light dethatching or aeration can be performed annually or biennially to prevent excessive thatch buildup, ensuring better nutrient, water, and air penetration to the soil.
- Monitor for Pests and Diseases: Regularly inspect your lawn for signs of insect activity (e.g., brown patches, chewing marks) or fungal diseases (e.g., discolored spots, slime molds). Early detection allows for targeted treatment, preventing widespread damage.
When to Call a Professional
While overseeding is a manageable DIY project, there are specific situations where calling a professional lawn care service or landscaper is highly advisable. If your lawn's thinning is accompanied by widespread and persistent discoloration, unusual growths, or rapid decline despite your best efforts, it could indicate a severe pest infestation, a challenging fungal disease, or a complex soil issue that requires specialized diagnosis and treatment. Similarly, if your property has very significant compaction problems across a large area, or requires extensive grading or drainage solutions before successful overseeding is possible, professionals have the heavy equipment and expertise to handle these foundational challenges efficiently. They can also offer expert advice on the best grass varieties for unique microclimates in your yard, ensuring a long-term solution rather than a temporary fix. Don't hesitate to call a pro if you're consistently failing to achieve results or if the underlying issues seem beyond a straightforward DIY approach.
Related Articles
Keep troubleshooting with these hand-picked guides from FixlyGuide:
- The #1 Mistake Killing Your Thin Lawn (And How to Fix It in a Weekend) — Overseeding your lawn can transform it from thin and patchy to lush, but many homeowners make a crucial mistake that hinders success. Learn…
- The #1 Mistake Killing Your Lawn's Thickness (and 5 Steps to a Lush Comeback) — Discover the crucial error most homeowners make when trying to thicken a thin lawn and follow five simple steps to revive it.
- The #1 Mistake Killing Your Lawn's Thickness (and How to Fix It in a Weekend) — Overseeding a thin lawn is essential for a lush green carpet, but many homeowners make a crucial mistake that hinders success. Learn the ri…
- The #1 Mistake Killing Your Lawn's Thickness (and How to Fix It for $50) — Overseeding can transform a thin, patchy lawn into a lush, vibrant carpet, but many homeowners miss a critical step, hindering success.
- The #1 Mistake Killing Your Thin Lawn (and How to Fix It in a Weekend) — Overseeding a thin lawn is crucial for a lush yard, but a common mistake can ruin your efforts before they even begin. Learn how to diagnos…
- The #1 Mistake Homeowners Make With HVAC Filters (And How Often to Really Change Them) — Discover the crucial mistake most homeowners make with HVAC filters and the specific schedule you should follow to avoid costly HVAC issues…
Get the print-ready PDF of this guide
A clean, ad-free, printable version you can keep on your phone or pin to the workshop wall. Free with a FixlyGuide account.
- Print-optimized layout
- Tools, materials & every step included
- Saved to your account
Frequently asked questions
When is the best time to overseed a lawn?+
For cool-season grasses (fescue, rye, bluegrass), early fall (late August to mid-October) is ideal. For warm-season grasses (Bermuda, Zoysia), late spring to early summer is best. This timing allows the new seedlings to establish before extreme temperatures arrive.
How long does it take for new grass seed to grow after overseeding?+
Germination typically takes 7-21 days, depending on the grass type and growing conditions. You should see visible sprouts within this window, but it can take 4-6 weeks for the new grass to be established enough for its first gentle mow.
Do I need to aerate before overseeding?+
Aeration is highly recommended, especially if your soil is compacted. It creates holes that allow seeds, water, and nutrients to penetrate deeper into the soil, significantly improving germination and root development. If your soil is already loose and healthy, you might be able to skip it.
How often should I water after overseeding?+
For the first 2-3 weeks, water lightly (5-10 minutes) 2-3 times a day to keep the top inch of soil consistently moist. As seedlings mature, gradually reduce frequency and increase watering duration to encourage deeper root growth. Avoid letting the soil dry out during this critical period.
Can I overseed in the spring?+
You can overseed cool-season grasses in early spring, but it's generally less ideal than fall. Spring seeding faces more competition from weeds and potential stress from summer heat before the grass is fully established. If you do seed in spring, be prepared for more intensive weed control and watering.

Discussion
Loading comments…