
Tools & materials you'll need
Affiliate linksAs an Amazon Associate FixlyGuide earns from qualifying purchases — at no extra cost to you. Prices and availability are accurate as of publication and subject to change.
Quick Answer
If your AC condenser fan isn't spinning, a common and often inexpensive fix is replacing a faulty capacitor. This small, cylindrical component stores and releases electrical charge to start the fan motor. Other causes include a seized fan motor due to debris, worn bearings, or an electrical problem like a tripped breaker or a loose wire. By carefully diagnosing the issue and performing a few simple checks, you can often restore your AC by replacing the capacitor or freeing a stuck fan.
The Problem
Picture this: It's a sweltering summer day, your thermostat is set to a crisp 72, but your home feels more like a sauna. You go outside to check your AC unit, and while you hear the hum of the compressor, the large fan on top of the outdoor unit isn't spinning. This is a common and frustrating problem. The condenser fan is crucial for expelling heat from your home. Without it, the refrigerant can't properly cool down, leading to your AC "running" but not cooling, potential system damage, and ultimately, a very hot house. Identifying why the fan isn't spinning, and addressing it safely, is key to restoring comfort.
How It Works
Your outdoor AC unit, also known as the condenser unit, has several critical components working in concert. Refrigerant, a special chemical compound, absorbs heat from your indoor air and travels to the outdoor unit. Here, the refrigerant is compressed, which raises its temperature and pressure. It then flows through a series of coiled copper tubes called the condenser coil. The heat trapped in the refrigerant needs to be released into the cooler ambient air outside. This is where the condenser fan comes in.
The fan, typically located at the top of the unit, pulls air across the hot condenser coils, drawing heat away from the refrigerant and expelling it upwards. As the refrigerant cools, it changes from a high-pressure gas back into a liquid, ready to circulate back indoors and repeat the cooling cycle. The fan motor, usually a shaded-pole or permanent split capacitor (PSC) motor, is powered by electricity from your home. A key component for starting and maintaining the motor's rotation is the run capacitor. This cylindrical component stores an electrical charge and imparts a starting "kick" to the motor, then helps maintain its efficiency. If the capacitor weakens or fails, the motor may hum but lack the power to start spinning, or it might not even hum at all. The electrical contactor, essentially a heavy-duty relay, sends power to both the compressor and the outdoor fan motor when instructed by the thermostat.
Step-by-Step Fix
Safety First — ALWAYS shut off power to your outdoor AC unit at the main electrical panel (the breaker labeled "AC" or "Outdoor Unit") and the disconnect switch near the unit before touching anything. Verify power is off with a non-contact voltage tester.
-
Check for Obstructions — Before anything else, ensure nothing is physically blocking the fan blades. Twigs, leaves, plastic bags, or even small animals can jam the fan.
- Tools: None (or a stick/gloved hand for gentle removal).
- Action: Visually inspect the fan blades and the grille. Gently remove any debris. If the fan blades feel stiff, this could indicate a seized motor.
-
Manually Start the Fan (Quick Test) — With the power OFF, try spinning the fan blades by hand. They should spin freely with minimal resistance. If they are stiff or won't budge, the motor bearings might be seized, or something is internally wrong with the motor.
- If it spins freely: Restore power and, using a long, insulated stick or screwdriver, gently try to give the fan blades a slight push to see if it starts spinning on its own. If it kicks on and runs fine after a push-start, a weak run capacitor is highly likely the culprit.
- If it doesn't spin freely: The motor is likely seized or has an internal issue. This usually means a motor replacement is necessary.
-
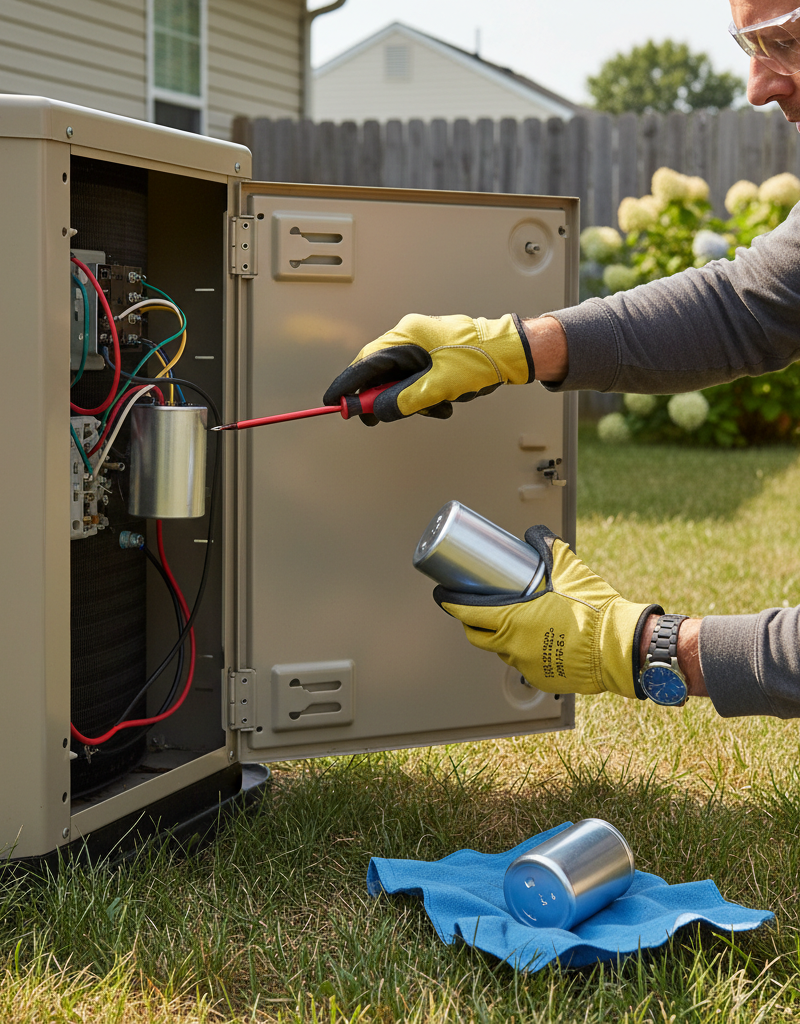
Inspect the Run Capacitor — This is a common failure point and often an easy DIY fix. The capacitor is typically a silver cylinder, often with two or three terminals on top, located inside the electrical compartment of your outdoor unit.
- Safety: Power MUST be off. Even with power off, a capacitor can hold a dangerous charge. Use the insulated handle of a screwdriver to carefully short between the terminals (touch the metal shaft across two terminals simultaneously) to discharge it. Repeat for all terminal combinations.
- Visual Check: Look for signs of failure: swelling (the top bulging out), leaks (oil residue), or rust. Any of these indicates a bad capacitor.
- If it looks fine: A capacitor can fail internally without visual cues. You'll need a multimeter with a capacitance setting to test it accurately.
- Tools: Multimeter with capacitance setting.
- Action: Disconnect the wires, note their positions, and test the microfarad (µF) rating against the label on the capacitor. If it's outside the stated tolerance (usually +/- 5%), it needs replacement.
-
Replace the Capacitor — If your visual inspection or multimeter test confirms a bad capacitor, replacement is straightforward.
- Tools: Screwdriver set, needle-nose pliers, replacement capacitor (match the voltage and µF precisely).
- Action: Take a picture of the wiring before disconnecting. Disconnect the old capacitor, noting that specific terminals (HERM, FAN, C) correspond to different wires (compressor, fan, common). Connect the new capacitor, ensuring wires go to the correct terminals. Secure it in place.
- Important: Always replace a dual-run capacitor (one with three terminals for "HERM", "FAN", and "C") with another dual-run capacitor of the exact same µF ratings (e.g., 40/5 µF). For a single-run capacitor (two terminals), match the µF and voltage.
-
Check the Contactor — The contactor sends power to the compressor and fan. Sometimes its contacts can get pitted or burnt.
- Safety: Power OFF and verified with a voltage tester.
- Visual Check: Locate the contactor (a rectangular block with a movable plunger) inside the electrical compartment. Look at the silver contacts inside – if they are heavily pitted, burnt, or fused together, it can prevent power from reaching the fan.
- Action: Gently press the plunger with an insulated tool. It should move freely. If it's stuck or the contacts look severely damaged, the contactor might need replacement. This is a more advanced DIY task; consider a pro if unsure.
-
Test the Fan Motor for Power — If the fan still doesn't spin after checking the capacitor and contactor, and you suspect an electrical issue with the motor itself, you'll need a multimeter.
- Safety: Power ON, but extreme caution is required. Keep hands clear of fan blades. If you are uncomfortable working with live electricity, call a pro.
- Tools: Multimeter (set to AC voltage).
- Action: Access the fan motor wires (typically Black, White, and Brown or Yellow). Carefully measure the voltage across the Black (Hot) and White (Neutral) wires going to the fan motor while the AC is trying to run. You should read approximately 240V (for a 240V unit) or 120V (for a 120V unit). If voltage is present but the motor isn't spinning (and isn't seized), the motor itself is likely bad.
-
Reset the Circuit Breaker — Sometimes a temporary overload can trip the breaker powering your outdoor unit.
- Action: Go to your main electrical panel and locate the breaker labeled for your AC unit. Flip it completely OFF, wait 30 seconds, then flip it firmly back to the ON position. Test the AC again. If it trips immediately, there's a serious electrical issue or a failing component that's drawing too much current, and you should call a pro.
Common Causes
- Failed Run Capacitor: This is by far the most common reason a fan motor hums but doesn't start, or doesn't start at all. Capacitors degrade over time, especially in extreme heat.
- Seized Fan Motor: Over time, the bearings in the fan motor can wear out, causing friction and preventing the motor from spinning freely. Debris entering the motor housing can also cause it to seize.
- Electrical Issues: This could include a tripped circuit breaker, loose wiring connections, a faulty contactor whose contacts are burnt or welded shut, or even a failed low-voltage control wire issue from the thermostat.
- Debris Obstruction: Leaves, twigs, plastic bags, or other yard debris can fall into the condenser unit and physically block the fan blades, preventing them from rotating.
- Overheating: If the compressor itself is overheating (perhaps due to a dirty coil or low refrigerant), some units have safety switches that will shut down the entire outdoor unit, including the fan, to prevent damage.
Common Mistakes
- Forgetting to Kill the Power: The most dangerous mistake. Always, always, ALWAYS shut off power at both the main electrical panel and the outdoor disconnect switch. Capacitors can also hold a charge, so discharge them safely.
- Ignoring the Proper µF and Voltage Rating for a Capacitor: Using a capacitor with incorrect microfarad (µF) or voltage ratings can lead to immediate failure, damage to the motor, or even a fire. Always match the exact specifications.
- Not Discharging the Capacitor: Even with power off, a capacitor can hold a significant electrical charge that can deliver a painful (and potentially dangerous) shock.
- Forcing a Seized Fan: If the fan motor does not spin freely by hand, forcing it or repeatedly trying to start it can cause further damage to the motor.
- Assuming a "Bad" Fan Motor Without Testing: Many homeowners jump straight to replacing the motor when a $5 capacitor is the actual problem. Proper diagnosis saves time and money.
- Ignoring Other Symptoms: If the compressor isn't running either, or if the unit is making unusual noises, the issue might be more complex than just the fan, and a broader diagnostic is needed.
Cost & Time Breakdown
| Task | DIY Cost | Pro Cost | Time |
|---|---|---|---|
| Obstruction Removal | $0 | $0 (part of diagnostic) | 5-10 min |
| Capacitor Replace | $15–$30 | $150–$300 | 20-30 min |
| Motor Bearing Lube | $0–$5 | $0 (if possible) | 30-60 min |
| Fan Motor Replace | $100–$300 | $400–$800 | 1-3 hours |
| Contactor Replace | $20–$50 | $200–$400 | 30-60 min |
| Electrical Fix | $0–$10 (wire nuts) | $150–$500+ | 30-120 min |
Tips & Prevention
- Regular Cleaning: Keep the area around your outdoor unit clear of leaves, grass clippings, and other debris. Annually, gently rinse the coils with a garden hose (from the inside out, if possible, and with power off) to improve airflow and efficiency.
- Annual Professional Tune-up: Schedule a professional HVAC tune-up once a year. A technician can inspect the capacitor, motor bearings, and electrical connections for signs of wear before they cause a breakdown.
- Monitor for Warning Signs: Listen for unusual noises like grinding, excessive humming, or squealing from the outdoor unit. Observe if the fan struggles to start or runs intermittently. These can be early indicators of a failing motor or capacitor.
- Consider a Capacitor Upgrade: If your unit is older and has a single-stage capacitor, discuss with a technician if a "hard start kit" or an upgraded capacitor could extend motor life, especially in hot climates.
- Check Breaker Periodically: If you experience frequent power outages or storms, occasionally check your AC breaker to ensure it hasn
Related Articles
Keep troubleshooting with these hand-picked guides from FixlyGuide:
- The $0 Trick to Get Your AC Condenser Fan Spinning Again (Before Calling a Pro) — Before you spend money on a technician, a simple, often overlooked check can get your AC condenser fan spinning and cool air flowing.
- The $0 Trick to Revive Your Frozen AC Fan (Before You Call a Pro) — Before you spend money on an AC repair, try this simple, no-cost trick to get your condenser fan spinning again and cool your home.
- The $5 Trick to Fix a Frozen AC Fan (and Why It Stops Spinning) — A non-spinning AC condenser fan can lead to system overheating and no cold air. Often, a simple, inexpensive fix can restore function.
- Why Your Heat Pump Auxiliary Heat Won't Turn Off — Discover why your heat pump's auxiliary heat keeps running, driving up your energy bills. Learn to troubleshoot common issues and know when…
- The Secret Reason Your Thermostat Lies (And How to Fix It in Minutes) — Discover why your thermostat isn't hitting its set temperature and learn simple, actionable steps to diagnose and fix the most common culpr…
- The #1 Mistake Homeowners Make When a Gas Burner Won't Light (And the Easy Fix) — Before you call a technician, discover the most common, overlooked reason your gas stove burner isn't lighting and how to fix it yourself i…
Get the print-ready PDF of this guide
A clean, ad-free, printable version you can keep on your phone or pin to the workshop wall. We'll also send occasional weekly tips matched to your home situation.
- Print-optimized layout
- Tools, materials & every step included
- Unsubscribe anytime
Frequently asked questions
Why is my AC compressor running but the fan isn't spinning?+
If your AC compressor is running but the fan blades on the outdoor unit aren't spinning, the most common cause is a faulty run capacitor. This component provides the initial jolt of electricity needed to start the fan motor. It can also be due to a seized fan motor or an electrical issue. Checking and potentially replacing the capacitor is often the first step.
How do I test an AC run capacitor?+
To test an AC run capacitor, you'll need a multimeter with a capacitance (µF) setting. First, ensure the power to the unit is OFF and discharge the capacitor using an insulated screwdriver. Then, disconnect the wires and connect your multimeter leads to the capacitor terminals. Compare the reading to the µF rating printed on the capacitor. If it's outside the manufacturer's tolerance (usually +/- 5-10%), the capacitor is likely bad.
Can I replace an AC condenser fan motor myself?+
Replacing an AC condenser fan motor is a moderate to advanced DIY task. It involves electrical wiring, ensuring correct blade rotation, and often matching specific motor specifications. If the fan blades don't spin freely and the capacitor tests good, a new motor is likely needed. While possible for experienced DIYers, if you're uncomfortable with electrical work or are unsure, it's best to call a qualified HVAC technician.
How much does it cost to fix an AC fan that isn't spinning?+
The cost to fix an AC fan that isn't spinning varies significantly depending on the cause. If it's a simple obstruction, it's free. Replacing a faulty run capacitor typically costs $15-$30 for the part if you DIY, or $150-$300 for a pro. If the fan motor itself needs replacement, DIY costs are $100-$300 for the motor, while professional replacement can range from $400-$800, including parts and labor.
What is the humming noise from my AC unit if the fan isn't spinning?+
A humming noise from your outdoor AC unit when the fan isn't spinning most often indicates that the fan motor is receiving power but lacks the necessary starting torque. This is a classic symptom of a failed or weak run capacitor. The capacitor isn't providing enough electrical impetus to get the motor spinning, leading to the motor's internal windings attempting to turn but failing to do so.

Discussion
Loading comments…