Tools & materials you'll need
Affiliate linksAs an Amazon Associate FixlyGuide earns from qualifying purchases — at no extra cost to you. Prices and availability are accurate as of publication and subject to change.
Quick Answer
Neglecting routine HVAC maintenance is the single biggest mistake homeowners make, leading to higher energy bills, reduced comfort, and costly breakdowns. The solution is a simple, consistent schedule of DIY tasks like filter changes and annual professional tune-ups. This approach can save you hundreds of dollars annually in energy costs and extend your system's life by years.
The Problem
You rely on your HVAC system daily, yet it's often an 'out of sight, out of mind' appliance until something goes wrong. That hum you hear in the summer and winter? It's working hard to keep your home comfortable. But over time, dust, dirt, and wear take their toll. Without regular attention, your system becomes less efficient, struggling to maintain target temperatures, consuming more electricity, and eventually breaking down. Many homeowners wait until a major issue arises, like a lack of cooling on a sweltering July day or no heat in the dead of winter, before thinking about maintenance. This reactive approach is not only inconvenient but also far more expensive than preventive care.
The real culprit behind this problem is a lack of understanding about what an HVAC system needs to perform optimally. It's not just about a thermostat setting; it's about airflow, refrigerant levels, electrical connections, and moving parts. When any of these components are compromised due to a build-up of grime or lack of lubrication, the entire system suffers. This leads to symptoms like weak airflow, inconsistent temperatures across rooms, strange noises, and most notably, an unexplained spike in your energy bills.
How It Works
To understand why maintenance is so critical, let's briefly look at how a typical split HVAC system (the most common type) operates. It consists of two main units: an outdoor condenser unit (containing the compressor, condenser coil, and fan) and an indoor air handler (containing the evaporator coil, blower fan, and furnace). These two units work in tandem to either remove heat from your home (cooling) or add heat to it (heating).
During cooling, refrigerant circulates between the indoor and outdoor coils. The indoor evaporator coil absorbs heat from your home's air. As warm air from your living space passes over the cold evaporator coil, the refrigerant inside absorbs the heat, turning into a low-pressure gas. This cooled air is then blown back into your home through your ductwork. The now-heated refrigerant gas travels to the outdoor condenser unit, where the compressor increases its pressure and temperature. It then flows into the condenser coil, where a fan blows outdoor air over the coil, rejecting the heat to the outside atmosphere, turning the refrigerant back into a high-pressure liquid. This liquid then returns to the indoor unit, and the cycle continues.
During heating (if you have a furnace), a heat exchanger heats air circulated by the blower motor. If you have a heat pump, the process reverses: the outdoor coil absorbs heat from the outside air (even cold air contains some heat), and the indoor coil releases that heat into your home.
The critical components that enable this cycle – coils, filters, fans, motors, and refrigerant lines – are all susceptible to dirt, debris, and wear. A dirty air filter restricts airflow, forcing the blower motor to work harder and potentially freezing the evaporator coil. Dirty coils cannot efficiently transfer heat. Low refrigerant levels, often due to leaks, reduce cooling capacity and strain the compressor. Loose electrical connections can cause intermittent operation or even safety hazards. Without regular checks and cleaning, these issues compound, leading to reduced efficiency, increased energy consumption, and eventual component failure.
Step-by-Step Fix
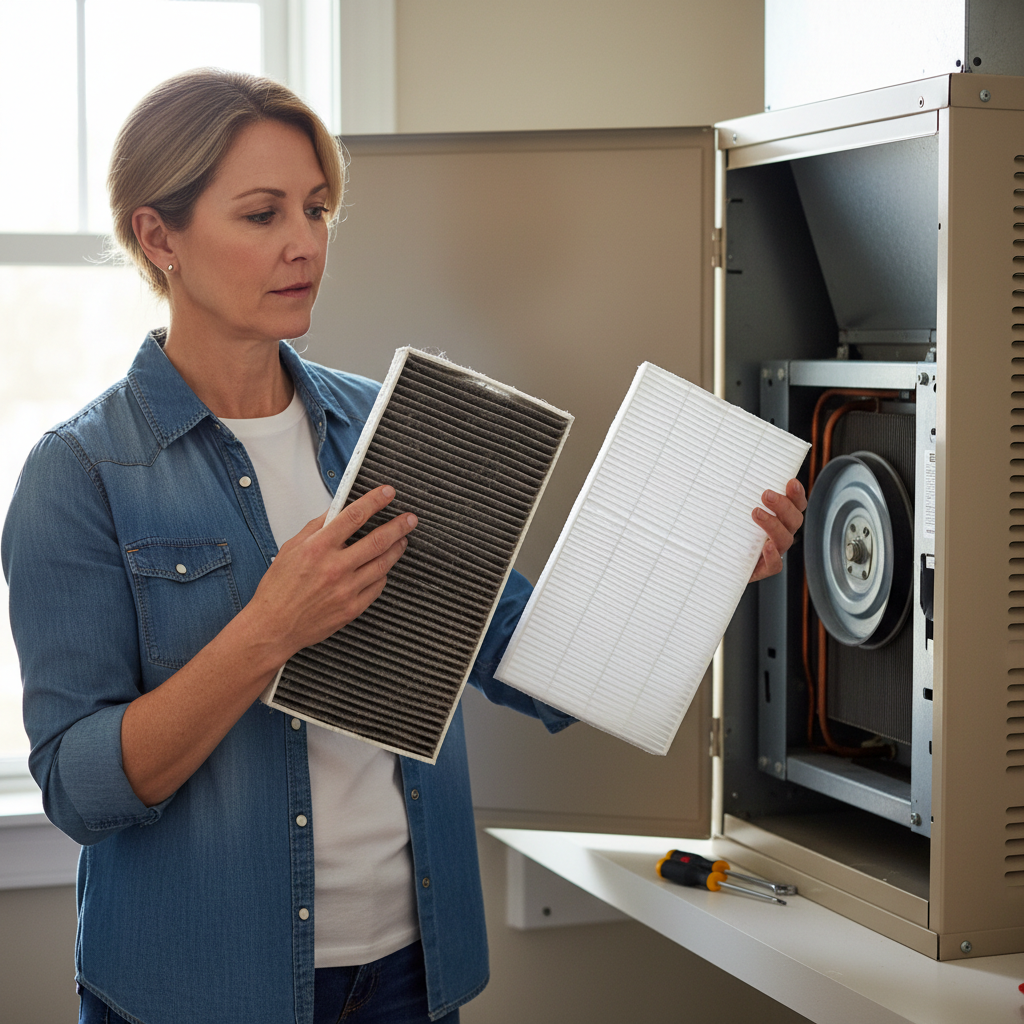
1. Prioritize Filter Changes — Don't underestimate the power of a clean filter.
- Monthly Visual Check. Pull out your filter and hold it up to a light source. If you can't see the light through it, it's time for a change. For most homes, especially with pets or allergies, a monthly check is wise. During peak seasons (summer and winter), aim to change it every 30 days.
- Correct Size and MERV Rating. Always use the correct size filter for your system. The dimensions are printed on the filter's frame. For most residential systems, a MERV (Minimum Efficiency Reporting Value) rating of 8-11 offers a good balance between air filtration and airflow. Higher MERV ratings (13+) are great for allergies but can restrict airflow more, so consult your HVAC manual or a pro before switching to a much higher rating.
- Safety Note: Always turn off your thermostat and ensure the HVAC system is powered down before opening any access panels or removing filters.
2. Keep Outdoor Unit Clear — Ensure proper airflow for efficient operation.
- Clear Debris. Regularly inspect your outdoor condenser unit. Remove any leaves, grass clippings, weeds, or other debris that has accumulated on or around the unit. A good rule of thumb is to maintain at least a 2-foot clearance around all sides and on top of the condenser.
- Gentle Cleaning. Using a garden hose with moderate pressure, gently spray down the outside of the condenser fins. Aim downwards to avoid bending the delicate fins. Never use a power washer, as it can easily damage the fins and internal components.
- Trim Foliage. Trim back any bushes, trees, or vegetation that are growing too close to the unit. Good airflow is essential for the condenser to release heat efficiently.
3. Check and Clean Drain Line — Prevent water damage and mold growth.
- Locate the Drain Line. Your indoor unit has a condensate drain line, usually a PVC pipe, that carries away moisture removed from the air. In humid climates, it can clog with algae.
- Clear with Vinegar. Pour a cup of distilled white vinegar down the access port (often a T-shaped fitting with a cap) of the condensate drain line. This helps kill algae and prevent clogs. Repeat every few months during cooling season.
- Safety Note: If you see standing water in the drain pan or notice water dripping from the indoor unit, a clog is likely. If clearing with vinegar doesn't work, this might require a professional to safely clear a stubborn blockage.
4. Thermostat Settings Review — Optimize for comfort and savings.
- Program for Savings. Utilize your programmable or smart thermostat to set back temperatures when you're away or asleep. A 7-10°F setback for 7-8 hours can save you up to 10% on your energy bill annually.
- Avoid Extreme Changes. Resist the urge to crank the AC way down or the heat way up when you get home. It won't cool or heat your house faster and will only make the system work harder, consuming more energy.
- Consider a Smart Thermostat. These devices learn your habits and can automatically adjust temperatures, offering even greater savings and convenience.
5. Conduct Visual Inspection — Look for obvious issues.
- Ductwork Leaks. Visually inspect exposed ductwork in your attic, basement, or crawl space for disconnected sections, gaps, or tears. Seal minor leaks with mastic sealant or metallic foil tape (not duct tape, which degrades over time). Significant leaks should be addressed by a professional.
- Blower Motor Access. If you have easy and safe access to your indoor unit's blower compartment, inspect the blower wheel for excessive dirt buildup. A dirty blower wheel can significantly impede airflow. Cleaning this is often best left to a professional, but a visual check is helpful.
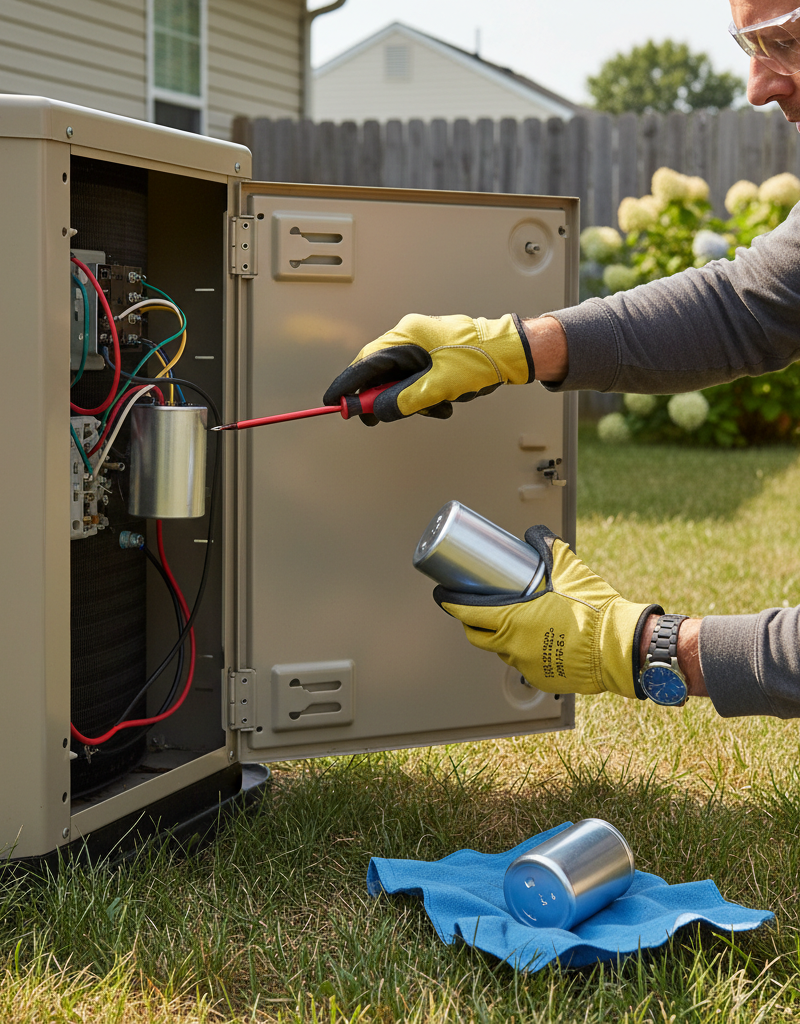
- Wiring and Connections. While you should never touch electrical components unless you are qualified, a quick visual scan for loose or frayed wiring (from a safe distance with the power off) can point to potential issues for a professional to investigate.
6. Schedule Annual Professional Tune-Up — The cornerstone of prevention.
- Spring for AC, Fall for Heat. Aim to have your AC serviced in the spring (before sustained hot weather) and your furnace/heating system serviced in the fall (before sustained cold weather). If you have a heat pump, an annual check-up in the fall is usually sufficient.
- What a Pro Does. A professional tune-up involves tasks like checking refrigerant levels, lubricating moving parts, inspecting electrical connections, cleaning coils, checking thermostat calibration, and testing system safety controls. This comprehensive check goes beyond what a homeowner can safely or effectively do.
- Documentation. Keep records of all professional service, including dates, work performed, and any recommendations from the technician. This helps track your system's history and warranty information.
Common Causes
- Neglect and Forgetfulness: The most common cause of HVAC problems is simply not remembering or understanding the importance of regular maintenance. Life gets busy, and HVAC systems are often out of sight, out of mind.
- Dirty Air Filters: Clogged filters are the number one airflow killer, leading to reduced efficiency, increased strain on the blower motor, and potential freezing of evaporator coils.
- Lack of Outdoor Unit Clearing: Overgrown vegetation and debris around the condenser unit prevent proper heat dissipation, making the AC work harder.
- Clogged Condensate Drain Lines: Algae and sludge can build up, causing water to back up, potentially leading to leaks, water damage, and even system shutdown via safety switches.
- Skipping Professional Tune-ups: DIY efforts are great, but they can't replace the deep diagnostics, specialized cleaning, and intricate adjustments a trained professional provides.
- Incorrect Thermostat Usage: Constantly changing settings or overriding programmable features can lead to inefficient operation and unnecessary wear.
Common Mistakes
- Using the Wrong MERV Filter: While higher MERV ratings filter more particulate, they can also restrict airflow too much for older or less powerful systems, potentially damaging the blower motor. Stick to what your manual recommends or consult a pro.
- Ignoring Strange Noises or Smells: A squealing belt, grinding noise, or burning smell are not
Related Articles
Keep troubleshooting with these hand-picked guides from FixlyGuide:
- The #1 Mistake Homeowners Make With Their AC (and the $50 Fix) — Discover the most common and costly mistake homeowners make with their AC system and how a simple, affordable fix can prevent expensive rep…
- The #1 HVAC Mistake Costing You Hundreds (and 2 Easy Fixes) — Discover the most common HVAC mistake homeowners make that leads to higher bills and breakdowns, plus two simple maintenance steps to preve…
- The #1 Mistake Homeowners Make When Heat Pumps Stop Heating in Winter — Discover the crucial mistake most homeowners make when their heat pump struggles in cold weather and how to fix it, potentially saving hund…
- The Secret Reason Your AC Isn't Drying Your Air (And What to Check First) — Your AC should cool and dehumidify, but if your house feels muggy, there's a specific, often overlooked culprit preventing it from doing it…
- The HVAC Maintenance Myth: Why "Annual Service" Can Cost You More (and 3 Things to Check Instead) — Discover why strict annual HVAC servicing isn't always necessary and learn the essential checks that can save you money and extend your sys…
- The 3 Critical Mistakes Homeowners Make Inspecting Their Roof (From the Ground) — Learn how to spot damaging roof problems safely from the ground, avoiding common pitfalls and knowing exactly what to look for.
Frequently asked questions
How often should I change my HVAC filter?+
You should check your HVAC filter monthly and replace it every 30-90 days, depending on factors like pets, allergies, and system usage. During peak heating and cooling seasons, or if you have indoor pets, monthly changes are often recommended.
What happens if I don't service my HVAC system?+
Neglecting HVAC service can lead to reduced efficiency (higher energy bills), diminished cooling or heating performance, premature component failure, costly repairs, and a shorter overall lifespan for your system. It also increases the risk of unexpected breakdowns.
Is an annual HVAC tune-up worth it?+
Yes, an annual professional HVAC tune-up is highly recommended and worth the cost. It helps ensure your system runs at peak efficiency, identifies minor issues before they become major problems, extends the equipment's lifespan, and can often pay for itself in energy savings and avoided repair costs.
Can I service my HVAC system myself?+
Homeowners can perform basic maintenance tasks like changing air filters, cleaning the outdoor unit of debris, and clearing the condensate drain line. However, complex tasks like checking refrigerant levels, cleaning coils thoroughly, and inspecting electrical components should always be left to a qualified HVAC professional for safety and effectiveness.
How much does an HVAC tune-up cost?+
The cost of a professional HVAC tune-up typically ranges from $75 to $200, depending on your location, the company, and the extent of the service package. Many HVAC companies offer service plans that include annual tune-ups at a reduced rate.


Discussion
Loading comments…