Tools & materials you'll need
Affiliate linksAs an Amazon Associate FixlyGuide earns from qualifying purchases — at no extra cost to you. Prices and availability are accurate as of publication and subject to change.
Quick Answer
If your AC system is blowing warm air, the most common and often overlooked problem is a frozen evaporator coil. This occurs when the return air filter is clogged, vents are blocked, or refrigerant levels are low, leading to reduced airflow over the coil. The coil gets too cold, and moisture in the air condenses and freezes on its surface. To fix this, turn off your AC unit at the thermostat and allow it to thaw for several hours, then replace your air filter and ensure all supply and return vents are open and unobstructed. If the problem persists, it may indicate a low refrigerant charge or another mechanical issue requiring professional attention.
The Problem
You walk into your home on a sweltering summer day, eager for the cool blast of your air conditioner, only to be met with a disappointing stream of warm, stale air. This isn't just uncomfortable; it's a sign that your AC system is struggling, potentially wasting energy, and if ignored, could lead to costly repairs. While many issues can cause an AC to blow warm air, one of the most prevalent and often misunderstood by homeowners is a frozen evaporator coil. This seemingly simple issue can cripple your system's ability to cool, turning your home into an oven.
A frozen evaporator coil prevents heat exchange. Your AC's job is to absorb heat from inside your home and release it outside. When the evaporator coil, located in your indoor unit (often within the furnace), becomes covered in a layer of ice, it can no longer effectively absorb heat from the air passing over it. Instead, the fan continues to blow air, but that air isn't cooled. Understanding why this ice forms and how to safely address it is the first step toward restoring comfort and efficiency to your home.
How It Works
Your air conditioning system operates on a refrigeration cycle, moving heat from one place to another. The primary components involved are the compressor, condenser, expansion valve, and evaporator coil. Refrigerant, a special chemical compound, circulates through these components, changing states from liquid to gas and back again.
Inside your home, the warm, humid air from your living space is drawn into the return air ductwork. It then passes over the evaporator coil, which is housed in your indoor unit. This coil contains cold, low-pressure liquid refrigerant. As the warm air flows over the coil, the heat from the air is absorbed by the refrigerant, causing the refrigerant to evaporate and turn into a low-pressure gas. This process cools the air, which is then distributed back into your home through the supply vents by the indoor blower fan. Simultaneously, moisture in the air condenses on the cold coil, removing humidity from your home.
The now warm, low-pressure gaseous refrigerant travels to the compressor in your outdoor unit. The compressor increases the pressure and temperature of the refrigerant gas, sending it to the condenser coil. Here, the hot, high-pressure refrigerant gas releases its heat to the cooler outdoor air, condensing back into a high-pressure liquid. Finally, this liquid refrigerant passes through an expansion valve, which drops its pressure and temperature, preparing it to enter the evaporator coil again as a cold, low-pressure liquid to repeat the cycle.
When the evaporator coil freezes, this cycle is disrupted. Ice acts as an insulator, preventing the coil from absorbing heat effectively. This can happen due to restricted airflow (e.g., a dirty air filter, blocked return vents, or a malfunctioning blower fan) or because there isn't enough refrigerant flowing through the coil (low refrigerant charge). Both scenarios cause the coil to get excessively cold without enough heat to temper its temperature, leading to the condensation on its surface freezing solid.
Step-by-Step Fix
1. Power Down Your AC — Safety first! Turn off all power to the AC system.
Locate your thermostat and switch the system from 'Cool' to 'Off'. It's also critical to turn off the actual circuit breaker that supplies power to both your indoor furnace/air handler and the outdoor condenser unit. This prevents any electrical hazards during inspection and ensures the system remains off while thawing.
- Safety Note: Always disconnect power at the breaker before working on electrical components.
- If this doesn't work: If the circuit breaker immediately trips again when you try to reset it, do not attempt to force it back on. This indicates a more serious electrical fault, and you should call a licensed electrician or HVAC professional.
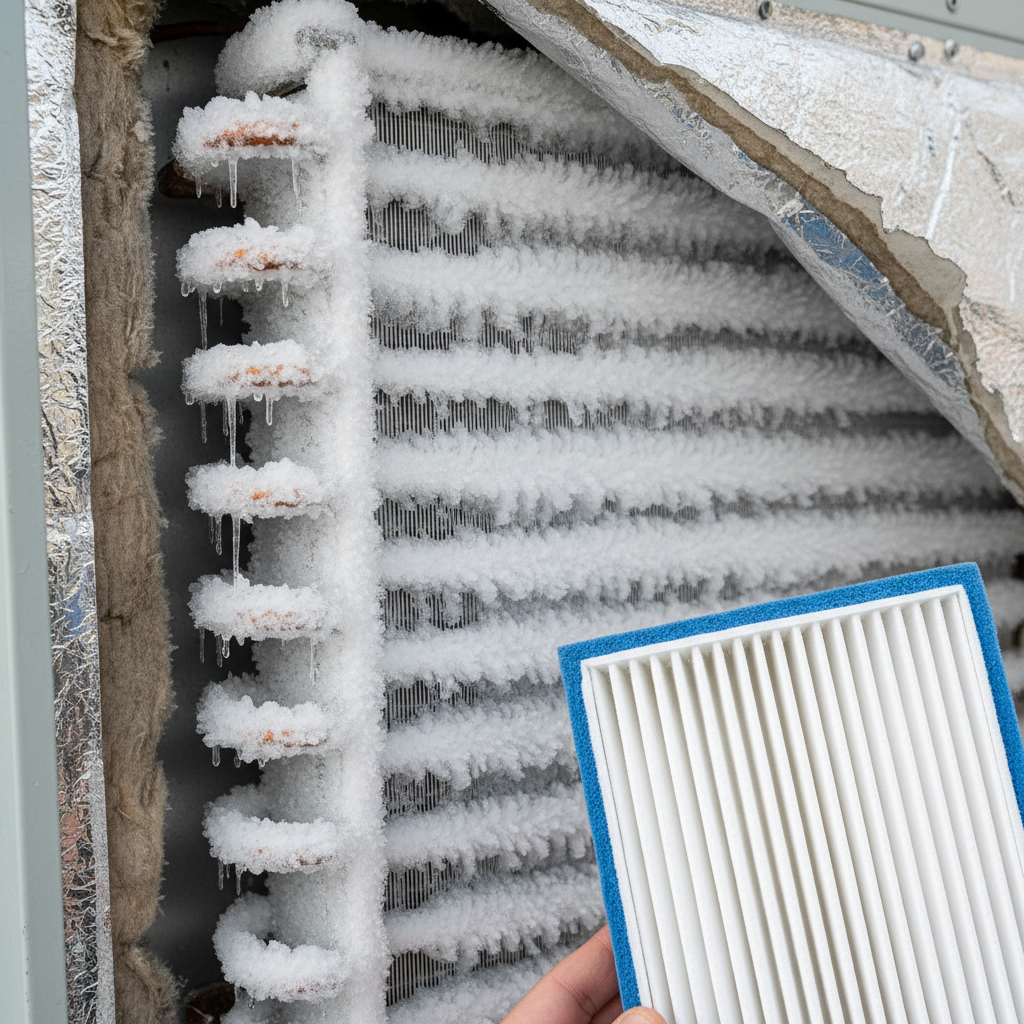
2. Locate the Evaporator Coil — Access the indoor unit to prepare for thawing.
The evaporator coil is typically located within your indoor air handler or furnace. This unit is often in a utility closet, attic, basement, or garage. You may need a screwdriver to remove an access panel. The coil itself often looks like a series of copper tubes with aluminum fins.
- Tool: Screwdriver (Phillips or flathead, depending on your unit).
- Tip: Take a photo of the unit before you start disassembling anything so you remember how to put it back together.
3. Thaw the Frozen Coil — Allow the ice to melt completely.
With the power off, the ice on the evaporator coil will begin to melt naturally. This can take anywhere from 2 to 24 hours, depending on the severity of the freeze and the ambient temperature. To speed up the process, you can: * Turn on the Fan: Set your thermostat to 'Fan On' (not 'Cool'). This will run the indoor blower fan without engaging the cooling cycle, circulating warmer air over the coil. Ensure the power to only the fan component is restored at the breaker if you previously killed all power. * Use a Hair Dryer (Carefully): You can gently use a hair dryer on a low, cool setting from a distance of at least 12 inches to encourage melting. Do not use a heat gun or direct high heat, as this can damage the coil or refrigerant lines.
- Catch the Water: Place old towels or a shallow pan beneath the indoor unit to catch runoff water from the melting ice. A clogged condensate drain line can exacerbate flooding, so monitor the area.
4. Replace the Air Filter — Improve airflow, a common cause of freezing.
While the coil is thawing, locate your air filter slot, usually near the return air duct or in the air handler itself. Note the direction of the airflow arrow on the old filter. Remove the old, dirty filter and replace it with a new, clean filter of the correct size. A clogged filter is a primary cause of reduced airflow and frozen coils.
- Material: New air filter (check your old filter for size, e.g., 20x25x1 inch, and MERV rating; MERV 8-11 is a good balance for most homes).
- Warning: Running your AC with a dirty filter dramatically reduces efficiency and puts strain on the system.
5. Check and Clear Vents — Ensure proper air circulation throughout your home.
Walk through your home and ensure all supply and return air vents are open and unobstructed by furniture, rugs, or curtains. Restricted vents reduce overall airflow, contributing to coil freezing. Pay particular attention to return air vents, which are typically larger and responsible for drawing air into the system.
- Tool: Flashlight (to check inside ducts for blockages).
- Tip: Clean dust and debris from vent grilles periodically.
6. Inspect Condensate Drain Line — Prevent future freezing and water damage.
Locate the condensate drain line, a PVC pipe usually exiting your indoor unit and leading to a drain or outdoors. Check for any visible clogs, standing water, or overflows in the condensate pan. A clogged drain can cause water to back up, leading to high humidity and potential coil freezing. You can try to clear minor clogs with a wet/dry vacuum at the exterior end of the pipe or by pouring a cup of distilled vinegar down the access port (if available) to kill algae.
- Tool: Wet/dry vacuum (optional for clearing clogs), measuring cup for vinegar.
- If this doesn't work: If the drain line remains clogged or frequently clogs, the slope may be incorrect, or there could be a significant blockage requiring a professional.
7. Restore Power and Test — Restart the system and monitor performance.
Once the coil has completely thawed, the drain line is clear, the filter is new, and vents are open, restore power to both your indoor and outdoor AC units at the circuit breaker. Set your thermostat to 'Cool' and a temperature several degrees below the current room temperature. Listen for the outdoor unit to kick on and feel for cold air coming from your supply vents.
- Observation: Monitor the system for at least 30-60 minutes. Check the outdoor unit's fan and compressor operation and verify cool air is flowing indoors.
Common Causes
- Dirty Air Filters: The most common culprit. A clogged filter severely restricts airflow over the evaporator coil, causing it to drop below freezing point.
- Blocked Return or Supply Vents: Furniture, curtains, or even closed vents can reduce the volume of air flowing through the system, much like a dirty filter, leading to freezing.
- Low Refrigerant (Freon) Charge: If your system is low on refrigerant due to a leak, the pressure inside the coil drops excessively, causing the coil temperature to plummet below freezing even with adequate airflow.
- Dirty Evaporator Coil: Over time, the evaporator coil itself can accumulate dirt and debris, acting as an insulator and hindering heat transfer, which can contribute to freezing.
- Malfunctioning Blower Motor: If the indoor blower fan isn't moving enough air, even with a clean filter, it can lead to freezing.
- Clogged Condensate Drain Line: While less direct, a severely clogged drain can cause high humidity within the system, contributing to coil freezing.
Common Mistakes
- Ignoring a Dirty Air Filter: Many homeowners neglect to check or replace their air filter regularly (monthly during peak use). This is the absolute easiest and most impactful preventative measure.
- Immediately Calling a Pro: While pros are essential for serious issues, diagnosing and thawing a frozen coil is often a simple DIY task. Calling a pro for a dirty filter is an expensive mistake.
- Turning the Thermostat Down Further: If the AC is blowing warm, the instinct is often to lower the thermostat setting. This only makes the problem worse, forcing the already struggling system to work harder and potentially exacerbating the freeze.
- Using a Heat Gun to Thaw: Applying direct, intense heat can damage delicate aluminum fins, copper tubing, or even electronic components. Always opt for passive thawing or a gentle, cool-setting hair dryer from a safe distance.
- Not Addressing the Underlying Cause: Thawing the coil is only a temporary fix if you don't resolve why it froze in the first place. You'll soon find yourself with another icy coil if you don't replace that filter or unblock those vents.
- Ignoring Water Leaks: A frozen coil will eventually thaw and melt. If you notice pooling water around your indoor unit, it's not just a sign of the freeze, but also potentially a clogged condensate drain, which can lead to significant water damage.
Cost & Time Breakdown
| Task | DIY Cost | Pro Cost | Time |
|---|---|---|---|
| Thawing Evaporator Coil | $0 | $150–$300 (service call) | 2–24 hours (passive) |
| Replacing Air Filter | $10–$30 | $50 (add-on to service) | 5 minutes |
| Clearing Blocked Vents | $0 | $50–$100 | 10–30 minutes |
| Inspecting/Clearing Drain Line | $0–$10 (vinegar) | $100–$250 | 15–30 minutes |
| Total (DIY) | $10–$40 | — | 2.5–25 hours |
| Total (Pro - if needed) | — | $200–$500+ | 1–3 hours |
Tips & Prevention
- Regular Filter Replacement: Check your air filter monthly, especially during peak cooling seasons. Replace it every 1–3 months, or more often if you have pets or allergies.
- Keep Vents Clear: Ensure all supply and return air vents are free from obstructions. Avoid closing too many vents in unused rooms, as this can unbalance the system's airflow.
- Annual Professional Tune-up: Schedule a professional HVAC tune-up every spring. A technician can clean coils, check refrigerant levels, inspect the condensate drain, and identify potential issues before they lead to breakdowns.
- Monitor Refrigerant Lines: Periodically check the large copper line (suction line) entering your outdoor unit. If it's covered in ice or appears excessively frosty, it's a strong indicator of low refrigerant or another serious problem.
- Listen to Your AC: Pay attention to unusual noises, such as hissing, bubbling, or grinding, which can signal refrigerant leaks or mechanical problems.
- Check Condensate Drain: Pour a cup of distilled vinegar down the condensate drain's access port every few months to inhibit algae growth and prevent clogs.
When to Call a Professional
While thawing a frozen coil and addressing basic airflow issues are excellent DIY tasks, there are critical situations where you should immediately call a licensed HVAC professional. If your AC continues to blow warm air after you've thawed the coil, replaced the filter, and ensured all vents are clear, the issue is likely more complex. Low refrigerant levels, a common cause of frozen coils, indicate a leak in the sealed system, which only a licensed technician can detect, repair, and recharge according to EPA regulations. Never attempt to add refrigerant yourself. Furthermore, if you suspect a malfunctioning blower motor, a dirty evaporator coil that you cannot safely access or clean, or an electrical problem (e.g., frequently tripping breakers), professional diagnosis and repair are essential. These issues require specialized tools, knowledge, and certifications to fix safely and effectively, ensuring your system runs efficiently and complies with environmental regulations.
Related Articles
Keep troubleshooting with these hand-picked guides from FixlyGuide:
- The #1 Reason Your AC Blows Warm Air (And It's Not What You Think) — A dirty air filter is often the overlooked culprit behind an air conditioner blowing warm air, hindering its ability to cool your home effi…
- The Secret Reason Your AC Isn't Drying Your Air (And What to Check First) — Your AC should cool and dehumidify, but if your house feels muggy, there's a specific, often overlooked culprit preventing it from doing it…
- The #1 Mistake Homeowners Make With Their AC (and the $50 Fix) — Discover the most common and costly mistake homeowners make with their AC system and how a simple, affordable fix can prevent expensive rep…
- The #1 Reason Your AC Fan Won't Spin (And the 20-Minute Fix) — Diagnose and fix a non-spinning AC condenser fan with our step-by-step guide, saving you money and restoring your home's cool air.
- The #1 Mistake Homeowners Make Installing a Smart Thermostat (and How to Fix It) — Avoid the most common pitfall when installing a smart thermostat yourself and ensure a smooth, energy-efficient setup.
- The #1 Mistake Homeowners Make When Their AC Drain Clogs (And The $5 Fix) — Discover the most common error homeowners make when tackling a clogged AC drain line and learn a simple, inexpensive solution to prevent co…
Frequently asked questions
How long does it take for an AC coil to unfreeze?+
An AC coil can take anywhere from 2 to 24 hours to entirely unfreeze, depending on the amount of ice buildup and the ambient temperature. You can speed up the process by turning your thermostat to the 'Fan On' setting (not 'Cool') to circulate warmer air, or by gently using a hair dryer on a cool setting from a safe distance.
Can I run my AC with a frozen coil?+
No, you should not run your AC with a frozen coil. Continuing to operate the unit will not produce cool air, wastes energy, and can put undue strain on the compressor, potentially leading to expensive damage. Always turn off the 'Cool' setting and allow the coil to thaw completely before restarting.
What's the easiest way to prevent a frozen AC coil?+
The easiest and most effective way to prevent a frozen AC coil is to regularly replace your air filter. A dirty, clogged filter restricts airflow, which is the most common cause of coil freezing. Check your filter monthly and replace it every 1-3 months during peak cooling seasons.
Is low refrigerant the only reason my AC coil freezes?+
While low refrigerant is a significant cause of coil freezing, it's not the only one. Other common culprits include severely restricted airflow due to a dirty air filter, blocked return or supply vents, a dirty evaporator coil, or a malfunctioning indoor blower motor. Always check these airflow issues first before suspecting a refrigerant leak.


Discussion
Loading comments…