
Tools & materials you'll need
Affiliate linksAs an Amazon Associate FixlyGuide earns from qualifying purchases — at no extra cost to you. Prices and availability are accurate as of publication and subject to change.
Quick Answer
Most running toilets stem from either a worn-out flapper not sealing correctly or an improperly set float causing the tank to overfill. This guide will walk you through diagnosing and fixing the most common culprit: a leaky flapper, which often takes mere minutes to resolve without special tools. Addressing this quickly prevents water waste and keeps your utility bills in check.
The Problem
A running toilet is more than just an annoying sound; it's a silent water thief, potentially wasting hundreds of gallons of water per day and significantly increasing your water bill. When your toilet 'runs,' it means water is continuously flowing from the tank into the toilet bowl, even when it hasn't been flushed. This happens because the flush valve isn't sealing properly after a flush, or the fill valve isn't shutting off the water supply once the tank is full. The most frequent offender is a faulty flapper at the bottom of the tank, which is designed to create a watertight seal. Over time, flappers can degrade, warp, or accumulate mineral deposits, preventing them from seating correctly and leading to a constant trickle or stream of water into the bowl.
How It Works
Understanding how your toilet's tank operates is key to fixing it. When you flush, the handle lifts a chain connected to the flapper, a rubber or plastic stopper that covers the flush valve opening at the bottom of the tank. This opens the flush valve, allowing water from the tank to rush into the bowl, creating the siphon action that cleanses the bowl. As the tank empties, the flapper falls back into place, sealing the flush valve. Meanwhile, the float mechanism (either a cup, ball-and-arm, or cylinder style) drops with the water level. This drop activates the fill valve, which refills the tank with fresh water and also sends a small amount of water through a refill tube into the overflow pipe to replenish the bowl's standing water. Once the water level in the tank reaches the preset line, the float rises, signaling the fill valve to shut off the water supply. If any part of this system — particularly the flapper or the float — malfunctions, the toilet will continue to run.
Step-by-Step Fix
Step 1: Diagnose the Leak Source — Is it the flapper or the fill valve?
- The Dye Test: The easiest way to confirm a flapper leak. Remove the tank lid and add 3-5 drops of dark food coloring (or a dye tablet) to the tank water. Wait 15-20 minutes without flushing. If colored water appears in the toilet bowl, your flapper isn't sealing properly. If no colored water appears, the issue is likely with the fill valve or float height. This article focuses on the more common flapper issue.
Step 2: Turn Off the Water Supply — Essential for preventing floods.
- Locate the shut-off valve on the wall behind or beneath the toilet tank. Turn it clockwise until the water flow completely stops. Flush the toilet to empty the tank as much as possible.
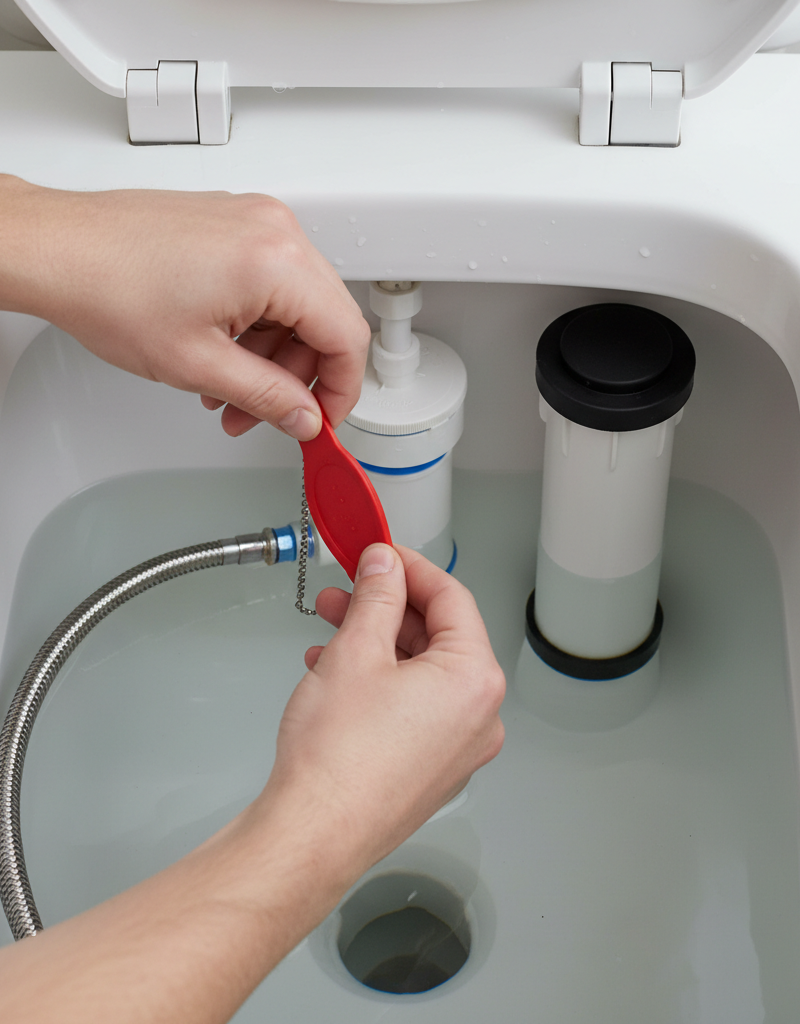
Step 3: Inspect the Flapper and Flapper Chain — Look for wear and proper slack.
- With the tank empty, examine the rubber flapper. Look for signs of deterioration, cracks, mineral buildup, or warping. Gently run your fingers around its edges to feel for rough spots that could prevent a good seal.
- Check the flapper chain. It should have about 1/2 to 1 inch of slack when the flapper is fully closed. Too much slack can cause the chain to get caught, preventing a full seal. Too little slack means the flapper might not close completely.
Step 4: Clean the Flapper and Flush Valve Seat — Remove obstructions.
- If the flapper appears in good condition but has mineral buildup, carefully remove it from its pivots (usually small ears on either side of the flush valve pipe). Clean the flapper and the rim of the flush valve opening (the 'seat') with a soft brush and white vinegar. Replace the flapper, ensuring it's properly seated.
- If this doesn't work: Proceed to replace the flapper.
Step 5: Purchase a Replacement Flapper — Get the right type.
- Take your old flapper to the hardware store for an exact match. There are several types (e.g., universal, specific brand/model, 2-inch, 3-inch). Matching it ensures proper fit and function. If the old one is too deteriorated, measure the flush valve opening diameter (typically 2 or 3 inches).
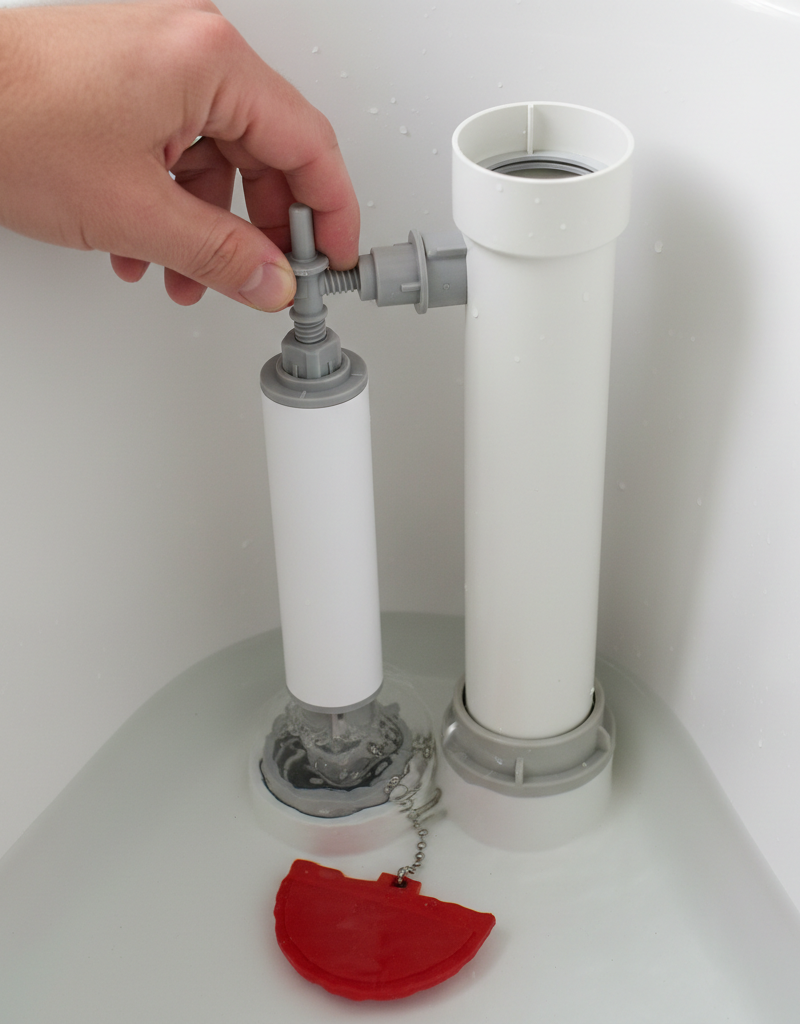
Step 6: Install the New Flapper — Simple, but critical for a good seal.
- Safety Note: Always ensure the water supply is off and the tank is empty before working inside the tank.
- Attach the new flapper's ears onto the pivots on the sides of the overflow pipe. Make sure it's securely in place and can pivot freely.
- Attach the flapper chain to the flush lever arm. Adjust the chain length to have that critical 1/2 to 1 inch of slack. Too tight, and the flapper won't seal; too loose, and it might get caught.
Step 7: Restore Water and Test — Verify the fix.
- Turn the water supply valve counter-clockwise to open it fully. Allow the tank to fill completely.
- Perform the dye test again (Step 1) to confirm the new flapper creates a perfect seal. Flush the toilet a few times to ensure the flapper operates smoothly and returns to its sealed position without running.
- If the toilet still runs: The issue may be the fill valve or float. Adjust the float arm slightly lower (if it's a ball-and-arm float) or inspect the fill valve for debris or wear. For persistent fill valve issues, replacement might be necessary, which is a more advanced task for an experienced DIYer or a plumber.
Common Causes
- Worn-Out Flapper: The most common culprit. Rubber flappers degrade over time due to wear, mineral deposits from hard water, or cleaning chemicals, losing their ability to create a watertight seal. This allows water to continuously leak into the bowl.
- Improper Flapper Chain Length: If the chain connecting the flush lever to the flapper is too long, it can get caught under the flapper, preventing it from closing fully. If it's too short, the flapper might not seal properly after a flush.
- Corroded or Dirty Flush Valve Seat: The rim where the flapper rests, known as the flush valve seat, can accumulate mineral deposits, scale, or grime. Even a small imperfection here can break the flapper's seal.
- High Water Level (Fill Valve Issue): If the water level in the tank is too high, it will continuously spill into the overflow tube. This is usually due to an improperly adjusted or malfunctioning fill valve or float mechanism that isn't signaling the water to shut off at the correct level.
- Broken or Loose Fill Valve: Less common, but a damaged fill valve can fail to shut off the incoming water entirely, leading to constant running.
Common Mistakes
- Ignoring the Dye Test: Many DIYers jump straight to replacing parts without accurately diagnosing the source. The dye test is a quick, free way to confirm a flapper leak before buying unnecessary components.
- Buying the Wrong Flapper: Not all flappers are universal. Using a 2-inch flapper on a 3-inch flush valve, or a generic flapper on a toilet designed for a specific model, will likely result in a continued leak. Always check your toilet's model or bring the old flapper.
- Improper Chain Slack: A common oversight. Too much slack in the flapper chain can cause it to snag, preventing the flapper from closing. Too little slack means the flapper might never fully seal, always allowing a trickle of water.
- Over-tightening the Supply Line: When reconnecting the water supply, overtightening the nut can damage the fill valve or the connector, leading to new leaks. Hand-tighten, then use a wrench for a quarter-turn more.
- Not Cleaning the Flush Valve Seat: Even with a new flapper, if the flush valve seat has mineral buildup or debris, the new flapper won't seal effectively. Always clean the seat thoroughly.
- Assuming the Flapper is the ONLY Problem: While the flapper is most common, if a new flapper doesn't fix it, don't keep replacing flappers. The issue has shifted to the fill valve or float mechanism, requiring a different approach.
Cost & Time Breakdown
| Task | DIY Cost | Pro Cost | Time |
|---|---|---|---|
| Diagnose Leak (Dye Test) | $0–$5 | (N/A) | 15–20 minutes |
| Flapper Replacement | $6–$20 | $75–$150 | 15–30 minutes |
| Fill Valve Adjustment | $0 | $75–$150 | 5–10 minutes |
| Fill Valve Replacement | $20–$40 | $150–$250 | 45–90 minutes |
| Total (Flapper Fix) | $6–$20 | $75–$150 | 15–30 minutes |
| Total (Fill Valve Fix) | $20–$45 | $150–$250 | 45–90 minutes |
Tips & Prevention
- Annual Dye Test: Make it a habit to perform the dye test once a year. This helps catch small leaks from the flapper early before they become significant water waste problems.
- Inspect Flapper Regularly: Every few years, or if you notice changes in flushing, visually inspect the flapper for signs of wear and tear, cracks, or discoloration. Proactive replacement can prevent running.
- Clean Tank Components: Periodically, gently clean mineral buildup from the flapper and flush valve seat. For hard water areas, a descaling solution (like white vinegar) can be used, but always flush thoroughly afterward.
- Adjust Float Correctly: Ensure the water level in the tank is always at the marked waterline (usually embossed on the inside of the tank) or about 1 inch below the top of the overflow tube. If it's too high, the toilet will run.
- Avoid Harsh Chemical Cleaners: Drop-in toilet bowl tablets with harsh chemicals can accelerate the deterioration of rubber flappers and other internal components. Opt for toilet bowl cleaners applied directly to the bowl and scrubbed.
- Proper Flapper Chain Adjustment: Recheck chain slack after any tank maintenance. It should have just enough length to operate smoothly without catching.
When to Call a Professional
While a running toilet due to a faulty flapper is a straightforward DIY fix, there are times when calling a licensed plumber is necessary. If you've replaced the flapper and adjusted the float, but the toilet continues to run, the issue might be a more complex fill valve problem, a crack in the tank, or issues with the water pressure regulator. If you encounter water continuously pouring out of the overflow tube even after adjusting the float, or if you suspect a deeper issue beyond the readily accessible tank components, a professional can accurately diagnose and repair the problem without causing further damage. Additionally, if you're uncomfortable working with plumbing components or don't have the time, a plumber can resolve the issue quickly and efficiently, ensuring proper function and preventing water waste.
Related Articles
Keep troubleshooting with these hand-picked guides from FixlyGuide:
- The $5 Secret to Silencing a Running Toilet (Plumbers Hope You Don't Know) — A running toilet is usually caused by a simple issue with the flapper or its chain, leading to constant water waste and higher utility bill…
- The $5 Flapper Trick Plumbers Hope You Don't Know About Your Running Toilet — Discover the secret $5 flapper trick that often fixes a running toilet, saving you money on parts and plumber call-outs.
- The $2 Trick to Stop a Running Toilet (Plumbers Don't Want You to Know) — Discover the simple, two-dollar fix that can stop your running toilet in minutes, saving water and preventing costly repairs.
- The 30-Second Toilet Fix Plumbers Don't Want You to Know — A running toilet can waste hundreds of gallons of water per day, but often the fix is incredibly simple and takes under a minute.
- The $5 Secret to Silencing That Annoying Dripping Faucet (Single-Handle Fix) — Stop a dripping single-handle faucet with a simple and inexpensive DIY fix by replacing a worn-out o-ring or washer.
- The #1 Hidden Culprit Behind Your Whole-House Low Water Pressure (It's Not Your City!) — Discover the most common, often overlooked cause of low water pressure throughout your entire home and how to fix it yourself.
Frequently asked questions
Why does my toilet keep running after flushing?+
The most common reason is a faulty flapper that isn't creating a watertight seal, allowing water to continuously leak from the tank into the bowl. Other causes include an improperly adjusted float or a malfunctioning fill valve that doesn't shut off the water supply once the tank is full.
How do I know if my flapper is the problem?+
Perform a dye test: Add a few drops of food coloring to your toilet tank. Wait 15-20 minutes without flushing. If colored water appears in the toilet bowl, your flapper is leaking and needs replacement or adjustment.
Can a running toilet increase my water bill significantly?+
Yes, absolutely. Even a small, constant trickle can waste hundreds of gallons of water per day, leading to a noticeable and significant increase in your monthly water bill. Fixing it quickly saves money and conserves water.

Discussion
Loading comments…