
Tools & materials you'll need
Affiliate links- AmazonRubber gloves1 pair
- AmazonSafety glasses1 pair
- AmazonBucket1
- AmazonCup-style rubber plungerensure it creates a good seal
- AmazonAdjustable pliers or basin wrenchfor slip nuts
- AmazonPhillips or flathead screwdriverdepending on strainer screws
- AmazonBottle brush or old toothbrushfor cleaning P-trap
- AmazonDrain snake (hand auger)up to 15 ft · if clog is deeper than P-trap
- AmazonOld towels or shop cloths2-3
As an Amazon Associate FixlyGuide earns from qualifying purchases — at no extra cost to you. Prices and availability are accurate as of publication and subject to change.
Quick Answer
A slow kitchen sink drain is almost always a sign of a partial clog, usually a sticky concoction of grease, food debris, and soap scum accumulating within the P-trap or further into the branch drainpipe. While chemical drain cleaners offer a temporary band-aid, they rarely solve the root issue and can even damage your pipes. The most effective and homeowner-friendly approach involves physically removing the blockage, starting with a thorough cleaning of the P-trap and then advancing to a drain snake if the problem persists beyond this initial point.
The Problem
Your kitchen sink is the workhorse of your culinary space, handling everything from rinsing vegetables to disposing of leftover sauces. Over time, all this activity leads to an inevitable accumulation of debris. Liquid fats solidify, coffee grounds clump, and small food particles settle, all adhering to the interior walls of your drainpipes. This gradual narrowing of the pipe's diameter restricts water flow, leading to the familiar gurgle and sluggish draining you're now experiencing. The problem isn't usually a sudden, dramatic blockage, but a slow, insidious buildup that the average DIYer often misdiagnoses or attempts to treat with ineffective, corrosive solutions.
How It Works
To truly fix a slow drain, it helps to understand the basic anatomy of your kitchen sink's drainage system. Water leaves your sink basin through the drain opening, passes through a strainer, and then enters the tailpiece. Below the tailpiece is the critical component: the P-trap. This U-shaped pipe is designed to hold a small amount of water, creating a barrier that prevents sewer gases from entering your home. It's also the most common location for minor clogs because gravity pulls heavier particles into its bend. Beyond the P-trap, the drainpipe connects to a larger branch line, which in turn leads to the main household drain.
When you pour grease, coffee grounds, or food scraps down the drain, they don't always make it all the way to the sewer. Instead, they often get caught in the sticky residue already clinging to the pipe walls, particularly in the P-trap's curve or at pipe joints where turbulence and changes in direction occur. Over time, this growing mass reduces the pipe's effective diameter. Water, following the path of least resistance, struggles to flow past the obstruction, resulting in the slow drainage you're experiencing. Understanding this journey – from sink to P-trap to branch line – empowers you to systematically attack the clog in the most likely locations.
Step-by-Step Fix
Before you begin, always wear gloves and eye protection. Have a bucket ready for potential spills.
-
Clear the Area – Ensure easy access and protect your cabinets. Remove everything from under your kitchen sink cabinet. Lay down old towels or a shop cloth to catch any water or debris that might spill during the process. This creates a clean workspace and protects your cabinet base.
-
Plunge Your Way to Freedom – Sometimes a little suction is all it takes. Fill the sink with a few inches of hot water. If you have a double sink, block the second drain opening with a wet cloth or a stopper. Position a cup-style plunger firmly over the drain. Plunge vigorously for 20-30 seconds, maintaining a good seal. The goal is to create pressure that dislodges the clog. If this doesn't work after a few tries, proceed to the next step.
-
Inspect the Basket Strainer – The first line of defense can be the first point of failure. Using a screwdriver, remove the screws holding the basket strainer in place in the sink basin. Lift out the strainer and thoroughly clean any accumulated food particles, hair, or debris from its underside and the drain opening. Reinstall the strainer tightly to prevent leaks.
-
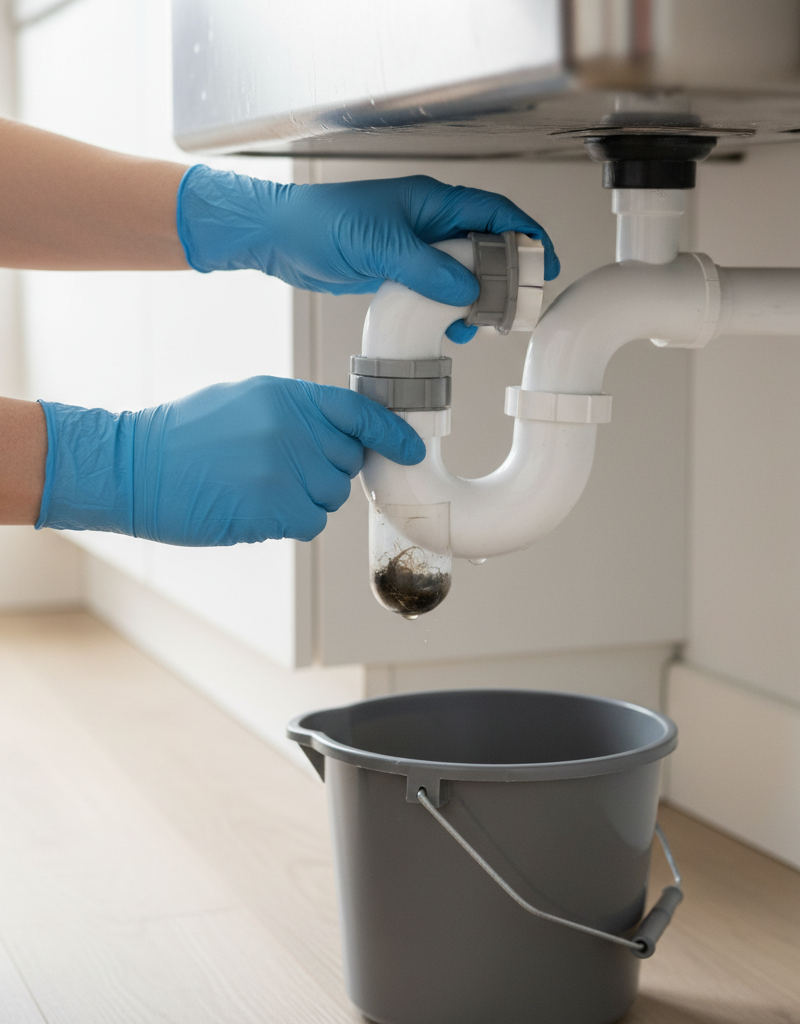
Disassemble the P-Trap – Target the most common clog location. Place a bucket directly under the P-trap to catch water and debris. Using adjustable pliers or a basin wrench, carefully loosen the slip nuts on both ends of the P-trap. These nuts connect the P-trap to the tailpiece above and the drainpipe leading into the wall. Once loosened, gently pull the P-trap away from the pipes. There will be some water and gunk inside – this is normal.
- Safety Note: Always wear rubber gloves and eye protection when working with drain components, as trapped water can be dirty and contain bacteria.
- If the nuts are stuck: Apply a little penetrating oil and let it sit for 15 minutes. Avoid excessive force, which could crack PVC pipes.
-
Clean the P-Trap – Physically remove the gunk. Take the disconnected P-trap to another utility sink or outdoors. Use a bottle brush, old toothbrush, or even a wire coat hanger straightened out to thoroughly scrub the inside of the P-trap. Remove all visible grease, hair, and food particles. Rinse it thoroughly under hot running water. Check that the interior is completely clear. Also, visually inspect the tailpiece (the pipe coming down from the sink) and the stub-out (the pipe going into the wall) for any obvious blockages you can reach by hand.
-
Reassemble the P-Trap – Tighten carefully to prevent leaks. Align the P-trap carefully with the tailpiece and the stub-out. Hand-tighten the slip nuts first, ensuring they are straight and not cross-threaded. Then, use your adjustable pliers to gently tighten them another quarter to half turn. Do not overtighten, especially on PVC pipes, as this can cause cracking.
-
Test the Drain – Check your work before declaring victory. Run hot water into the sink for several minutes. Observe the drainage rate. Check for any leaks around the P-trap connections. If the water drains quickly and without leaks, you've likely solved the problem. If it's still draining slowly, the clog is deeper.
-
Snake the Drain (If Needed) – For deeper, more stubborn clogs. If the slow drain persists, the clog is likely past the P-trap, further down the branch drainpipe. Disassemble the P-trap again (using the bucket). Carefully feed a drain snake (sometimes called a plumber's auger) into the drain opening that goes into the wall. Push the snake until you feel resistance. Once resistance is met, turn the handle of the snake clockwise to grab the clog. Pull the snake back out slowly, hopefully bringing the clog with it. Repeat this process several times, extending the snake further each time, until you no longer feel resistance and the snake pulls out clean. For a typical kitchen sink, snaking 5-10 feet should reach most common clogs.
- Safety Note: Never force the snake. If it gets stuck, gently rotate and pull back. Always feed the snake slowly to avoid damaging pipes.
- If the snake doesn't work: The clog might be a tough grease buildup requiring professional-grade equipment, or it could be in a shared main line, which is a job for a plumber.
Common Causes
- Grease Accumulation: This is the number one culprit. Pouring even small amounts of cooking oil or melted butter down the drain allows it to cool and solidify, clinging to pipe walls and catching other debris. Over time, this creates a sticky, almost cement-like blockage.
- Food Particles: Coffee grounds, rice, pasta, potato peels, and other small food scraps, especially when combined with grease, create a formidable clog. Garbage disposals help, but don't eliminate the issue entirely, as fine particles can still get through.
- Soap Scum & Detergent Residue: While often associated with bathroom drains, dish soap and detergents, especially those with high levels of fats or waxes, can contribute to buildup in kitchen drains, particularly when combined with hard water minerals.
- Hair: While less common than in bathroom sinks, hair can occasionally migrate into kitchen drains, especially if pets are bathed in the sink or if hair from cleaning brushes gets washed down.
- Foreign Objects: Small utensils, bottle caps, or even children's toys can accidentally fall into the drain and create an immediate or partial blockage.
Common Mistakes
- Relying on Chemical Drain Cleaners: These are often ineffective against grease-based kitchen clogs, can corrode pipes (especially older ones), and create hazardous fumes. They also make the problem worse for plumbers if the clog isn't cleared, as they have to deal with caustic chemicals.
- Pouring Boiling Water Down the Drain: While hot water can temporarily melt some grease, it often just pushes it further down the pipe where it cools and reforms, creating a larger, harder-to-reach clog.
- Overtightening P-Trap Nuts: Especially with PVC pipes, overtightening slip nuts can crack the plastic, leading to leaks and the need for pipe replacement. Hand-tighten, then a quarter to half turn with pliers.
- Ignoring the Problem: A slow drain is a warning sign. Ignoring it allows the clog to grow larger and more stubborn, potentially leading to a complete blockage or, worse, pipe damage from persistent pressure.
- Not Protecting Your Cabinets: Skipping the step of laying down towels or a bucket can lead to frustrating and messy cleanups if water or debris spills during the P-trap disconnection.
Cost & Time Breakdown
| Task | DIY Cost | Pro Cost | Time |
|---|---|---|---|
| Plunging the Drain | $0 | $0 | 5–10 minutes |
| Cleaning Basket Strainer | $0 | $0 | 5–10 minutes |
| Removing/Cleaning P-Trap | $0–$10 | $100–$250 | 20–40 minutes |
| Snaking the Drain | $20–$50 | $150–$400+ | 30–60 minutes |
| Professional Hydro-Jet | NA | $300–$600+ | 1–3 hours |
Tips & Prevention
- Scrape Plates Thoroughly: Before washing dishes, scrape all food scraps into the trash or compost, not down the drain. Even small bits contribute to buildup.
- Dispose of Grease Properly: Never pour cooking oil, bacon grease, or any kind of fat down the drain. Let it cool and solidify, then scrape it into the trash. For larger quantities, collect it in an old container and dispose of it with your regular waste.
- Use a Drain Strainer: Install a fine-mesh drain strainer in your sink to catch food particles that might otherwise go down the drain. Clean it out after every use.
- Monthly Hot Water Flush: Once a month, pour a large pot of boiling water (if pipes are metal) or very hot tap water (for PVC) down the drain, followed by a mixture of half a cup of baking soda and half a cup of vinegar. Let it sit for 30 minutes, then flush with more hot water. This helps break down minor grease and odor-causing buildup.
- Regular P-Trap Inspection: If you experience frequent slow drains, consider inspecting and cleaning your P-trap every 6-12 months as a preventative measure.
When to Call a Professional
While many slow kitchen drains are DIY-fixable, there are clear signs it's time to call a licensed plumber. If you've diligently followed the steps of plunging, cleaning the P-trap, and snaking the drain up to 10 feet and the drain is still slow or completely blocked, the clog is likely beyond your reach or too stubborn for homeowner-grade tools. This could indicate a significant grease blockage deeper in the branch line, a buildup in the main sewer line affecting multiple fixtures, or even a damaged or displaced pipe. Additionally, if you notice slow drains in other areas of your home (like a bathroom sink or shower), it's a strong indicator of a main line issue requiring professional diagnosis and specialized equipment like a much longer plumbing auger or hydro-jetting. A professional can quickly identify the exact location and nature of the blockage and resolve it without risking damage to your plumbing system.
Related Articles
Keep troubleshooting with these hand-picked guides from FixlyGuide:
- The #1 Mistake Homeowners Make with a Slow Kitchen Drain (And the Easy Fix) — A slow kitchen sink drain is frustrating, but often it's a simple fix homeowners overlook by focusing on the wrong culprits.
- The #1 Mistake Homeowners Make with a Slow Kitchen Drain (And the Simple Fix) — A slow kitchen sink drain is frustrating, but often an easy fix if you avoid common mistakes and know where to look first.
- The #1 Mistake Homeowners Make with a Slow Kitchen Drain (and How to Undo It) — A slow kitchen sink drain is a common and frustrating problem, but often stems from a single preventable mistake that's easily fixed with t…
- The Secret Culprit Behind Your Slow Sink Drain (It's Not Always Hair) — Uncover the surprising reasons your kitchen sink drains slowly and learn actionable steps to fix common clogs yourself.
- The #1 Mistake Homeowners Make with a Slow Kitchen Sink (And Its Dead Simple Fix) — Before you reach for harsh chemicals, learn the most common, easily fixable reason your kitchen sink is draining slowly and how to fix it y…
- The #1 Mistake Homeowners Make When Battling Lawn Grubs (And a Simple Fix) — Discover the common mistake homeowners make when treating grubs and learn a simple, effective solution for a healthier lawn.
Get the print-ready PDF of this guide
A clean, ad-free, printable version you can keep on your phone or pin to the workshop wall. Free with a FixlyGuide account.
- Print-optimized layout
- Tools, materials & every step included
- Saved to your account
Frequently asked questions
Why is my kitchen sink draining slowly but not completely clogged?+
A slow drain often indicates a partial blockage, typically a buildup of grease, food particles, and soap scum clinging to the interior walls of your P-trap or drainpipe. Water can still get through, but the reduced pipe diameter restricts flow.
Can I use baking soda and vinegar for a slow kitchen drain?+
Yes, a baking soda and vinegar mixture can help with minor clogs and odors. Pour half a cup of baking soda down the drain, followed by half a cup of white vinegar. Let it fizz for 30 minutes to an hour, then flush with very hot water. It's less effective on severe grease clogs.
How often should I clean my kitchen P-trap?+
If you experience frequent slow drains, cleaning your P-trap every 6-12 months as a preventative measure is a good idea. For most homes with careful drain habits, it might only be necessary every few years or when a slow drain occurs.
When should I call a plumber for a slow kitchen drain?+
Call a plumber if you've tried plunging, cleaning the P-trap, and snaking the drain 5-10 feet without success. Also, if multiple drains in your home are slow, it suggests a main line blockage that requires professional tools and expertise.
What's the best way to prevent kitchen sink clogs?+
The best prevention involves scraping all food scraps into the trash, never pouring grease down the drain (dispose of it in the trash), using a good drain strainer, and performing monthly hot water flushes (and occasional baking soda/vinegar treatments).


Discussion
Loading comments…